
学习LSM(Linux security module)之二:编写并运行一个简单的demo
各种折腾,经过了一个蛋疼的周末,终于在Ubuntu14.04上运行了一个基于LSM的简单demo程序。
一:程序编写
先简单的看一下这个demo:
//demo_lsm.c
#include <linux/lsm_hooks.h>

#include <linux/sysctl.h>

static unsigned long long count = ;

int demo_task_create(unsigned long clone_flags)

{

    printk("[+geek] call task_create(). count=%llu\n", ++count);

    return ;

}

static struct security_hook_list demo_hooks[] = {

    LSM_HOOK_INIT(task_create,demo_task_create),

};

void __init demo_add_hooks(void)

{

    pr_info("Demo: becoming mindful.\n");        //打印相关信息,可以通过dmesg |  grep Yama:查看

    security_add_hooks(demo_hooks, ARRAY_SIZE(demo_hooks));   //添加安全模块函数

}

static __init int demo_init(void){

    demo_add_hooks();

    return ;

}

security_initcall(demo_init);
根据(一)的yama可以得出,编写一个基于LSM的安全模块的基本流程:
1>确定需要hook的函数
2>对hook函数进行填充,添加自己的逻辑(安全检查)
3>添加到在security_hook_list的数据结构里
4>对这个有注册逻辑的函数进行注册
1:确定需要hook的函数:
1>用户创建进程需要调用系统调用 sys_fork()/sys_vfork()/sys_clone()
2>sys_fork()等函数中调用 do_fork()
3>do_fork()调用copy_process()
4>copy_process()调用security_task_create(),这里便是hook点了,可以进行自己的逻辑
5>security_task_create()的主体就是security_hook_list的task_create()
2:对hook函数进行必要的填充,添加自己的逻辑(额外的安全检查)
在这里,只是为了简单的检测自己的代码是否能够正常运行,所以,只用了简单的printk,详情请看demo_task_create函数。
3:添加到在security_hook_list的数据结构里
额外说一点:关于这一步,在4.0之前后某个版本,打了个补丁,所以实现方式会有不同,先看一下4.0以前:
struct security_operations {

         char name[SECURITY_NAME_MAX + ];

         int (*ptrace_access_check) (struct task_struct *child, unsigned int mode);

         int (*ptrace_traceme) (struct task_struct *parent);

         int (*capget) (struct task_struct *target, kernel_cap_t *effective, kernel_cap_t *inheritable, kernel_cap_t *permitted);

         int (*capset) (struct cred *new, const struct cred *old, const kernel_cap_t *effective, const kernel_cap_t *inheritable, const kernel_cap_t *permitted);

         int (*capable) (const struct cred *cred, struct user_namespace *ns, int cap, int audit);

         int (*quotactl) (int cmds, int type, int id, struct super_block *sb);
      ....
这种实现方式有个缺点,无论hook几个函数,都会替每个指针占一个位置,由于内核空间,内存十分宝贵,这种占空间西行为产生了很大的浪费。所以实现换了一种方式,如下:
struct security_hook_list {

         struct list_head                list;

         struct list_head                *head;

         union security_list_options     hook;

 };
然后,security_list_options以一种联结体的方式存在,然后通过侵入式链表连接,可以有效的节省空间。
言归正传。数据结构可以通过LSM_HOOK_INIT宏来进行填充,详情可以看(一):
4:对这个有注册逻辑的函数进行注册
在这一点上,简单的security_initcall(demo_init);就可以了
二:Makefile和Kconfig编写
在编写这两个文件时,由于在2.6.X后,lsm的模块不允许通过insmod动态加载到内核中,需要在编译内核时添加,所以,需要谨慎,否则容易出错(-_-)。
如下:
//Kconfig
config     SECURITY_DEMO

   bool     "demo support"

   depends on SECURITY

   default     n

   help

        introduction of demo modules
//Makefile
obj-$(CONFIG_SECURITY_GEEK) := demo.o

demo-y := demo_lsm.o
将这两个文件以及前文的 demo_lsm.c 放到./linux-X.X.X(X.X.X>4.0.0)/security/demo(自己创建)中,然后修改security下的Kconfig和Makefile,这里可以参照SElinux或者yama的格式进行编写, 但需要注意的是,在Linux>4.2之后,Yama默认只能依附在其它模块上,所以,最好对照SELinux。
#

# Makefile for the kernel security code

#

obj-$(CONFIG_KEYS)            += keys/

subdir-$(CONFIG_SECURITY_SELINUX)    += selinux

subdir-$(CONFIG_SECURITY_DEMO)        += demo

subdir-$(CONFIG_SECURITY_SMACK)        += smack

subdir-$(CONFIG_SECURITY_TOMOYO)        += tomoyo

subdir-$(CONFIG_SECURITY_APPARMOR)    += apparmor

subdir-$(CONFIG_SECURITY_YAMA)        += yama

# always enable default capabilities

obj-y                    += commoncap.o

obj-$(CONFIG_MMU)            += min_addr.o

# Object file lists

obj-$(CONFIG_SECURITY)            += security.o

obj-$(CONFIG_SECURITYFS)        += inode.o

obj-$(CONFIG_SECURITY_SELINUX)        += selinux/

obj-$(CONFIG_SECURITY_DEMO)        += demo/

obj-$(CONFIG_SECURITY_SMACK)        += smack/

obj-$(CONFIG_AUDIT)            += lsm_audit.o

obj-$(CONFIG_SECURITY_TOMOYO)        += tomoyo/

obj-$(CONFIG_SECURITY_APPARMOR)        += apparmor/

obj-$(CONFIG_SECURITY_YAMA)        += yama/

obj-$(CONFIG_CGROUP_DEVICE)        += device_cgroup.o

# Object integrity file lists

subdir-$(CONFIG_INTEGRITY)        += integrity

obj-$(CONFIG_INTEGRITY)            += integrity/
#

# Security configuration

#

menu "Security options"

source security/keys/Kconfig

.....

source security/selinux/Kconfig

source security/demo/Kconfig

source security/smack/Kconfig

source security/tomoyo/Kconfig

source security/apparmor/Kconfig

source security/yama/Kconfig

source security/integrity/Kconfig

choice

    prompt "Default security module"

    default DEFAULT_SECURITY_SELINUX if SECURITY_SELINUX

    default DEFAULT_SECURITY_DEMO if SECURITY_DEMO

    default DEFAULT_SECURITY_SMACK if SECURITY_SMACK

    default DEFAULT_SECURITY_TOMOYO if SECURITY_TOMOYO

    default DEFAULT_SECURITY_APPARMOR if SECURITY_APPARMOR

    default DEFAULT_SECURITY_DAC

    help

      Select the security module that will be used by default if the

      kernel parameter security= is not specified.

    config DEFAULT_SECURITY_SELINUX

        bool "SELinux" if SECURITY_SELINUX=y

    config DEFAULT_SECURITY_DEMO

        bool "demo" if SECURITY_DEMO=y

    config DEFAULT_SECURITY_SMACK

        bool "Simplified Mandatory Access Control" if SECURITY_SMACK=y

    config DEFAULT_SECURITY_TOMOYO

        bool "TOMOYO" if SECURITY_TOMOYO=y

    config DEFAULT_SECURITY_APPARMOR

        bool "AppArmor" if SECURITY_APPARMOR=y

    config DEFAULT_SECURITY_DAC

        bool "Unix Discretionary Access Controls"

endchoice

config DEFAULT_SECURITY

    string

    default "selinux" if DEFAULT_SECURITY_SELINUX

    default "demo" if DEFAULT_SECURITY_DEMO

    default "smack" if DEFAULT_SECURITY_SMACK

    default "tomoyo" if DEFAULT_SECURITY_TOMOYO

    default "apparmor" if DEFAULT_SECURITY_APPARMOR

    default "" if DEFAULT_SECURITY_DAC

endmenu
三:编译安装运行内核
1>将linux内核源码和二里面添加和更改的部分移到 /usr/src中。
2> cp /boot/config-‘uname -r’ /usr/src/kernels/linux3.2.14/.config,将原系统内核配置拷贝到需要编译的源码上
3> make menuconfig,这里可能会失败,这时候,你需要去apt-get install libncurses5-dev:截图如下:
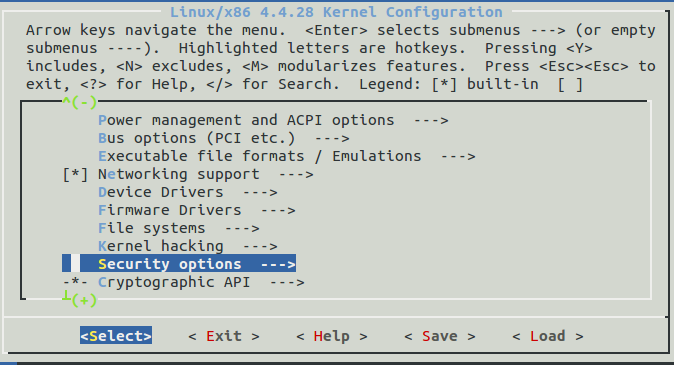
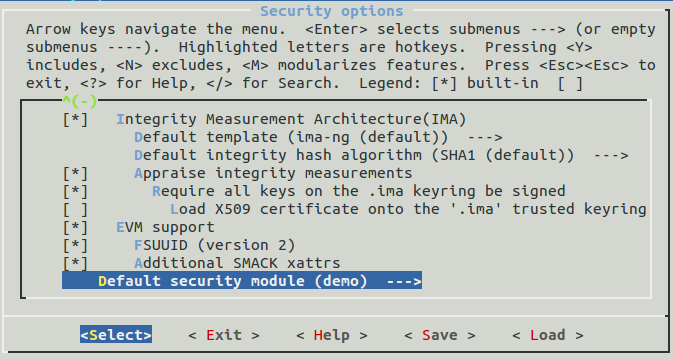
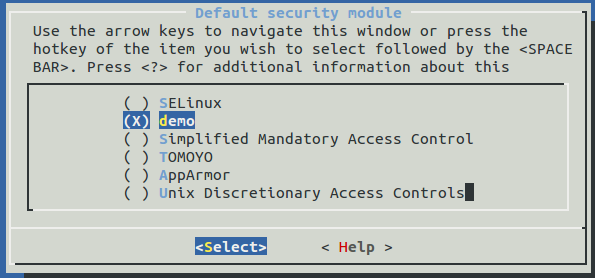
在配置上,需要自己根据自己的水平来进行配置,否则极易弄巧成拙(-_-)
4>make bzImage -jN(N为具体数字,代表线程数),可以根据虚拟机内核数 X2来确定N的具体值,以节约时间
5>make modules -jN,同上
6>make modules_install
7>make install
8>部分可能需要修改grub的default为0,经测ubuntu14.04自动修改了,不需要自己去改
9>reboot ,并且demesg,可以得到如下:
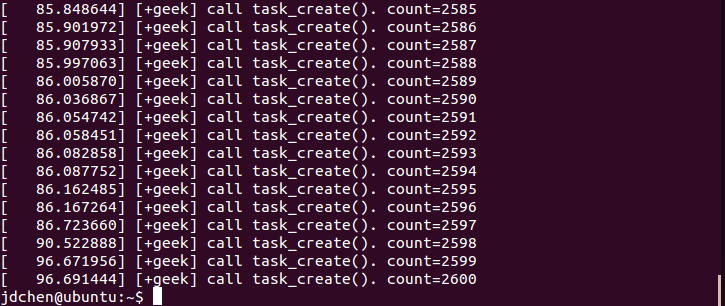
demo就运行成功了
学习LSM(Linux security module)之二:编写并运行一个简单的demo的更多相关文章
- 学习LSM(Linux security module)之四:一个基于LSM的简单沙箱的设计与实现
嗯!如题,一个简单的基于LSM的沙箱设计.环境是Linux v4.4.28.一个比较新的版本,所以在实现过程中很难找到资料,而且还有各种坑逼,所以大部分的时间都是在看源码,虽然写的很烂,但是感觉收获还 ...
- 学习LSM(Linux security module)之一:解读yama
最近打算写一个基于LSM的安全模块,发现国内现有的资料极少.因此打算自己琢磨一下.大致的学习路线如下: 由易至难使用并阅读两到三个安全模块->参照阅读模块自己实现一个安全模块->在自己实现 ...
- 学习LSM(Linux security module)之三:Apparmor的前世今生和基本使用
感冒了,感觉一脑子浆糊,真是蛋疼. 先粗略讲一些前置知识. 一:MAC和DAC DAC(Discretionary Access Control),自主访问控制,是最常用的一类访问控制机制,意思为主体 ...
- Linux环境下部署完JDK后运行一个简单的Java程序
前言 前一篇文章详细讲解了如何在Windows环境下安装虚拟机+Linux系统,并且成功部署了JDK. 不过部署完JDK之后,我们判断部署是否成功的依据是看"java -version&qu ...
- Linux LSM(Linux Security Modules) Hook Technology
目录 . 引言 . Linux Security Module Framework Introduction . LSM Sourcecode Analysis . LSMs Hook Engine: ...
- linux security module机制
linux security module机制 概要 Hook机制,linux MAC的通用框架,可以使用SElinux, AppArmor,等作为不同安全框架的实现
- tensorflow笔记(二)之构造一个简单的神经网络
tensorflow笔记(二)之构造一个简单的神经网络 版权声明:本文为博主原创文章,转载请指明转载地址 http://www.cnblogs.com/fydeblog/p/7425200.html ...
- linux设备驱动第三篇:写一个简单的字符设备驱动
在linux设备驱动第一篇:设备驱动程序简介中简单介绍了字符驱动,本篇简单介绍如何写一个简单的字符设备驱动.本篇借鉴LDD中的源码,实现一个与硬件设备无关的字符设备驱动,仅仅操作从内核中分 ...
- 《Linux内核分析》第三周 构建一个简单的Linux系统MenuOS
[刘蔚然 原创作品转载请注明出处 <Linux内核分析>MOOC课程http://mooc.study.163.com/course/USTC-1000029000] WEEK THREE ...
随机推荐
- VS的ncb、pdb文件分析
原文链接地址:http://blog.csdn.net/changbaolong/article/details/7472685 NCB是"No Compile ...
- BZOJ4569 [SCOI2016]萌萌哒 【并查集 + 倍增】
题目链接 BZOJ4569 题解 倍增的思想很棒 题目实际上就是每次让我们合并两个区间对应位置的数,最后的答案\(ans = 9 \times 10^{tot - 1}\),\(tot\)是联通块数, ...
- BZOJ3236: [Ahoi2013]作业 树状数组维护 莫队
水果~~~~ 关于四个while可行性的证明:区间有正确性所以不管那团小东西用没有duang~反它最终总会由于两次覆盖二准确 关于区间种数可行性的证明:他会在0 1间(或两边)来回跳动(过程中),最终 ...
- JavaScript词法作用域与调用对象
关于 Javascript 的函数作用域.调用对象和闭包之间的关系很微妙,关于它们的文章已经有很多,但不知道为什么很多新手都难以理解.我就尝试用比较通俗的语言来表达我自己的理解吧. 作用域 Scope ...
- taotao用户登录springMVC拦截器的实现
在springMVC中写拦截器,只需要两步: 一.写 java 拦截器类,实现 interceptor 拦截器接口. 二.在 springMVC 的xml配置文件中,配置我们创建的拦截器对象及其拦截目 ...
- 迅雷Bolt的ClipSubBindBitmap函数特别说明
因为在工作中基于迅雷Bolt开发的是IM产品,需要实现自定义用户头像的功能. 但Bolt中对图像的默认拉伸锯齿效果非常明显,所以自己实现了图像拉伸函数,代码已共享,具体可查看:<迅雷Bolt图像 ...
- Linux下rsync 安装与配置
1.什么是rsync Rsync(remote synchronize)是一个远程数据同步工具,可通过LAN/WAN快速同步多台主机间的文件.Rsync使用所谓的“Rsync算法”来使本地和远 程两个 ...
- js 内置对象属性及方法
1.Date 属性(1): constructor 所建立对象的函数参考 prototype 能够为对象加入的属性和方法 方法(43): getDay() 返回一周 ...
- Java并发(8)- 读写锁中的性能之王:StampedLock
在上一篇<你真的懂ReentrantReadWriteLock吗?>中我给大家留了一个引子,一个更高效同时可以避免写饥饿的读写锁---StampedLock.StampedLock实现了不 ...
- 【BZOJ1468】Tree [点分治]
Tree Time Limit: 10 Sec Memory Limit: 64 MB[Submit][Status][Discuss] Description 给你一棵TREE,以及这棵树上边的距 ...