【MVC5】First AngularJS
※本文参照《ASP.NET MVC 5高级编程(第5版)》
1.创建Web工程
1-1.选择ASP.NET Web Application→Web API
工程名为【atTheMovie】
1-2.添加AngularJS
在Package Manager Console执行如下命令:
Install-Package AngularJS.core
1-3.添加EntityFramework
在Package Manager Console执行如下命令:
Install-Package EntityFramework
1-4.添加AngularJS.Route
Install-Package -IncludePrerelease AngularJS.Route
2.添加Model
2-1.在Models目录中添加Movie类
using System.Data.Entity;

namespace atTheMovies.Models

{

    public class Movie

    {

        public int Id { get; set; }

        public string Title { get; set; }

        public int ReleaseYear { get; set; }

        public int RunTime { get; set; }

    }

    public class MovieDb : DbContext

    {

        public DbSet<Movie> Movies { get; set; }

    }

}
2-2.根据Model更新DB,生成Table
在Package Manager Console执行如下命令,会在Migrations目录中追加一个Configuration.cs的类:
Enable-Migrations -ContextTypeName atTheMovies.Models.MovieDb
修改Configuration.cs类的Seed方法如下:
namespace atTheMovies.Migrations

{

    using Models;

    using System;

    using System.Data.Entity;

    using System.Data.Entity.Migrations;

    using System.Linq;

    internal sealed class Configuration : DbMigrationsConfiguration<atTheMovies.Models.MovieDb>

    {

        public Configuration()

        {

            AutomaticMigrationsEnabled = true;

        }

        protected override void Seed(atTheMovies.Models.MovieDb context)

        {

            //  This method will be called after migrating to the latest version.

            //  You can use the DbSet<T>.AddOrUpdate() helper extension method

            //  to avoid creating duplicate seed data. E.g.

            //

            //    context.People.AddOrUpdate(

            //      p => p.FullName,

            //      new Person { FullName = "Andrew Peters" },

            //      new Person { FullName = "Brice Lambson" },

            //      new Person { FullName = "Rowan Miller" }

            //    );

            //

            context.Movies.AddOrUpdate(m => m.Title,

                new Movie

                {

                    Title = "Star Wars",

                    ReleaseYear = ,

                    RunTime =

                },

                new Movie

                {

                    Title = "Inception",

                    ReleaseYear = ,

                    RunTime =

                },

                new Movie

                {

                    Title = "Toy Story",

                    ReleaseYear = ,

                    RunTime =

                } );

        }

    }

}
在Package Manager Console执行如下命令,执行上面的代码:
update-database
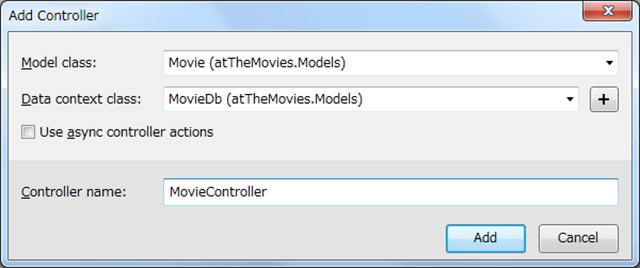
3.使用基架根据Model生成Controller
右击Controller目录,点击追加Controller;选择【Web API 2 Controller with actions, using Entiry Framework】;
Model选择刚刚追加的Movie;
Data context class选择Movie类中的DBContext(MovieDb);
Controller name设置为MovieController;
自动生成的MovieController的代码如下:
using System;

using System.Collections.Generic;

using System.Data;

using System.Data.Entity;

using System.Data.Entity.Infrastructure;

using System.Linq;

using System.Net;

using System.Net.Http;

using System.Web.Http;

using System.Web.Http.Description;

using atTheMovies.Models;

namespace atTheMovies.Controllers

{

    public class MovieController : ApiController

    {

        private MovieDb db = new MovieDb();

        // GET: api/Movie

        public IQueryable<Movie> GetMovies()

        {

            return db.Movies;

        }

        // GET: api/Movie/5

        [ResponseType(typeof(Movie))]

        public IHttpActionResult GetMovie(int id)

        {

            Movie movie = db.Movies.Find(id);

            if (movie == null)

            {

                return NotFound();

            }

            return Ok(movie);

        }

        // PUT: api/Movie/5

        [ResponseType(typeof(void))]

        public IHttpActionResult PutMovie(int id, Movie movie)

        {

            if (!ModelState.IsValid)

            {

                return BadRequest(ModelState);

            }

            if (id != movie.Id)

            {

                return BadRequest();

            }

            db.Entry(movie).State = EntityState.Modified;

            try

            {

                db.SaveChanges();

            }

            catch (DbUpdateConcurrencyException)

            {

                if (!MovieExists(id))

                {

                    return NotFound();

                }

                else

                {

                    throw;

                }

            }

            return StatusCode(HttpStatusCode.NoContent);

        }

        // POST: api/Movie

        [ResponseType(typeof(Movie))]

        public IHttpActionResult PostMovie(Movie movie)

        {

            if (!ModelState.IsValid)

            {

                return BadRequest(ModelState);

            }

            db.Movies.Add(movie);

            db.SaveChanges();

            return CreatedAtRoute("DefaultApi", new { id = movie.Id }, movie);

        }

        // DELETE: api/Movie/5

        [ResponseType(typeof(Movie))]

        public IHttpActionResult DeleteMovie(int id)

        {

            Movie movie = db.Movies.Find(id);

            if (movie == null)

            {

                return NotFound();

            }

            db.Movies.Remove(movie);

            db.SaveChanges();

            return Ok(movie);

        }

        protected override void Dispose(bool disposing)

        {

            if (disposing)

            {

                db.Dispose();

            }

            base.Dispose(disposing);

        }

        private bool MovieExists(int id)

        {

            return db.Movies.Count(e => e.Id == id) > ;

        }

    }

}
4.修改既存的Index.cshtml代码
这里已经把所有相关的JS追加好了,具体代码见后面部分。
@section scripts {

    <script src="~/Scripts/angular.js"></script>

    <script src="~/Scripts/angular-route.js"></script>

    <script src="~/Client/Scripts/atTheMovies.js"></script>

    <script src="~/Client/Scripts/ListController.js"></script>

    <script src="~/Client/Scripts/DetailsController.js"></script>

    <script src="~/Client/Scripts/movieService.js"></script>

    <script src="~/Client/Scripts/EditController.js"></script>

}

<div ng-app="atTheMovies">

    <ng-view></ng-view>

</div>
5.注册模块、路由、常量等
5-1.创建Client\Scripts目录;追加atTheMovies.js;
(function () {

    // 创建了一个新模块atTheMovies

    // 第二个参数为空[],代表这个模块依赖于核心Angular模块ng

    // var app = angular.module("atTheMovies", []);

    // 添加依赖模块 ngRoute 路由

    var app = angular.module("atTheMovies", ["ngRoute"]);

    var config = function ($routeProvider) {

        $routeProvider

            .when("/list", { templateUrl: "/client/views/list.html" })

            .when("/details/:id", { templateUrl: "/client/views/details.html" })

            .otherwise({ redirectTo: "/list" });

    };

    app.config(config);

    // 注册常量值

    app.constant("movieApiUrl", "/api/movie/");

}());
6.创建Service
6-1.在Client\Scripts目录中追加movieService.js;
(function (app) {

    var movieService = function ($http, movieApiUrl) {

        var getAll = function () {

            return $http.get(movieApiUrl);

        };

        var getById = function (id) {

            return $http.get(movieApiUrl + id);

        };

        var update = function (movie) {

            return $http.put(movieApiUrl + movie.Id, movie);

        };

        var create = function (movie) {

            return $http.post(movieApiUrl, movie);

        };

        var destroy = function (movie) {

            return $http.delete(movieApiUrl + movie.Id);

        };

        return {

            getAll: getAll,

            getById: getById,

            update: update,

            create: create,

            delete: destroy,

        };

    };

    app.factory("movieService", movieService);

})(angular.module("atTheMovies"));
7.创建ListController和ListView
7-1.在Client\Scripts目录中追加ListController.js;
(function (app) {

    //var ListController = function ($scope, $http) {

    //    $scope.message = "Hello, World!";

    //    $http.get("/api/movie").success(function (data) {

    //        $scope.movies = data;

    //    });

    //};

    //ListController.$inject = ["$scope", "$http"];

    // 使用movieService

    var ListController = function ($scope, movieService) {

        movieService

            .getAll()

            .success(function (data) {

                $scope.movies = data;

            });

        $scope.create = function () {

            $scope.edit = {

                movie: {

                    Title: "",

                    RunTime: 0,

                    ReleaseYear: new Date().getFullYear()

                }

            };

        };

        $scope.delete = function (movie) {

            movieService.delete(movie)

                .success(function () {

                    removeMovieById(movie.Id);

                });

        };

        var removeMovieById = function (id) {

            for (var i = 0; i < $scope.movies.length; i++) {

                if ($scope.movies[i].Id == id) {

                    $scope.movies.splice(i, 1);

                    break;

                }

            }

        };

    };

    // 注册新控制器

    // 参数:

    //      控制器名称

    //      与这个名称关联的构造函数

    app.controller("ListController", ListController);

})(angular.module("atTheMovies"));

// 使用临时的调用函数表达式来代替创建全局变量

// 还有一种方法可以获取atTheMovies的引用

// (function (app) {

//     var app = angular.module("atTheMovies");

// }());.
7-2.在Client\Views目录中追加list.html;
<div ng-controller="ListController">

    <table class="table" >

        <tr ng-repeat="movie in movies">

            <td>{{movie.Title}}</td>

            <td>

                <a class="btn btn-default" href="#/details/{{movie.Id}}">Details</a>

                <button class="btn btn-default" ng-click="delete(movie)">Delete</button>

            </td>

        </tr>

    </table>

    <button class="btn btn-default" ng-click="create()">Create</button>

    <div ng-include="'/Client/views/edit.html'"></div>

</div>
8.创建DetailsController和DetailsView
8-1.在Client\Scripts目录中追加DetailsController.js;
(function (app) {

    //var DetailsController = function ($scope, $http, $routeParams) {

    //    var id = $routeParams.id;

    //    $http.get("/api/movie/" + id)

    //        .success(function (data) {

    //            $scope.movie = data;

    //        });

    //};

    // 使用movieService

    var DetailsController = function ($scope, $routeParams, movieService) {

        var id = $routeParams.id;

        movieService

            .getById(id)

            .success(function (data) {

                $scope.movie = data;

            });

        $scope.edit = function () {

            $scope.edit.movie = angular.copy($scope.movie);

        };

    };

    app.controller("DetailsController", DetailsController);

})(angular.module("atTheMovies"));
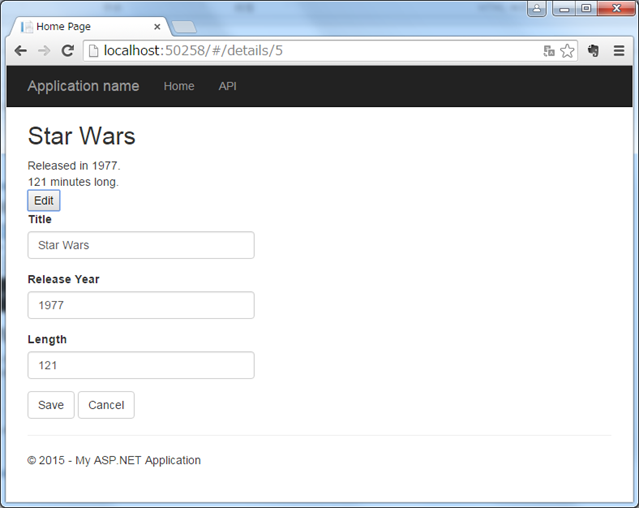
8-2.在Client\Views目录中追加details.html;
<div ng-controller="DetailsController">

    <h2>{{movie.Title}}</h2>

    <div>

        Released in {{movie.ReleaseYear}}.

    </div>

    <div>

        {{movie.RunTime}} minutes long.

    </div>

    <button ng-click="edit()">Edit</button>

    <div ng-include="'/Client/views/edit.html'"></div>

</div>
9.创建EditController和EditView
9-1.在Client\Scripts目录中追加EditController.js;
(function (app) {

    var EditController = function ($scope, movieService) {

        $scope.isEditable = function () {

            return $scope.edit && $scope.edit.movie;

        };

        $scope.cancel = function () {

            $scope.edit.movie = null;

        };

        $scope.save = function () {

            if ($scope.edit.movie.Id) {

                updateMovie();

            } else {

                createMovie();

            }

        };

        var updateMovie = function () {

            movieService.update($scope.edit.movie)

                .success(function () {

                    angular.extend($scope.movie, $scope.edit.movie);

                    $scope.edit.movie = null;

                });

        };

        var createMovie = function () {

            movieService.create($scope.edit.movie)

                .success(function (movie) {

                    $scope.movies.push(movie);

                    $scope.edit.movie = null;

                });

        };

    };

    app.controller("EditController", EditController);

})(angular.module("atTheMovies"));
9-2.在Client\Views目录中追加edit.html;
<div ng-controller="EditController">

    <form ng-show="isEditable()">

        <fieldset>

            <div class="form-group">

                <label for="title">

                    Title

                </label>

                <input id="title" type="text" ng-model="edit.movie.Title" required class="form-control" />

            </div>

            <div class="form-group">

                <label for="release">

                    Release Year

                </label>

                <input id="release" type="number" ng-model="edit.movie.ReleaseYear" required min="1900" max="2030" class="form-control" />

            </div>

            <div class="form-group">

                <label for="runtime">

                    Length

                </label>

                <input id="runtime" type="number" ng-model="edit.movie.RunTime" required min="0" max="500" class="form-control" />

            </div>

            <button class="btn btn-default" ng-click="save()">Save</button>

            <button class="btn btn-default" ng-click="cancel()">Cancel</button>

        </fieldset>

    </form>

</div>
10.运行效果

点击Create按钮

点击Delete按钮

点击Details按钮

点击Edit按钮
11.注意点
11-1.JS模型中属性名的大小写
一定要保持和CS代码中模型属性名大小写一致;否则会导致画面上显示不出来值或者画面上的值没有更新到DB中。
【MVC5】First AngularJS的更多相关文章
- 【MVC5】画面多按钮提交
画面上有个多个按钮时,如何绑定到各自的Action上? 1.追加如下MultipleButtonAttribute类 1 using System; 2 using System.Reflection ...
- 【MVC5】对MySql数据库使用EntityFramework
版本: MySql : 5.6.3 MySql.Data : 6.9.7 MVC : 5 EntityFramework : 6.1.3 VS : 2015 步骤: 1.安装[mysql-connec ...
- 【MVC5】使用域用户登录+记住我
1.配置Web.config文件 添加域链接字符串 <connectionStrings> <add name="ADConnectionString" conn ...
- 【MVC5】使用权限+角色
1.在Ticket中设置用户角色 在权限的Ticket中设置用户的角色(这里是逗号分割). List<string> roles = new List<string>(); i ...
- 【MVC5】后台修改的Model值反映不到客户端的问题
画面上的检索结果有翻页功能,就在画面上追加了几个隐藏控件保存上次检索时的检索条件. 检索时更新这些隐藏控件的值,Debug时确实把Model中对应的属性值变掉了,但是到了客户端又变回之前的值了. 百思 ...
- 【MVC5】日期选择控件DatePicker
项目中使用了Bootstrap,日期控件就选择了依赖于bootstrap的DatePicker. 在App_Start\BundleConfig.cs中引用css和js文件: bundles.Add( ...
- 【MVC5】ASP.NET MVC 项目笔记汇总
ASP.NET MVC 5 + EntityFramework 6 + MySql 先写下列表,之后慢慢补上~ 对MySql数据库使用EntityFramework 使用域用户登录+记住我 画面多按钮 ...
- 【转】Laravel+Angularjs+D3打造可视化数据,RESTful+Ajax
http://897371388.iteye.com/blog/1975351 大致思路也就是下面,由于最近在学Laravel也在学Angularjs,加上之前做的项目用到了d3. 原来的方案如下: ...
- 【转载】图灵AngularJS入门教程
摘自图灵的AngularJS入门教程:http://www.ituring.com.cn/article/13471 感觉非常不错,所以推荐到首页一下! (一)Hello World! 开始学习Ang ...
随机推荐
- TemplateBinding和Binding
TemplateBinding是Binding的一个轻量级版本,它失去了成熟版本Binding的很多功能,比如继承内容引用(inheritence context referencing),Relat ...
- 【CString与string转换】不存在从 "LPWSTR" 转换到 "std::basic_string<char, std::char_traits<char>, std::allocator(转)
原文转自 http://blog.csdn.net/qq_23536063/article/details/52291332 [问题描述] CString cstr: sring str(cstr.G ...
- read 系统调用剖析【转】
转自:https://www.ibm.com/developerworks/cn/linux/l-cn-read/ 大部分程序员可能会有这样的疑问:当在程序中调用库函数 read 时,这个请求是经过哪 ...
- UVA 10205 Stack 'em Up
直接模拟就好. #include <map> #include <set> #include <list> #include <cmath> #incl ...
- linux系统查看主机序列号
#dmidecode -t 1 System Information Manufacturer: IBM Product Name: System x3650 M3 -[7 ...
- ajax验证前端页面
1.html页面 用ajax验证表单的时候不需要form标签,并把提交按钮由type=“submit ”改为type=“button” 数据表结构 ajax.html <!DOCTYPE htm ...
- matlab后处理保存avi动画
有时候需要在后处理时,将图片一张张合成视频,下面介绍一种简单的方法: ... aviobj=VideoWriter('example.avi');%新建叫example.avi的文件 open(avi ...
- HDU 2586.How far away ?-在线LCA(ST)-代码很认真的写了注释(捞到变形)
2018.9.10 0:40 重新敲一遍,然后很认真的写了注释,方便自己和队友看,刚过去的一天的下午打网络赛有一题用到了这个,但是没写注释,队友改板子有点伤,因为我没注释... 以后写博客,代码要写注 ...
- Python的网络编程[1] -> FTP 协议[0] -> FTP 的基本理论
FTP协议 / FTP Protocol FTP全称为File Transfer Protocol(文件传输协议),常用于Internet上控制文件的双向传输,常用的操作有上传和下载.基于TCP/IP ...
- 模拟【P1650】 田忌赛马
顾z 你没有发现两个字里的blog都不一样嘛 qwq 题目描述--->p1650 田忌赛马 先%dalao sto GMPotlc orz 他教给的我,征求意见后终于来水题解. 分析 我们需要知 ...