Core篇——初探IdentityServer4(OpenID Connect模式)
Core篇——初探IdentityServer4(OpenID Connect客户端验证)
目录
1、Oauth2协议授权码模式介绍
2、IdentityServer4的OpenID Connect客户端验证简单实现
Oauth2协议授权码模式介绍
- 授权码模式是Oauth2协议中最严格的认证模式,它的组成以及运行流程是这样
1、用户访问客户端,客户端将用户导向认证服务器
2、用户在认证服务器输入用户名密码选择授权,认证服务器认证成功后,跳转至一个指定好的"跳转Url",同时携带一个认证码。
3、用户携带认证码请求指定好的"跳转Url"再次请求认证服务器(这一步后台完成,对用户不可见),此时,由认证服务器返回一个Token
4、客户端携带token请求用户资源 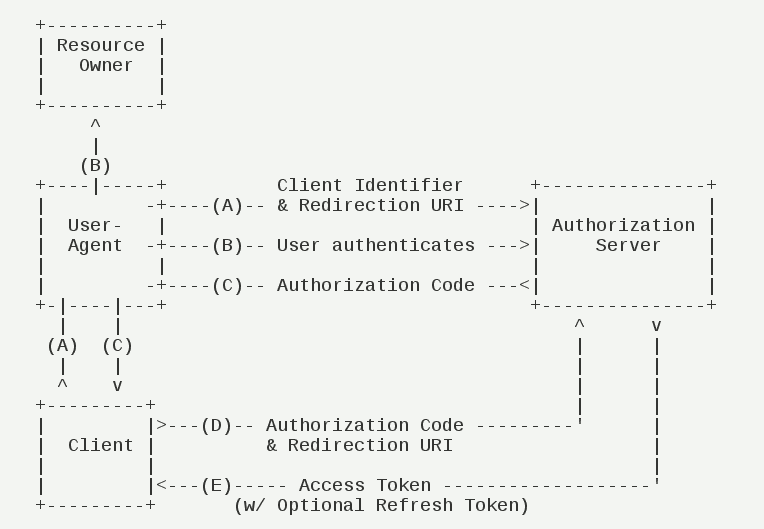
- OpenId Connect运行流程为
1、用户访问客户端,客户端将用户导向认证服务器
2、用户在认证服务器输入用户名密码认证授权
3、认证服务器返回token和资源信息 
IdentityServer4的OpenID Connect客户端验证简单实现
Server部分
- 添加一个Mvc项目,配置Config.cs文件
   public class Config

     {

         //定义要保护的资源(webapi)

         public static IEnumerable<ApiResource> GetApiResources()

         {

             return new List<ApiResource>

             {

                 new ApiResource("api1", "My API")

             };

         }

         //定义可以访问该API的客户端

         public static IEnumerable<Client> GetClients()

         {

             return new List<Client>

             {

                 new Client

                 {

                     ClientId = "mvc",

                     // no interactive user, use the clientid/secret for authentication

                     AllowedGrantTypes = GrantTypes.Implicit,  //简化模式

                     // secret for authentication

                     ClientSecrets =

                     {

                         new Secret("secret".Sha256())

                     },

                     RequireConsent =true,                                  //用户选择同意认证授权

                     RedirectUris={ "http://localhost:5001/signin-oidc" },  //指定允许的URI返回令牌或授权码(我们的客户端地址)

                     PostLogoutRedirectUris={ "http://localhost:5001/signout-callback-oidc" },//注销后重定向地址 参考https://identityserver4.readthedocs.io/en/release/reference/client.html

                     LogoUri="https://ss1.bdstatic.com/70cFuXSh_Q1YnxGkpoWK1HF6hhy/it/u=3298365745,618961144&fm=27&gp=0.jpg",

                     // scopes that client has access to

                     AllowedScopes = {                       //客户端允许访问个人信息资源的范围

                         IdentityServerConstants.StandardScopes.Profile,

                         IdentityServerConstants.StandardScopes.OpenId,

                         IdentityServerConstants.StandardScopes.Email,

                         IdentityServerConstants.StandardScopes.Address,

                         IdentityServerConstants.StandardScopes.Phone

                     }

                 }

             };

         }

         public static List<TestUser> GeTestUsers()

         {

             return new List<TestUser>

             {

                 new TestUser

                 {

                     SubjectId = "",

                     Username = "alice",

                     Password = "password"

                 },

                 new TestUser

                 {

                     SubjectId = "",

                     Username = "bob",

                     Password = "password"

                 }

             };

         }

         //openid  connect

         public static IEnumerable<IdentityResource> GetIdentityResources()

         {

             return new List<IdentityResource>

             {

                 new IdentityResources.OpenId(),

                 new IdentityResources.Profile(),

                 new IdentityResources.Email()

             };

         }

     }
Config
- 添加几个ViewModel 用来接收解析跳转URL后的参数
     public class InputConsentViewModel

     {

         public string Button { get; set; }

         public IEnumerable<string> ScopesConsented { get; set; }

         public bool RemeberConsent { get; set; }

         public string ReturnUrl { get; set; }

     }

     //解析跳转url后得到的应用权限等信息

     public class ConsentViewModel:InputConsentViewModel

     {

         public string ClientId { get; set; }

         public string ClientName { get; set; }

         public string ClientUrl { get; set; }

         public string ClientLogoUrl { get; set; }

         public IEnumerable<ScopeViewModel> IdentityScopes { get; set; }

         public IEnumerable<ScopeViewModel> ResourceScopes { get; set; }

     }

     //接收Scope

     public class ScopeViewModel

     {

         public string Name { get; set; }

         public string DisplayName { get; set; }

         public string Description { get; set; }

         public bool Emphasize { get; set; }

         public bool Required { get; set; }

         public bool Checked { get; set; }

     }

     public class ProcessConsentResult

     {

         public string RedirectUrl { get; set; }

         public bool IsRedirectUrl => RedirectUrl != null;

         public string ValidationError { get; set; }

         public ConsentViewModel ViewModel { get; set; }

     }
ViewModel
- 配置StartUp,将IdentityServer加入到DI容器,这里有个ConsentService,用来处理解析跳转URL的数据,这个Service在下面实现。
         public void ConfigureServices(IServiceCollection services)

         {

             services.AddIdentityServer()

                 .AddDeveloperSigningCredential()  //添加登录证书

                 .AddInMemoryIdentityResources(Config.GetIdentityResources())  //添加IdentityResources

                 .AddInMemoryApiResources(Config.GetApiResources())

                 .AddInMemoryClients(Config.GetClients())

                 .AddTestUsers(Config.GeTestUsers());

             services.AddScoped<ConsentService>();

             services.AddMvc();

         }

         public void Configure(IApplicationBuilder app, IHostingEnvironment env)

         {

             if (env.IsDevelopment())

             {

                 app.UseDeveloperExceptionPage();

             }

             else

             {

                 app.UseExceptionHandler("/Home/Error");

             }

             app.UseStaticFiles();

             app.UseIdentityServer();//引用IdentityServer中间件

             app.UseMvc(routes =>

             {

                 routes.MapRoute(

                     name: "default",

                     template: "{controller=Home}/{action=Index}/{id?}");

             });

         }
Startup配置IdentityServer
- 添加一个ConsentService,用来根据Store拿到Resource
     public class ConsentService

     {

         private readonly IClientStore _clientStore;

         private readonly IResourceStore _resourceStore;

         private readonly IIdentityServerInteractionService _identityServerInteractionService;

         public ConsentService(IClientStore clientStore,

             IResourceStore resourceStore,

             IIdentityServerInteractionService identityServerInteractionService)

         {

             _clientStore = clientStore;

             _resourceStore = resourceStore;

             _identityServerInteractionService = identityServerInteractionService;

         }

         public async Task<ConsentViewModel> BuildConsentViewModel(string returnUrl)

         {

             //根据return url 拿到ClientId 等信息

             var request = await _identityServerInteractionService.GetAuthorizationContextAsync(returnUrl);

             if (returnUrl == null)

                 return null;

             var client = await _clientStore.FindEnabledClientByIdAsync(request.ClientId);

             var resources = await _resourceStore.FindEnabledResourcesByScopeAsync(request.ScopesRequested);//根据请求的scope 拿到resources

             return CreateConsentViewModel(request, client, resources);

         }

         private ConsentViewModel CreateConsentViewModel(AuthorizationRequest request, Client client, Resources resources)

         {

             var vm = new ConsentViewModel();

             vm.ClientName = client.ClientName;

             vm.ClientLoggoUrl = client.LogoUri;

             vm.ClientUrl = client.ClientUri;

             vm.RemeberConsent = client.AllowRememberConsent;

             vm.IdentityScopes = resources.IdentityResources.Select(i => CreateScopeViewModel(i));

             //api resource

             vm.ResourceScopes = resources.ApiResources.SelectMany(i => i.Scopes).Select(x => CreateScopeViewModel(scope: x));

             return vm;

         }

         //identity 1个scopes

         private ScopeViewModel CreateScopeViewModel(IdentityResource identityResource)

         {

             return new ScopeViewModel

             {

                 Name = identityResource.Name,

                 DisplayName = identityResource.DisplayName,

                 Description = identityResource.Description,

                 Required = identityResource.Required,

                 Checked = identityResource.Required,

                 Emphasize = identityResource.Emphasize

             };

         }

         //apiresource

         private ScopeViewModel CreateScopeViewModel(Scope scope)

         {

             return new ScopeViewModel

             {

                 Name = scope.Name,

                 DisplayName = scope.DisplayName,

                 Description = scope.Description,

                 Required = scope.Required,

                 Checked = scope.Required,

                 Emphasize = scope.Emphasize

             };

         }

     }
ConsentService
- 添加一个ConsentController,用来显示授权登录页面,以及相应的跳转登录逻辑。
 public class ConsentController : Controller

     {

         private readonly ConsentService _consentService;

         public ConsentController(ConsentService consentService)

         {

             _consentService = consentService;

         }

         public async Task<IActionResult> Index(string returnUrl)

         {

             //调用consentService的BuildConsentViewModelAsync方法,将跳转Url作为参数传入,解析得到一个ConsentViewModel

             var model =await _consentService.BuildConsentViewModelAsync(returnUrl);

             if (model == null)

                 return null;

             return View(model);

         }

         [HttpPost]

         public async Task<IActionResult> Index(InputConsentViewModel viewModel)

         {

             //用户选择确认按钮的时候,根据选择按钮确认/取消,以及勾选权限

             var result = await _consentService.PorcessConsent(viewModel);

             if (result.IsRedirectUrl)

             {

                 return Redirect(result.RedirectUrl);

             }

             if (!string.IsNullOrEmpty(result.ValidationError))

             {

                 ModelState.AddModelError("", result.ValidationError);

             }

             return View(result.ViewModel);

         }

     }
ConsentController
- 配置服务端的登录Controller
     public class AccountController : Controller

     {

         private readonly TestUserStore _user;  //放入DI容器中的TestUser(GeTestUsers方法),通过这个对象获取

         public AccountController(TestUserStore user)

         {

             _user = user;

         }        public IActionResult Login(string returnUrl = null)

         {

             ViewData["ReturnUrl"] = returnUrl;

             return View();

         }

         [HttpPost]

         public async Task<IActionResult> Login(LoginViewModel loginViewModel,string returnUrl)

         {

             //用户登录

             if (ModelState.IsValid)

             {

                 ViewData["ReturnUrl"] = returnUrl;

                 var user =  _user.FindByUsername(loginViewModel.Email);

                 if (user == null)

                 {

                     ModelState.AddModelError(nameof(loginViewModel.Email), "Email not exists");

                 }

                 else

                 {

                     var result = _user.ValidateCredentials(loginViewModel.Email, loginViewModel.Password);

                     if(result)

                     {

                         var props = new AuthenticationProperties()

                         {

                             IsPersistent = true,

                             ExpiresUtc = DateTimeOffset.UtcNow.AddMinutes()

                         };

                         await Microsoft.AspNetCore.Http.AuthenticationManagerExtensions.SignInAsync(   //Id4扩展方法和HttpContext扩展方法重名,这里强制使用命名空间方法

                             this.HttpContext,

                             user.SubjectId,

                             user.Username,

                             props);

                         return RedirectToLoacl(returnUrl);

                     }

                     else

                     {

                         ModelState.AddModelError(nameof(loginViewModel.Email), "Wrong password");

                     }

                 }

             }

             return View();

         }
AccountController
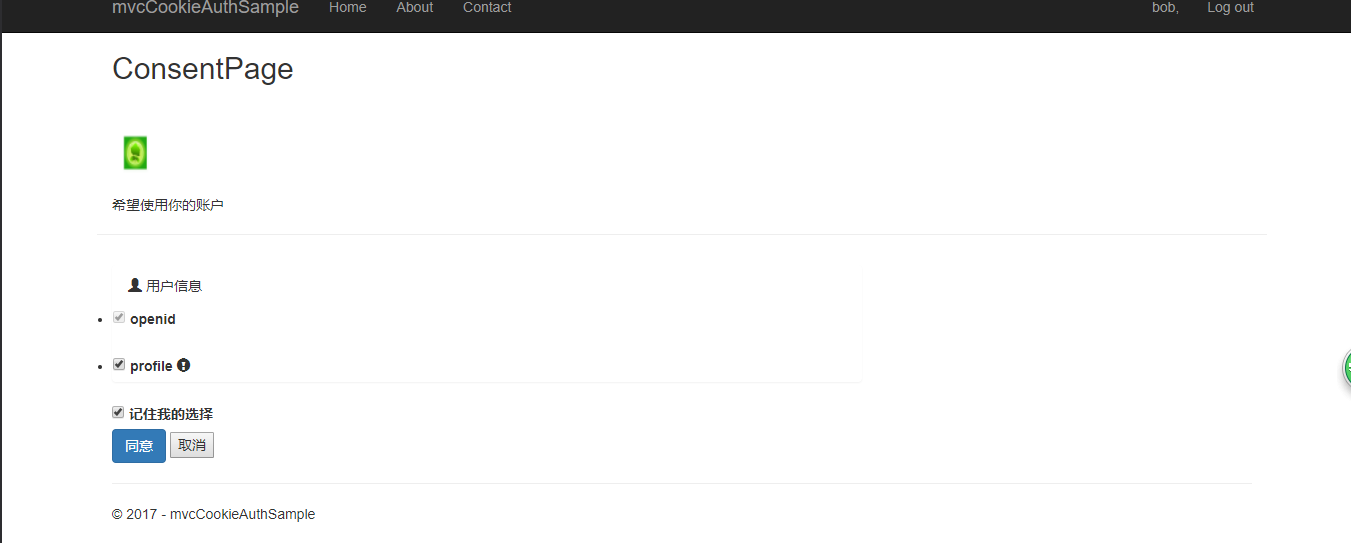
- 接下来给Consent控制器的Index添加视图
 @using mvcCookieAuthSample.ViewModels

 @model  ConsentViewModel

 <h2>ConsentPage</h2>

 @*consent*@

 <div class="row page-header">

     <div class="col-sm-10">

         @if (!string.IsNullOrWhiteSpace(Model.ClientLogoUrl))

         {

             <div>

                 <img src="@Model.ClientLogoUrl" style="width:50px;height:50px" />

             </div>

         }

         <h1>@Model.ClientName</h1>

         <p>希望使用你的账户</p>

     </div>

 </div>

 @*客户端*@

 <div class="row">

     <div class="col-sm-8">

         <div asp-validation-summary="All" class="danger"></div>

         <form asp-action="Index" method="post">

             <input type="hidden" asp-for="ReturnUrl"/>

             @if (Model.IdentityScopes.Any())

             {

                 <div class="panel">

                     <div class="panel-heading">

                         <span class="glyphicon glyphicon-user"></span>

                         用户信息

                     </div>

                     <ul class="list-group">

                         @foreach (var scope in Model.IdentityScopes)

                         {

                             @Html.Partial("_ScopeListitem.cshtml", scope);

                         }

                     </ul>

                 </div>

             }

             @if (Model.ResourceScopes.Any())

             {

                 <ul class="list-group">

                     @foreach (var scope in Model.ResourceScopes)

                     {

                         @Html.Partial("_ScopeListitem.cshtml", scope);

                     }</ul>

             }

             <div>

                 <label>

                     <input type="checkbox" asp-for="RemeberConsent"/>

                     <strong>记住我的选择</strong>

                 </label>

             </div>

             <div>

                 <button name="button" value="yes" class="btn btn-primary"  autofocus>同意</button>

                 <button name="button" value="no">取消</button>

                 @if (!string.IsNullOrEmpty(Model.ClientUrl))

                 {

                     <a href="@Model.ClientUrl" class="pull-right btn btn-default">

                         <span class="glyphicon glyphicon-info-sign" ></span>

                         <strong>@Model.ClientUrl</strong>

                     </a>

                 }

             </div>

         </form>

     </div>

 </div>

 //这里用到了一个分部视图用来显示用户允许授权的身份资源和api资源

 @using mvcCookieAuthSample.ViewModels

 @model ScopeViewModel;

 <li>

     <label>

         <input type="checkbox"

                name="ScopesConsented"

                id="scopes_@Model.Name"

                value="@Model.Name"

                checked=@Model.Checked

                disabled=@Model.Required/>

         @if (Model.Required)

         {

             <input type="hidden" name="ScopesConsented" value="@Model.Name" />

         }

         <strong>@Model.Name</strong>

         @if (Model.Emphasize)

         {

             <span class="glyphicon glyphicon-exclamation-sign"></span>

         }

     </label>

     @if(string.IsNullOrEmpty(Model.Description))

     {

         <div>

             <label for="scopes_@Model.Name">@Model.Description</label>

         </div>

     }

 </li>
Index.cshtml
- 添加客户端,依旧添加一个mvc项目,配置startup,Home/Index action打上Authorize标签。
 public void ConfigureServices(IServiceCollection services)

         {

             services.AddAuthentication(options => {

                 options.DefaultScheme = "Cookies";

                 options.DefaultChallengeScheme = "oidc";//openidconnectservice

             })

             .AddCookie("Cookies")

             .AddOpenIdConnect("oidc",options=> {

                 options.SignInScheme = "Cookies";

                 options.Authority = "http://localhost:5000";    //设置认证服务器

                 options.RequireHttpsMetadata = false;

                 options.ClientId = "mvc";                       //openidconfig的配置信息

                 options.ClientSecret = "secret";

                 options.SaveTokens = true;

             });

             services.AddMvc();

         }

         public void Configure(IApplicationBuilder app, IHostingEnvironment env)

         {

             if (env.IsDevelopment())

             {

                 app.UseDeveloperExceptionPage();

                 app.UseBrowserLink();

             }

             else

             {

                 app.UseExceptionHandler("/Home/Error");

             }

             app.UseStaticFiles();

             app.UseAuthentication();

             app.UseMvc(routes =>

             {

                 routes.MapRoute(

                     name: "default",

                     template: "{controller=Home}/{action=Index}/{id?}");

             });

         }
客户端配置Startup
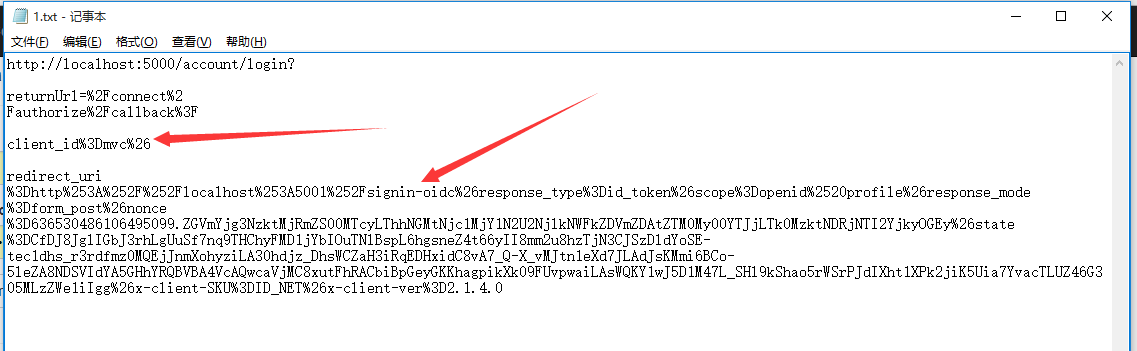
设置服务端端口5000,运行服务器端;设置客户端端口5001,运行客户端。我们可以看到,localhost:5001会跳转至认证服务器

然后看下Url=》
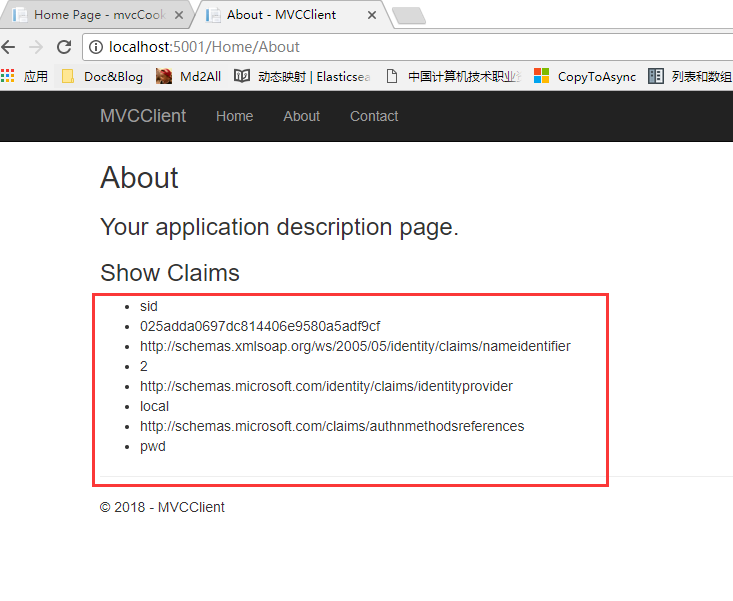
使用config配置的testuser登录系统,选择允许授权的身份权限。登录成功后看到我们的Claims
总结
- 最后来总结一下
用户访问客户端(5001端口程序),客户端将用户导向认证服务器(5000程序),用户选择允许授权的身份资源和api资源后台解析(这两个资源分别由Resources提供,resources 由IResourceStore解析returnurl后的Scopes提供),最后由ProfileService返回数条Claim。(查看ConsentService的各个方法) 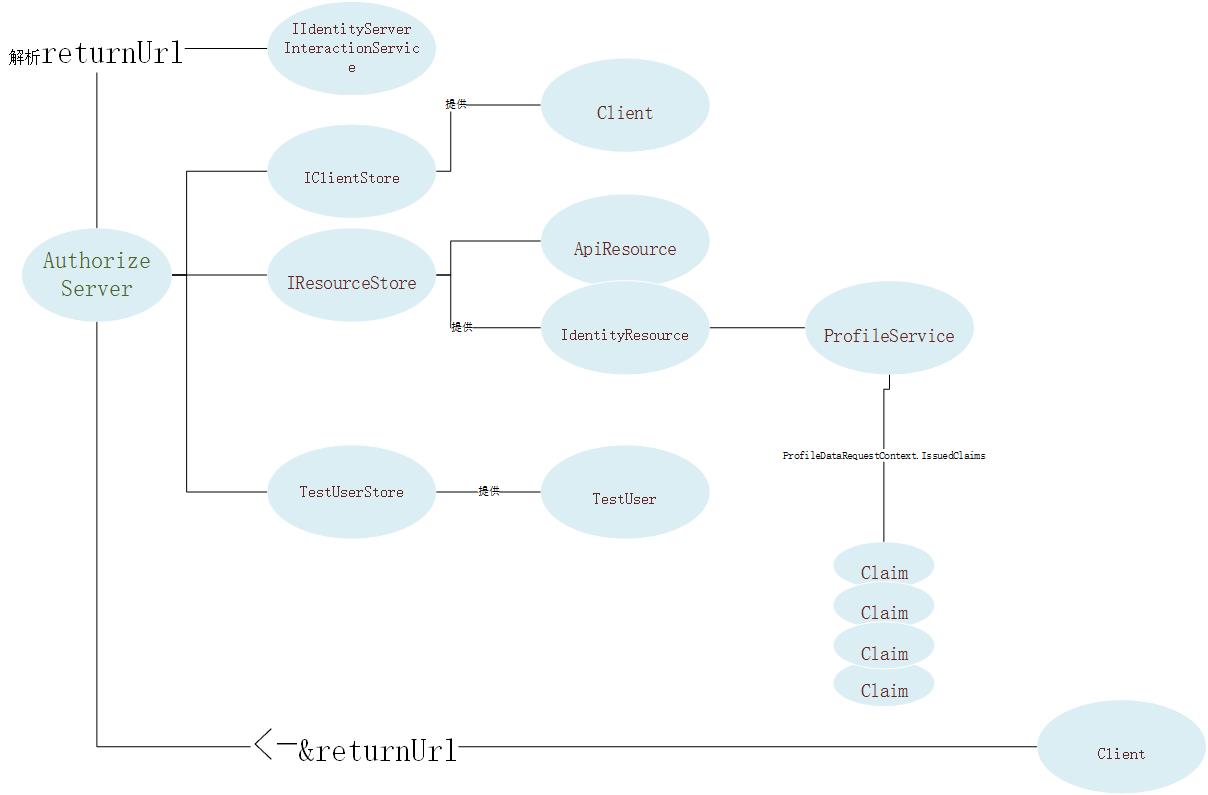
Core篇——初探IdentityServer4(OpenID Connect模式)的更多相关文章
- Core篇——初探IdentityServer4(客户端模式,密码模式)
Core篇——初探IdentityServer4(客户端模式,密码模式) 目录 1.Oatuth2协议的客户端模式介绍2.IdentityServer4客户端模式实现3.Oatuth2协议的密码模式介 ...
- Core篇——初探Core配置管理
文章目录 1.命令行配置 2.Json文件配置 3.配置文件文本至C#对象实例的映射 4.配置文件热更新 5.总结 命令行的配置 我们首先来创建一个.net core 的控制台项目,然后引入.net ...
- Core篇——初探Core的认证,授权机制
目录 1.Cookie-based认证的实现 2.Jwt Token 的认证与授权 3.Identity Authentication + EF 的认证 Cookie-based认证的实现 cooki ...
- Core篇——初探Core的Http请求管道&&Middleware
目录: 1.Core 处理HTTP请求流程 2.中间件(Middleware)&&处理流程 3.创建自定义中间件&&模拟Core的请求管道 Core 处理HTTP请求流 ...
- Core篇——初探依赖注入
目录 1.DI&&IOC简单介绍 2.UML类图中六种关联关系 3..net core 中DI的使用 4..net core DI初始化源码初窥 DI&&IOC简单介绍 ...
- 使用 IdentityServer4 实现 OAuth 2.0 与 OpenID Connect 服务
IdentityServer4 是 ASP.NET Core 的一个包含 OIDC 和 OAuth 2.0 协议的框架.最近的关注点在 ABP 上,默认 ABP 也集成 IdentityServer4 ...
- asp.net core系列 53 IdentityServer4 (IS4)介绍
一.概述 在物理层之间相互通信必须保护资源,需要实现身份验证和授权,通常针对同一个用户存储.对于资源安全设计包括二个部分,一个是认证,一个是API访问. 1 认证 认证是指:应用程序需要知道当前用户的 ...
- IdentityServer4 ASP.NET Core的OpenID Connect OAuth 2.0框架学习保护API
IdentityServer4 ASP.NET Core的OpenID Connect OAuth 2.0框架学习之保护API. 使用IdentityServer4 来实现使用客户端凭据保护ASP.N ...
- ASP.NET Core的身份认证框架IdentityServer4(9)-使用OpenID Connect添加用户认证
OpenID Connect OpenID Connect 1.0是OAuth 2.0协议之上的一个简单的身份层. 它允许客户端基于授权服务器执行的身份验证来验证最终用户的身份,以及以可互操作和类似R ...
随机推荐
- [读书笔记]-技术学习-Redis
1:Redis概览 Remote Dictionary Server 远程字典服务 Redis是基于内存的存储 在一台普通的笔记本上,Redis每秒的读取速度可以达到10万 内存读取数据,断电的时候数 ...
- 【sqli-labs】 less25a GET- Blind based -All you OR&AND belong to us -Intiger based(GET型基于盲注的去除了or和and的整型注入)
因为过滤是针对输入的字符串进行的过滤,所以如果过滤了or and的话,提交id=1和id=and1结果应该相同 http://localhost/sqli-labs-master/Less-25a/? ...
- PyCharm for Mac 调整字体大小
网上的教程大多已过时,那个路径根本找不到,于是就有了本文. 前言 以前用 Sublime 时,直接快捷键CMD+[+/-](CMD加加号或减号)直接调整字体大小,非常方便,后来用 VSCode,字体大 ...
- Java中String类的常用方法
判断功能的方法 public boolean equals (Object anObject) :将此字符串与指定对象进行比较. public boolean equalsIgnoreCase (St ...
- day003 python解释器、变量和数据类型基础讲解
Python解释器 打开官网https://www.python.org/downloads/windows/ 下载中心下载对应电脑版本的Python安装包,选择custom后一路next安装完成.过 ...
- Mysql [Err] 1118 - Row size too large. The maximum row size for the used table type, not counting BLOBs, is 65535.
对于越来越多的数据,数据库的容量越来越大,压缩也就越来越常见了.在我的实际工作中进行过多次压缩工作,也遇到多次问题,在此和大家分享一下. 首先,我们先说说怎么使用innodb的压缩. 第一,mysql ...
- php curl选项列表(超详细)
第一类:对于下面的这些option的可选参数,value应该被设置一个bool类型的值:选项可选value值备注 CURLOPT_AUTOREFERER当根据Location:重定向时,自动设置hea ...
- 面试官问你如何解决web高并发这样回答就好了
所谓高并发,就是同一时间有很多流量(通常指用户)访问程序的接口.页面及其他资源,解决高并发就是当流量峰值到来时保证程序的稳定性. 我们一般用QPS(每秒查询数,又叫每秒请求数)来衡量程序的综合性能,数 ...
- 3. IDEA 的样式设置和快捷键设置
一.样式设置 首先打开IDEA之后,点击任务栏的“File”→Settings 二.设置快捷键 1.首先打开IDEA之后,点击任务栏的“File”. 2.在下拉列表中中选择“Settings” 3.在 ...
- 支付宝h5支付从支付到退款
先说明,支付是之前写好的,调用的是支付宝旧的即时到账接口,所也没有去集成应用,退款调用的是无密即时到账退款接口!!! https://doc.open.alipay.com/支付宝文档资料,蚂蚁金服开 ...