
Python 创建本地服务器环境生成二维码
一. 需求
公司要做一个H5手机端适配页面,因技术问题所以H5是外包的,每次前端给我们源码,我们把源码传到服务器让其他人访问看是否存在bug,这个不是很麻烦吗?有人说,可以让前端在他们的服务器上先托管,等我们验收了后在给源码不结了嘛,是的呀!所有的人都愿意这样,but……
要是能在本地搭建环境直接访问是不是更好的。问题是我们这边程序此刻没时间与H5前端对接,既浪费我们时间又浪费他们时间。所以开发一个service服务器让测试人员直接参与,这样就可以把我们完美分工了。
二.Python搭建web服务器
Python自带一个http.serrver包可以简单的搭建web服务器
参考:
http://www.cnblogs.com/xuxn/archive/2011/02/14/build-simple-web-server-with-python.html
http://blog.csdn.net/kevin_darkelf/article/details/40979545
http://blog.csdn.net/tianmohust/article/details/7689414
# return Html page

class MyHttpBaseHandler(BaseHTTPRequestHandler):

    def do_GET(self):

        print(self.path)

        enc = "UTF-8"

        encoded = ''.join(self.path).encode(enc)

        f = io.BytesIO()

        f.write(encoded)

        f.seek(0)

        self.send_response(200)

        self.send_header("Content-type", "text/html; charset=%s" % enc)

        self.send_header("Content-Length", str(len(encoded)))

        self.end_headers()

        shutil.copyfileobj(f, self.wfile)

    # This method serves the 'POST' request type, only allowed for CGI scripts.

    def do_POST(self):

        pass

# return  static  -m  eg:python -m http.server 8080

class MyHttpSimpleHandler(SimpleHTTPRequestHandler):

    pass
httpd = HTTPServer((self.addressIP, self.port), MyHttpSimpleHandler)
print("Server started on " + self.addressIP + ",port " + str(self.port) + ".....")
httpd.serve_forever()
三. 绘制UI,生成二维码
之前写过
Pyqt+QRcode 生成 识别 二维码
直接参考生成二维码
绘制UI
class MainWidgetUI(QDialog):

    def __init__(self, parent=None):

        super(MainWidgetUI, self).__init__(parent)

        self.setFixedSize(640, 480)  # PyQT禁止调整窗口大小

        self.setWindowTitle('Python 创建本地服务器环境生成二维码')

        self.setWindowIcon(QtGui.QIcon("favicon.ico"))

        # Main布局

        main_layout = QVBoxLayout()

        self.methodtype = QComboBox()

        self.methodTopLayout = QHBoxLayout()

        self.methodtype.addItem('文件', QVariant(1))  # 使用 QVariant保存Key

        self.methodtype.addItem('地址', QVariant(2))

        self.methodtype.setFixedWidth(90)  # 设置固定不变的宽度为90px

        self.pushButton = QPushButton("选择文件")

        self.Url = QLineEdit()

        self.Url.hide()

        self.methodTopLayout.addWidget(self.methodtype)  # 添加一个挂件

        self.methodTopLayout.addWidget(self.Url)  # 添加一个挂件

        self.methodTopLayout.addSpacing(10)  # 添加一个10px的空间距离 且不带弹性

        self.methodTopLayout.addWidget(self.pushButton)

        self.qrcodeGroup = QVBoxLayout()

        self.groupBox = QGroupBox("二维码")

        self.QrLabel = QLabel(self.groupBox)

        self.qrcodeGroup.addWidget(self.groupBox)

        main_layout.addLayout(self.methodTopLayout)  # 添加一个布局

        main_layout.addLayout(self.qrcodeGroup)

        self.setLayout(main_layout)

        self.QrLabel.setGeometry(QRect(30, 30, 540, 380))  # 设置qrLabel 的图形位置

        # self.QrLabel.setScaledContents(True)  # 按比例缩放二维码显示内容

        self.pushButton.clicked.connect(self.FileOperator)  # 点击按钮

        self.methodtype.currentIndexChanged.connect(self.comboxchange)  # 下拉框改变时候事件

        self.Url.textChanged.connect(self.comboxchange)  # 当地址文本框内容改变时触发
生成二维码
    # 获取服务器(地址) 生成二维码

    def ShowQrCode(self, strings):

        if not strings:  # 参数为空,pixmap为空

            self.QrLabel.setPixmap(QtGui.QPixmap(""))

        else:

            qr = qrcode.QRCode(version=None, error_correction=qrcode.constants.ERROR_CORRECT_L, box_size=10, border=2, )

            qr.add_data(strings)

            qr.make(fit=True)

            img = qr.make_image()

            qraddr=tempDir+'qr.png'

            print(qraddr)

            img.save(qraddr)
很简单,通过选择文件获取路径,将文件copy到当前目录,将当前目录设置为http.server服务目录,二维码则为服务地址+文件名
四.注意的事项
1. 获取当前局域网IP
addressIP = socket.gethostbyname_ex(socket.gethostname())[-1][0] # 获取局域网IP
2.获取windows临时目录
tempDir = tempfile.gettempdir() + '/' # 获取临时temp目录
3. copy文件
copy文件有两种,一种为Python自带,另一种为Pyqt中方法
shutil.copy(filePath, "./") # 文件=>目录
QFile.copy(filePath, sys.path[0]+"\\"+file) # QFile.copy 必须文件对=>文件
4. 使用线程开启服务
直接在UI中开启httpd.serve_forever() 会导致UI堵塞,所以使用QtCore.QThread 线程开启http服务
5.动态调整UI大小
参数不同导致生成的二维码大小不同,所以要动态修改UI大小以便将整个二维码显示全
            qrsize = Image.open(qraddr).size

            if qrsize[0] > 400:  # 二维码的像素值大于400的时候动态修改窗体的大小

                dsize = qrsize[0] // 2  # 取整数部分

                self.setFixedSize(640 + dsize, 480 + dsize)

                self.QrLabel.setGeometry(QRect(30, 30, 540 + dsize, 380 + dsize))

            else:

                self.setFixedSize(640, 480)

                self.QrLabel.setGeometry(QRect(30, 30, 540, 380))

            self.QrLabel.setPixmap(QtGui.QPixmap(qraddr))
6. 通过判断文件的md5对比文件是否为最新版文件
    if filePath:

            file = filePath.split('/')[-1]

            isfExist = os.path.exists(file)

            if not isfExist:  # 不存在文件

                shutil.copy(filePath, "./")  # 文件对=>目录

            else:  # 已经存在文件,对比文件md5 判断是否为最新文件

                md5FilePath = self.getFileMD5(filePath)

                md5File = self.getFileMD5(file)

                if md5File != md5FilePath:

                    shutil.copy(filePath,  "./")

    # 获取文件的MD5值,适用于小文件

    def getFileMD5(self, filepath):

        f = open(filepath, 'rb')

        md5obj = hashlib.md5()

        md5obj.update(f.read())

        hash = md5obj.hexdigest()

        f.close()

        return str(hash).upper()
7.生成debug.log 日志
def delog(string='--'):

    debugFile=open("debog.txt",'a',1,'utf-8')

    debugFile.writelines(string+'\n')

    debugFile.close()
五.完整代码
# -*- coding: UTF8 -*-

import io, shutil, sys, os

from http.server import HTTPServer, BaseHTTPRequestHandler, SimpleHTTPRequestHandler

from PyQt5.QtWidgets import *

from PyQt5.QtCore import *

from PyQt5 import QtGui

import qrcode

from PIL import Image

import socket

import hashlib

import tempfile

port = 8080  # 默认端口

addressIP = socket.gethostbyname_ex(socket.gethostname())[-1][0]  # 获取局域网IP

tempDir = tempfile.gettempdir() + '/'  # 获取临时temp目录

class MainWidgetUI(QDialog):

    def __init__(self, parent=None):

        super(MainWidgetUI, self).__init__(parent)

        self.setFixedSize(640, 480)  # PyQT禁止调整窗口大小

        self.setWindowTitle('Python 创建本地服务器环境生成二维码')

        self.setWindowIcon(QtGui.QIcon("favicon.ico"))

        # Main布局

        main_layout = QVBoxLayout()

        self.methodtype = QComboBox()

        self.methodTopLayout = QHBoxLayout()

        self.methodtype.addItem('文件', QVariant(1))  # 使用 QVariant保存Key

        self.methodtype.addItem('地址', QVariant(2))

        self.methodtype.setFixedWidth(90)  # 设置固定不变的宽度为90px

        self.pushButton = QPushButton("选择文件")

        self.Url = QLineEdit()

        self.Url.hide()

        self.methodTopLayout.addWidget(self.methodtype)  # 添加一个挂件

        self.methodTopLayout.addWidget(self.Url)  # 添加一个挂件

        self.methodTopLayout.addSpacing(10)  # 添加一个10px的空间距离 且不带弹性

        self.methodTopLayout.addWidget(self.pushButton)

        self.qrcodeGroup = QVBoxLayout()

        self.groupBox = QGroupBox("二维码")

        self.QrLabel = QLabel(self.groupBox)

        self.qrcodeGroup.addWidget(self.groupBox)

        main_layout.addLayout(self.methodTopLayout)  # 添加一个布局

        main_layout.addLayout(self.qrcodeGroup)

        self.setLayout(main_layout)

        self.QrLabel.setGeometry(QRect(30, 30, 540, 380))  # 设置qrLabel 的图形位置

        # self.QrLabel.setScaledContents(True)  # 按比例缩放二维码显示内容

        self.pushButton.clicked.connect(self.FileOperator)  # 点击按钮

        self.methodtype.currentIndexChanged.connect(self.comboxchange)  # 下拉框改变时候事件

        self.Url.textChanged.connect(self.comboxchange)  # 当地址文本框内容改变时触发

    # 文件操作

    def FileOperator(self):

        filePath = self.selectFile()

        if filePath:

            file = filePath.split('/')[-1]

            isfExist = os.path.exists(file)

            if not isfExist:  # 不存在文件

                shutil.copy(filePath, "./")  # 文件对=>目录

                # delog(a)  #  打包exe调试日志log

                # QFile.copy(filePath, sys.path[0]+"\\"+file)  QFile.copy 必须文件对=>文件

            else:  # 已经存在文件,对比文件md5 判断是否为最新文件

                md5FilePath = self.getFileMD5(filePath)

                md5File = self.getFileMD5(file)

                if md5File != md5FilePath:

                    shutil.copy(filePath,  "./")

            # 拼接二维码参数

            address = "http://" + addressIP + ':' + str(port) + '/' + file

            self.ShowQrCode(address)  # 显示二维码

            print('生成qrcord')

            self.Theading = TheadingPost((addressIP, port))  # 开进程打开服务-直接启动http.service 会导致UI进程无响应

            self.Theading.start()  # 线程开始

    # 获取文件的MD5值,适用于小文件

    def getFileMD5(self, filepath):

        f = open(filepath, 'rb')

        md5obj = hashlib.md5()

        md5obj.update(f.read())

        hash = md5obj.hexdigest()

        f.close()

        return str(hash).upper()

    # 选择文件

    def selectFile(self):

        # getOpenFileName  只能选择一个    getOpenFileNames  可多个选择

        files = QFileDialog.getOpenFileName(self, "请选择播放文件", '', "*.*")

        if files[0] == '':

            QMessageBox.warning(self, u'错误提示!', "请选择文件", QMessageBox.Yes)

        else:

            return files[0]

    # 下拉框选择

    def comboxchange(self):

        currentIndex = self.methodtype.currentIndex()  # currentIndex  索引是从0开始自增

        key = self.methodtype.itemData(currentIndex)  # QVariant 保存的 key

        #  self.methodtype.currentText()  # 文本

        if key == 1:  # 文件

            self.pushButton.show()

            self.Url.hide()

            self.ShowQrCode("")

        elif key == 2:  # 地址

            self.pushButton.hide()

            self.Url.show()

            url = self.Url.text()

            self.ShowQrCode(url)

    # 获取服务器(地址) 生成二维码12

    def ShowQrCode(self, strings):

        if not strings:  # 参数为空,pixmap为空

            self.QrLabel.setPixmap(QtGui.QPixmap(""))

        else:

            qr = qrcode.QRCode(version=None, error_correction=qrcode.constants.ERROR_CORRECT_L, box_size=10, border=2, )

            qr.add_data(strings)

            qr.make(fit=True)

            img = qr.make_image()

            qraddr=tempDir+'qr.png'

            print(qraddr)

            img.save(qraddr)

            qrsize = Image.open(qraddr).size

            if qrsize[0] > 400:  # 二维码的像素值大于400的时候动态修改窗体的大小

                dsize = qrsize[0] // 2  # 取整数部分

                self.setFixedSize(640 + dsize, 480 + dsize)

                self.QrLabel.setGeometry(QRect(30, 30, 540 + dsize, 380 + dsize))

            else:

                self.setFixedSize(640, 480)

                self.QrLabel.setGeometry(QRect(30, 30, 540, 380))

            self.QrLabel.setPixmap(QtGui.QPixmap(qraddr))

# return Html page

class MyHttpBaseHandler(BaseHTTPRequestHandler):

    def do_GET(self):

        print(self.path)

        enc = "UTF-8"

        encoded = ''.join(self.path).encode(enc)

        f = io.BytesIO()

        f.write(encoded)

        f.seek(0)

        self.send_response(200)

        self.send_header("Content-type", "text/html; charset=%s" % enc)

        self.send_header("Content-Length", str(len(encoded)))

        self.end_headers()

        shutil.copyfileobj(f, self.wfile)

    # This method serves the 'POST' request type, only allowed for CGI scripts.

    def do_POST(self):

        pass

# return  static  -m  eg:python -m http.server 8080

class MyHttpSimpleHandler(SimpleHTTPRequestHandler):

    pass

# 启动服务

class TheadingPost(QThread):

    def __init__(self, list):

        super(TheadingPost, self).__init__()

        self.addressIP = list[0]

        self.port = list[1]

    def run(self):

        httpd = HTTPServer((self.addressIP, self.port), MyHttpSimpleHandler)

        print("Server started on " + self.addressIP + ",port " + str(self.port) + ".....")

        httpd.serve_forever()

def delog(string='--'):

    debugFile=open("debog.txt",'a',1,'utf-8')

    debugFile.writelines(string+'\n')

    debugFile.close()

if __name__ == "__main__":

    app = QApplication(sys.argv)

    main_widget = MainWidgetUI()

    main_widget.show()

    sys.exit(app.exec_())
六.运行效果
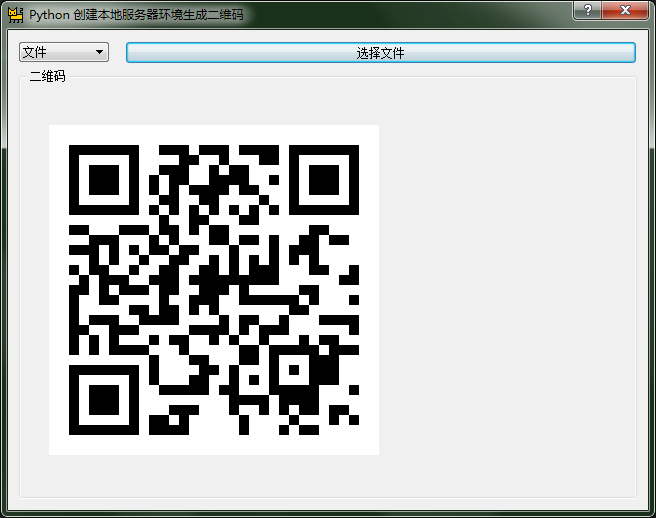

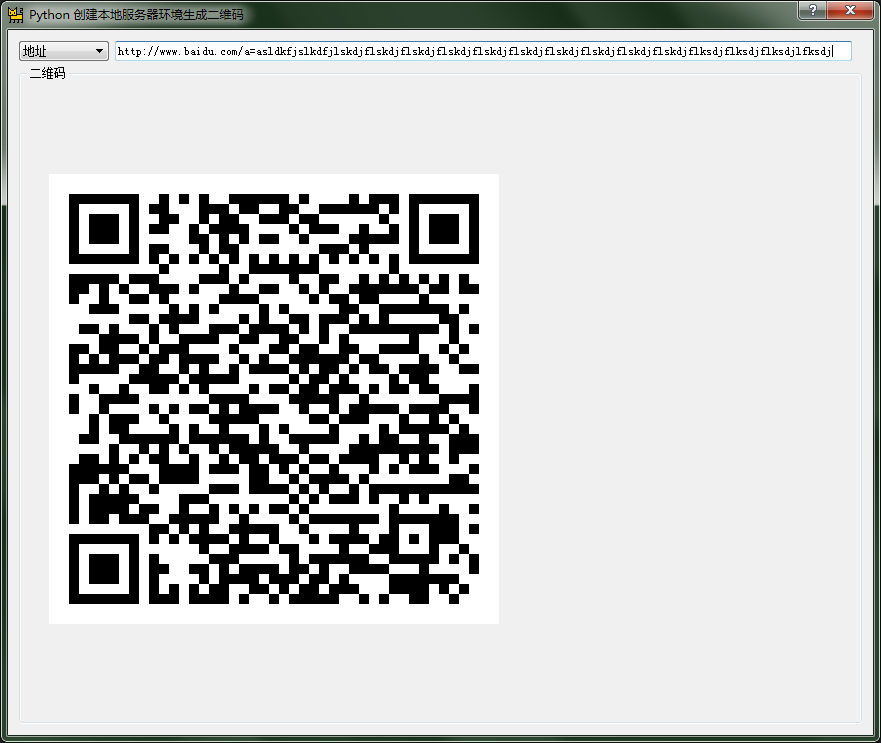
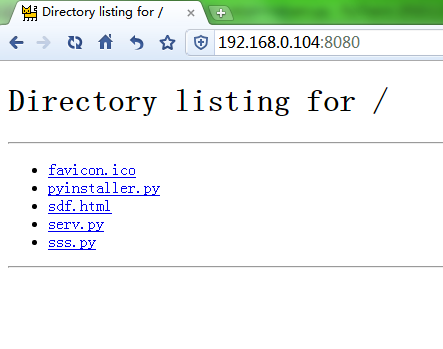
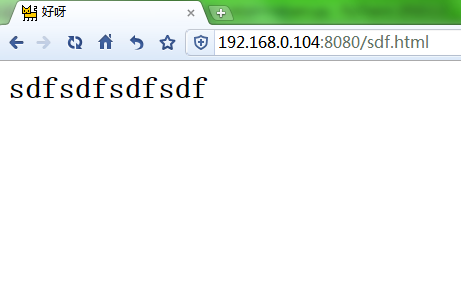
Python 创建本地服务器环境生成二维码的更多相关文章
- python学习 —— 使用QRCode包生成二维码
我使用的是python3,最简单的方法就是使用QRCode,如果没有安装QRCode package,那么可以使用下面命令进行安装: pip3 install QRCode 然后,测试一下: from ...
- java后台中处理图片辅助类汇总(上传图片到服务器,从服务器下载图片保存到本地,缩放图片,copy图片,往图片添加水印图片或者文字,生成二维码,删除图片等)
最近工作中处理小程序宝箱活动,需要java画海报,所以把这块都快百度遍了,记录一下处理的方法,百度博客上面也有不少坑! 获取本地图片路径: String bgPath = Thread.current ...
- 一次使用Python连接数据库生成二维码并安装为windows服务的工作任务
最近有一个需求,在现有生产系统上的人员库中增加一个此人员关键信息的二维码,支持文字版和跳转版两种方式,与报表工具关联,可打印.以windows服务方式,定时检查,只要发现某人员没有此二维码信息,就生成 ...
- python生成二维码
1.python-qrcode是个用来生成二维码图片的第三方模块,依赖于 PIL 模块和 qrcode 库. 首先,我们要安装三个模块,qrcode,image,PIL. pip install q ...
- C# 动态创建SQL数据库(二) 在.net core web项目中生成二维码 后台Post/Get 请求接口 方式 WebForm 页面ajax 请求后台页面 方法 实现输入框小数多 自动进位展示,编辑时实际值不变 快速掌握Gif动态图实现代码 C#处理和对接HTTP接口请求
C# 动态创建SQL数据库(二) 使用Entity Framework 创建数据库与表 前面文章有说到使用SQL语句动态创建数据库与数据表,这次直接使用Entriy Framwork 的ORM对象关 ...
- Python使用QRCode模块生成二维码
QRCode官网https://pypi.python.org/pypi/qrcode/5.1 简介python-qrcode是个用来生成二维码图片的第三方模块,依赖于 PIL 模块和 qrcode ...
- Python将文本生成二维码
#coding:utf-8 ''' Python生成二维码 v1.0 主要将文本生成二维码图片 测试一:将文本生成白底黑字的二维码图片 测试二:将文本生成带logo的二维码图片 ''' __autho ...
- 使用Python的库qrcode生成二维码
现在有很多二维码的生成工具,在线的,或者安装的软件,都可以进行生成二维码.今天我用Python的qrcode库生成二维码.需要预先安装 Image 库 安装 用pip安装 # pip install ...
- 从Scratch到Python——Python生成二维码
# Python利用pyqrcode模块生成二维码 import pyqrcode import sys number = pyqrcode.create('从Scratch到Python--Pyth ...
随机推荐
- photoshop常见抠图方法
1.多边形套索:这种工具是用于抠图的边界比较平直,但颜色比较复杂类的图像,它也是最笨最无奈的方法,只能是利用鼠标一点一点去点击抠选.2.磁性套索工具:分为三种:套索,多边形,磁性.这类工具一般只用于边 ...
- linux查看MySQL版本的四种方法
1 在终端下执行 mysql -V 2 在help中查找 mysql --help |grep Distrib 3 在mysql 里查看 select version() 4 在mysql 里查看 s ...
- 基于jQuery的Validate表单验证
表单验证可以说在前端开发工作中是无处不在的~ 有数据,有登录,有表单, 都需要前端验证~~ 而我工作中用到最多的就是基于基于jQuery的Validate表单验证~ 就向下面这样~ 因为今天有个朋 ...
- HDU 2296 Ring -----------AC自动机,其实我想说的是怎么快速打印字典序最小的路径
大冥神的代码,以后能贴的机会估计就更少了....所以本着有就贴的好习惯,= =....直接贴 #include <bits/stdc++.h> using LL = long long ; ...
- 《jQuery判断radio、checkbox、select 是否选中和设置选中问题以及获取选中值》总结
<form> <input type="radio" name="gender" id="man" value=" ...
- 使用jstack分析cpu消耗过高的问题
我们使用jdk自带的jstack来分析.当linux出现cpu被java程序消耗过高时,以下过程说不定可以帮上你的忙: 1.top查找出哪个进程消耗的cpu高 21125 co_ad2 18 ...
- iOS小Tip之查看FPS
可能大家有的时候会想要查看app在运行时的帧率能否达到60帧,如果达不到的话,你可能会想着去优化动画或者其它任何会影响显示性能的问题. 但是,你首先要观察到你的FPS,对吧? 我告诉大家一个简单的方法 ...
- python3 黑板客爬虫闯关游戏(三)
第三关,先登录,再猜密码,这关难度较第二关大幅增加,要先去注册一个登录账号,然后打开F12,多登录几次,观察headers数据的变化 给出代码,里面注释很详细 import urllib.reques ...
- js抛物线动画——加入购物车动效
参考文章:http://www.zhangxinxu.com/wordpress/2013/12/javascript-js-元素-抛物线-运动-动画/ parapola.js /*! * by zh ...
- 【Network】OVS基础知识
本文主要介绍Open VSwitch - 虚拟交换机的概述内容,阅读本文可以对OVS(Open VSwitch)有一个大致的了解.那么本文主要回答了这样几个问题: 1. 虚拟交换机是什么,干什么? 2 ...