Flask基础-配置,路由
一,配置文件
flask中的配置文件是一个flask.config.Config对象(继承字典),默认配置为:

    {

        'DEBUG':                                get_debug_flag(default=False),  是否开启Debug模式

        'TESTING':                              False,                          是否开启测试模式

        'PROPAGATE_EXCEPTIONS':                 None,

        'PRESERVE_CONTEXT_ON_EXCEPTION':        None,

        'SECRET_KEY':                           None,

        'PERMANENT_SESSION_LIFETIME':           timedelta(days=31),

        'USE_X_SENDFILE':                       False,

        'LOGGER_NAME':                          None,

        'LOGGER_HANDLER_POLICY':               'always',

        'SERVER_NAME':                          None,

        'APPLICATION_ROOT':                     None,

        'SESSION_COOKIE_NAME':                  'session',

        'SESSION_COOKIE_DOMAIN':                None,

        'SESSION_COOKIE_PATH':                  None,

        'SESSION_COOKIE_HTTPONLY':              True,

        'SESSION_COOKIE_SECURE':                False,

        'SESSION_REFRESH_EACH_REQUEST':         True,

        'MAX_CONTENT_LENGTH':                   None,

        'SEND_FILE_MAX_AGE_DEFAULT':            timedelta(hours=12),

        'TRAP_BAD_REQUEST_ERRORS':              False,

        'TRAP_HTTP_EXCEPTIONS':                 False,

        'EXPLAIN_TEMPLATE_LOADING':             False,

        'PREFERRED_URL_SCHEME':                 'http',

        'JSON_AS_ASCII':                        True,

        'JSON_SORT_KEYS':                       True,

        'JSONIFY_PRETTYPRINT_REGULAR':          True,

        'JSONIFY_MIMETYPE':                     'application/json',

        'TEMPLATES_AUTO_RELOAD':                None,

    }
方式一:

    app.config['DEBUG'] = True

    PS: 由于Config对象本质上是字典,所以还可以使用app.config.update(...)

方式二:

    app.config.from_pyfile("python文件名称")

        如:

            settings.py

                DEBUG = True

            app.config.from_pyfile("settings.py")

    app.config.from_envvar("环境变量名称")

        环境变量的值为python文件名称名称,内部调用from_pyfile方法

    app.config.from_json("json文件名称")

        JSON文件名称,必须是json格式,因为内部会执行json.loads

    app.config.from_mapping({'DEBUG':True})

        字典格式

    app.config.from_object("python类或类的路径")

        app.config.from_object('pro_flask.settings.TestingConfig')

        settings.py

            class Config(object):

                DEBUG = False

                TESTING = False

                DATABASE_URI = 'sqlite://:memory:'

            class ProductionConfig(Config):

                DATABASE_URI = 'mysql://user@localhost/foo'

            class DevelopmentConfig(Config):

                DEBUG = True

            class TestingConfig(Config):

                TESTING = True

        PS: 从sys.path中已经存在路径开始写

    PS: settings.py文件默认路径要放在程序root_path目录,如果instance_relative_config为True,则就是instance_path目录
案例1
from flask import Flask

app = Flask(__name__)

app.config.from_object("settings.DevelopmentConfig")

@app.route('/')

def hello_world():

    return 'Hello World!'

if __name__ == '__main__':

    app.run()
class Config(object):

    DEBUG = False

    TESTING = False

    DATABASE_URI = 'sqlite://:memory:'

class ProductionConfig(Config):

    DATABASE_URI = 'mysql://user@localhost/foo'

class DevelopmentConfig(Config):

    DEBUG = False

class TestingConfig(Config):

    TESTING = True
2. URL 反向解析
from flask import Flask,url_for

app = Flask(__name__)

app.config.from_object("settings.DevelopmentConfig")

# @app.route('/')

# def hello_world():

#     return 'Hello World!'

# 1. index函数路由

@app.route("/index",endpoint="n1")  #<string:xx><default:xx> <xxx>  都表示字符串

def index():

    print(id)

    return "hello"

#2. order 函数路由

@app.route("/order",endpoint="n2")

def order():

    print("order")

    return "hello"

#3. user 函数路由

@app.route("/user")

def user():

    print(url_for("n1"))  #打印结果 /index

    print(url_for("n2"))  #打印结果 /order

    #endport ,为url起别名,根据别名可以反向生成url

    return 'hello11'

if __name__ == '__main__':

    app.run()
3.路由系统
三、路由系统

@app.route('/user/<username>')

@app.route('/post/<int:post_id>')

@app.route('/post/<float:post_id>')

@app.route('/post/<path:path>')

@app.route('/login', methods=['GET', 'POST'])

常用路由系统有以上五种,所有的路由系统都是基于一下对应关系来处理:

DEFAULT_CONVERTERS = {

    'default':          UnicodeConverter,

    'string':           UnicodeConverter,

    'any':              AnyConverter,

    'path':             PathConverter,

    'int':              IntegerConverter,

    'float':            FloatConverter,

    'uuid':             UUIDConverter,

}
        def auth(func):

            def inner(*args, **kwargs):

                print('before')

                result = func(*args, **kwargs)

                print('after')

                return result

        return inner

        @app.route('/index.html',methods=['GET','POST'],endpoint='index')

        @auth

        def index():

            return 'Index'

        或

        def index():

            return "Index"

        self.add_url_rule(rule='/index.html', endpoint="index", view_func=index, methods=["GET","POST"])

        or

        app.add_url_rule(rule='/index.html', endpoint="index", view_func=index, methods=["GET","POST"])

        app.view_functions['index'] = index

        或

        def auth(func):

            def inner(*args, **kwargs):

                print('before')

                result = func(*args, **kwargs)

                print('after')

                return result

        return inner

        class IndexView(views.View):

            methods = ['GET']

            decorators = [auth, ]

            def dispatch_request(self):

                print('Index')

                return 'Index!'

        app.add_url_rule('/index', view_func=IndexView.as_view(name='index'))  # name=endpoint

        或

        class IndexView(views.MethodView):

            methods = ['GET']

            decorators = [auth, ]

            def get(self):

                return 'Index.GET'

            def post(self):

                return 'Index.POST'

        app.add_url_rule('/index', view_func=IndexView.as_view(name='index'))  # name=endpoint

        @app.route和app.add_url_rule参数:

            rule,                       URL规则

            view_func,                  视图函数名称

            defaults=None,              默认值,当URL中无参数,函数需要参数时,使用defaults={'k':'v'}为函数提供参数

            endpoint=None,              名称,用于反向生成URL,即: url_for('名称')

            methods=None,               允许的请求方式,如:["GET","POST"]

            strict_slashes=None,        对URL最后的 / 符号是否严格要求,

                                        如:

                                            @app.route('/index',strict_slashes=False),

                                                访问 http://www.xx.com/index/ 或 http://www.xx.com/index均可

                                            @app.route('/index',strict_slashes=True)

                                                仅访问 http://www.xx.com/index

            redirect_to=None,           重定向到指定地址

                                        如:

                                            @app.route('/index/<int:nid>', redirect_to='/home/<nid>')

                                            或

                                            def func(adapter, nid):

                                                return "/home/888"

                                            @app.route('/index/<int:nid>', redirect_to=func)

            subdomain=None,             子域名访问

                                                from flask import Flask, views, url_for

                                                app = Flask(import_name=__name__)

                                                app.config['SERVER_NAME'] = 'wupeiqi.com:5000'

                                                @app.route("/", subdomain="admin")

                                                def static_index():

                                                    """Flask supports static subdomains

                                                    This is available at static.your-domain.tld"""

                                                    return "static.your-domain.tld"

                                                @app.route("/dynamic", subdomain="<username>")

                                                def username_index(username):

                                                    """Dynamic subdomains are also supported

                                                    Try going to user1.your-domain.tld/dynamic"""

                                                    return username + ".your-domain.tld"

                                                if __name__ == '__main__':

                                                    app.run()
注册路由原理
4 .文件上传
@app.route("/upload",methods=["GET","POST"])

def upload():

    if request.method =="GET":

        return render_template("upload.html")

    from werkzeug.datastructures import FileStorage

    file =request.files.get("ff")

    print("file是什么:",file,"file类型:",type(file))

    print("file_name:",file.filename)

    print("file_stream:",file.stream)


  #方法一、

    file_path =os.path.join('upload',file.filename)

    print(file_path)

    with open(file_path,"wb") as f:

        file.save(f)

  #方法二、
  file.save(file_path) 直接保存文件路径.

    return "上传成功"

if __name__ == '__main__':

    app.run()
输出结果:

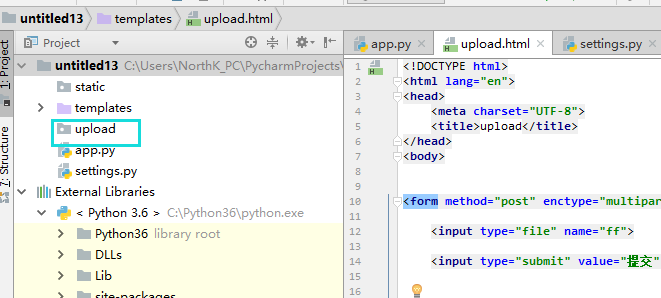
html页面
<!DOCTYPE html>

<html lang="en">

<head>

    <meta charset="UTF-8">

    <title>upload</title>

</head>

<body>

<form method="post" enctype="multipart/form-data">

    <input type="file" name="ff">

    <input type="submit" value="提交">

</form>

</body>

</html>
5、 请求和相应.
复制代码

   from flask import Flask

    from flask import request

    from flask import render_template

    from flask import redirect

    from flask import make_response

    app = Flask(__name__)

    @app.route('/login.html', methods=['GET', "POST"])

    def login():

        # 请求相关信息

        # request.method

        # request.args

        # request.form

        # request.values

        # request.cookies

        # request.headers

        # request.path

        # request.full_path

        # request.script_root

        # request.url

        # request.base_url

        # request.url_root

        # request.host_url

        # request.host

        # request.files

        # obj = request.files['the_file_name']

        # obj.save('/var/www/uploads/' + secure_filename(f.filename))

        # 响应相关信息

        # return "字符串"

        # return render_template('html模板路径',**{})

        # return redirect('/index.html')

        # response = make_response(render_template('index.html'))

        # response是flask.wrappers.Response类型

        # response.delete_cookie('key')

        # response.set_cookie('key', 'value')

        # response.headers['X-Something'] = 'A value'

        # return response

        return "内容"

    if __name__ == '__main__':

        app.run()
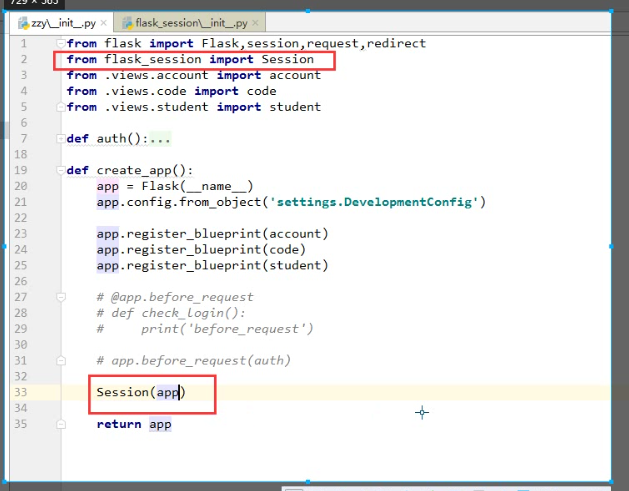
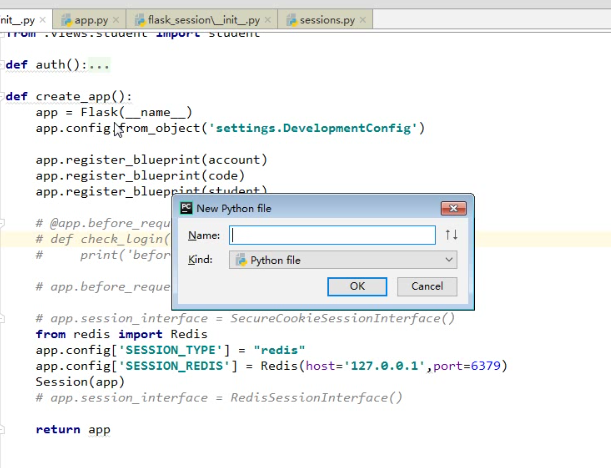
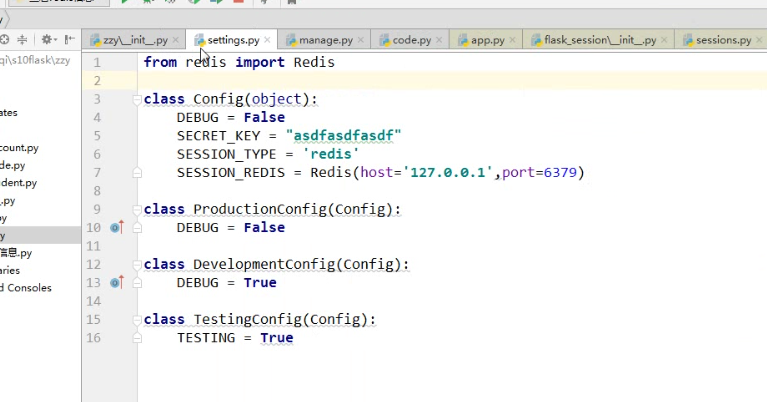
6. flask-session
Flask基础-配置,路由的更多相关文章
- Flask基础(05)-->路由的基本定义
# 导入Flask from flask import Flask # 创建Flask的应用程序 app = Flask(__name__) # http://127.0.0.1:5000/123或者 ...
- Flask(2)- 装饰器的坑及解决办法、flask中的路由/实例化配置/对象配置/蓝图/特殊装饰器(中间件、重定义错误页面)
一.装饰器的坑以及解决方法 1.使用装饰器装饰两个视图函数,代码如下 from flask import Flask, redirect, render_template, request, sess ...
- flask框架--设置配置文件的几种方式 与Flask两种配置路由的方式
设置配置文件的几种方式 ==========方式一:============ app.config['SESSION_COOKIE_NAME'] = 'session_lvning' #这种方式要把所 ...
- koa 基础(二)配置路由
1.配置路由 app.js // 引入模块 const Koa = require('koa'); const Router = require('koa-router'); // 实例化 let a ...
- Cisco基础(二):三层交换vlan间通信、多交换机vlan间通信、三层交换配置路由、RIP动态路由配置、三层交换配置RIP动态路由
一.三层交换vlan间通信 目标: VLAN实现了广播域的隔离,同时也将VLAN间的通信隔离了.三层交换技术使得VLAN间可以通信. 通过三层交换实现VLAN间通信 方案: 为了解决了传统路由器低速. ...
- flask基础之app初始化(四)
前言 flask的核心对象是Flask,它定义了flask框架对于http请求的整个处理逻辑.随着服务器被启动,app被创建并初始化,那么具体的过程是这样的呢? 系列文章 flask基础之安装和使用入 ...
- Flask 基础知识一
Flask是一个基于Python开发并且依赖jinja2模板和Werkzeug WSGI服务的一个微型框架,对于Werkzeug本质是Socket服务端,其用于接收http请求并对请求进行预处理,然后 ...
- 笔记-flask基础操作
笔记-flask基础操作 1. 前言 本文为flask基础学习及操作笔记,主要内容为flask基础操作及相关代码. 2. 开发环境配置 2.1. 编译环境准备 安装相关Lib ...
- Flask基础(16)-->WTForms表单创建和简单验证
Flask基础(16)-->WTForms表单创建和简单验证 前言:使用Flask_WTF需要配置参数SECRET_KEYCSRF_ENABLED是为了CSRF(跨站请求伪造)保护.SECRET ...
随机推荐
- php单点登陆简单实现 (iframe方式)
有四个网站分别为: www.a.com www.b.com www.c.com www.sso.com 需求是如果我们在sso登陆后,其他网站也会显示登陆中,不需要重复登陆,退出时,其他网站也会失效. ...
- centos6.6 下 安装 nginx
1.安装nginx需要pcre的依赖,请安装好pcre.假设安装目录如下: /usr/local/pcre-8.38 源码目录如下: /usr/src/pcre-8.38 2.下载nginx安装压缩包 ...
- struts2框架之OGNL表达式概述(在代码中使用OGNL表达式)
1. OGNL是Object Graphic Navigation Language(对象图导航语言)的缩写 * 所谓对象图,即以任意一个对象为根,通过OGNL可以访问与这个对象关联的其它对象 * 通 ...
- js-移动端android浏览器中input框被软键盘遮住的问题解决方案
我遇到的问题:在一个页面里有一个弹出层之前我给我的最外层加了固定定位 用了下面的方法也不好使:没有办法我将之改为绝对定位层级变高在加上一个顶部标签通过js计算顶部高度来实现满屏遮挡: <sect ...
- maven 发布打包部署 命令
一.配置好jdk 二.下载安装maven http://maven.apache.org/download.cgi 三.添加环境变量 1. 添加 M2_HOME 和 MAVEN_HOME 环境变量到 ...
- Linux screen命令
一.简介 GNU Screen是一款由GNU计划开发的用于命令行终端切换的自由软件.用户可以通过该软件同时连接多个本地或远程的命令行会话,并在其间自由切换. GNU Screen可以看作是窗口管理器的 ...
- axios 设置拦截器 全局设置带默认参数(发送 token 等)
应用场景: 1,每个请求都带上的参数,比如token,时间戳等. 2,对返回的状态进行判断,比如token是否过期 代码如下: [javascript] view plain copy axios.i ...
- struts2值栈ValueStack中都有哪些东西?
com.opensymphony.xwork2.dispatcher.HttpServletRequest application com.opensymphony.xwork2.dispatcher ...
- ubuntu16下Elasticsearch5.1.1安装部署
本人在安装es5.1.1版本时候整理的一些过程,参照了网上部分过程:其中过程中也出现一些其它问题,出现的问题和解决方案都整理在此文中. 1Elasticsearch5.1.1安装 到ES官网https ...
- 【Mac】使用PicGIF制作gif动态图片
动态图片是我们常常需要的,mac系统下制作gif图片,可以使用PicGIF,AppStore中有一个简单版本免费的 环境与工具 1.mac系统 2.PicGIF Lite(可以在AppStore下载) ...