【转】使用nginx搭建高可用,高并发的wcf集群
原文:http://www.cnblogs.com/huangxincheng/p/7707830.html
很多情况下基于wcf的复杂均衡都首选zookeeper,这样可以拥有更好的控制粒度,但zk对C# 不大友好,实现起来相对来说比较麻烦,实际情况下,如果
你的负载机制粒度很粗糙的话,优先使用nginx就可以搞定,既可以实现复杂均衡,又可以实现双机热备,以最小的代码量实现我们的业务,下面具体分享下。
一:准备的材料
1. 话不多说,一图胜千言,图中的服务器都是采用vmware虚拟化,如下图:
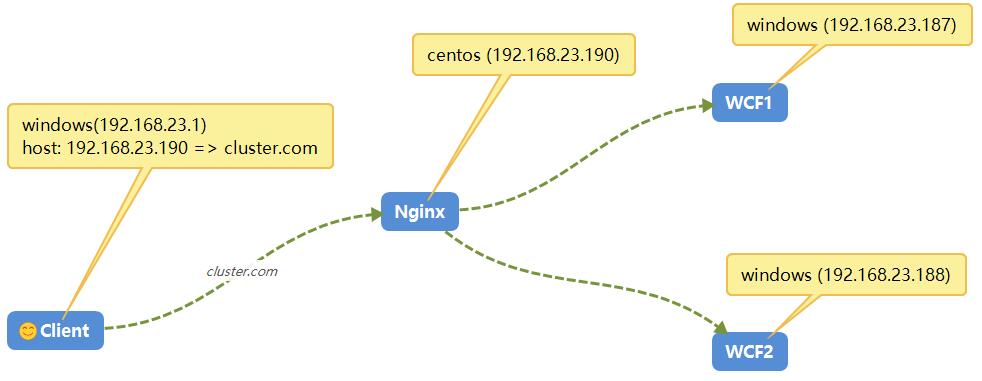
《1》 三台windows机器 ,两个WCF的windows服务器承载(192.168.23.187,192.168.23.188),一台Client的服务器(192.168.23.1)
《2》 一台Centos机器,用来承载web复杂均衡nginx(192.168.23.190)。
《3》在所有的Client的Hosts文件中增加host映射:【192.168.23.190 cluster.com】,方便通过域名的形式访问nginx所在服务器的ip地址。
二:环境搭建
1. WCF程序
既然是测试,肯定就是简单的程序,代码就不完全给出了。
《1》 HomeService实现类代码如下(输出当前server的ip地址,方便查看):

 1     public class HomeService : IHomeService

 2     {

 3         public string DoWork(string msg)

 4         {

 5             var ip = Dns.GetHostAddresses(Dns.GetHostName()).FirstOrDefault(i => i.AddressFamily ==

 6                                                                AddressFamily.InterNetwork).ToString();

 7

 8             return string.Format("当前 request 由 server={0} 返回", ip);

 9         }

10     }
《2》 App.Config代码
 1 <?xml version="1.0" encoding="utf-8" ?>

 2 <configuration>

 3   <startup>

 4     <supportedRuntime version="v4.0" sku=".NETFramework,Version=v4.5.2" />

 5   </startup>

 6   <system.serviceModel>

 7     <behaviors>

 8       <serviceBehaviors>

 9         <behavior name="">

10           <serviceMetadata httpGetEnabled="true" httpsGetEnabled="true" />

11           <serviceDebug includeExceptionDetailInFaults="false" />

12         </behavior>

13       </serviceBehaviors>

14     </behaviors>

15     <services>

16       <service name="WcfService.HomeService">

17         <endpoint address="/HomeService" binding="basicHttpBinding" contract="WcfService.IHomeService">

18           <identity>

19             <dns value="localhost" />

20           </identity>

21         </endpoint>

22         <endpoint address="mex" binding="mexHttpBinding" contract="IMetadataExchange" />

23         <host>

24           <baseAddresses>

25             <add baseAddress="http://192.168.23.187:8733" />

26           </baseAddresses>

27         </host>

28       </service>

29     </services>

30   </system.serviceModel>

31 </configuration>
因为windows的两台机器的ip地址是192.168.23.187,192.168.23.188,所以部署的时候注意一下config中的baseAddress地址。
2. centos上的nginx搭建
nginx我想大家用的还是比较多的,去官网下载最新的就好【nginx-1.13.6】:http://nginx.org/en/download.html,下载之后,就是常规的三板斧安装!!!
[root@localhost nginx-1.13.6]# ./configure --prefix=/usr/myapp/nginx

[root@localhost nginx-1.13.6]# make && make install
然后在nginx的安装目录下面找到conf文件,修改里面的nginx.conf 配置。
[root@localhost nginx]# cd conf

[root@localhost conf]# ls

fastcgi.conf            koi-utf             nginx.conf           uwsgi_params

fastcgi.conf.default    koi-win             nginx.conf.default   uwsgi_params.default

fastcgi_params          mime.types          scgi_params          win-utf

fastcgi_params.default  mime.types.default  scgi_params.default

[root@localhost conf]# vim nginx.conf
详细配置如下,注意下面“标红”的地方,权重按照1:5的方式进行调用,关于其他的配置,大家可以在网上搜一下就可以了。
#user  nobody;

worker_processes  1;

#error_log  logs/error.log;

#error_log  logs/error.log  notice;

#error_log  logs/error.log  info;

#pid        logs/nginx.pid;

events {

    worker_connections  1024;

}

http {

    include       mime.types;

    default_type  application/octet-stream;

    #log_format  main  '$remote_addr - $remote_user [$time_local] "$request" '

    #                  '$status $body_bytes_sent "$http_referer" '

    #                  '"$http_user_agent" "$http_x_forwarded_for"';

    #access_log  logs/access.log  main;

    sendfile        on;

    #tcp_nopush     on;

    #keepalive_timeout  0;

    keepalive_timeout  65;

    #gzip  on;

    upstream  cluster.com{

                 server 192.168.23.187:8733 weight=1;

                 server 192.168.23.188:8733 weight=5;

                 }

    server {

        listen       80;

        server_name  localhost;

        #charset koi8-r;

        #access_log  logs/host.access.log  main;

        location / {

            root   html;

            index  index.html index.htm;

            proxy_pass http://cluster.com;

            #设置主机头和客户端真实地址,以便服务器获取客户端真实IP

            proxy_set_header X-Forwarded-Host $host;

            proxy_set_header X-Forwarded-Server $host;

            proxy_set_header X-Forwarded-For $proxy_add_x_forwarded_for;

            proxy_set_header  X-Real-IP  $remote_addr;

        }

        #error_page  404              /404.html;

        # redirect server error pages to the static page /50x.html

        #

        error_page   500 502 503 504  /50x.html;

        location = /50x.html {

            root   html;

        }

        # proxy the PHP scripts to Apache listening on 127.0.0.1:80

        #

        #location ~ \.php$ {

        #    proxy_pass   http://127.0.0.1;

        #}

        # pass the PHP scripts to FastCGI server listening on 127.0.0.1:9000

        #

        #location ~ \.php$ {

        #    root           html;

        #    fastcgi_pass   127.0.0.1:9000;

        #    fastcgi_index  index.php;

        #    fastcgi_param  SCRIPT_FILENAME  /scripts$fastcgi_script_name;

        #    include        fastcgi_params;

        #}

        # deny access to .htaccess files, if Apache's document root

        # concurs with nginx's one

        #

        #location ~ /\.ht {

        #    deny  all;

        #}

    }

    # another virtual host using mix of IP-, name-, and port-based configuration

    #

    #server {

    #    listen       8000;

    #    listen       somename:8080;

    #    server_name  somename  alias  another.alias;

    #    location / {

    #        root   html;

    #        index  index.html index.htm;

    #    }

    #}

    # HTTPS server

    #

    #server {

    #    listen       443 ssl;

    #    server_name  localhost;

    #    ssl_certificate      cert.pem;

    #    ssl_certificate_key  cert.key;

    #    ssl_session_cache    shared:SSL:1m;

    #    ssl_session_timeout  5m;

    #    ssl_ciphers  HIGH:!aNULL:!MD5;

    #    ssl_prefer_server_ciphers  on;

    #    location / {

    #        root   html;

    #        index  index.html index.htm;

    #    }

    #}

}
3. client端的程序搭建
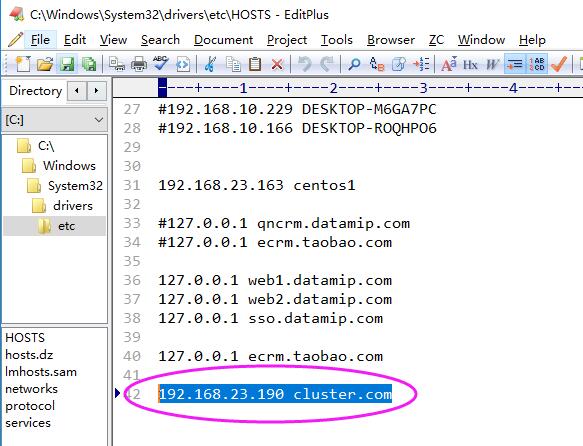
《1》 第一件事就是将 192.168.23.190 映射到本机的host中去,因为服务不提供给第三方使用,所以加host还是很轻松的。
192.168.23.190 cluster.com
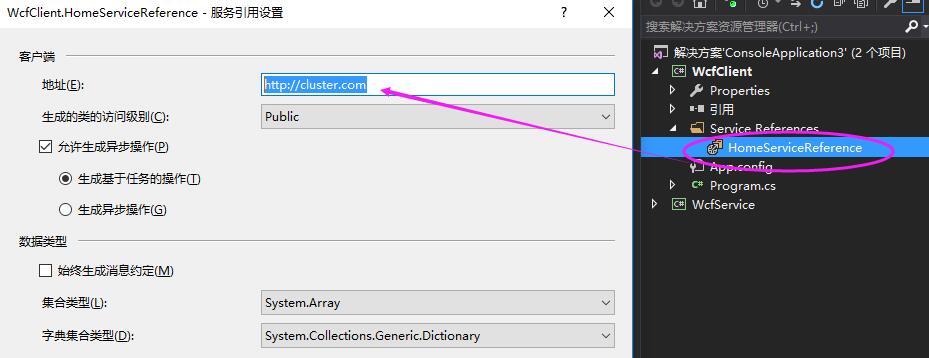
《2》 然后就是client端程序添加服务引用,因为添加了host映射,所以服务引用地址就是"http://cluster.com"。 代码如下:
 1     class Program

 2     {

 3         static void Main(string[] args)

 4         {

 5             for (int i = 0; i < 1000; i++)

 6             {

 7                 HomeServiceClient client = new HomeServiceClient();

 8

 9                 var info = client.DoWork("hello world!");

10

11                 Console.WriteLine(info);

12

13                 System.Threading.Thread.Sleep(1000);

14             }

15

16             Console.Read();

17         }

18     }
最后来执行以下程序,看看1000次循环中,是不是按照权重1:5 的方式对后端的wcf进行调用的???
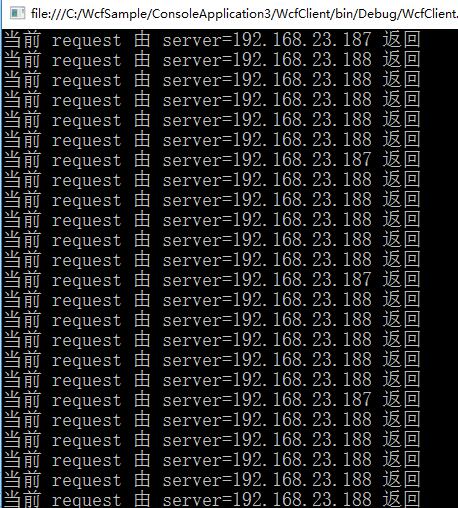
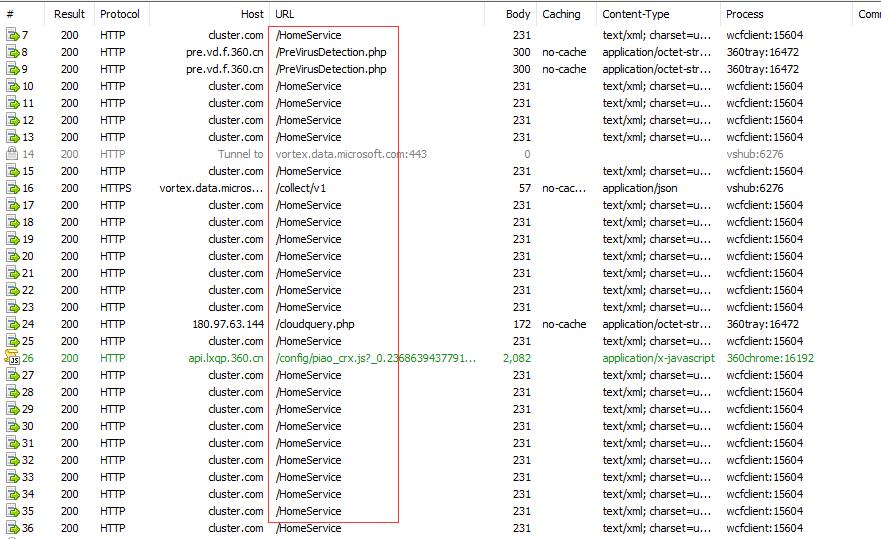
看到没有,是不是很牛逼,我只需要通过cluster.com进行服务访问,nginx会自动给我复杂均衡,这就是我们开发中非常简单化的wcf复杂均衡。
希望本篇对你有帮助~~~~ 附完整源代码:cluster.zip
【转】使用nginx搭建高可用,高并发的wcf集群的更多相关文章
- 高可用,多路冗余GFS2集群文件系统搭建详解
高可用,多路冗余GFS2集群文件系统搭建详解 2014.06 标签:GFS2 multipath 集群文件系统 cmirror 实验拓扑图: 实验原理: 实验目的:通过RHCS集群套件搭建GFS2集群 ...
- 高性能Linux服务器 第11章 构建高可用的LVS负载均衡集群
高性能Linux服务器 第11章 构建高可用的LVS负载均衡集群 libnet软件包<-依赖-heartbeat(包含ldirectord插件(需要perl-MailTools的rpm包)) l ...
- 使用nginx搭建高可用,高并发的wcf集群
很多情况下基于wcf的复杂均衡都首选zookeeper,这样可以拥有更好的控制粒度,但zk对C# 不大友好,实现起来相对来说比较麻烦,实际情况下,如果 你的负载机制粒度很粗糙的话,优先使用nginx就 ...
- 使用Nginx+Keepalived组建高可用负载平衡Web server集群
一,首先说明一下网络拓扑结构: 1,Nginx 反向代理Server(HA): ①Nginx master:192.168.1.157 ②Nginx backup:192.168.1. ...
- 高可用Hadoop平台-HBase集群搭建
1.概述 今天补充一篇HBase集群的搭建,这个是高可用系列遗漏的一篇博客,今天抽时间补上,今天给大家介绍的主要内容目录如下所示: 基础软件的准备 HBase介绍 HBase集群搭建 单点问题验证 截 ...
- 使用kubeadm搭建高可用k8s v1.16.3集群
目录 1.部署环境说明 2.集群架构及部署准备工作 2.1.集群架构说明 2.2.修改hosts及hostname 2.3.其他准备 3.部署keepalived 3.1.安装 3.2.配置 3.3. ...
- LVS + Keepalived 实现高可用、负载均衡 Web 集群
简介: LVS 是 Linux Virtual Server 的简写,Linux 虚拟服务器的意思,是一个虚拟的服务器集群系统,此项目由章文嵩博士于 1998 年 5 月成立,是中国最早出现的自由软件 ...
- Centos7使用kubeadm 安装多主高可用kubernets:v.1.11集群
实验环境介绍: 本次实验环境是5个节点 3台master 2台node节点: k8smaster01 192.168.111.128 软件:etcd k8smaster haproxy keepali ...
- 华为云:实现高可用的负载均衡web集群
华为云: 2台云主机做负载均衡调度 >>申请一个虚拟浮动ip,并绑定一个弹性公网ip >>将两台云主机绑定到虚拟浮动ip上 3台web服务器 1台云服务器做jumpserver ...
随机推荐
- JS DOM节点增删改查 属性设置
一.节点操作 增 createElement(name)创建元素 appendChild();将元素添加 删 获得要删除的元素 获得它的父元素 使用removeChild()方法删除 改 第一种方 ...
- Java中的Number和Math类简单介绍
Java Number类 一般地,当需要使用数字的时候,我们通常使用内置数据类型,如:byte.int.long.double 等. 实例: int a = 5000; float b = 13.65 ...
- ubuntu16.04安装五笔输入法
在 Ubuntu16.04 中为fctix小企鹅增加五笔输入法 转载:https://jingyan.baidu.com/article/454316ab67d702f7a7c03a1a.html U ...
- npm私有仓库搭建
背景 Node.js开发本地项目,有时不同项目之间存在依赖,如果不想把项目发布到npm社区的仓库,则需要有自己本地的仓库. 有些公司采用的是内网开发,很多npm资源无法从内网去下载. sinopia( ...
- 如何在ScrollView滑动的瞬间禁用拖拽手势
如何在ScrollView滑动的瞬间禁用拖拽手势 效果: 在UIScrollView滑动的瞬间禁用pan手势,可以防止用户按着屏幕不放后导致出现的一些莫须有的bug. // // ViewContro ...
- firewalld防火墙简单理解总结(一)
参考文章:https://linux.cn/article-8098-1.html https://linux.cn/article-9073-1.html #多区域使用示例,重点参考 前言 防火 ...
- 转贴:C语言链表基本操作
http://www.oschina.net/code/snippet_252667_27314#comments 这个代码有很多错误,估计是从老谭书上抄来但是很多还抄错了:对照老谭的书好好研究下.切 ...
- QT导入libcurl支持HTTPS
对于我这种不会编译的人来说,必须找到已经编译好的DLL文件,以及头文件才能使用. 幸运的在这个网站https://stackoverflow.com/questions/28137379/libcur ...
- Scala学习——Scala By Example——to be continued
这一篇是来自官网的Scala By Example 即Tutorial后更详细地对Scala怎么用给了示例 该文一开始给了一个快速排序的示例 版本一: def sort(xs: Array[Int]) ...
- Java虚拟机19:再谈四种引用状态
JVM的四种引用状态 在Java虚拟机5:Java垃圾回收(GC)机制详解一文中,有简单提到过JVM的四种引用状态,当时只是简单学习,知道有这么一个概念,对四种引用状态理解不深.这两天重看虚拟机这部分 ...