springboot学习笔记-3 整合redis&mongodb
一.整合redis
1.1 建立实体类
@Entity

@Table(name="user")

public class User implements Serializable {

    @Id

    @GeneratedValue(strategy=GenerationType.AUTO)

    private Long id;

    private String name;

    @DateTimeFormat(pattern="yyyy-MM-dd HH:mm:ss")

    private Date createDate;

    @JsonBackReference        //防止json的重复引用问题

    private Department department;

    private Set<Role> roles;

    public Long getId() {

        return id;

    }

    public void setId(Long id) {

        this.id = id;

    }

    public String getName() {

        return name;

    }

    public void setName(String name) {

        this.name = name;

    }

    public Date getCreateDate() {

        return createDate;

    }

    public void setCreateDate(Date createDate) {

        this.createDate = createDate;

    }

    public Department getDepartment() {

        return department;

    }

    public void setDepartment(Department department) {

        this.department = department;

    }

    public Set<Role> getRoles() {

        return roles;

    }

    public void setRoles(Set<Role> roles) {

        this.roles = roles;

    }

    @Override

    public String toString() {

        return "User [id=" + id + ", name=" + name + ", createDate=" + createDate + ", department=" + department

                + ", roles=" + roles + "]";

    }

}
1.2 建立Redis的配置类
首先导入pom.xml相应的依赖
<dependency>

            <groupId>org.springframework.boot</groupId>

            <artifactId>spring-boot-starter-redis</artifactId>

</dependency>
在springboot中,没有去提供直接操作Redis的Repository,但是我们可以使用RedisTemplate去访问Redis.想要去使用RedisTemplate,首先需要完成一些必要的配置.这里使用配置类去完成.
在application.properties中建立Redis的相关配置:
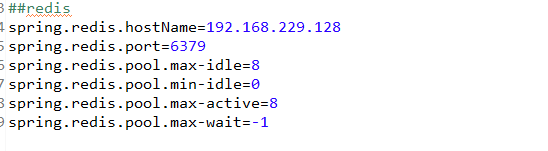
建立配置类,配置RedisTemplate,而要使用RedisTemplate还需要配置RedisConnectionFactory:
@ConfigurationProperties("application.properties")

@Configuration

public class RedisConfig {

    @Value("${spring.redis.hostName}")

    private String hostName;

    @Value("${spring.redis.port}")

    private Integer port;

    @Bean

    public RedisConnectionFactory redisConnectionFactory() {

        JedisConnectionFactory cf = new JedisConnectionFactory();

        cf.setHostName(hostName);

        cf.setPort(port);

        cf.afterPropertiesSet();

        return cf;

    }

    @Bean

    public RedisTemplate<String, String> redisTemplate(RedisConnectionFactory factory) {

        StringRedisTemplate template=new StringRedisTemplate(factory);

        Jackson2JsonRedisSerializer jackson2JsonRedisSerializer=new Jackson2JsonRedisSerializer(Object.class);

        ObjectMapper om=new ObjectMapper();

        om.setVisibility(PropertyAccessor.ALL,JsonAutoDetect.Visibility.ANY);

        om.enableDefaultTyping(ObjectMapper.DefaultTyping.NON_FINAL);

        jackson2JsonRedisSerializer.setObjectMapper(om);

        template.setValueSerializer(jackson2JsonRedisSerializer);

        template.afterPropertiesSet();

        return template;

    }

}
1.3 建立UserRedis类,它实现了与Redis的交互
注意,在UserRedis中,使用了Redis的数据结构中最常用的key-value都是字符串的形式,采用Gson将对象转化为字符串然后存放到redis中.
@Repository

public class UserRedis {

    @Autowired

    private RedisTemplate<String, String> redisTemplate;

    public void add(String key,User user) {

        Gson gson=new Gson();

        redisTemplate.opsForValue().set(key,gson.toJson(user));

    }

    public void add(String key,List<User> users) {

        Gson gson=new Gson();

        redisTemplate.opsForValue().set(key,gson.toJson(users));

    }

    public User get(String key ) {

        Gson gson=new Gson();

        User user=null;

        String userStr=redisTemplate.opsForValue().get(key);

        if(!StringUtils.isEmpty(userStr))

            user=gson.fromJson(userStr, User.class);

        return user;

    }

    public List<User> getList(String key) {

        Gson gson=new Gson();

        List<User> users=null;

        String listJson=redisTemplate.opsForValue().get(key);

        if(!StringUtils.isEmpty(listJson)) {

            users=gson.fromJson(listJson,new TypeToken<List<User>>(){}.getType());

        }

        return users;

    }

    public void delete(String key) {

        redisTemplate.opsForValue().getOperations().delete(key);

    }

}
1.4 建立UserController类
它自动注入了UserRedis类,通过不同的url实现了向redis存储数据,获取数据的功能.
@Controller

public class UserController {

    @Autowired

    UserRedis userRedis;

    @RequestMapping("/user/testRedisSave")

    public String testRedis() {

        Department department=new Department();

        department.setName("开发部");

        Role role=new Role();

        role.setName("admin");

        User user=new User();

        user.setName("hlhdidi");

        user.setCreateDate(new Date());

        user.setDepartment(department);

        Set<Role> roles=new HashSet<>();

        roles.add(role);

        user.setRoles(roles);

        userRedis.delete(this.getClass().getName()+":username:"+user.getName());

        userRedis.add(this.getClass().getName()+":username:"+user.getName(), user);

        return null;

    }

    @RequestMapping("/user/testRedisGet")

    public String testRedis2() {

        User user=userRedis.get(this.getClass().getName()+":username:hlhdidi");

        System.out.println(user);

        return null;

    }

}
先访问localhost:8080/user/testRedisSave,再访问localhost:8080/user/testRedisGet,即可测试成功!
二.整合MongoDB
MongoDB是一种文档类型的NoSql数据库.它内部有三个层次的概念,分别为数据库,集合,文档.使用springboot可以非常方便的整合MongoDB
2.1 建立mongo.properties配置文件
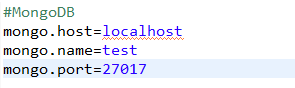
导入依赖:
<dependency>

            <groupId>org.pegdown</groupId>

            <artifactId>pegdown</artifactId>

            <version>1.4.1</version>

        </dependency>

        <dependency>

            <groupId>org.springframework.boot</groupId>

            <artifactId>spring-boot-starter-hateoas</artifactId>

        </dependency>

        <dependency>

            <groupId>org.springframework.data</groupId>

            <artifactId>spring-data-mongodb</artifactId>

        </dependency>

        <dependency>

            <groupId>com.fasterxml.jackson.core</groupId>

            <artifactId>jackson-annotations</artifactId>

        </dependency>
2.2 建立MongoConfig配置类,完成对于MongoDB的配置
@Configuration

@EnableMongoRepositories(basePackages={"com.hlhdidi.springboot.mongo"})//MongoRepository的扫描包

@PropertySource("classpath:mongo.properties")//注入配置文件属性

public class MongoConfig extends AbstractMongoConfiguration{

    @Autowired

    private Environment env;

    @Override

    protected String getDatabaseName() {

        return env.getRequiredProperty("mongo.name");

    }

    @Override

    @Bean

    public Mongo mongo() throws Exception {

        ServerAddress serverAddress=new ServerAddress(env.getRequiredProperty("mongo.host"));

        List<MongoCredential> credentials=new ArrayList<>();

        return new MongoClient(serverAddress, credentials);

    }

}
2.3 建立SysUser实体类.
该实体类需要被存储到MongoDB数据库中.
@Document(collection="user")//配置collection的名称,如果没有将会自动建立对应的Collection

public class SysUser {

    @Id

    private String userId;

    @NotNull @Indexed(unique=true)

    private String username;

    @NotNull

    private String password;

    @NotNull

    private String name;

    @NotNull

    private String email;

    @NotNull

    private Date registrationDate=new Date();

    private Set<String> roles=new HashSet<>();

    public SysUser(){}

    @PersistenceConstructor

    public SysUser(String userId, String username, String password, String name, String email, Date registrationDate,

            Set<String> roles) {

        super();

        this.userId = userId;

        this.username = username;

        this.password = password;

        this.name = name;

        this.email = email;

        this.registrationDate = registrationDate;

        this.roles = roles;

    }

    public String getUserId() {

        return userId;

    }

    public void setUserId(String userId) {

        this.userId = userId;

    }

    public String getUsername() {

        return username;

    }

    public void setUsername(String username) {

        this.username = username;

    }

    public String getPassword() {

        return password;

    }

    public void setPassword(String password) {

        this.password = password;

    }

    public String getName() {

        return name;

    }

    public void setName(String name) {

        this.name = name;

    }

    public String getEmail() {

        return email;

    }

    public void setEmail(String email) {

        this.email = email;

    }

    public Date getRegistrationDate() {

        return registrationDate;

    }

    public void setRegistrationDate(Date registrationDate) {

        this.registrationDate = registrationDate;

    }

    public Set<String> getRoles() {

        return roles;

    }

    public void setRoles(Set<String> roles) {

        this.roles = roles;

    }

    @Override

    public String toString() {

        return "SysUser [userId=" + userId + ", username=" + username + ", password=" + password + ", name=" + name

                + ", email=" + email + ", registrationDate=" + registrationDate + ", roles=" + roles + "]";

    }

}
2.4 建立SysUserRepository
由于springboot已经帮我们提供了操作MongoDB数据库的API,因此直接继承对应的类即可(和JPA一致)
@Repository

public interface SysUserRepository extends MongoRepository<SysUser, String>{

}
2.5 测试
测试类先向MongoDB中存储了一个实体类对象,随后获取指定对象的指定Collections下面的所有文档
@RunWith(SpringJUnit4ClassRunner.class)

@ContextConfiguration(classes={MongoConfig.class})

@FixMethodOrder

public class MongoTest {

    @Autowired

    SysUserRepository repository;

    @Before

    public void setup() {

        Set<String> roles=new HashSet<>();

        roles.add("manage");

        SysUser sysUser=new SysUser("1", "hlhdidi", "123", "xiaohulong", "email@com.cn", new Date(), roles);

        repository.save(sysUser);

    }

    @Test

    public void findAll() {

        List<SysUser> users=repository.findAll();

        for(SysUser user:users) {

            System.out.println(user);

        }

    }

}
springboot学习笔记-3 整合redis&mongodb的更多相关文章
- SpringBoot学习- 5、整合Redis
SpringBoot学习足迹 SpringBoot项目中访问Redis主要有两种方式:JedisPool和RedisTemplate,本文使用JedisPool 1.pom.xml添加dependen ...
- springboot学习笔记-4 整合Druid数据源和使用@Cache简化redis配置
一.整合Druid数据源 Druid是一个关系型数据库连接池,是阿里巴巴的一个开源项目,Druid在监控,可扩展性,稳定性和性能方面具有比较明显的优势.通过Druid提供的监控功能,可以实时观察数据库 ...
- Spring Boot 学习笔记(六) 整合 RESTful 参数传递
Spring Boot 学习笔记 源码地址 Spring Boot 学习笔记(一) hello world Spring Boot 学习笔记(二) 整合 log4j2 Spring Boot 学习笔记 ...
- SpringBoot学习笔记(10):使用MongoDB来访问数据
SpringBoot学习笔记(10):使用MongoDB来访问数据 快速开始 本指南将引导您完成使用Spring Data MongoDB构建应用程序的过程,该应用程序将数据存储在MongoDB(基于 ...
- SpringBoot学习笔记:Redis缓存
SpringBoot学习笔记:Redis缓存 关于Redis Redis是一个使用ANSI C语言编写的免费开源.支持网络.可基于内存亦可以持久化的日志型.键值数据库.其支持多种存储类型,包括Stri ...
- SpringBoot学习笔记
SpringBoot个人感觉比SpringMVC还要好用的一个框架,很多注解配置可以非常灵活的在代码中运用起来: springBoot学习笔记: .一.aop: 新建一个类HttpAspect,类上添 ...
- Springboot学习笔记(六)-配置化注入
前言 前面写过一个Springboot学习笔记(一)-线程池的简化及使用,发现有个缺陷,打个比方,我这个线程池写在一个公用服务中,各项参数都定死了,现在有两个服务要调用它,一个服务的线程数通常很多,而 ...
- SpringBoot学习笔记(14):使用SpringBootAdmin管理监控你的应用
SpringBoot学习笔记(14):使用SpringBootAdmin管理监控你的应用 Spring Boot Admin是一个管理和监控Spring Boot应用程序的应用程序.本文参考文档: 官 ...
- SpringMVC:学习笔记(10)——整合Ckeditor且实现图片上传
SpringMVC:学习笔记(10)——整合Ckeditor且实现图片上传 配置CKEDITOR 精简文件 解压之后可以看到ckeditor/lang下面有很多语言的js,如果不需要那么多种语言的,可 ...
随机推荐
- virtualenvwrapper安装和常用指令(mac)
安装: .安装(要有python环境+pip): * sudo pip install virtualenvwrapper .配置: 执行:vi ~/.bash_profile 在~/.bash_pr ...
- Ansible详解(一)基础安装和配置
ansible 是一款轻量级自动化运维工具,由的 Python 语言开发,结合了多种自动化运维工具的特性,实现了批量系统配置,批量程序部署,批量命令执行等功能; ansible 是基于模块化实现批量操 ...
- canvas高效绘制10万图形,你必须知道的高效绘制技巧
最近的一个客户项目中,简化的需求是绘制按照行列绘制很多个圆圈.需求看起来不难,上手就可以做,写两个for循环. 原始绘制方法 首先定义了很多Circle对象,在遍历循环中调用该对象的draw方法.代码 ...
- 廖雪峰git教程学习笔记3
commit是一串不便记忆的数字,为了方便记忆,引入tag,tag就跟HEAD一样,就像一个指针,指向commit,且指向是不能变得,一个commit就有一个tag 给当前分支下的当前commit打上 ...
- 廖雪峰git教程学习笔记
对git来说,没有消息就是最好的消息 使用 git init 把当前目录变为git仓库 要在仓库里加入文件,先在仓库目录新建这个文件后,比如新建一个文件xiaobai.txt,内容为: 在命令行里输入 ...
- Spark聚合操作:combineByKey()
Spark中对键值对RDD(pairRDD)基于键的聚合函数中,都是通过combineByKey()实现的. 它可以让用户返回与输入数据类型不同的返回值(可以自己配置返回的参数,返回的类型) 首先理解 ...
- php从入门到放弃系列-01.php环境的搭建
php从入门到放弃系列-01.php环境的搭建 一.为什么要学习php 1.php语言适用于中小型网站的快速开发: 2.并且有非常成熟的开源框架,例如yii,thinkphp等: 3.几乎全部的CMS ...
- java 实现验证码功能
所需文件以及技术: · SecurityUtil.java (后面我会复制给大家) · 图像处理技术 · 向客户端输出io流 一,实现的原理,当视图页面加载的时候通过<img >元素的 ...
- 第十四次ScrumMeeting博客
第十四次ScrumMeeting博客 本次会议于12月3日(日)22时整在3公寓725房间召开,持续30分钟. 与会人员:刘畅.辛德泰.张安澜.方科栋. 1. 每个人的工作(有Issue的内容和链接) ...
- CocoaPods pod install的时候报错:invalid byte sequence in UTF-8 (ArgumentError)解决办法
CocoaPods pod install的时候报错:invalid byte sequence in UTF-8 (ArgumentError)解决办法: 基本可以确定是Podfile中的内容编码有 ...