
nginx实战五
nginx用户认证
https://coding.net/u/aminglinux/p/nginx/git/blob/master/access/auth.md
当访问一些私密资源时,最好配置用户认证,增加安全性。
安装httpd
yum install -y httpd
使用htpasswd生产密码文件
htpasswd -c /usr/local/nginx/conf/htpasswd aming
配置nginx用户认证
location  /admin/

  {

      auth_basic              "Auth";

      auth_basic_user_file   /usr/local/nginx/conf/htpasswd;

  }
测试
curl -uaming:passwd www.aminglinux.com/admin/1.html
实验:
1.配置1.conf文件
[root@centos-03 vhost]# vim 1.conf

[root@centos-03 vhost]# cat 1.conf

server {

        listen 80;

        server_name www.1.com;

        index index.html;

        root /data/wwwroot/www.1.com;

        access_log /tmp/1.log;

        location /admin/

        {

                auth_basic              "Auth";

                auth_basic_user_file    /usr/local/nginx/conf/htpasswd;

        }

}

[root@centos-03 vhost]#
2.查看是否有htpasswd命令,没有需要安装httpd
3.创建user1
[root@centos-03 vhost]# htpasswd -c /usr/local/nginx/conf/htpasswd user1

New password:

Re-type new password:

Adding password for user user1

[root@centos-03 vhost]# cat /usr/local/nginx/conf/htpasswd

user1:$apr1$uxh3ptes$Yd7avMFbzdq6sDHTw2i8a0

[root@centos-03 vhost]#
4.创建user2
[root@centos-03 vhost]# htpasswd /usr/local/nginx/conf/htpasswd user2

New password:

Re-type new password:

Adding password for user user2

[root@centos-03 vhost]# cat /usr/local/nginx/conf/htpasswd

user1:$apr1$uxh3ptes$Yd7avMFbzdq6sDHTw2i8a0

user2:$apr1$5sdndSVS$Cm2qbv2SUeHMjD1U9TgPO/

[root@centos-03 vhost]#
测试:
[root@centos-03 vhost]# /usr/local/nginx/sbin/nginx -s reload

[root@centos-03 vhost]# curl -x127.0.0.1:80 www.1.com/admin/adf

<html>

<head><title> Authorization Required</title></head>

<body bgcolor="white">

<center><h1>401 Authorization Required</h1></center>

<hr><center>nginx/1.14.0</center>

</body>

</html>

[root@centos-03 vhost]#
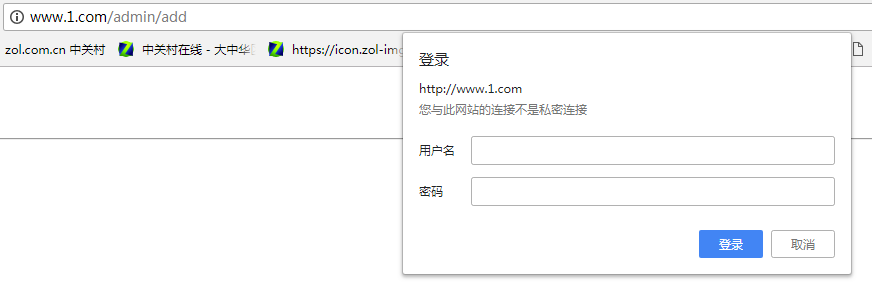
5.curl 输入用户名和密码
[root@centos-03 vhost]# curl -x127.0.0.1:80 -uuser1:user1 www.1.com/admin/adf

<html>

<head><title>404 Not Found</title></head>

<body bgcolor="white">

<center><h1>404 Not Found</h1></center>

<hr><center>nginx/1.14.0</center>

</body>

</html>

[root@centos-03 vhost]#
什么是ca证书
https://coding.net/u/aminglinux/p/nginx/git/blob/master/ssl/ca.md
先来一个例子
A公司的小明被派到B公司办事情。B公司如何信任小明是A公司派来的呢?
普通介绍信
为了让B公司信任小明,A公司特意给小明开了一封介绍信,在信件中详细说明了小明的特征以及小明过来的目的,

并且声明这个小明确实是A公司派来的,除此之外还要有一个A公司的公章。

这样B公司前台小姐姐拿到介绍信后,通过信件内容和A公司公章就能判断出小明确实是A公司派来的员工。

那万一A公司公章是假的呢?毕竟公章伪造太容易了,这样岂不是会存在问题。咱们就暂且认为公章这种东西很难伪造,

否则故事无法继续喽。
引入第三方中介公司
好,回到刚才的话题。如果和B公司有业务往来的公司很多,每个公司的公章都不同,那B公司的前台小姐姐就要懂得分辨各种公章,

非常滴麻烦。所以,有某个中介公司C,发现了这个商机。C公司专门开设了一项“代理公章”的业务。


于是今后,A公司的业务员去B公司,需要带2个介绍信:

介绍信1(含有C公司的公章及A公司的公章。并且特地注明:C公司信任A公司。)

介绍信2(仅含有A公司的公章,然后写上:兹有xxx先生/女士前往贵公司办理业务,请给予接洽......。)

这样不是增加麻烦了吗?有啥好处呢?

主要的好处在于,对于接待公司的前台,就不需要记住各个公司的公章分别是啥样子的,她只要记住中介公司C的公章即可。

当她拿到两份介绍信之后,先对介绍信1的C公章验明正身,确认无误之后,再比对“介绍信1”和“介绍信2”的两个A公章是否一致。

如果是一样的,那就可以证明“介绍信2”是可以信任的了。
相关专业术语的解释
下面就着上面的例子,把相关的名词,作一些解释。
什么是证书?
证书,洋文也叫“digital certificate”或“public key certificate”。

它是用来证明某某东西确实是某某的东西,通俗地说,证书就好比例子里面的公章。通过公章,

可以证明该介绍信确实是对应的公司发出的。

理论上,人人都可以找个证书工具,自己做一个证书。那如何防止坏人自己制作证书出来骗人呢?
什么是CA?
CA 是“Certificate Authority”的缩写,也叫“证书授权中心”。它是负责管理和签发证书的第三方机构,

就好比例子里面的中介C公司。

一般来说,CA必须是所有行业和所有公众都信任的、认可的。因此它必须具有足够的权威性。

就好比A、B两公司都必须信任C公司,才会找C公司作为公章的中介。
什么是CA证书?
CA证书,顾名思义,就是CA颁发的证书。

前面已经说了,人人都可以找工具制作证书。但是你一个小破孩制作出来的证书是没啥用处的。

因为你不是权威的CA机关,你自己搞的证书不具有权威性。

这就好比上述的例子里,某个坏人自己刻了一个公章,盖到介绍信上。但是别人一看,

不是受信任的中介公司的公章,就不予理睬。
什么是证书之间的信任关系?
在开篇的例子里谈到,引入中介后,业务员要同时带两个介绍信。第一个介绍信包含了两个公章,并注明,公章C信任公章A。

证书间的信任关系,就和这个类似。就是用一个证书来证明另一个证书是真实可信滴。
什么是证书信任链?
实际上,证书之间的信任关系,是可以嵌套的。

比如,C信任A1,A1信任A2,A2信任A3......这个叫做证书的信任链。

只要你信任链上的头一个证书,那后续的证书,都是可以信任滴。
什么是根证书?
根证书的洋文叫“root certificate”,为了说清楚根证书是咋回事,再来看个稍微复杂点的例子。

假设C证书信任A和B;然后A信任A1和A2;B信任B1和B2。则它们之间,构成如下的一个树形关系(一个倒立的树)。

处于最顶上的树根位置的那个证书,就是“根证书”。除了根证书,其它证书都要依靠上一级的证书,来证明自己。

那谁来证明“根证书”可靠呢?

实际上,根证书自己证明自己是可靠滴(或者换句话说,根证书是不需要被证明滴)。

聪明的同学此刻应该意识到了:根证书是整个证书体系安全的根本。

所以,如果某个证书体系中,根证书出了问题(不再可信了),那么所有被根证书所信任的其它证书,也就不再可信了。
证书有啥用?
CA证书的作用有很多,只列出常用的几个。
验证网站是否可信(针对HTTPS)
通常,我们如果访问某些敏感的网页(比如用户登录的页面),其协议都会使用HTTPS而不是HTTP,因为HTTP协议是明文的,

一旦有坏人在偷窥你的网络通讯,他/她就可以看到网络通讯的内容(比如你的密码、银行帐号、等)。

而 HTTPS 是加密的协议,可以保证你的传输过程中,坏蛋无法偷窥。

但是,千万不要以为,HTTPS协议有了加密,就可高枕无忧了。

假设有一个坏人,搞了一个假的网银的站点,然后诱骗你上这个站点。

假设你又比较单纯,一不留神,就把你的帐号,口令都输入进去了。那这个坏蛋的阴谋就得逞了。

为了防止坏人这么干,HTTPS 协议除了有加密的机制,还有一套证书的机制。通过证书来确保,某个站点确实就是某个站点。

有了证书之后,当你的浏览器在访问某个HTTPS网站时,会验证该站点上的CA证书(类似于验证介绍信的公章)。

如果浏览器发现该证书没有问题(证书被某个根证书信任、证书上绑定的域名和该网站的域名一致、证书没有过期),

那么页面就直接打开,否则的话,浏览器会给出一个警告,告诉你该网站的证书存在某某问题,是否继续访问该站点。
验证文件是否可信
本文参考于 https://program-think.blogspot.com/2010/02/introduce-digital-certificate-and-ca.html
SSL原理
要想弄明白SSL认证原理,首先要对CA有有所了解,它在SSL认证过程中有非常重要的作用。

说白了,CA就是一个组织,专门为网络服务器颁发证书的,国际知名的CA机构有VeriSign、Symantec,国内的有GlobalSign。

每一家CA都有自己的根证书,用来对它所签发过的服务器端证书进行验证。

如果服务器提供方想为自己的服务器申请证书,它就需要向CA机构提出申请。

服务器提供方向CA提供自己的身份信息,CA判明申请者的身份后,就为它分配一个公钥,

并且CA将该公钥和服务器身份绑定在一起,并为之签字,这就形成了一个服务器端证书。

如果一个用户想鉴别另一个证书的真伪,他就用CA的公钥对那个证书上的签字进行验证,一旦验证通过,该证书就被认为是有效的。

证书实际是由证书签证机关(CA)签发的对用户的公钥的认证。

证书的内容包括:电子签证机关的信息、公钥用户信息、公钥、权威机构的签字和有效期等等。

目前,证书的格式和验证方法普遍遵循X.509国际标准。
申请证书过程

首先要有一个CA根证书,然后用CA根证书来签发用户证书。

用户进行证书申请:

1. 先生成一个私钥

2. 用私钥生成证书请求(证书请求里应含有公钥信息)

3. 利用证书服务器的CA根证书来签发证书

这样最终拿到一个由CA根证书签发的证书,其实证书里仅有公钥,而私钥是在用户手里的。
SSL工作流程(单向)

1.客户端say hello 服务端

2.服务端将证书、公钥等发给客户端

3.客户端CA验证证书,成功继续、不成功弹出选择页面

4.客户端告知服务端所支持的加密算法

5.服务端选择最高级别加密算法明文通知客户端

6.客户端生成随机对称密钥key,使用服务端公钥加密发送给服务端

7.服务端使用私钥解密,获取对称密钥key

8.后续客户端与服务端使用该密钥key进行加密通信
SSL工作流程(双向)
单向认证,仅仅是客户端需要检验服务端证书是否是正确的,而服务端不会检验客户端证书是否是正确的。 双向认证,指客户端验证服务器端证书,而服务器也需要通过CA的公钥证书来验证客户端证书。
双向验证的过程:
1.客户端say hello 服务端

2.服务端将证书、公钥等发给客户端

3.客户端CA验证证书,成功继续、不成功弹出选择页面

4.客户端将自己的证书和公钥发送给服务端

5.服务端验证客户端证书,如不通过直接断开连接

6.客户端告知服务端所支持的加密算法

7.服务端选择最高级别加密算法使用客户端公钥加密后发送给客户端

8.客户端收到后使用私钥解密并生成随机对称密钥key,使用服务端公钥加密发送给服务端

9.服务端使用私钥解密,获取对称密钥key

10.后续客户端与服务端使用该密钥key进行加密通信
自制CA证书
https://coding.net/u/aminglinux/p/nginx/git/blob/master/ssl/key.md
生成CA根证书
# mkdir /etc/pki/ca_test //创建CA更证书的目录

# cd /etc/pki/ca_test

# mkdir root server client newcerts  //创建几个相关的目录

# echo 01 > serial   //定义序列号为01

# echo 01 > crlnumber  //定义crl号为01

# touch index.txt  //创建index.txt

# cd ..

# vi tls/openssl.cnf  //改配置文件

default_ca     = CA_default 改为 default_ca     = CA_test

[ CA_default ] 改为 [ CA_test ]

dir             = /etc/pki/CA  改为  dir             = /etc/pki/ca_test

certificate	= $dir/cacert.pem  改为 certificate	= $dir/root/ca.crt

private_key	= $dir/private/cakey.pe 改为  private_key	= $dir/root/ca.key

# openssl genrsa -out /etc/pki/ca_test/root/ca.key  //生成私钥

# openssl req -new -key /etc/pki/ca_test/root/ca.key -out /etc/pki/ca_test/root/ca.csr

//生成请求文件,会让我们填写一些指标,这里要注意:如果在这一步填写了相应的指标,

比如Country Name、State or Province Name、hostname。

# openssl x509 -req -days 3650 -in /etc/pki/ca_test/root/ca.csr -signkey /etc/pki/ca_test/root/ca.key -out /etc/pki/ca_test/root/ca.crt

//生成crt文件
生成server端证书
# cd /etc/pki/ca_test/server

# openssl genrsa -out server.key   //生成私钥文件

# openssl req -new -key server.key -out server.csr//生成证书请求文件,填写信息需要和ca.csr中的Organization Name保持一致

# openssl ca -in server.csr -cert /etc/pki/ca_test/root/ca.crt -keyfile /etc/pki/ca_test/root/ca.key -out server.crt -days 3650

//用根证书签名server.csr,最后生成公钥文件server.crt,此步骤会有两个地方需要输入y

Sign the certificate? [y/n]:y

1 out of 1 certificate requests certified, commit? [y/n]y
生成客户端证书
如果做ssl的双向认证,还需要给客户端生成一个证书,步骤和上面的基本一致

# cd /etc/pki/ca_test/client

# openssl genrsa -out  client.key  //生成私钥文件

# openssl req -new  -key client.key -out client.csr  //生成请求文件,填写信息需要和ca.csr中的Organization Name保持一致

# openssl ca -in client.csr -cert /etc/pki/ca_test/root/ca.crt -keyfile /etc/pki/ca_test/root/ca.key -out client.crt -days 3650

//签名client.csr, 生成client.crt,此步如果出现

failed to update database

TXT_DB error number 2

需执行:

# sed -i 's/unique_subject = yes/unique_subject = no/' /etc/pki/ca_test/index.txt.attr

执行完,再次重复执行签名client.csr那个操作
实验:
1.创建目录
[root@centos-03 ~]# mkdir /etc/pki/ca_test

[root@centos-03 ~]# cd /etc/pki/ca_test/

[root@centos-03 ca_test]# mkdir root server client newcerts

[root@centos-03 ca_test]#

[root@centos-03 ca_test]# echo 01 > serial

[root@centos-03 ca_test]# echo 01 > crlnumber

[root@centos-03 ca_test]# touch index.txt

[root@centos-03 ca_test]#

[root@centos-03 pki]# vim tls/openssl.cnf

[ ca ]

#default_ca     = CA_default            # The default ca section

default_ca      = CA_test               # The default ca section

####################################################################

[ CA_test ]

dir             = /etc/pki/ca_test              # Where everything is kept

certs           = $dir/certs            # Where the issued certs are kept

crl_dir         = $dir/crl              # Where the issued crl are kept

database        = $dir/index.txt        # database index file.

#unique_subject = no                    # Set to 'no' to allow creation of

                                        # several ctificates with same subject.

new_certs_dir   = $dir/newcerts         # default place for new certs.

certificate     = $dir/root/ca.crt      # The CA certificate

serial          = $dir/serial           # The current serial number

crlnumber       = $dir/crlnumber        # the current crl number

                                        # must be commented out to leave a V1 CR

L

crl             = $dir/crl.pem          # The current CRL

private_key     = $dir/root/ca.key # The private key

RANDFILE        = $dir/private/.rand    # private random number file
2.生成私钥
[root@centos-03 pki]# openssl genrsa -out /etc/pki/ca_test/root/ca.key

Generating RSA private key, 2048 bit long modulus

..................+++

..........................+++

e is 65537 (0x10001)

[root@centos-03 pki]#
3.生成请求文件,会让我们填写一些指标,这里要注意:如果在这一步填写了相应的指标, 比如Country Name、State or Province Name、hostname。
[root@centos-03 pki]# openssl req -new -key /etc/pki/ca_test/root/ca.key -out /etc/pki/ca_test/root/ca.csr

You are about to be asked to enter information that will be incorporated

into your certificate request.

What you are about to enter is what is called a Distinguished Name or a DN.

There are quite a few fields but you can leave some blank

For some fields there will be a default value,

If you enter '.', the field will be left blank.

-----

Country Name (2 letter code) [XX]:

State or Province Name (full name) []:bj

Locality Name (eg, city) [Default City]:bj

Organization Name (eg, company) [Default Company Ltd]:aming

Organizational Unit Name (eg, section) []:test

Common Name (eg, your name or your server's hostname) []:aming.com

Email Address []:aming@aming.com

Please enter the following 'extra' attributes

to be sent with your certificate request

A challenge password []:123456

An optional company name []:aminglinux.com

[root@centos-03 pki]#
4.生成crt文件
[root@centos-03 pki]# openssl x509 -req -days 3650 -in /etc/pki/ca_test/root/ca.csr -signkey /etc/pki/ca_test/root/ca.key -out /etc/pki/ca_test/root/ca.crt

Signature ok

subject=/C=XX/ST=bj/L=bj/O=aming/OU=test/CN=aming.com/emailAddress=aming@aming.com

Getting Private key

[root@centos-03 pki]#
5.我们在root下生成了三个文件
[root@centos-03 pki]# ls -l ca_test/root/

总用量 12

-rw-r--r-- 1 root root 1253 7月  28 11:19 ca.crt

-rw-r--r-- 1 root root 1102 7月  28 11:17 ca.csr

-rw-r--r-- 1 root root 1679 7月  28 11:14 ca.key

[root@centos-03 pki]#
生成server端证书
[root@centos-03 pki]# cd /etc/pki/ca_test/server

[root@centos-03 server]#
1.生成私钥文件
[root@centos-03 server]# openssl genrsa -out server.key

Generating RSA private key, 2048 bit long modulus

...........+++

....+++

e is 65537 (0x10001)

[root@centos-03 server]#
2.生成证书请求文件,填写信息需要和ca.csr中的Organization Name保持一致
[root@centos-03 server]# openssl req -new -key server.key -out server.csr

You are about to be asked to enter information that will be incorporated

into your certificate request.

What you are about to enter is what is called a Distinguished Name or a DN.

There are quite a few fields but you can leave some blank

For some fields there will be a default value,

If you enter '.', the field will be left blank.

-----

Country Name (2 letter code) [XX]:

State or Province Name (full name) []:bj

Locality Name (eg, city) [Default City]:bj

Organization Name (eg, company) [Default Company Ltd]:aming

Organizational Unit Name (eg, section) []:test2

Common Name (eg, your name or your server's hostname) []:123.com

Email Address []:admin@123.com

Please enter the following 'extra' attributes

to be sent with your certificate request

A challenge password []:123456

An optional company name []:123.com

[root@centos-03 server]#
3.用根证书签名server.csr,最后生成公钥文件server.crt,此步骤会有两个地方需要输入y
[root@centos-03 server]# openssl ca -in server.csr -cert /etc/pki/ca_test/root/ca.crt -keyfile /etc/pki/ca_test/root/ca.key -out server.crt -days 3650

Using configuration from /etc/pki/tls/openssl.cnf

Check that the request matches the signature

Signature ok

Certificate Details:

        Serial Number: 1 (0x1)

        Validity

            Not Before: Jul 28 03:27:13 2018 GMT

            Not After : Jul 25 03:27:13 2028 GMT

        Subject:

            countryName               = XX

            stateOrProvinceName       = bj

            organizationName          = aming

            organizationalUnitName    = test2

            commonName                = 123.com

            emailAddress              = admin@123.com

        X509v3 extensions:

            X509v3 Basic Constraints:

                CA:FALSE

            Netscape Comment:

                OpenSSL Generated Certificate

            X509v3 Subject Key Identifier:

                C6:56:E8:E3:35:40:FA:F3:46:A7:EE:37:F6:02:E1:F5:29:6E:32:8B

            X509v3 Authority Key Identifier:

                DirName:/C=XX/ST=bj/L=bj/O=aming/OU=test/CN=aming.com/emailAddress=aming@aming.com

                serial:A9:31:0D:12:47:56:CE:81

Certificate is to be certified until Jul 25 03:27:13 2028 GMT (3650 days)

Sign the certificate? [y/n]:y

1 out of 1 certificate requests certified, commit? [y/n]y

Write out database with 1 new entries

Data Base Updated

[root@centos-03 server]#
4.crt文件生成成功
[root@centos-03 server]# ls -l

总用量 16

-rw-r--r-- 1 root root 4769 7月  28 11:27 server.crt

-rw-r--r-- 1 root root 1090 7月  28 11:26 server.csr

-rw-r--r-- 1 root root 1679 7月  28 11:23 server.key

[root@centos-03 server]#
生成客户端证书
如果做ssl的双向认证,还需要给客户端生成一个证书,步骤和上面的基本一致
[root@centos-03 server]# cd /etc/pki/ca_test/client

[root@centos-03 client]#
1.生成私钥文件
[root@centos-03 client]# openssl genrsa -out  client.key

Generating RSA private key, 2048 bit long modulus

.................................................................................+++

........+++

e is 65537 (0x10001)

[root@centos-03 client]#
2.生成请求文件,填写信息需要和ca.csr中的Organization Name保持一致
[root@centos-03 client]# openssl req -new  -key client.key -out client.csr

You are about to be asked to enter information that will be incorporated

into your certificate request.

What you are about to enter is what is called a Distinguished Name or a DN.

There are quite a few fields but you can leave some blank

For some fields there will be a default value,

If you enter '.', the field will be left blank.

-----

Country Name (2 letter code) [XX]:

State or Province Name (full name) []:bj

Locality Name (eg, city) [Default City]:bj

Organization Name (eg, company) [Default Company Ltd]:aming

Organizational Unit Name (eg, section) []:test3

Common Name (eg, your name or your server's hostname) []:aaa.com

Email Address []:ad@aaa.com

Please enter the following 'extra' attributes

to be sent with your certificate request

A challenge password []:123456

An optional company name []:aaa.com

[root@centos-03 client]#
3.签名client.csr, 生成client.crt
[root@centos-03 client]# openssl ca -in client.csr -cert /etc/pki/ca_test/root/ca.crt -keyfile /etc/pki/ca_test/root/ca.key -out client.crt -days 3650

Using configuration from /etc/pki/tls/openssl.cnf

Check that the request matches the signature

Signature ok

Certificate Details:

        Serial Number: 2 (0x2)

        Validity

            Not Before: Jul 28 03:42:18 2018 GMT

            Not After : Jul 25 03:42:18 2028 GMT

        Subject:

            countryName               = XX

            stateOrProvinceName       = bj

            organizationName          = aming

            organizationalUnitName    = test3

            commonName                = aaa.com

            emailAddress              = ad@aaa.com

        X509v3 extensions:

            X509v3 Basic Constraints:

                CA:FALSE

            Netscape Comment:

                OpenSSL Generated Certificate

            X509v3 Subject Key Identifier:

                C0:B7:1E:6A:D2:AE:2D:95:C0:D8:D4:AE:49:07:C5:81:0D:98:C9:FF

            X509v3 Authority Key Identifier:

                DirName:/C=XX/ST=bj/L=bj/O=aming/OU=test/CN=aming.com/emailAddress=aming@aming.com

                serial:A9:31:0D:12:47:56:CE:81

Certificate is to be certified until Jul 25 03:42:18 2028 GMT (3650 days)

Sign the certificate? [y/n]:y

1 out of 1 certificate requests certified, commit? [y/n]y

Write out database with 1 new entries

Data Base Updated

[root@centos-03 client]#
4.生成了crt和key
[root@centos-03 client]# ls -l

总用量 16

-rw-r--r-- 1 root root 4762 7月  28 11:42 client.crt

-rw-r--r-- 1 root root 1086 7月  28 11:40 client.csr

-rw-r--r-- 1 root root 1675 7月  28 11:38 client.key

[root@centos-03 client]#
配置Nginx单向SSL
https://coding.net/u/aminglinux/p/nginx/git/blob/master/ssl/nginx.md
Nginx配置示例(单向)
cp /etc/pki/ca_test/server/server.* /usr/local/nginx/conf/

{

    listen 443 ssl;

    server_name www.aminglinux.com;

    index index.html index.php;

    root /data/wwwroot/aminglinux.com;

    ssl on;

    ssl_certificate server.crt;

    ssl_certificate_key server.key;

    ssl_protocols TLSv1 TLSv1.1 TLSv1.2;

    ssl_ciphers ALL:!DH:!EXPORT:!RC4:+HIGH:+MEDIUM:!eNULL;

    ssl_prefer_server_ciphers on;

    ...

}
配置说明
1. 443端口为ssl监听端口。

2. ssl on表示打开ssl支持。

3. ssl_certificate指定crt文件所在路径,如果写相对路径,必须把该文件和nginx.conf文件放到一个目录下。

4. ssl_certificate_key指定key文件所在路径。

5. ssl_protocols指定SSL协议。

6. ssl_ciphers配置ssl加密算法,多个算法用:分隔,ALL表示全部算法,!表示不启用该算法,+表示将该算法排到最后面去。

7. ssl_prefer_server_ciphers 如果不指定默认为off,当为on时,在使用SSLv3和TLS协议时,服务器加密算法将优于客户端加密算法。
Nginx配置双向认证
cp /etc/pki/ca_test/root/ca.crt /usr/local/nginx/conf/

配置示例:

{

    listen 443 ssl;

    server_name www.aminglinux.com;

    index index.html index.php;

    root /data/wwwroot/aminglinux.com;

    ssl on;

    ssl_certificate server.crt;

    ssl_certificate_key server.key;

    ssl_protocols TLSv1 TLSv1.1 TLSv1.2;

    ssl_ciphers ALL:!DH:!EXPORT:!RC4:+HIGH:+MEDIUM:!eNULL;

    ssl_prefer_server_ciphers on;

    ssl_client_certificate ca.crt; //这里的ca.crt是根证书公钥文件

    ssl_verify_client on;

    ...

}
客户端(浏览器)操作
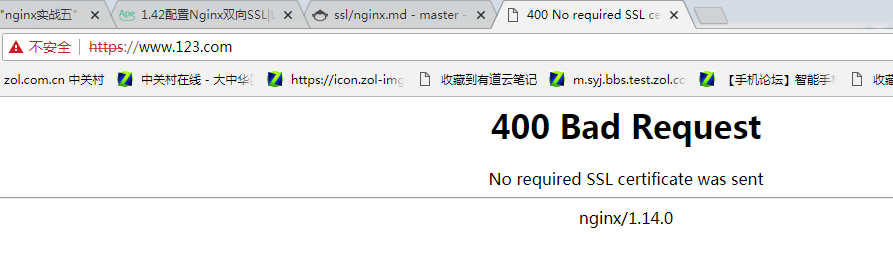
如果不进行以下操作,浏览器会出现400错误。400 Bad Request(No required SSL certificate was sent)

首先需要将client.key转换为pfx(p12)格式

# cd /etc/pki/ca_test/client

# openssl pkcs12 -export -inkey client.key -in client.crt -out client.pfx  //这一步需要输入一个自定义密码,一会在windows上安装的时候要用到,需要记一下。

然后将client.pfx拷贝到windows下,双击即可安装。

也可以直接curl测试:

curl -k --cert /etc/pki/ca_test/client/client.crt  --key /etc/pki/ca_test/client/client.key https://www.aminglinux.com/index.html
实验
1.查看是否安装了http_ssl_module模块
[root@centos-03 client]# /usr/local/nginx/sbin/nginx -V

nginx version: nginx/1.14.0

built by gcc 4.8.5 20150623 (Red Hat 4.8.5-28) (GCC)

configure arguments: --prefix=/usr/local/nginx --add-module=/usr/local/src/echo-nginx-module/

[root@centos-03 client]#
[root@centos-03 nginx-1.14.0]# ./configure --help |grep ssl

  --with-http_ssl_module             enable ngx_http_ssl_module

  --with-mail_ssl_module             enable ngx_mail_ssl_module

  --with-stream_ssl_module           enable ngx_stream_ssl_module

  --with-stream_ssl_preread_module   enable ngx_stream_ssl_preread_module

  --with-openssl=DIR                 set path to OpenSSL library sources

  --with-openssl-opt=OPTIONS         set additional build options for OpenSSL

[root@centos-03 nginx-1.14.0]#
[root@centos-03 nginx-1.14.0]# ./configure --with-http_ssl_module --prefix=/usr/local/nginx
2.没有openssl的需要安装openssl
[root@centos-03 nginx-1.14.0]# yum install openssl openssl-devel
[root@centos-03 nginx-1.14.0]# make && make install
  oot@centos-03 nginx-1.14.0]# /usr/local/nginx/sbin/nginx -V

▽ginx version: nginx/1.14.0

built by gcc 4.8.5 20150623 (Red Hat 4.8.5-28) (GCC)

built with OpenSSL 1.0.2k-fips  26 Jan 2017

TLS SNI support enabled

configure arguments: --with-http_ssl_module --prefix=/usr/local/nginx

[root@centos-03 nginx-1.14.0]# killall nginx

[root@centos-03 nginx-1.14.0]# killall nginx

nginx: no process found

[root@centos-03 nginx-1.14.0]# /usr/local/nginx/sbin/nginx
[root@centos-03 nginx-1.14.0]# ps aux|grep nginx

root      29709  0.0  0.1  77268  1204 ?        Ss   12:22   0:00 nginx: master process /usr/local/nginx/sbin/nginx

nobody    29710  0.0  0.1  77268  1968 ?        S    12:22   0:00 nginx: worker process

nobody    29711  0.0  0.1  77268  1724 ?        S    12:22   0:00 nginx: cache manager process

nobody    29712  0.0  0.1  77268  1724 ?        S    12:22   0:00 nginx: cache loader process

root      29715  0.0  0.0 112724   972 pts/1    S+   12:23   0:00 grep --color=auto nginx

[root@centos-03 nginx-1.14.0]#
3.配置ssl
[root@centos-03 nginx-1.14.0]# cd /usr/local/nginx/conf/vhost/

[root@centos-03 vhost]# ls

1.conf  default_8080.conf  fp.conf        zp.conf

2.conf  default.conf.bak   test.com.conf

[root@centos-03 vhost]# vim 1.conf
[root@centos-03 vhost]# cat 1.conf

server {

        listen 443 ssl;

        server_name www.123.com;

        index index.html;

        root /data/wwwroot/www.1.com;

        ssl on;

        ssl_certificate /etc/pki/ca_test/server/server.crt;

        ssl_certificate_key /etc/pki/ca_test/server/server.key;

        ssl_protocols TLSv1 TLSv1.1 TLSv1.2;

        ssl_ciphers ALL:!DH:!EXPORT:!RC4:+HIGH:+MEDIUM:!eNULL;

        ssl_prefer_server_ciphers on;

}

[root@centos-03 vhost]# /usr/local/nginx/sbin/nginx -t

nginx: the configuration file /usr/local/nginx/conf/nginx.conf syntax is ok

nginx: configuration file /usr/local/nginx/conf/nginx.conf test is successful

[root@centos-03 vhost]# /usr/local/nginx/sbin/nginx -s reload
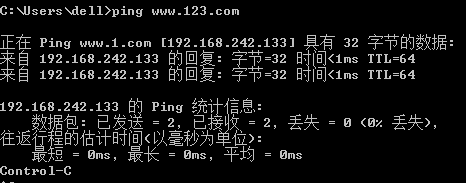
4.Windows做下host绑定1.com ,服务器也绑定host
192.168.242.133 www.1.com www.123.com

配置Nginx双向SSL
1.在单向ssl基础之上再增加两行
[root@centos-03 vhost]# vim 1.conf ^C

[root@centos-03 vhost]# cat 1.conf

server {

        listen 443 ssl;

        server_name www.123.com;

        index index.html;

        root /data/wwwroot/www.1.com;

        ssl on;

        ssl_certificate /etc/pki/ca_test/server/server.crt;

        ssl_certificate_key /etc/pki/ca_test/server/server.key;

        ssl_protocols TLSv1 TLSv1.1 TLSv1.2;

        ssl_ciphers ALL:!DH:!EXPORT:!RC4:+HIGH:+MEDIUM:!eNULL;

        ssl_prefer_server_ciphers on;

        ssl_client_certificate /etc/pki/ca_test/root/ca.crt;

        ssl_verify_client on;

}

[root@centos-03 vhost]#
[root@centos-03 vhost]# /usr/local/nginx/sbin/nginx -s reload

[root@centos-03 vhost]#
2.浏览器访问报400错误,这是因为双向验证浏览器需要有一个key文件(公钥文件)
3.转换浏览器能用的key文件格式
[root@centos-03 vhost]# cd /etc/pki/ca_test/client

[root@centos-03 client]# openssl pkcs12 -export -inkey client.key -in client.crt -out client.pfx

Enter Export Password:

Verifying - Enter Export Password:

[root@centos-03 client]#
4.下载文件到Windows下
[root@centos-03 client]# ls

client.crt  client.csr  client.key  client.pfx

[root@centos-03 client]# sz client.pfx

rz

Starting zmodem transfer.  Press Ctrl+C to cancel.

  100%       2 KB    2 KB/s 00:00:01       0 Errors

[root@centos-03 client]#
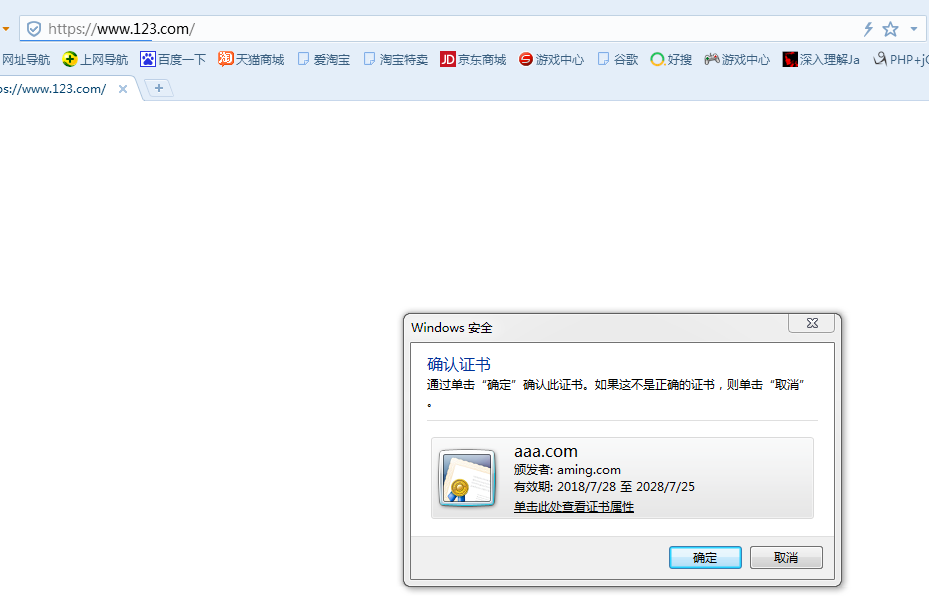
5.下载完成后双击文件导入
6.再次访问
7.用curl访问测试
[root@centos-03 client]# curl -k --cert /etc/pki/ca_test/client/client.crt  --key /etc/pki/ca_test/client/client.key https://www.123.com

www.1.com

[root@centos-03 client]#
nginx实战五的更多相关文章
- 深入浅出Nginx实战与架构
本文主要内容如下(让读者朋友们深入浅出地理解Nginx,有代码有示例有图): 1.Nginx是什么? 2.Nginx具有哪些功能? 3.Nginx的应用场景有哪些? 4.Nginx的衍生生态有哪些? ...
- [原创].NET 分布式架构开发实战五 Framework改进篇
原文:[原创].NET 分布式架构开发实战五 Framework改进篇 .NET 分布式架构开发实战五 Framework改进篇 前言:本来打算这篇文章来写DAL的重构的,现在计划有点改变.之前的文章 ...
- nginx实战
原文:http://www.cnblogs.com/yucongblog/p/6289628.html nginx实战 (一) nginx环境的搭建安装流程: 1 通过ftp将nginx-1.11 ...
- SpringCloud---熔断降级理解、Hystrix实战(五)
SpringCloud---熔断降级理解.Hystrix实战(五) https://www.cnblogs.com/qdhxhz/p/9581440.html https://blog.csdn.ne ...
- Nginx实战之让用户通过用户名密码认证访问web站点
1.Nginx实战之让用户通过用户名密码认证访问web站点 [root@master ~]# vim /usr/local/nginx/conf/extra/www.conf server { lis ...
- Python爬虫实战五之模拟登录淘宝并获取所有订单
经过多次尝试,模拟登录淘宝终于成功了,实在是不容易,淘宝的登录加密和验证太复杂了,煞费苦心,在此写出来和大家一起分享,希望大家支持. 温馨提示 更新时间,2016-02-01,现在淘宝换成了滑块验证了 ...
- miniFTP项目实战五
项目简介: 在Linux环境下用C语言开发的Vsftpd的简化版本,拥有部分Vsftpd功能和相同的FTP协议,系统的主要架构采用多进程模型,每当有一个新的客户连接到达,主进程就会派生出一个ftp服务 ...
- 恶意代码分析实战五:OllyDebug动态结合
目录 恶意代码分析实战五:OllyDebug动态结合 OllyDebug界面介绍 OllyDebug载入程序方法 OllyDebug地址跳转 OllyDebug下断点 OllyDebug单步执行 Ol ...
- 【云计算】实战-五个Docker监控工具的对比
[实战]五个Docker监控工具的对比 阅读目录 Docker Stats命令 CAdvisor Scout Data Dog Sensu Monitoring Framework 总结 这篇文章作者 ...
随机推荐
- mac苹果ping不通网络
新买了mac,在安装synergy的时候,我拿我的win当server,mac当client,随后发现,synergy提示连接不到server,ping host 失败, cannot connect ...
- Mysql创建多列唯一索引Sql
ALTER TABLE `t_city_combo` ADD UNIQUE INDEX ` t_city_combo_index` (`combo_id`, `combo_name`, `city_i ...
- 【leetcode 桶排序】Maximum Gap
1.题目 Given an unsorted array, find the maximum difference between the successive elements in its sor ...
- Android MVP 构架封装
上一篇我们简单实现了一个MVP的构架,下面我们来做一个简单的封装使其使用更简单方便 源码地址RxMVP分支Tag03 最终实现目录结构如下 BasePresenter 如果每一个Activity都需要 ...
- com.esotericsoftware.kryo.kryoexception java.util.ConcurentModificationException
近期 有网友看我的"整合Kafka到Spark Streaming--代码演示样例和挑战"文章, 讲 kafka对象 放到 pool 并通过broadcast广播出去: 然后 在开 ...
- Android 四大组件之 Service(一)
Service是Android中四大组件之一,在Android开发中起到非常重要的作用,它运行在后台,不与用户进行交互. 1.Service的继承关系: java.lang.Object → andr ...
- UNIX网络编程读书笔记:辅助数据
辅助数据(ancillary data)可通过调用sendmsg和recvmsg这两个函数,使用msghdr结构中的msg_control和msg_controllen这两个成员发送和接收. 辅助数据 ...
- OA项目实战学习(7)——初始化数据&权限配置显示
详细有哪些功能: 初始化数据 权限数据. 超级管理员. Installer.java package cn.xbmu.oa.install; import javax.annotation.Resou ...
- 解决-bash: fork: retry: Resource temporarily unavailable (修改最大线程数)
错误提示的本质是Linux操作系统无法创建更多进程,导致出错.因此要解决这个问题需要修改Linux允许创建更多的进程. 方案一: cat /etc/security/limits.conf echo ...
- 深入浅出搜索架构引擎、方案与细节 倒排 bitmap
深入浅出搜索架构引擎.方案与细节(上) 2017-02-14 23:55 58沈剑0 20 阅读 131 一.缘起 <100亿数据1万属性数据架构设计>文章发布后,不少朋友对58同城自 ...