
前端(九):react生命周期
一、组件渲染
当组件的props或者state发生改变时,组件会自动调用render方法重新渲染。当父组件被重新渲染时,子组件也会被递归渲染。那么组件是如何渲染的呢?
# 方案一

1.state数据

2.JSX模板

3.数据 + 模板 生成真实DOM来显示

4.state发生改变

5.JSX模板

6.数据 + 模板重新结合,生成新的真实的DOM,替换掉以前的DOM

缺陷:

    第一次生成了完整的DOM片段

    第二次生成了完整的DOM片段,替换第一次的DOM片段,比较耗性能
# 方案二

1.state数据

2.JSX模板

3.数据 + 模板 生成真实DOM来显示

4.state发生改变

5.sJSX模板

6.数据 + 模板重新结合,生成新的真实的DOM

7.新的DOM和原来的DOM进行比对,只用新的DOM中改变的部分替换掉以前DOM对应的部分

缺陷:

    因为仍然是生成了一个新的真实的DOM,所以性能提升并不明显
# 方案三

1.state数据

2.JSX模板

3.生成虚拟DOM,也就是一个js对象

    {

        "div": {

            id: "div-id",

            span: {

                id: "span-d",

                class: "span-class",

                content: "hello, world"

            }

        }

    }

4.数据 + 模板 生成真实DOM来显示

    <div id="div-id"><span id="span-id" class="span-class">hello, world</span></div>

5.state发生变化

6.生成新的虚拟DOM

    {

        "div": {

            id: "div-id",

            span: {

                id: "span-d",

                class: "span-class",

                content: "what the hell"

            }

        }

    }

7.对比两个虚拟DOM,将obj中span的content变动更改到原始真实DOM中

    <div id="div-id"><span id="span-id" class="span-class">what the hell</span></div>

优点:

    不再重新创建真实DOM,只是比较两个js对象的不同来修改原始DOM
# 将一个object对象转换成DOM

const dom = {

            "div": {

                id: "div-id",

                span: {

                    id: "span-id",

                    class: "span-class",

                    content: "hello, world"

                }

            }

        };

        function createDom(dom) {

            const div = Object.keys(dom)[0];

            const divNode = document.createElement(div);

            const innerKeys = Object.keys(dom.div);

            for(const i in innerKeys){

                const innerKey = innerKeys[i];

                if(innerKey === "span"){

                    const spanNode = document.createElement(innerKey);

                    const span = dom.div["span"];

                    const spanKeys = Object.keys(span);

                    for (const j in spanKeys){

                        const spanKey = spanKeys[j];

                        if(spanKey === "content"){

                            spanNode.innerText = "hello, world";

                        }else {

                            spanNode.setAttribute(spanKey, span[spanKey]);

                        }

                    }

                    divNode.appendChild(spanNode);

                }else {

                    divNode.setAttribute(innerKey, dom.div[innerKey]);

                }

            }

            return divNode;

        };

        div = createDom(dom);
二、组件的生命周期
组件的声明周期可分成三个状态:Mounting,已插入真实 DOM;Updating,正在被重新渲染;Unmounting:已移出真实 DOM。如下图所示(本图根据Rosen老师示例改写)。
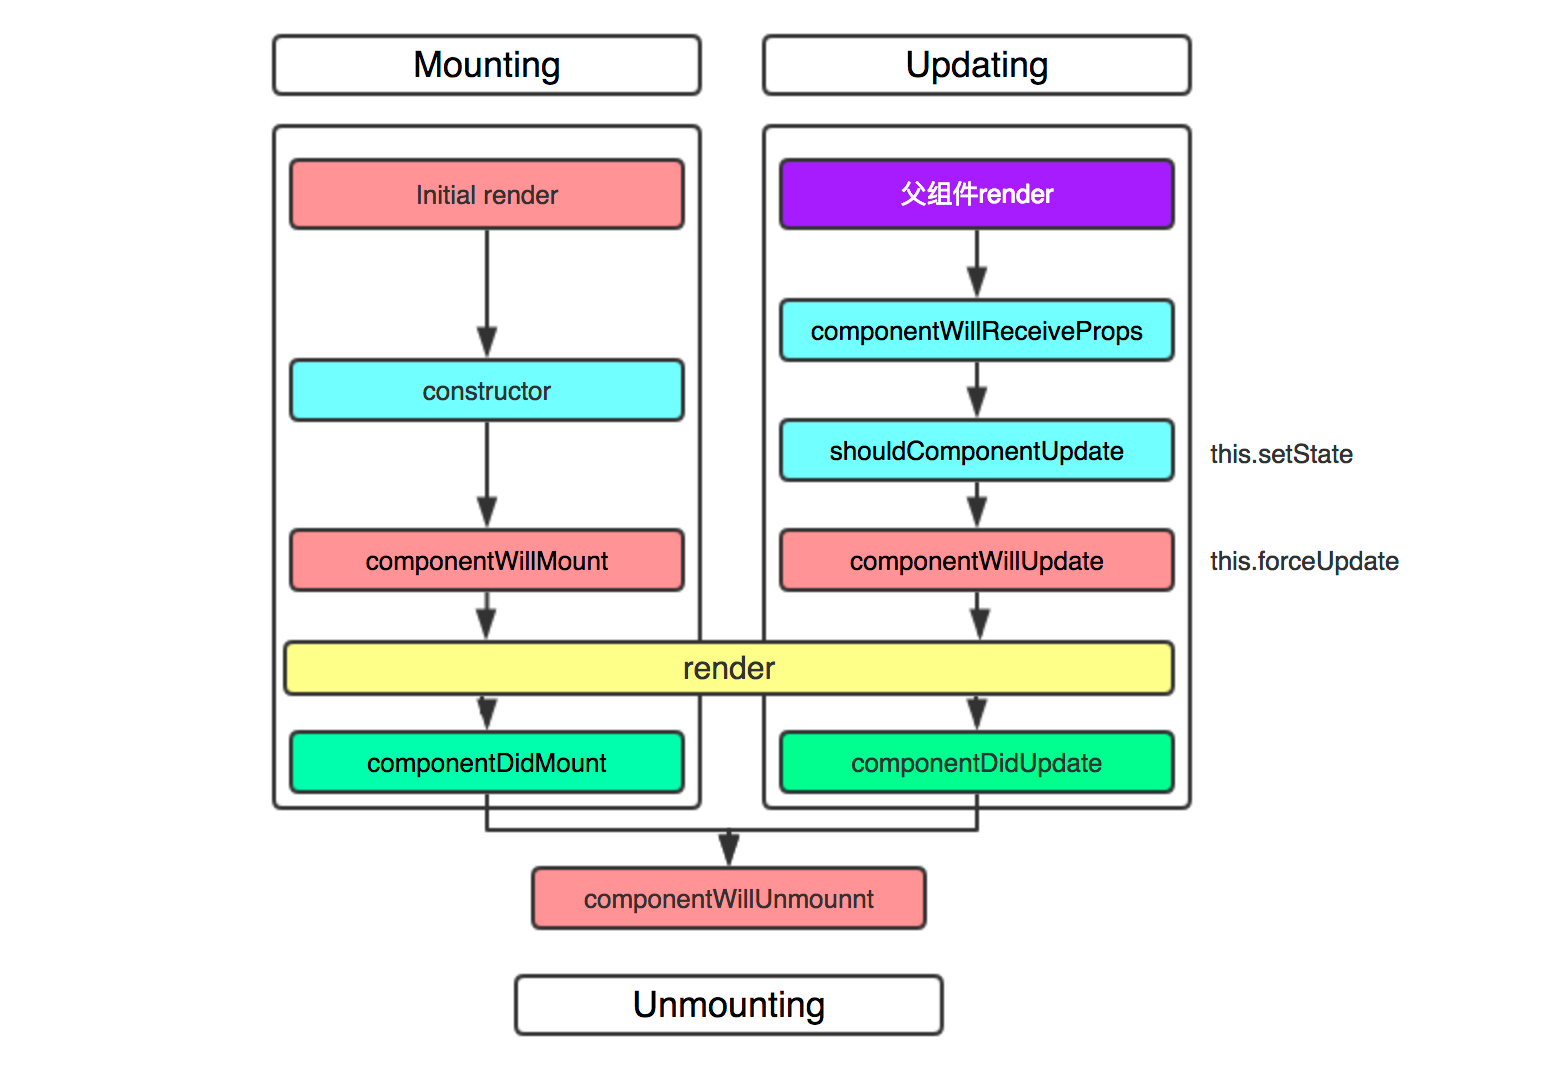
各个函数的释义(摘自菜鸟教程):
componentWillMount 在渲染前调用,在客户端也在服务端。
componentDidMount : 在第一次渲染后调用,只在客户端,只执行一次。之后组件已经生成了对应的DOM结构,可以通过this.getDOMNode()来进行访问。 如果你想和其他JavaScript框架一起使用,可以在这个方法中调用setTimeout, setInterval或者发送AJAX请求等操作(防止异部操作阻塞UI)。
componentWillReceiveProps 在组件接收到一个新的 prop (更新后)时被调用。这个方法在初始化render时不会被调用。
shouldComponentUpdate 返回一个布尔值。在组件接收到新的props或者state时被调用。在初始化时或者使用forceUpdate时不被调用。
可以在你确认不需要更新组件时使用。
shouldComponentUpdate(nextProps, nextState) {
    console.log(nextProps, nextState);
    console.log(this.props, this.state);
    if(this.state.update === true){
        // 只有在给定条件发生的时候返回true,也就是可以重新渲染
        return true
    }
   // 只有在给定条件发生的时候返回true,也就是可以重新渲染
   if(nextState.update === true){
        // 在下一个状态达到条件时重新渲染
        return true
    }
    return false // 其它条件返回false,不重新渲染
}
componentWillUpdate在组件接收到新的props或者state但还没有render时被调用。在初始化时不会被调用。
componentDidUpdate 在组件完成更新后立即调用。在初始化时不会被调用。
componentWillUnmount在组件从 DOM 中移除的时候立刻被调用。
一个示例:
import React, {Fragment} from "react";

class LifeCircle extends React.Component{

    constructor(props){

        super(props);

        console.log("STEP1: constructor is called.");

        this.state = {

            list: [],

            input: ""

        }

    }

    componentWillMount() {

        console.log("STEP2: componentWillMount is called.");

    }

    componentDidMount() {

        console.log("STEP4: componentDidMount is called."); // 可以在这里写ajax数据请求,因为它只在组件被挂载到页面上时执行一次,而不是render里(因为render会被重复渲染)

    }

    componentWillReceiveProps(nextProps, nextContext) {

        console.log("STEP5: componentWillReceiveProps is called.")

    }

    shouldComponentUpdate(nextProps, nextState, nextContext) {

        console.log("STEP6: shouldComponentUpdate is called.");

        return true; // 是否更新,true更新,更新就是要把有关的子组件也一并渲染;如果子组件没有数据更改那就没重新渲染,此时可以返回一个false

    }

    componentWillUpdate(nextProps, nextState, nextContext) {

        console.log("STEP7: componentWillUpdate is called.")

    }

    componentDidUpdate(prevProps, prevState, snapshot) {

        console.log("STEP8: componentDidUpdate is called.")

    }

    componentWillUnmount() {

        console.log("STEP9: componentDidUpdate is called.")

    }

    render() {

        console.log("STEP3: render is called.");

        return (

            <Fragment>

                <div>

                    <input

                        value={this.state.input}

                        onChange={(e) => {this.handleChange(e)}}

                    />

                    <button onClick={() => {this.handleClick()}}>添加句子</button>

                </div>

                <ul>

                    {

                        this.state.list.map((name, index) => {

                            return <li

                                key={index}

                                onClick={() => {this.handleliClick(index)}}

                            > { name }</li>

                        })

                    }

                </ul>

            </Fragment>

        );

    }

    handleChange(e){

        const value = e.target.value;

        this.setState(() => ({

            input: value

        }))

    }

    handleClick(){

        this.setState((prevState)=>({

            list: [...prevState.list, prevState.input],

            input: ""

        }))

    }

    handleliClick(index){

        this.setState((prevState) => {

            const list =[...prevState.list];

            list.splice(index, 1);

            return {

                list

            }

        })

    }

}

export default LifeCircle;
三、使用component请求后台数据并交给组件
在my-app下建立server/server.js文件,启动一个后端服务:
const express = require('express');

const app = express();
app.get("/data", function (req, res) {
    res.json({"name": "old monkey", "age": 5000})
});
app.listen(3002, function () {
    console.log("Node app start at port 3002.")
});
Terminal启动该服务: node server/server.js。此时可以访问http://localhost:3002/data来获取json数据。
安装axios: cnpm install axios --save。并在package.json的配置文件中添加"proxy"配置,让它转换端口到3002:
// package.json
{
  "name": "my-app",
  "version": "0.1.0",
  "private": true,
  "dependencies": {
    "axios": "^0.18.0",
    "react": "^16.4.1",
    "react-dom": "^16.4.1",
    "react-scripts": "1.1.4"
  },
  "scripts": {
    "start": "react-scripts start",
    "build": "react-scripts build",
    "test": "react-scripts test --env=jsdom",
    "eject": "react-scripts eject"
  },
  "proxy": "http://localhost:3002"
}
在src/index.js中写组件:
// src/index.js
import React from 'react';
import ReactDOM from 'react-dom';
import axios from 'axios';

class App extends React.Component{
    constructor(props){
        super(props);
        this.state = {name: "monkey", age: 100}

    }
  // 在component内部使用ajax请求数据,并通过setState传递给App。
    componentDidMount(){
        axios.get("/data").then(res=>{
            if(res.status === 200){
                console.log(res);
                this.setState({name: res.data.name, age: res.data.age});
            }
        }, err=>{
            console.log(err);
        })
    }
    addAge(){
        this.setState({age: this.state.age + 1})
    };
    decAge(){
        this.setState({age: this.state.age - 1})
    }
    render (){
        const style={
            display: "inline-block",
            width: "150px",
            height: "40px",
            backgroundColor: "rgb(173, 173, 173)",
            color: "white",
            marginRight: "20px"
        };
        return (
            <div>
                <h2>this {this.state.name } is { this.state.age } years old.</h2>
                <button style={style} onClick={()=>this.addAge()}>增加一岁</button>
                <button style={style} onClick={()=>this.decAge()}>减少一岁</button>
            </div>
        )
    }
}
ReactDOM.render(<App />, document.getElementById('root'));
前端(九):react生命周期的更多相关文章
- 前端005/React生命周期
ES6中React生命周期 一.React生命周期 React生命周期主要包括三个阶段:初始化阶段.运行中阶段和销毁阶段. 在React不同的生命周期里,会依次触发不同的钩子函数. 二.React的生 ...
- React生命周期
在react生命周期中,分2段执行,一个挂载的生命周期,一个是组件发生了数据变动,或者事件触发而引发的更新生命周期. 注:react生命周期很重要,对于很多组件场景的应用发挥重要作用,而且不熟悉生命周 ...
- React 生命周期
前言 学习React,生命周期很重要,我们了解完生命周期的各个组件,对写高性能组件会有很大的帮助. Ract生命周期 React 生命周期分为三种状态 1. 初始化 2.更新 3.销毁 初始化 1.g ...
- React生命周期详解
React生命周期图解: 一.旧版图解: 二.新版图解: 从图中,我们可以清楚知道React的生命周期分为三个部分: 实例化.存在期和销毁时. 旧版生命周期如果要开启async rendering, ...
- React生命周期简单详细理解
前言 学习React,生命周期很重要,我们了解完生命周期的各个组件,对写高性能组件会有很大的帮助. Ract生命周期 React 生命周期分为三种状态 1. 初始化 2.更新 3.销毁 初始化 1.g ...
- 22.1 、react生命周期(一)
在每个react组件中都有以下几个生命周期方法~我们需要在不同阶段进行讨论 组件生命周期概述 1.初始化 在组件初始化阶段会执行 constructor static getDerivedStateF ...
- react 生命周期钩子里不要写逻辑,否则不生效
react 生命周期钩子里不要写逻辑,否则不生效,要把逻辑写在函数里,然后在钩子里调用函数,否则会出现问题.
- react复习总结(2)--react生命周期和组件通信
这是react项目复习总结第二讲, 第一讲:https://www.cnblogs.com/wuhairui/p/10367620.html 首先我们来学习下react的生命周期(钩子)函数. 什么是 ...
- React生命周期执行顺序详解
文章内容转载于https://www.cnblogs.com/faith3/p/9216165.html 一.组件生命周期的执行次数是什么样子的??? 只执行一次: constructor.compo ...
- vue生命周期和react生命周期对比
一 vue的生命周期如下图所示(很清晰)初始化.编译.更新.销毁 二 vue生命周期的栗子 注意触发vue的created事件以后,this便指向vue实例,这点很重要 <!DOCTYPE ht ...
随机推荐
- js处理想要得到数据结构
例1 var arr = [ { date: "2018-01-10", time: "11:00" }, { date: "2018-01-10&q ...
- Django(图书管理系统1)
day63 内容回顾 1. 单表的增删改查 1. 删和改 1. GET请求 URL传值 1. 格式 ...
- 小型Http服务器
HTTP又叫做超文本传输协议,现如今用的最多的版本是1.1版本.HTTP有如下的特点: 支持客户/服务器模式(C/S或B/S) 简单快速:基于请求和响应,请求只需传送请求方法和请求路径 灵活:HTTP ...
- Git 使用流程
# 下载远程仓库到本地 git clone 仓库地址cd 本地仓库文件夹 # 创建本地开发分支并与远程开发分支关联 git checkout -b develop origin/developgit ...
- Centos7安装Chacha20加密算法 (验证成功)
Centos7安装Chacha20加密算法 (验证成功) 有些程序会使用Chacha20加密算法,如果Centos7系统报错Exception: libsodium not found,则缺乏M2Cr ...
- jvm内存结构(一)(结构总览)
jvm内存结构:<Java虚拟机原理图解>3.JVM运行时数据区 程序计数器: ,是执行的字节码的行号指示器,记录的是正在执行的虚拟机字节码指令的地址. ,每个线程都有独立计数器,互不干扰 ...
- System Trace in Depth
原理 使用 system trace 时,会记录最近 5s 的 kernel trace,然后分析下面的操作: Scheduling activity System calls Virtual mem ...
- Linux必备命令
目录 概述 常用系统工作命令 系统状态检测命令 工作目录切换命令 文本文件 ...
- 【xsy1378】 水题7号 贪心
题目大意:有$m$组约束关系$(x_i,y_i)$,你要构造一个排列,满足数$x_i$出现在数$y_i$前面,请使得这个排列字典序最小,请输出这个排列.无解请输出-1. 数据范围:$n,m≤10^5$ ...
- 怎么在一台电脑上同时启动多个tomcat
怎么在一台电脑上同时启动多个tomcat? 应用场景: 一台电脑,需要同时部署多个tomcat,用于部署不同的系统 分布式系统,一个系统,同时需要开启多个tomcat,因为分布式系统可能会有多个war ...