caffe 如何训练自己的数据图片
申明:此教程加工于caffe 如何训练自己的数据图片
一、准备数据
有条件的同学,可以去imagenet的官网http://www.image-net.org/download-images,下载imagenet图片来训练。但是我没有下载,一个原因是注册账号的时候,验证码始终出不来(听说是google网站的验证码,而我是上不了google的)。第二个原因是数据太大了。。。
我去网上找了一些其它的图片来代替,共有500张图片,分为大巴车、恐龙、大象、鲜花和马五个类,每个类100张。需要的同学,可到我的网盘下载:http://pan.baidu.com/s/1nuqlTnN(已保存至个人网盘)
编号分别以3,4,5,6,7开头,各为一类。我从其中每类选出20张作为测试,其余80张作为训练。因此最终训练图片400张,测试图片100张,共5类。我将图片放在caffe根目录下的data文件夹下面。即训练图片目录:data/re/train/ ,测试图片目录: data/re/test/
二、转换为lmdb格式
具体的转换过程,可参见我的前一篇博文:Caffe学习系列(11):图像数据转换成db(leveldb/lmdb)文件
首先,在examples下面创建一个myfile的文件夹,来用存放配置文件和脚本文件。然后编写一个脚本create_filelist.sh,用来生成train.txt和test.txt清单文件
# sudo mkdir examples/myfile

# sudo vi examples/myfile/create_filelist.sh
编辑此文件,写入如下代码,并保存

#!/usr/bin/env sh
DATA=data/re/
MY=examples/myfile
echo "Create train.txt..."
rm -rf $MY/train.txt #删除原有数据
for i in 3 4 5 6 7
do
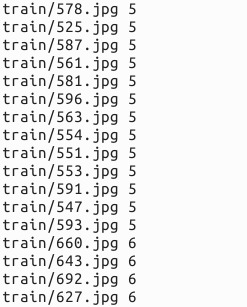
find $DATA/train -name $i*.jpg | cut -d '/' -f4-5 | sed "s/$/ $i/">>$MY/train.txt
done
echo "Create test.txt..."
rm -rf $MY/test.txt
for i in 3 4 5 6 7
do
find $DATA/test -name $i*.jpg | cut -d '/' -f4-5 | sed "s/$/ $i/">>$MY/test.txt
done
echo "All done"
然后,运行此脚本
# sudo sh examples/myfile/create_filelist.sh
成功的话,就会在examples/myfile/ 文件夹下生成train.txt和test.txt两个文本文件,里面就是图片的列表清单。
接着再编写一个脚本文件,调用convert_imageset命令来转换数据格式。
# sudo vi examples/myfile/create_lmdb.sh
插入:
#!/usr/bin/env sh

MY=examples/myfile

# 这里说明下:一共有6处需要修改
# 原数据为256×256 现在为了优化训练速度改成32×32,精确度降低可忽略(4个)
# /home/xxx/caffe/data/re/,修改xxx为自己用户的目录,这里为undo (2个)

echo "Create train lmdb.."

rm -rf $MY/img_train_lmdb

build/tools/convert_imageset \

--shuffle \

--resize_height=32 \

--resize_width=32 \

/home/undo/caffe/data/re/ \

$MY/train.txt \

$MY/img_train_lmdb  #转换成lmdb格式的训练数据

echo "Create test lmdb.."

rm -rf $MY/img_test_lmdb

build/tools/convert_imageset \

--shuffle \

--resize_width=32 \

--resize_height=32 \

/home/undo/caffe/data/re/ \

$MY/test.txt \

$MY/img_test_lmdb

echo "All Done.."
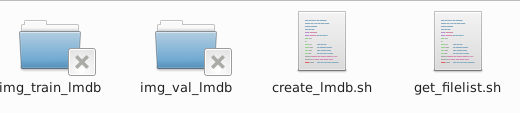
因为图片大小不一,因此我统一转换成256*256(32×32速度更快,精度影响不大)大小。运行成功后,会在 examples/myfile下面生成两个文件夹img_train_lmdb和img_test_lmdb,分别用于保存图片转换后的lmdb文件。
三、计算均值并保存
图片减去均值再训练,会提高训练速度和精度。因此,一般都会有这个操作。
caffe程序提供了一个计算均值的文件compute_image_mean.cpp,我们直接使用就可以了
# sudo build/tools/compute_image_mean examples/myfile/img_train_lmdb examples/myfile/mean.binaryproto
compute_image_mean带两个参数,第一个参数是lmdb训练数据位置,第二个参数设定均值文件的名字及保存路径。
运行成功后,会在 examples/myfile/ 下面生成一个mean.binaryproto的均值文件。

四、创建模型并编写配置文件(使用原作者的配置文件,训练不成功,后参考其他教程该用cifar-10的配置文件成功训练)
由于在32*32位框架中,cifar-10有现成的学习框架,我们只需要进行一些关键数据的改写就可以快速的训练进行我们的训练了,以下时详细的说明。
首先拷贝文件。
sudo cp examples/cifar10/cifar10_quick_solver.prototxt  examples/myfile/

sudo cp examples/cifar10/cifar10_quick_train_test.prototxt  examples/myfile/

sudo mv examples/myfile/cifar10_quick_solver.prototxt examples/myfile/quick_solver.prototxt

sudo mv examples/myfile/cifar10_quick_train_test.prototxt examples/myfile/quick_train_test.prototxt
sudo vi examples/myfile/quick_train_test.prototxt
修改的地方:(name之类自己随便修改)
1.
transform_param {

mean_file: “examples/myfile/mean.binaryproto”#修改

}

data_param {

source: “examples/myfile/img_train_lmdb”#修改

batch_size: 50#修改

backend: LMDB

}
2.
transform_param {

    mean_file: “examples/myfile/mean.binaryproto”#修改

  }

  data_param {

    source: “examples/myfile/img_test_lmdb”#修改

    batch_size: 50 #修改

    backend: LMDB
这里直接贴上我个人的配置文件
name: "selfimg_quick"

layer {

  name: "selfimg"

  type: "Data"

  top: "data"

  top: "label"

  include {

    phase: TRAIN

  }

  transform_param {

    mean_file: "examples/myfile/mean.binaryproto"

  }

  data_param {

    source: "examples/myfile/img_train_lmdb"

    batch_size: 50

    backend: LMDB

  }

}

layer {

  name: "selfimg"

  type: "Data"

  top: "data"

  top: "label"

  include {

    phase: TEST

  }

  transform_param {

    mean_file: "examples/myfile/mean.binaryproto"

  }

  data_param {

    source: "examples/myfile/img_test_lmdb"

    batch_size: 50

    backend: LMDB

  }

}

layer {

  name: "conv1"

  type: "Convolution"

  bottom: "data"

  top: "conv1"

  param {

    lr_mult: 1

  }

  param {

    lr_mult: 2

  }

  convolution_param {

    num_output: 32

    pad: 2

    kernel_size: 5

    stride: 1

    weight_filler {

      type: "gaussian"

      std: 0.0001

    }

    bias_filler {

      type: "constant"

    }

  }

}

layer {

  name: "pool1"

  type: "Pooling"

  bottom: "conv1"

  top: "pool1"

  pooling_param {

    pool: MAX

    kernel_size: 3

    stride: 2

  }

}

layer {

  name: "relu1"

  type: "ReLU"

  bottom: "pool1"

  top: "pool1"

}

layer {

  name: "conv2"

  type: "Convolution"

  bottom: "pool1"

  top: "conv2"

  param {

    lr_mult: 1

  }

  param {

    lr_mult: 2

  }

  convolution_param {

    num_output: 32

    pad: 2

    kernel_size: 5

    stride: 1

    weight_filler {

      type: "gaussian"

      std: 0.01

    }

    bias_filler {

      type: "constant"

    }

  }

}

layer {

  name: "relu2"

  type: "ReLU"

  bottom: "conv2"

  top: "conv2"

}

layer {

  name: "pool2"

  type: "Pooling"

  bottom: "conv2"

  top: "pool2"

  pooling_param {

    pool: AVE

    kernel_size: 3

    stride: 2

  }

}

layer {

  name: "conv3"

  type: "Convolution"

  bottom: "pool2"

  top: "conv3"

  param {

    lr_mult: 1

  }

  param {

    lr_mult: 2

  }

  convolution_param {

    num_output: 64

    pad: 2

    kernel_size: 5

    stride: 1

    weight_filler {

      type: "gaussian"

      std: 0.01

    }

    bias_filler {

      type: "constant"

    }

  }

}

layer {

  name: "relu3"

  type: "ReLU"

  bottom: "conv3"

  top: "conv3"

}

layer {

  name: "pool3"

  type: "Pooling"

  bottom: "conv3"

  top: "pool3"

  pooling_param {

    pool: AVE

    kernel_size: 3

    stride: 2

  }

}

layer {

  name: "ip1"

  type: "InnerProduct"

  bottom: "pool3"

  top: "ip1"

  param {

    lr_mult: 1

  }

  param {

    lr_mult: 2

  }

  inner_product_param {

    num_output: 64

    weight_filler {

      type: "gaussian"

      std: 0.1

    }

    bias_filler {

      type: "constant"

    }

  }

}

layer {

  name: "ip2"

  type: "InnerProduct"

  bottom: "ip1"

  top: "ip2"

  param {

    lr_mult: 1

  }

  param {

    lr_mult: 2

  }

  inner_product_param {

    num_output: 10

    weight_filler {

      type: "gaussian"

      std: 0.1

    }

    bias_filler {

      type: "constant"

    }

  }

}

layer {

  name: "accuracy"

  type: "Accuracy"

  bottom: "ip2"

  bottom: "label"

  top: "accuracy"

  include {

    phase: TEST

  }

}

layer {

  name: "loss"

  type: "SoftmaxWithLoss"

  bottom: "ip2"

  bottom: "label"

  top: "loss"

}
quick_train
$ sudo vi examples/myfile/quick_train_test.prototxt
只需要修改几句,其它参数默认即可。想要调优的话,可以试试其它的参数。
这里直接贴上我的配置
# The train/test net protocol buffer definition
net: "examples/myfile/quick_train_test.prototxt"
# test_iter specifies how many forward passes the test should carry out.
# In the case of MNIST, we have test batch size 100 and 100 test iterations,
# covering the full 100 testing images.
test_iter: 2
# Carry out testing every 50 training iterations.
test_interval: 50
# The base learning rate, momentum and the weight decay of the network.
base_lr: 0.001
momentum: 0.9
weight_decay: 0.004
# The learning rate policy
lr_policy: "fixed"
# Display every 2 iterations
display: 2
# The maximum number of iterations
max_iter: 300
# snapshot intermediate results
snapshot: 100
snapshot_prefix: "examples/myfile/selfimg_quick"
# solver mode: CPU or GPU
solver_mode: CPU
step 5 训练
caffe工具箱下,提供了专门训练的函数。
sudo build/tools/caffe train -solver examples/myfile/quick_solver.prototxt
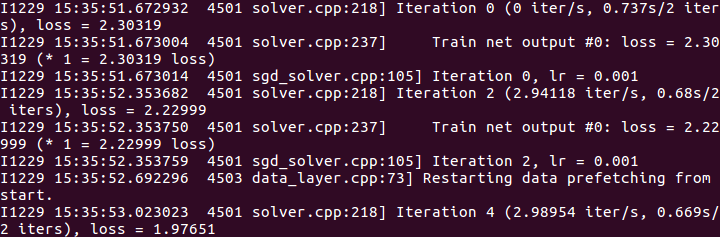
在cpu模式下,大约训练几分钟即可迭代完300次,以下是我的训练结果。
训练时间3分钟(设置32×32)。精确度0.93(还行。。)

caffe 如何训练自己的数据图片的更多相关文章
- caffe(12) 训练自己的数据
学习caffe的目的,不是简单的做几个练习,最终还是要用到自己的实际项目或科研中.因此,本文介绍一下,从自己的原始图片到lmdb数据,再到训练和测试模型的整个流程. 一.准备数据 有条件的同学,可以去 ...
- caffe学习三:使用Faster RCNN训练自己的数据
本文假设你已经完成了安装,并可以运行demo.py 不会安装且用PASCAL VOC数据集的请看另来两篇博客. caffe学习一:ubuntu16.04下跑Faster R-CNN demo (基于c ...
- caffe 用faster rcnn 训练自己的数据 遇到的问题
1 . 怎么处理那些pyx和.c .h文件 在lib下有一些文件为.pyx文件,遇到不能import可以cython 那个文件,然后把lib文件夹重新make一下. 遇到.c 和 .h一样的操作. 2 ...
- 在caffe中用训练好的 caffemodel 来分类新的图片所遇到的问题
结合之前的博客: http://www.cnblogs.com/Allen-rg/p/5834551.html#3949333 用caffemodel去测试单通道的图像(mnist数据集)时,出现了问 ...
- caffe绘制训练过程的loss和accuracy曲线
转自:http://blog.csdn.net/u013078356/article/details/51154847 在caffe的训练过程中,大家难免想图形化自己的训练数据,以便更好的展示结果.如 ...
- CAFFE中训练与使用阶段网络设计的不同
神经网络中,我们通过最小化神经网络来训练网络,所以在训练时最后一层是损失函数层(LOSS), 在测试时我们通过准确率来评价该网络的优劣,因此最后一层是准确率层(ACCURACY). 但是当我们真正要使 ...
- py-faster-rcnn 训练自己的数据
转载:http://blog.csdn.net/sinat_30071459/article/details/51332084 Faster-RCNN+ZF用自己的数据集训练模型(Python版本) ...
- YOLO2解读,训练自己的数据及相关转载以供学习
https://pjreddie.com/darknet/yolo/ 具体安装及使用可以参考官方文档https://github.com/pjreddie/darknet https://blog.c ...
- faster r-cnn 在CPU配置下训练自己的数据
因为没有GPU,所以在CPU下训练自己的数据,中间遇到了各种各样的坑,还好没有放弃,特以此文记录此过程. 1.在CPU下配置faster r-cnn,参考博客:http://blog.csdn.net ...
随机推荐
- mysql自学路线
入门: -Head First:PHP & MySQL.Lynn Beighley -MySQL必知必会 -MySQL5.5从零开始学.刘增杰 -MYSQL完全手册 (the Complete ...
- Windows系统环境下Solr之Java实战(三)使用solrJ管理索引库
https://www.cnblogs.com/zhuxiaojie/p/5764680.html https://www.cnblogs.com/xieyupeng/p/9317158.html
- spring-mvc Mybatis插件打印SQL
代码: package com.chainup.exchange.service.adapter; import com.chainup.exchange.service.impl.AccountSe ...
- Linux学习4-信号
信号 信号是Unix和Linux系统响应某些条件而产生的一个条件.接收到该信号的进程会相应的采取一些行动. 信号是由于某些错误条件而生成的,如内存冲突,浮点处理器错误或非法指令等.它们由shell ...
- [csp-201809-4]再卖菜 差分约束or记忆化搜索
先更新第一个做法:差分约束 转化成最长路,求出的每一个解是满足差分方程的最小值 spfa求最短路 对于边(x->y) 有: if(dis[y] > dis[x] + a[i].d) dis ...
- Java:数值-字符串转换(String转Double)
String ss = "3.141592653"; double value = Double.valueOf(ss.toString());
- pandas空值处理与插值
# coding:utf-8 import pandas as pd import numpy as np import matplotlib.pyplot as plt from scipy.int ...
- windebug分析高cpu问题
分析高CPU的关键是找到哪个线程是持续运行,占用CPU时间. 可以隔上两分钟连续抓两个dump文件,使用 !runaway 查看线程运行的时间 通过对比两个dump文件的线程时间,看看哪个线程运行的时 ...
- IIS8.0 配置应用程序初始化功能
IIS进程回收后,第一次访问会超级慢,这对于用户是不能接受的,怎么解决这个问题? 我们不能设置IIS不回收进程,因为这样可能会导致IIS内存泄漏.有效的方法时,尽量在业务空闲时间回收进程,回收后立刻预 ...
- win10定时关机
CMD 输入shutdown -s -t 7200这个命令,大家可以自已设置7200这个时间,自己算一下60分钟=3600秒: