Ubuntu16.04 + gtx1060 + cuda8.0 + cudnn5.1 + caffe + Theano + Tensorflow
参考 ubuntu16.04+gtx1060+cuda8.0+caffe安装、测试经历 ,细节处有差异。
首先说明,这是在台式机上的安装测试经历,首先安装的win10,然后安装ubuntu16.04双系统,显卡为GTX1060
台式机显示器接的是GTX1060 HDMI口,win10上首先安装了最新的GTX1060驱动375
废话不多说,上车吧,少年
一、首先安装nvidia显卡驱动
我是1080P的显示器,在没有安装显卡驱动前,ubuntu分辨率很低,可以手动修改一下grub文件,提高分辨率,在终端输入
sudo vim /etc/default/grub
找到以下行# The resolution used on graphical terminal# note that you can use only modes which your graphic card supports via VBE# you can see them in real GRUB with the command 'vbeinfo'# GRUB_GFXMODE=640×480
按a进入插入模式,增加下面一行GRUB_GFXMODE=1920×1080#这里分辨率自行设置
按esc退出插入模式,按:wq保存退出
在终端编辑sudo update-grub
更新grub
重新启动ubuntu使之生效进入ubuntu系统设置-软件与更新-附加驱动
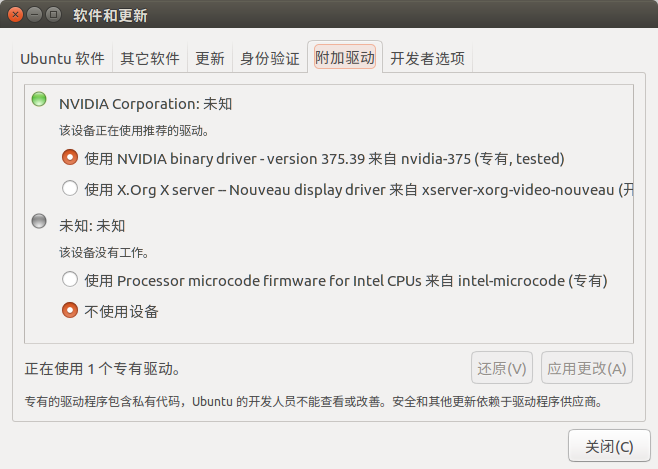
安装之后重启系统让GTX1060显卡驱动生效- 测试
终端输入
nvidia-smi
显示效果如下图表示安装成功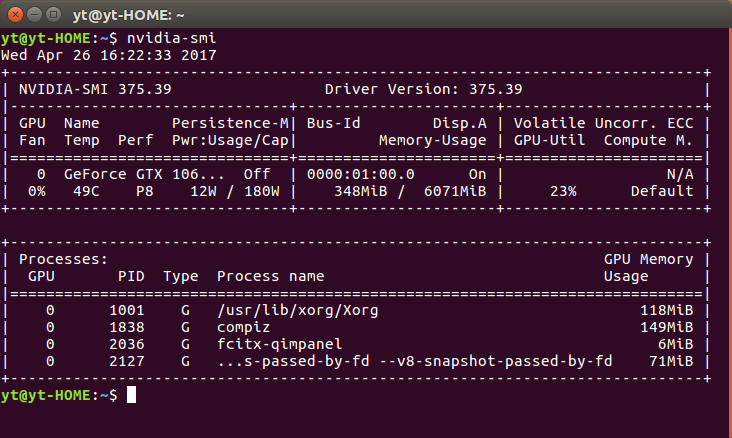
二、cuda安装
下载cuda_8.0.61_375.26_linux.run 和 cudnn-8.0-linux-x64-v5.1.tgz
这里我提供了百度网盘,这两个文件我先在win10下下载好,并用u盘拷贝到ubuntu的下载目录下
安装cuda8.0
终端输入
cd 下载/sh cuda_8.0.27_linux.run --override
启动安装程序,一直按空格到最后,输入accept接受条款 (或者按 Q)
输入n不安装nvidia图像驱动,之前已经安装过了
输入y安装cuda 8.0工具
回车确认cuda默认安装路径:/usr/local/cuda-8.0
输入y用sudo权限运行安装,输入密码
输入y或者n安装或者不安装指向/usr/local/cuda的符号链接
输入y安装CUDA 8.0 Samples,以便后面测试
回车确认CUDA 8.0 Samples默认安装路径:/home/yt(yt是我的用户名),该安装路径测试完可以删除安装cudnn v5.1
终端输入
cd 下载/

tar zxvf cudnn-8.0-linux-x64-v5..tgz
解压在下载目录下产生一个cuda目录
cd cuda

sudo cp lib64/* /usr/local/cuda/lib64/         #复制头文件

sudo cp include/cudnn.h /usr/local/cuda/include/  #复制动态链接库

sudo chmod a+r /usr/local/cuda/include/cudnn.h

sudo chmod a+r /usr/local/cuda/lib64

sudo chmod a+r /usr/local/cuda/lib64/libcudnn*   #给所有用户增加这些文件的读权限
建立软链接
终端输入
cd /usr/local/cuda/lib64/

sudo rm -rf libcudnn.so libcudnn.so.

sudo ln -s libcudnn.so.5.1. libcudnn.so.   #具体看版本

sudo ln -s libcudnn.so. libcudnn.so
设置环境变量,终端输入
sudo gedit /etc/profile
在末尾加入
PATH=/usr/local/cuda/bin:$PATH

export PATH
保存后,创建链接文件
sudo vim /etc/ld.so.conf.d/cuda.conf
按a进入插入模式,增加下面一行
/usr/local/cuda/lib64
按esc退出插入模式,按:wq保存退出
最后在终端输入sudo ldconfig使链接生效cuda Samples测试
打开CUDA 8.0 Samples默认安装路径,终端输入
cd /home/yt/NVIDIA_CUDA-8.0_Samples(yt是我的用户名)sudo make all -j4(4核)
出现“unsupported GNU version! gcc versions later than 5.3 are not supported!”的错误,这是由于GCC版本过高,在终端输入cd /usr/local/cuda-8.0/includesudo cp host_config.h host_config.h.baksudo gedit host_config.h
ctrl+f寻找有“5.3”的地方,只有一处,如下# if __GNUC__ > 5 || (__GNUC__ == 5 && __GNUC_MINOR__ > 3)#error -- unsupported GNU version! gcc versions later than 5.3 are not supported!
将两个5改成6,即#if __GNUC__ > 6 || (__GNUC__ == 6 && __GNUC_MINOR__ > 3)
保存退出,继续在终端输入cd /home/yt/NVIDIA_CUDA-8.0_Samples(yt是我的用户名)sudo make all -j4(4核)
完成后继续向终端输入cd bin/x86_64/linux/release./deviceQuery
完成之后出现如下图所示,表示成功安装cuda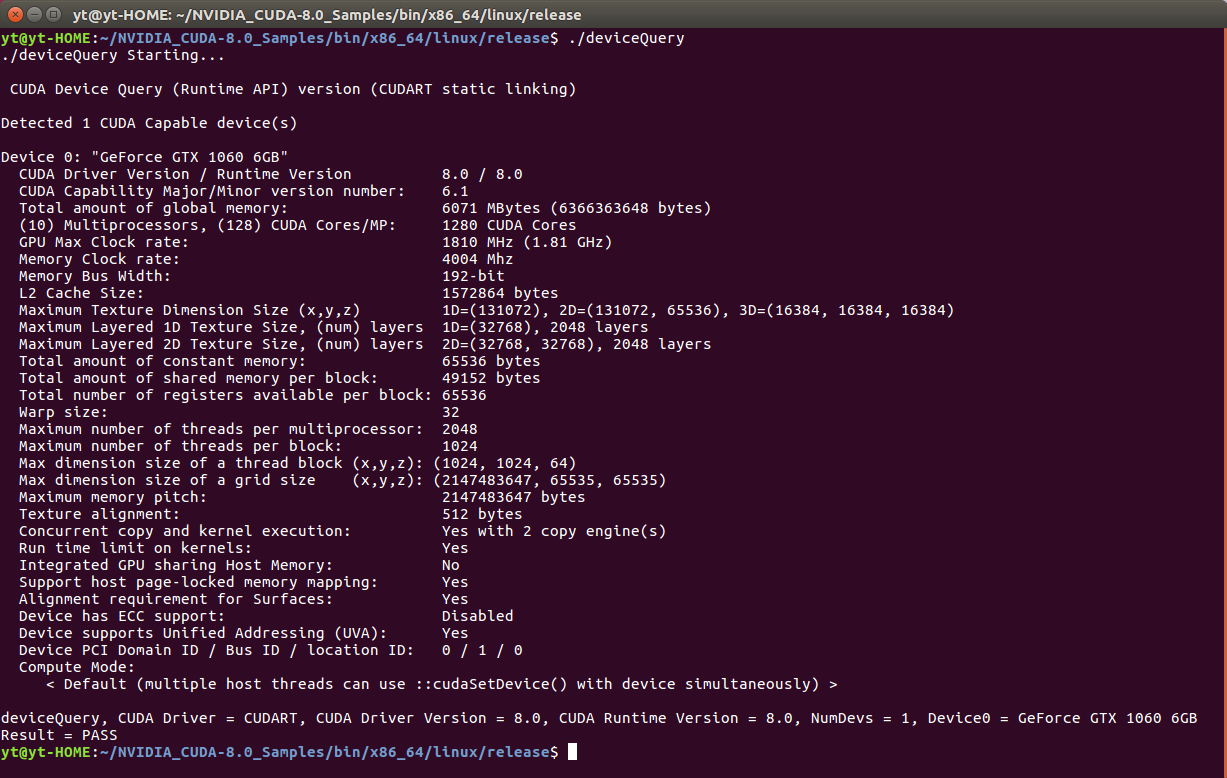
三、依赖包安装
sudo apt-get install build-essential#必要的编译工具依赖sudo apt-get install libprotobuf-dev libleveldb-dev libsnappy-dev libopencv-dev libhdf5-serial-dev protobuf-compilersudo apt-get install --no-install-recommends libboost-all-devsudo apt-get install libatlas-base-devsudo apt-get install libgflags-dev libgoogle-glog-dev liblmdb-dev
四
安装python的pip和easy_install,方便安装软件包
终端输入
cdwget --no-check-certificate https://bootstrap.pypa.io/ez_setup.pysudo python ez_setup.py --insecurewget https://bootstrap.pypa.io/get-pip.pysudo python get-pip.py
五
安装科学计算和python所需的部分库
终端输入
sudo apt-get install libblas-dev liblapack-dev libatlas-base-dev gfortran python-numpy
六
安装git,拉取源码
终端输入
sudo apt-get install gitgit clone https://github.com/BVLC/caffe.git
七
安装python依赖
终端输入
sudo apt-get install python-pip安装pip
cd /home/yt/caffe/pythonsudo sufor req in $(cat "requirements.txt"); do pip install -i https://pypi.tuna.tsinghua.edu.cn/simple $req; done
按Ctrl+D退出sudo su模式
八、编译caffe(暂不对matlab说明)
终端输入
cd /home/yt/caffecp Makefile.config.example Makefile.configgedit Makefile.config①将
USE_CUDNN := 1取消注释,②
INCLUDE_DIRS := $(PYTHON_INCLUDE) /usr/local/include后面打上一个空格 然后添加/usr/include/hdf5/serial如果没有这一句可能会报一个找不到hdf5.h的错误终端输入
make all -j4
make过程中出现找不到lhdf5_hl和lhdf5的错误,
解决方案:
在计算机中搜索libhdf5_serial.so.10.1.0,找到后右键点击打开项目位置
该目录下空白处右键点击在终端打开,打开新终端输入sudo ln libhdf5_serial.so.10.1.0 libhdf5.sosudo ln libhdf5_serial_hl.so.10.0.2 libhdf5_hl.so
最后在终端输入sudo ldconfig使链接生效
原终端中输入make clean清除第一次编译结果
再次输入make all -j4重新编译终端输入
make test -j4

make runtest -j4

make pycaffe -j4

make distribute   #生成发布安装包
测试python,终端输入
pip install protobuf -i https://pypi.tuna.tsinghua.edu.cn/simple pyspidercd /home/yt/caffe/pythonpythonimport caffe
如果不报错就说明编译成功
九、mnist测试
下载mnist数据集,终端输入
cd /home/yt/caffe/data/mnist/./get_mnist.sh获取mnist数据集
在/home/yt/caffe/data/mnist/目录下会多出训练集图片、训练集标签、测试集图片和测试集标签等4个文件mnist数据格式转换,终端输入
cd /home/yt/caffe/./examples/mnist/create_mnist.sh
必须要在第一行之后运行第二行,即必须要在caffe根目录下运行create_mnist.sh
此时在/caffe/examples/mnist/目录下生成mnist_test_lmdb和mnist_train_lmdb两个LMDB格式的训练集和测试集LeNet-5模型描述在
/caffe/examples/mnist/lenet_train_test.prototxtSolver配置文件在
/caffe/examples/mnist/lenet_solver.prototxt训练mnist,执行文件在
/caffe/examples/mnist/train_lenet.sh
终端输入cd /home/yt/caffe/./examples/mnist/train_lenet.sh
测试结果如下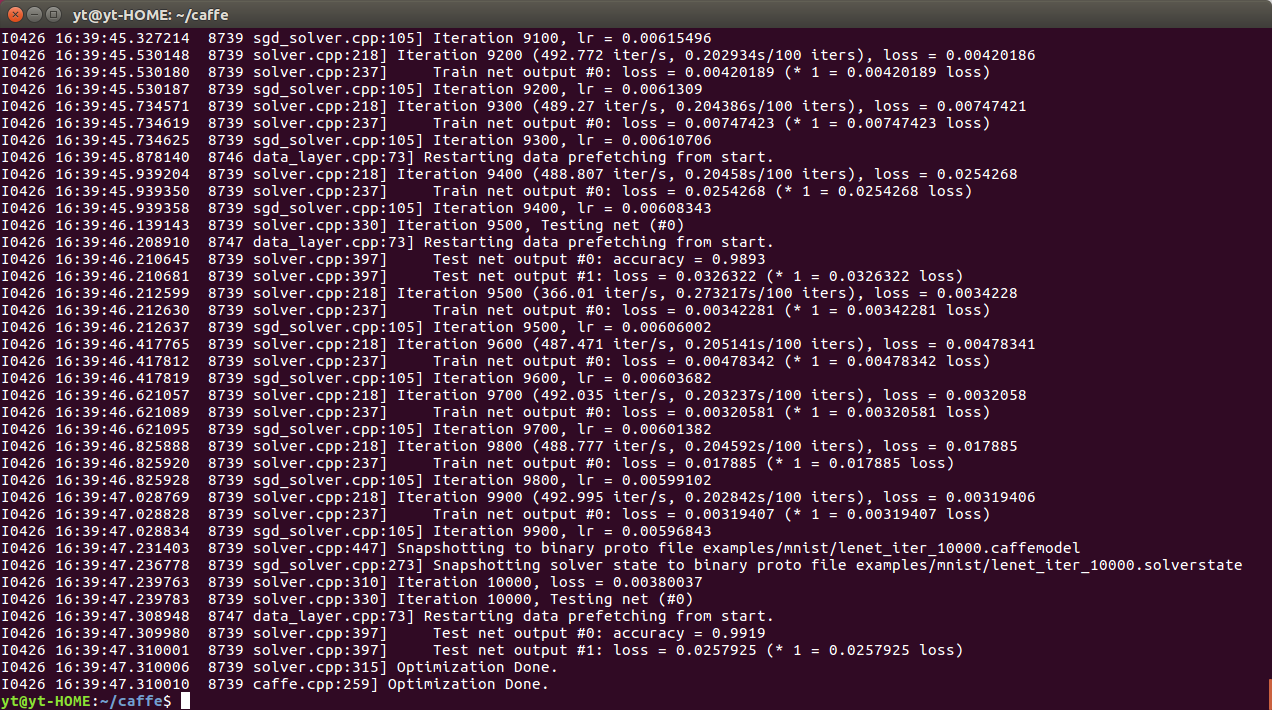
十、安装theano
1、直接输入命令:
sudo pip install theano
2、配置参数文件:.theanorc
sudo gedit ~/.theanorc
[global]

floatX=float32

device=gpu

base_compiledir=~/external/.theano/

allow_gc=False

warn_float64=warn

[mode]=FAST_RUN

[nvcc]

fastmath=True

[cuda]

root=/usr/local/cuda
3、运行测试例子:
from theano import function, config, shared, sandbox

import theano.tensor as T

import numpy

import time

vlen = 10 * 30 * 768  # 10 x #cores x # threads per core

iters = 1000

rng = numpy.random.RandomState(22)

x = shared(numpy.asarray(rng.rand(vlen), config.floatX))

f = function([], T.exp(x))

print(f.maker.fgraph.toposort())

t0 = time.time()

for i in range(iters):

    r = f()

t1 = time.time()

print("Looping %d times took %f seconds" % (iters, t1 - t0))

print("Result is %s" % (r,))

if numpy.any([isinstance(x.op, T.Elemwise) for x in f.maker.fgraph.toposort()]):

    print('Used the cpu')

else:

    print('Used the gpu')
十、安装tensosrflow
echo "deb [arch=amd64] http://storage.googleapis.com/bazel-apt stable jdk1.8" | sudo tee /etc/apt/sources.list.d/bazel.list
curl https://storage.googleapis.com/bazel-apt/doc/apt-key.pub.gpg | sudo apt-key add -
sudo apt-get update && sudo apt-get install bazel
sudo apt-get upgrade bazel
git clone https://github.com/tensorflow/tensorflow

cd tensorflow

git checkout Branch # where Branch is the desired branch

git checkout r1.
sudo apt-get install python-numpy python-dev python-pip python-wheel

sudo apt-get install python3-numpy python3-dev python3-pip python3-wheel
sudo apt-get install libcupti-dev
./configure
$ ./configure # 以下是一个例子

Please specify the location of python. [Default is /usr/bin/python]: y

Invalid python path. y cannot be found

Please specify the location of python. [Default is /usr/bin/python]:

Please specify optimization flags to use during compilation when bazel option "--config=opt" is specified [Default is -march=native]:

Do you wish to use jemalloc as the malloc implementation? [Y/n] y

jemalloc enabled

Do you wish to build TensorFlow with Google Cloud Platform support? [y/N] n

No Google Cloud Platform support will be enabled for TensorFlow

Do you wish to build TensorFlow with Hadoop File System support? [y/N] y

Hadoop File System support will be enabled for TensorFlow

Do you wish to build TensorFlow with the XLA just-in-time compiler (experimental)? [y/N] n

No XLA JIT support will be enabled for TensorFlow

Found possible Python library paths:

  /usr/local/lib/python2.7/dist-packages

  /usr/lib/python2.7/dist-packages

Please input the desired Python library path to use.  Default is [/usr/local/lib/python2.7/dist-packages]

Using python library path: /usr/local/lib/python2.7/dist-packages

Do you wish to build TensorFlow with OpenCL support? [y/N] n

No OpenCL support will be enabled for TensorFlow

Do you wish to build TensorFlow with CUDA support? [y/N] y

CUDA support will be enabled for TensorFlow

Please specify which gcc should be used by nvcc as the host compiler. [Default is /usr/bin/gcc]:

Please specify the CUDA SDK version you want to use, e.g. 7.0. [Leave empty to use system default]: 8.0

Please specify the location where CUDA 8.0 toolkit is installed. Refer to README.md for more details. [Default is /usr/local/cuda]:

Please specify the Cudnn version you want to use. [Leave empty to use system default]: 5

Please specify the location where cuDNN 5 library is installed. Refer to README.md for more details. [Default is /usr/local/cuda]:

Please specify a list of comma-separated Cuda compute capabilities you want to build with.

You can find the compute capability of your device at: https://developer.nvidia.com/cuda-gpus.

Please note that each additional compute capability significantly increases your build time and binary size.

[Default is: "3.5,5.2"]: 6.1

INFO: Starting clean (this may take a while). Consider using --expunge_async if the clean takes more than several minutes.

........

INFO: All external dependencies fetched successfully.

Configuration finished
编译
bazel build --config=opt --config=cuda //tensorflow/tools/pip_package:build_pip_package --cxxopt="-D_GLIBCXX_USE_CXX11_ABI=0"
bazel-bin/tensorflow/tools/pip_package/build_pip_package /tmp/tensorflow_pkg
检查tmp文件夹下生成的whl文件名
sudo pip install /tmp/tensorflow_pkg/ tensorflow-1.0.-cp27-cp27mu-linux_x86_64.whl
3、测试
python

import tensorflow as tf

sess = tf.Session()

Ubuntu16.04 + gtx1060 + cuda8.0 + cudnn5.1 + caffe + Theano + Tensorflow的更多相关文章
- 初用Linux, 安装Ubuntu16.04+NVIDIA387+CUDA8.0+cudnn5.1+TensorFlow1.0.1
因为最近Deep Learning十分热门, 装一下TensorFlow学习一下. 本文主要介绍安装流程, 将自己遇到的问题说明出来, 并记录自己如何处理, 原理方面并没有能力解释. 由于本人之前从来 ...
- ubuntu16.04安装cuda8.0试错锦集
ubuntu16.04安装cuda8.0试错锦集 参考文献: [http://www.jianshu.com/p/35c7fde85968] [http://blog.csdn.net/sinat_1 ...
- Ubuntn16.04+OpenCV3.1+CUDA8.0+cudnn5.1+caffe配置及问题集锦
ubuntn16.04 Caffe安装步骤记录(超详尽) 一开始安装好ubuntn16.04后,先安装的opencv3.1,再自己安装的390驱动,cuda8.0和cudnn,之后配置caffe一直不 ...
- 深度学习环境搭建(Ubuntu16.04+GTX1080Ti+CUDA8.0+Cudnn6.0+TensorFlow+Caffe2(Pytorch))
OS System:Ubuntu16.04 GPU Device:GTX1080Ti Softwares:CUDA8.0.Cudnn6.0.TensorFlow(1.4.0).Caffe2(1.0.0 ...
- ubuntu16.04 NVIDIA CUDA8.0 以及cuDNN安装
下载CUDA 官网下载按照自己的实际情况进行选择,下载合适的版本. 官方安装指南 注意这里下载的是cuda8.0的runfile(local)文件. 安装CUDA 下载完成后,解压到当前目录,切换到该 ...
- ubuntu16.04+cuda8.0+cudnn5.0+caffe
ubuntu安装过程(硬盘安装)http://www.cnblogs.com/zhbzz2007/p/5493395.html“但是千万不要用麒麟版!!!比原版体验要差很多!!!”开关机的时候电脑最上 ...
- Ubuntu16.04+CUDA8.0+CUNN5.1+caffe+tensorflow+Theano
title: Ubuntu 16.04+CUDA8.0+CUNN5.1+caffe+tensorflow+Theano categories: 深度学习 tags: [深度学习框架搭建] --- 前言 ...
- Ubuntu16.04 +cuda8.0+cudnn+caffe+theano+tensorflow配置明细
本文为原创作品,未经本人同意,禁止转载,禁止用于商业用途!本人对博客使用拥有最终解释权 欢迎关注我的博客:http://blog.csdn.net/hit2015spring和http://www ...
- 深度学习主机环境配置: Ubuntu16.04 + GeForce GTX 1070 + CUDA8.0 + cuDNN5.1 + TensorFlow
深度学习主机环境配置: Ubuntu16.04 + GeForce GTX 1070 + CUDA8.0 + cuDNN5.1 + TensorFlow 最近在公司做深度学习相关的学习和实验,原来一直 ...
随机推荐
- MFC笔记5
1.MessageBox() 引用自(http://www.douban.com/note/40199603/) 一 函数原型及参数 function MessageBox(h ...
- Python 学习图谱
https://mp.weixin.qq.com/s/-fJYAlOs4ui0YeJ-W6BkeQ
- linux网络日志分析
1.清空日志的技巧 2.访问日志格式分析 3. web日志统计举例
- 天天向上的力量 III
描述 一年365天,以第1天的能力值为基数,记为1.0. 当好好学习时,能力值相比前一天提高N‰:当没有学习时,能力值相比前一天下降N‰. 每天努力或放任,一年下来的能力值相差多少呢?其中,N的取值范 ...
- 227. Basic Calculator II 无括号版本计算器
[抄题]: Implement a basic calculator to evaluate a simple expression string. The expression string con ...
- JavaSE基础知识(3)—流程控制结构
一.顺序结构 1.说明 程序从上往下依次执行,中间没有任何跳转或选择2.特点 变量必须遵循 “前向引用” (局部变量必须先声明.赋值,然后再使用!) 二.分支结构(条件) 1.说明 程序从两条或多条路 ...
- linux resin 安装 配置 相关
resin跟tomcat一样,也是解析jsp网站的,也需要JDK的支持,所以第一步也是安装JDK,安装JDK的方法参考Tomcat中的安装JDK部分.下面介绍安装resin.resin官网http:/ ...
- Java 7 使用TWR(Try-with-resources)完成文件copy
try-with-resources语句是声明了一个或多个资源的try语句块.在java中资源作为一个对象,在程序完成后必须关闭.try-with-resources语句确保每个资源在语句结束时关闭. ...
- Spring遇到的问题合集
2018-09-15 元素 "tx:annotation-driven" 的前缀 "tx" 未绑定. 后来我加了 http://www.springframew ...
- rpc和http
rpc,远程过程调用,分布式各服务在不同的节点,因为不在同一进程中,所以节点间的调用需要通过网络进行传输,rpc是基于tcp/ip的,通过长连接进行通信.客户端需要缓存服务端的ip和端口,服务端也要缓 ...