thymeleaf(二)
项目demo http://pan.baidu.com/s/1wg6PC
compile("org.springframework.boot:spring-boot-starter-thymeleaf")

<?xml version="1.0" encoding="UTF-8"?>

<web-app xmlns="http://java.sun.com/xml/ns/javaee"

         xmlns:xsi="http://www.w3.org/2001/XMLSchema-instance"

         xsi:schemaLocation="http://java.sun.com/xml/ns/javaee

                 http://java.sun.com/xml/ns/javaee/web-app_3_0.xsd"

         version="3.0">

    <!--配置WEB-INF下的servlet-context.xml文件-->

    <servlet>

        <servlet-name>appServlet</servlet-name>

        <servlet-class>org.springframework.web.servlet.DispatcherServlet</servlet-class>

        <init-param>

            <param-name>contextConfigLocation</param-name>

            <param-value>/WEB-INF/servlet-context.xml</param-value>

        </init-param>

        <load-on-startup>1</load-on-startup>

    </servlet>

    <servlet-mapping>

        <servlet-name>appServlet</servlet-name>

        <url-pattern>/</url-pattern>

    </servlet-mapping>

</web-app>
<?xml version="1.0" encoding="UTF-8"?>

<beans xmlns="http://www.springframework.org/schema/beans"

       xmlns:xsi="http://www.w3.org/2001/XMLSchema-instance"

       xmlns:context="http://www.springframework.org/schema/context"

       xmlns:mvc="http://www.springframework.org/schema/mvc"

       xsi:schemaLocation="http://www.springframework.org/schema/mvc

       http://www.springframework.org/schema/mvc/spring-mvc-3.1.xsd

       http://www.springframework.org/schema/beans http://www.springframework.org/schema/beans/spring-beans-3.1.xsd

       http://www.springframework.org/schema/context http://www.springframework.org/schema/context/spring-context-3.1.xsd">

       <!-- Scans the classpath of this application for @Components to deploy as beans -->

       <context:component-scan base-package="com.test.thymeleaf.controller" />

       <!-- Configures the @Controller programming model -->

       <mvc:annotation-driven />

        <!--Resolves view names to protected .jsp resources within the /WEB-INF/views directory -->

        <!--springMVC+jsp的跳转页面配置-->

       <!--<bean class="org.springframework.web.servlet.view.InternalResourceViewResolver">-->

              <!--<property name="prefix" value="/WEB-INF/views/" />-->

              <!--<property name="suffix" value=".jsp" />-->

       <!--</bean>-->

       <!--springMVC+thymeleaf的跳转页面配置-->

       <bean id="templateResolver"

          class="org.thymeleaf.templateresolver.ServletContextTemplateResolver">

         <property name="prefix" value="/WEB-INF/views/" />

         <property name="suffix" value=".html" />

         <property name="templateMode" value="HTML5" />

       </bean>

       <bean id="templateEngine"

           class="org.thymeleaf.spring4.SpringTemplateEngine">

          <property name="templateResolver" ref="templateResolver" />

       </bean>

       <bean class="org.thymeleaf.spring4.view.ThymeleafViewResolver">

         <property name="templateEngine" ref="templateEngine" />

       </bean>

</beans>
package com.test.thymeleaf.controller;

import com.test.thymeleaf.domain.User;

import org.springframework.stereotype.Controller;

import org.springframework.ui.Model;

import org.springframework.web.bind.annotation.RequestMapping;

import org.springframework.web.bind.annotation.RequestMethod;

@Controller

public class HomeController {

    User user = new User();
    //入口

    @RequestMapping(value = "/home")

    public String home(Model model) {

        model.addAttribute("user",user);

        return "aa";

    }


  //提交表单后进行数据读取,并将数据传出

    @RequestMapping(value = "/bb",method = RequestMethod.POST)

    public String bb(User user,Model model) {

        model.addAttribute("user", user);

        model.addAttribute("message", ",welcome");

        return "bb";

    }

}
<!DOCTYPE html>

<html xmlns="http://www.w3.org/1999/xhtml"

      xmlns:th="http://www.thymeleaf.org">
<!DOCTYPE html>

<html xmlns="http://www.w3.org/1999/xhtml"

      xmlns:th="http://www.thymeleaf.org">

<head>

  <title>Home</title>

</head>

<body>

<form th:action="@{/bb}" th:object="${user}" th:method="post">

    <input type="text" th:field="*{name}"/>

    <input type="text" th:field="*{msg}"/>

    <input type="submit"/>

</form>

</body>

</html>
bb.html(用${}读取后台传出的数据动态替换静态数据“vinphy,”和"welcome!")
<!DOCTYPE html>

<html xmlns="http://www.w3.org/1999/xhtml"

      xmlns:th="http://www.thymeleaf.org">

<head>

    <meta charset="utf-8"/>

  <title>Home</title>

</head>

<body>

<div>

<sapn th:text="${user.name}">vinphy,</sapn>

<sapn th:text="${message}">welcome!</sapn>

</div>

</body>

</html>
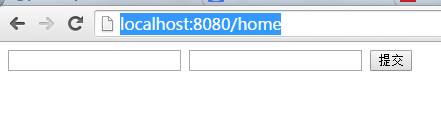
7.部署访问
部署后访问http://localhost:8080/home进行访问,出现aa.html的内容
I386P8MNSACP.png)

thymeleaf(二)的更多相关文章
- Spring MVC : Java模板引擎 Thymeleaf (二)
本文原计划直接介绍Thymeleaf的视图解析,但考虑到学习的方便,决定先构建一个spring-mvc. 以下的全部过程仅仅要一个记事本和JDK就够了. 第一步,使用maven构建一个web app. ...
- Thymeleaf模板引擎的使用
Thymeleaf模板引擎的使用 1.模板引擎 JSP.Velocity.Freemarker.Thymeleaf 2.springboot推荐使用Thymeleaf模板引擎 特点:语法更简单,功能更 ...
- Thymeleaf3语法详解和实战
Thymeleaf3语法详解 Thymeleaf是Spring boot推荐使用的模版引擎,除此之外常见的还有Freemarker和Jsp.Jsp应该是我们最早接触的模版引擎.而Freemarker工 ...
- Thymeleaf3语法详解
每天学习一点点 编程PDF电子书.视频教程免费下载:http://www.shitanlife.com/code Thymeleaf是Spring boot推荐使用的模版引擎,除此之外常见的还有F ...
- vfd-cloud——一个适合练习上手的云存储网盘springboot项目(开发中)
vfd-cloud 一个基于SpringBoot的云存储网盘项目,适合练手学习SpringBoot,用到的技术栈列到了下面.支持用户的注册登陆及修改密码,利用邮箱进行验证.支持 ...
- (二)SpringBoot基础篇- 静态资源的访问及Thymeleaf模板引擎的使用
一.描述 在应用系统开发的过程中,不可避免的需要使用静态资源(浏览器看的懂,他可以有变量,例:HTML页面,css样式文件,文本,属性文件,图片等): 并且SpringBoot内置了Thymeleaf ...
- Spring Boot学习记录(二)--thymeleaf模板 - CSDN博客
==他的博客应该不错,没有细看 Spring Boot学习记录(二)--thymeleaf模板 - CSDN博客 http://blog.csdn.net/u012706811/article/det ...
- (二)SpringBoot2.0基础篇- 静态资源的访问及Thymeleaf模板引擎的使用
一.描述 在应用系统开发的过程中,不可避免的需要使用静态资源(浏览器看的懂,他可以有变量,例:HTML页面,css样式文件,文本,属性文件,图片等): 并且SpringBoot内置了Thymeleaf ...
- Spring Boot (二):模版引擎 Thymeleaf 渲染 Web 页面
Spring Boot (二):模版引擎 Thymeleaf 渲染 Web 页面 在<Spring Boot(一):快速开始>中介绍了如何使用 Spring Boot 构建一个工程,并且提 ...
随机推荐
- 介绍三款串口监控工具:Device Monitoring Studio,portmon,Comspy
在开发上位机下位机通讯程序时,有一个好的监控工具会事半功倍.特在网上找了几款串口监控软件,作了简单对比: 一.Device Monitoring Studio 网址:http://www.hhdsof ...
- mui 从列表进入到详情,再返回,列表页还是进入列表之前的样子,而不刷新页面
mui 从列表进入到详情,再返回,列表页还是进入列表之前的样子,而不刷新页面
- Jquery如何获取某个元素前(后)的文本内容?
<span> text here... <a id="target_element">百万创想</a></span> 如何获得a标签 ...
- sql server ExecuteNonQuery()返回受影响行数不适用select语句
SqlCommand.ExecuteNonQuery 方法对连接执行 Transact-SQL 语句并返回受影响的行数. 对于 UPDATE.INSERT 和 DELETE 语句,返回值为该命令所影响 ...
- 【转】Wireshark和Fiddler分析Android中的TLS协议包数据(附带案例样本)
本文转自:http://www.wjdiankong.cn/wireshark%E5%92%8Cfiddler%E5%88%86%E6%9E%90android%E4%B8%AD%E7%9A%84tl ...
- Java高并发和多线程系列 - 1. 线程基本概念
1. 什么是线程? 线程和进程的区别 在了解线程的概念前,我们应该先知道什么是进程? 进程是操作系统的基本概念之一, 它是正在执行的程序实例. * 下面的一些进程的基本概念你可以了解下 ------- ...
- 升级SilverLight为5.1.50907.0后,VS调试时报“无法启动调试--未安装 Silverlight Developer 运行时。请安装一个匹配版本”的处理办法
作者: zyl910 一.问题 今天需要调试一个SilverLight程序.运行时ie弹出了一个升级提示,于是手贱点了升级. 随后便悲剧了,VS调试时报"无法启动调试--未安装 Silver ...
- python 执行sql得到字典格式数据
本文在提供一种方式,实现执行sql语句 返回字典结果集 # 连接数据库,数据库的,这里使用的setting中的默认设置,在这里不做具体的介绍,不懂的可以百度一下 conn = MySQLdb.conn ...
- BizTalk RosettaNet解决方案之Loopback
本教程使用 BizTalk Accelerator for RosettaNet (BTARN) 在一台计算机上模拟本组织与合作伙伴组织之间的流程实施情况. 创建本组织 “BizTalk <版本 ...
- Sublime Text3 运行 PHP 文件
在 Zend Studio(12.5)下可以通过 Run(Ctrl + F11)把 PHP 程序的执行结果通过 Debug Output 显示在 IDE 中,这样比开启 Server,再打开浏览器执行 ...