Vue 组件&组件之间的通信 之 template模板引用与动态组件的使用
template模板引用
在component的template中书写大量的HTML元素很麻烦。 Vue提供了<template>标签,可以在里边书写HTML,然后通过ID指定到组建内的template属性上;
示例:
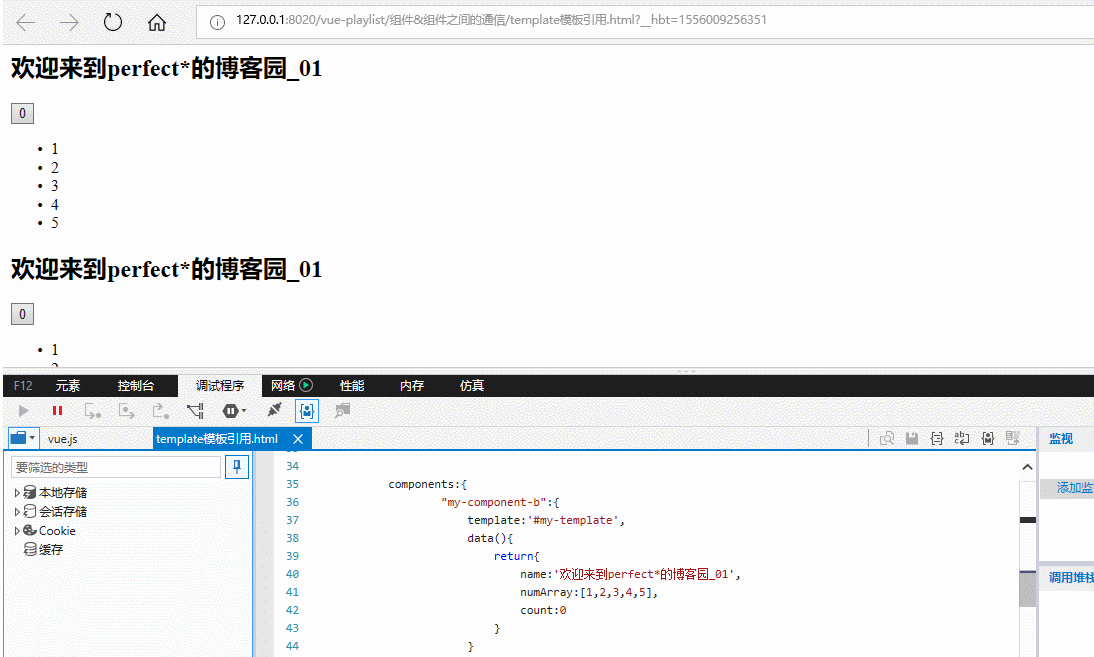
由图可知自定义组件的count的值是自增的,是独立的,互不影响。
vue代码:
<template id="my-template">

        <div>

            <h2>{{name}}</h2>

            <button  @click="count++">{{count}}</button>

            <ul>

                <li v-for="item in numArray">{{item}}</li>

            </ul>

        </div>

    </template>

    <script type="text/javascript" src="../js/vue.js" ></script>

    <script>

        new Vue({

            components:{

                    "my-component-b":{

                        template:'#my-template',

                        data(){

                            return{

                                name:'欢迎来到perfect*的博客园_01',

                                numArray:[,,,,],

                                count:

                            }

                        }

                    }

                }

        }).$mount('div');

    </script>
html:
<body>

        <div>

        <my-component-b></my-component-b><!--可以把my-component-b看做一个对象-->

        <my-component-b></my-component-b><!--可以把my-component-b看做一个对象-->

        </div>

    </body>
动态组件:
在一个元素上挂载多个组件,根据不同状态进行切换的时候,可以使用动态组件;
动态组件的使用:
需要使用内置组件<component></component>,根据 :is 的值决定显示哪个组件,:is的值是要显示的组件id;
示例:
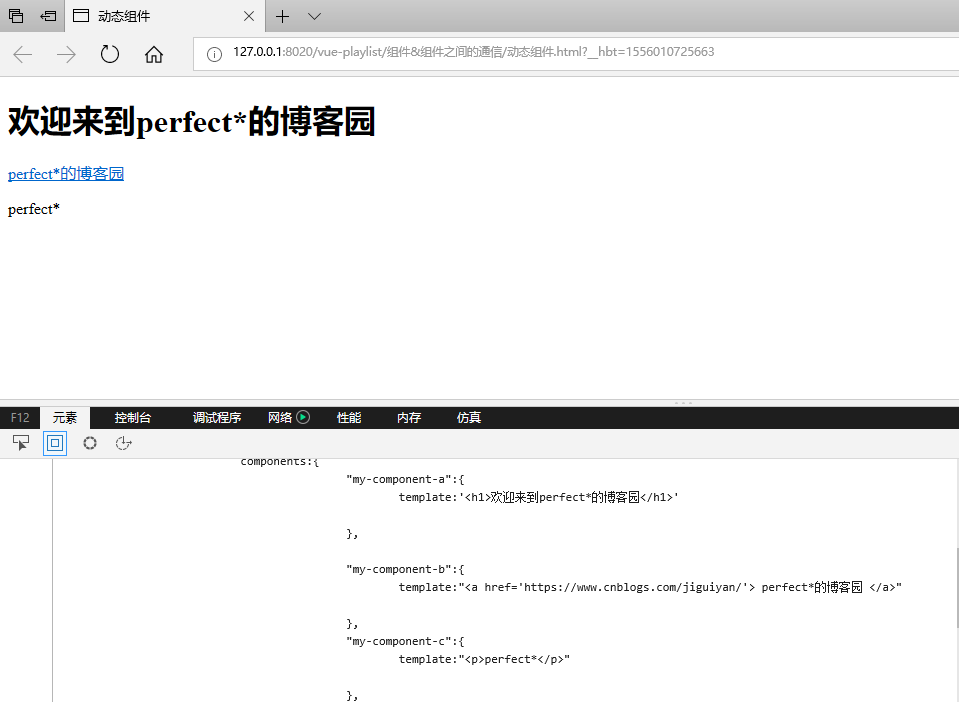
初始效果:
初始代码:
 <!DOCTYPE html>

 <html>

     <head>

         <meta charset="UTF-8">

         <title>动态组件</title>

     </head>

     <body>

         <div>

         <my-component-a></my-component-a>

         <my-component-b></my-component-b>

         <my-component-c></my-component-c>

         </div>

     </body>

     <script type="text/javascript" src="../js/vue.js" ></script>

     <script>

         new Vue({

             components:{

                     "my-component-a":{

                         template:'<h1>欢迎来到perfect*的博客园</h1>'

                     },

                     "my-component-b":{

                         template:"<a href='https://www.cnblogs.com/jiguiyan/'> perfect*的博客园 </a>"

                     },

                     "my-component-c":{

                         template:"<p>perfect*</p>"

                     },

                 }

         }).$mount('div');

     </script>

 </html>
动态组件
现在的需求:
需要在页面中只显示一个,并通过三个button来进进行控制它们的显示
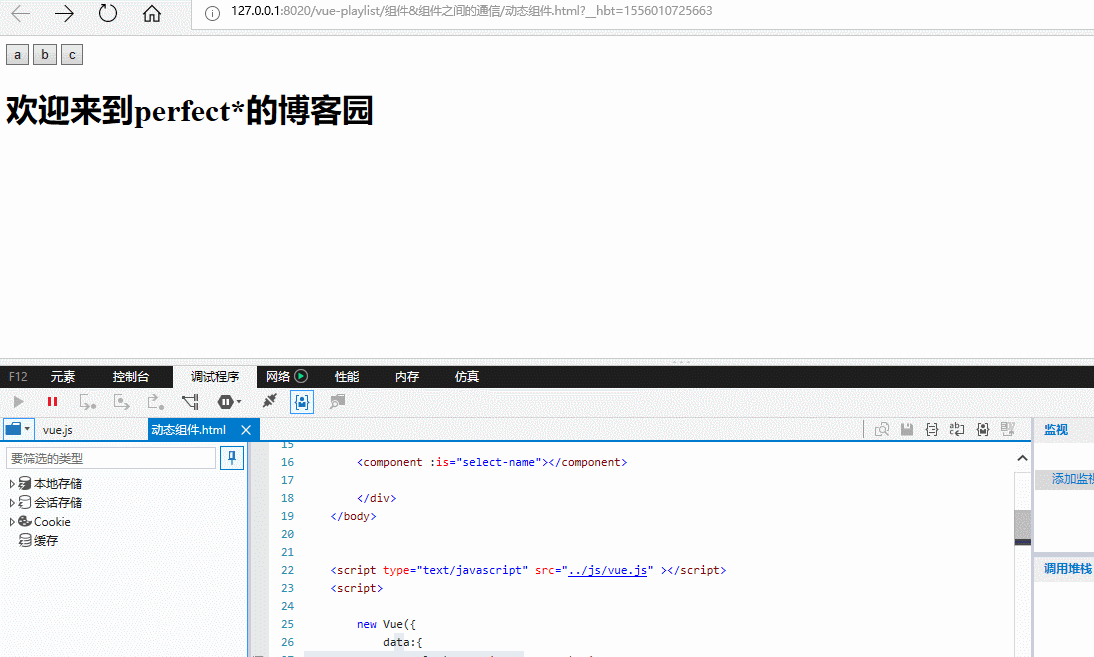
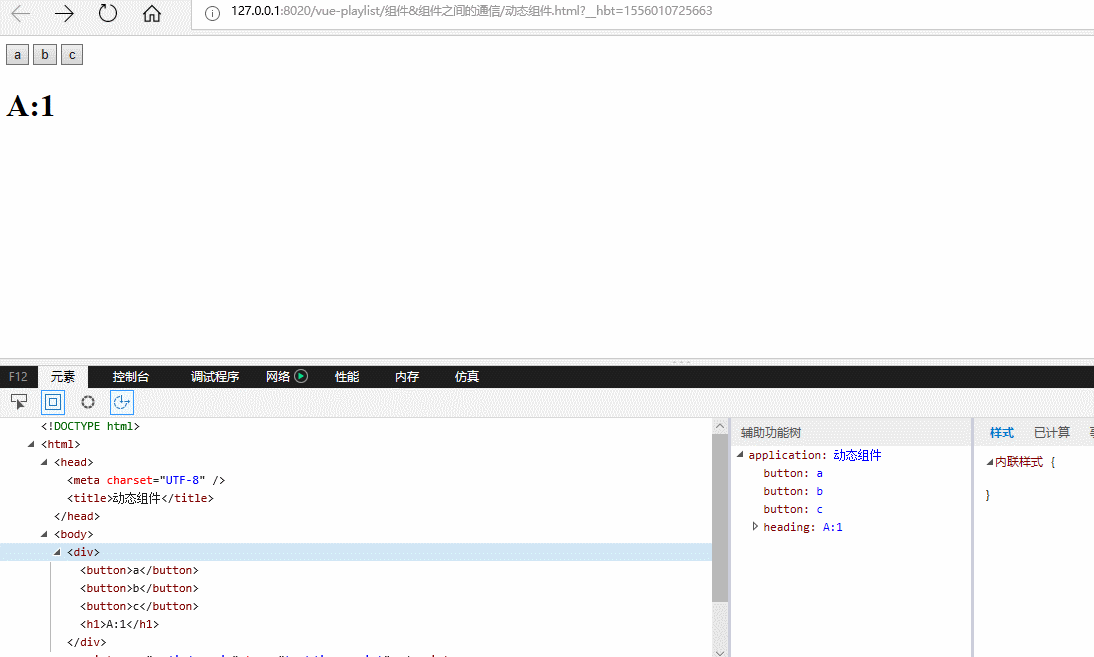
由效果图可知,页面默认显示my-component-a标签的内容
vue代码:
<script>

        new Vue({

            data:{

                selectName:'my-component-a'

            },

            components:{

                    "my-component-a":{

                        template:'<h1>欢迎来到perfect*的博客园</h1>'

                    },

                    "my-component-b":{

                        template:"<a href='https://www.cnblogs.com/jiguiyan/'> perfect*的博客园 </a>"

                    },

                    "my-component-c":{

                        template:"<p>perfect*</p>"

                    },

                }

        }).$mount('div');

    </script>
html:
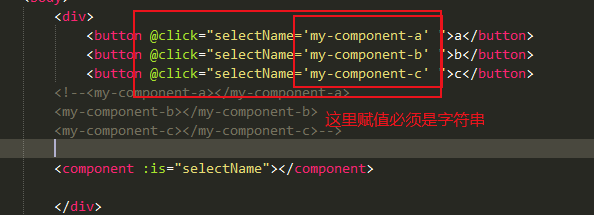
    <div>

            <button @click="selectName='my-component-a' ">a</button>

            <button @click="selectName='my-component-b' ">b</button>

            <button @click="selectName='my-component-c' ">c</button>

        <!--<my-component-a></my-component-a>

        <my-component-b></my-component-b>

        <my-component-c></my-component-c>-->

        <component :is="selectName"></component>

        </div>
代码注意:
总的代码:
 <!DOCTYPE html>

 <html>

     <head>

         <meta charset="UTF-8">

         <title>动态组件</title>

     </head>

     <body>

         <div>

             <button @click="selectName='my-component-a' ">a</button>

             <button @click="selectName='my-component-b' ">b</button>

             <button @click="selectName='my-component-c' ">c</button>

         <!--<my-component-a></my-component-a>

         <my-component-b></my-component-b>

         <my-component-c></my-component-c>-->

         <component :is="selectName"></component>

         </div>

     </body>

     <script type="text/javascript" src="../js/vue.js" ></script>

     <script>

         new Vue({

             data:{

                 selectName:'my-component-a'

             },

             components:{

                     "my-component-a":{

                         template:'<h1>欢迎来到perfect*的博客园</h1>'

                     },

                     "my-component-b":{

                         template:"<a href='https://www.cnblogs.com/jiguiyan/'> perfect*的博客园 </a>"

                     },

                     "my-component-c":{

                         template:"<p>perfect*</p>"

                     },

                 }

         }).$mount('div');

     </script>

 </html>
动态组件
动态组件结合keep-alive
keep-alive:将非活动的组件缓存起来
include - 字符串或正则表达式。只有名称匹配的组件会被缓存。
exclude - 字符串或正则表达式。任何名称匹配的组件都不会被缓存。
max - 数字。最多可以缓存多少组件实例。
示例:
初始效果:
由图可以看出每一次点击button调用的值不一样,因此引入了keep-alive来进行缓存
<!DOCTYPE html>

<html>

    <head>

        <meta charset="UTF-8">

        <title>动态组件</title>

    </head>

    <body>

        <div>

            <button @click="selectName='my-component-a' ">a</button>

            <button @click="selectName='my-component-b' ">b</button>

            <button @click="selectName='my-component-c' ">c</button>

        <!--<my-component-a></my-component-a>

        <my-component-b></my-component-b>

        <my-component-c></my-component-c>-->

        <component :is="selectName"></component>

        </div>

    </body>

    <script type="text/javascript" src="../js/vue.js" ></script>

    <script>

        new Vue({

            data:{

                selectName:'my-component-a'

            },

            components:{

                    "my-component-a":{

                        template:'<h1>A:{{num}}</h1>',

                        data(){

                            return{

                                num:Math.ceil(Math.random()*)

                            }

                        }

                    },

                    "my-component-b":{

                        template:"<a href='#'>B:{{num}} </a>",

                        data(){

                            return{

                                num:Math.ceil(Math.random()*)

                            }

                        }

                    },

                    "my-component-c":{

                        template:"<p>C:{{num}}</p>",

                        data(){

                            return{

                                num:Math.ceil(Math.random()*)

                            }

                        }

                    },

                }

        }).$mount('div');

    </script>

</html>
初始代码
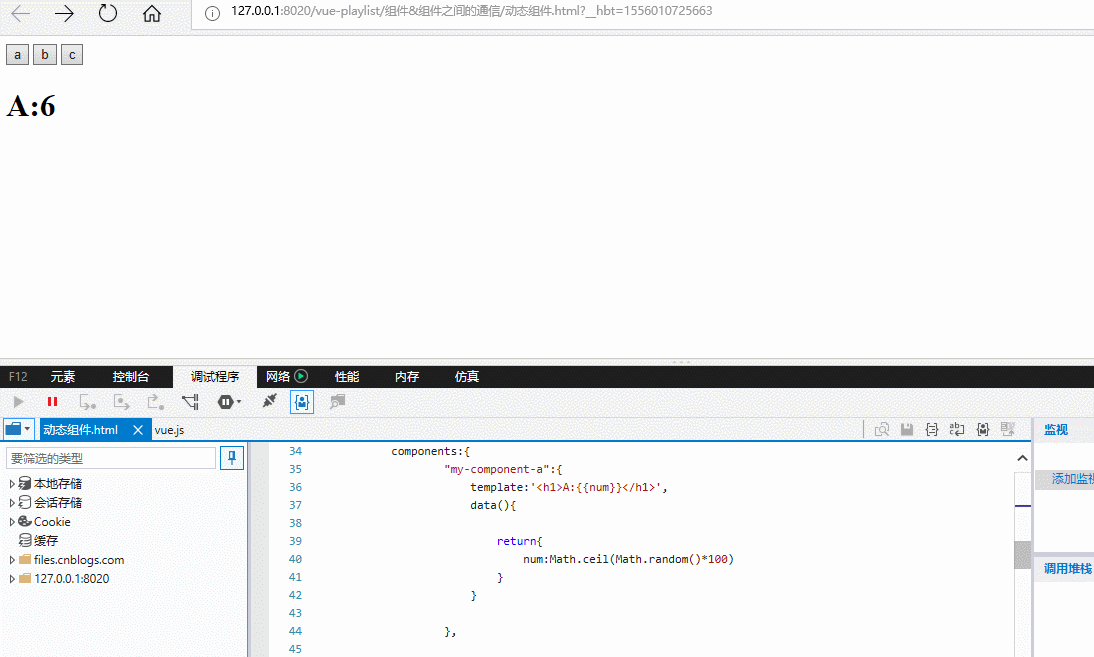
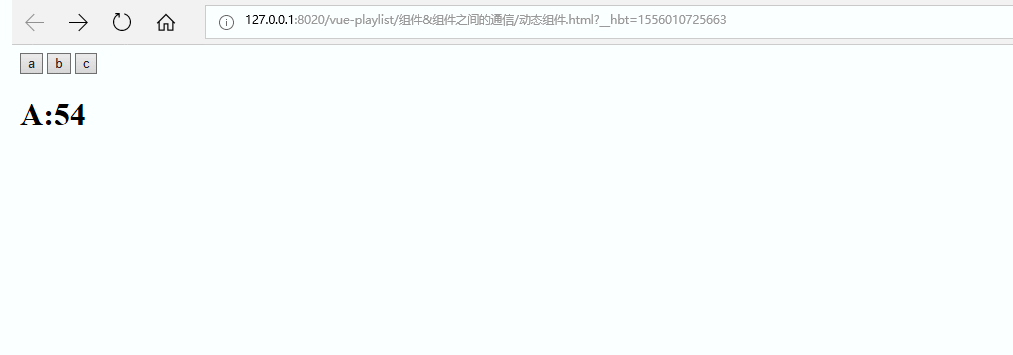
从图中可以看出 a:1 b:84 c: 86的值一直没发生改变,说明已经被缓存了。
include属性:
只有a的值被缓存了
<keep-alive include="my-component-a"><!--只有a的值被缓存了-->

            <component :is="selectName"></component>

        </keep-alive>
可以通过数组进行多个:
效果:

缓存了a和b的值
<keep-alive :include="['my-component-a','my-component-b']"><!--a,b的值被缓存了-->

            <component :is="selectName"></component>

          </keep-alive>
同理exclude 属性测试方法和include一样,只是exclude表示的是除了那一个不缓存
max属性:最多可以缓存多少组件实例
效果图:
<keep-alive :max=''><!--最多只能缓存abc三个值中的其中两个-->

            <component :is="selectName"></component>

          </keep-alive>
总的代码:
 <!DOCTYPE html>

 <html>

     <head>

         <meta charset="UTF-8">

         <title>动态组件</title>

     </head>

     <body>

         <div>

             <button @click="selectName='my-component-a' ">a</button>

             <button @click="selectName='my-component-b' ">b</button>

             <button @click="selectName='my-component-c' ">c</button>

         <!--<my-component-a></my-component-a>

         <my-component-b></my-component-b>

         <my-component-c></my-component-c>-->

         <!--<keep-alive include="my-component-a"><!--只有a的值被缓存了-->

             <!--<keep-alive :include="['my-component-a','my-component-b']"><!--a,b的值被缓存了-->

             <keep-alive :max=''><!--最多只能缓存abc三个值中的其中两个-->

             <component :is="selectName"></component>

           </keep-alive>

         </div>

     </body>

     <script type="text/javascript" src="../js/vue.js" ></script>

     <script>

         new Vue({

             data:{

                 selectName:'my-component-a'

             },

             components:{

                     "my-component-a":{

                         template:'<h1>A:{{num}}</h1>',

                         data(){

                             return{

                                 num:Math.ceil(Math.random()*)

                             }

                         }

                     },

                     "my-component-b":{

                         template:"<a href='#'>B:{{num}} </a>",

                         data(){

                             return{

                                 num:Math.ceil(Math.random()*)

                             }

                         }

                     },

                     "my-component-c":{

                         template:"<p>C:{{num}}</p>",

                         data(){

                             return{

                                 num:Math.ceil(Math.random()*)

                             }

                         }

                     },

                 }

         }).$mount('div');

     </script>

 </html>
动态组件结合keep-alive
详细介绍官网网址:
https://cn.vuejs.org/v2/api/#keep-alive
Vue 组件&组件之间的通信 之 template模板引用与动态组件的使用的更多相关文章
- vue组件父子之间相互通信案例
- vue组件---动态组件&异步组件
(1)在动态组件上使用keep-alive 之前曾经在一个多标签的界面中使用 is 特性来切换不同的组件.接下来简单回顾下 <component>元素是vue 里面的一个内置组件.在里面使 ...
- Vue组件-动态组件
动态组件 通过使用保留的 <component> 元素,动态地绑定到它的 is 特性,可以让多个组件使用同一个挂载点,并动态切换: <div id="app6"& ...
- 三、深入Vue组件——Vue插槽slot、动态组件
一.插槽slot() 1.1简单插槽slot [功能]用于从父组件中,通过子组件写成双标签,向子组件中放入自定的内容 parent.vue [1]首先把child写成双标签样式,把要插入的内容放双标签 ...
- Vue_(组件通讯)动态组件结合keep-alive
keep-alive 传送门 <keep-alive> 包裹动态组件时,会缓存不活动的组件实例,而不是销毁它们.和 <transition> 相似,<keep-alive ...
- Angular 学习笔记 (动态组件 & Material Overlay & Dialog 分析)
更新: 2019-11-24 dialog vs router link refer : https://stackoverflow.com/questions/51821766/angular-m ...
- Vue.js组件之同级之间的通信
<!DOCTYPE html> <html lang="en"> <head> <meta charset="UTF-8&quo ...
- vue 基础-->进阶 教程(3):组件嵌套、组件之间的通信、路由机制
前面的nodejs教程并没有停止更新,因为node项目需要用vue来实现界面部分,所以先插入一个vue教程,以免不会的同学不能很好的完成项目. 本教程,将从零开始,教给大家vue的基础.高级操作.组件 ...
- vue工程利用pubsub-js实现兄弟组件之间的通信
前言 项目是基于vue-cli创建的,不会搭建vue开发环境的同学可以百度,这里不再赘述. 步骤流程 vue项目搭建完成之后的文件图如下: 我的上一篇博客已经详细叙述vue工程中各个文件的作用,不清楚 ...
随机推荐
- C# 解决“请求被中止: 未能创建 SSL/TLS 安全通道”的问题
最近在开发项目的时候,使用爬虫抓取网络数据的时候,当请求Web数据时,碰到了“请求被中止: 未能创建 SSL/TLS 安全通道”的问题,尝试过很多网上的方法,例如添加证书等都没有用.最后在GitHub ...
- 【CF660E】Different Subsets For All Tuples 结论题
[CF660E]Different Subsets For All Tuples 题意:对于所有长度为n,每个数为1,2...m的序列,求出每个序列的本质不同的子序列的数目之和.(多个原序列可以有相同 ...
- 使用nginx运行thinkphp的nginx配置
location / { index index.php; #如果文件不存在则尝试TP解析 if (!-e $request_filename) { rewrite ^(.*)$ /index.php ...
- springmvc02,使用注解
unit04_01 a.RequestMappingHandlerMapping组件 @RequestMapping("/login.do") 该标记用在Controller业务方 ...
- 7 ArcMap能复制,不能粘贴
1:能复制不能粘贴 有时候在编辑数据的时候,需要在不同的shp层之间操作,往往有时候可以复制,但是粘贴那一项是灰色的 解决办法1:打开ArcScene,在关掉即可 解决办法2:如果是在编辑状态下,有时 ...
- PAT甲级1057 Stack【树状数组】【二分】
题目:https://pintia.cn/problem-sets/994805342720868352/problems/994805417945710592 题意:对一个栈进行push, pop和 ...
- 主席树||可持久化线段树+离散化 || 莫队+分块 ||BZOJ 3585: mex || Luogu P4137 Rmq Problem / mex
题面:Rmq Problem / mex 题解: 先离散化,然后插一堆空白,大体就是如果(对于以a.data<b.data排序后的A)A[i-1].data+1!=A[i].data,则插一个空 ...
- 算法基础_递归_求杨辉三角第m行第n个数字
问题描述: 算法基础_递归_求杨辉三角第m行第n个数字(m,n都从0开始) 解题源代码(这里打印出的是杨辉三角某一层的所有数字,没用大数,所以有上限,这里只写基本逻辑,要符合题意的话,把循环去掉就好) ...
- spring管理的类如何调用非spring管理的类
spring管理的类如何调用非spring管理的类. 就是使用一个spring提供的感知概念,在容器启动的时候,注入上下文即可. 下面是一个工具类. import org.springframewor ...
- nginx配置框架问题
1.框架源文件没有引入 2.nginx fastcgi.conf配置允许访问上级目录地址 3.使用autoindex on;参数