spring cloud服务提供与调用示例
本文创建方式采用intellij IDEA 创建项目
1.创建基于Eureka的注册中心。
在打开项目中右键,选择new 选择moudle

然后下一步
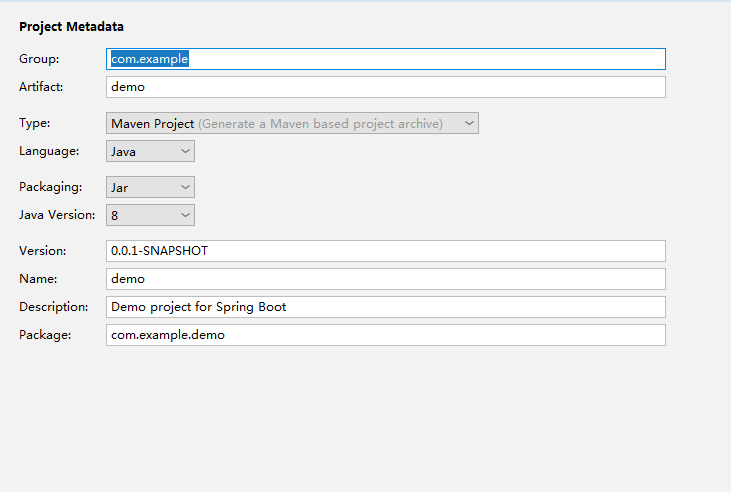
输入要创建的项目的信息

选择web下面的web,选择cloud discovery下面的 Eureka server 下一步,创建项目
然后同步pom.xml文件内容、
<?xml version="1.0" encoding="UTF-8"?>

<project xmlns="http://maven.apache.org/POM/4.0.0" xmlns:xsi="http://www.w3.org/2001/XMLSchema-instance"

         xsi:schemaLocation="http://maven.apache.org/POM/4.0.0 http://maven.apache.org/xsd/maven-4.0.0.xsd">

    <modelVersion>4.0.0</modelVersion>

    <parent>

        <groupId>org.springframework.boot</groupId>

        <artifactId>spring-boot-starter-parent</artifactId>

        <version>2.1.3.RELEASE</version>

        <relativePath/> <!-- lookup parent from repository -->

    </parent>

    <groupId>com.example</groupId>

    <artifactId>server</artifactId>

    <version>0.0.1-SNAPSHOT</version>

    <name>server</name>

    <description>Demo project for Spring Boot</description>

    <properties>

        <java.version>1.8</java.version>

        <spring-cloud.version>Greenwich.SR1</spring-cloud.version>

    </properties>

    <dependencies>

        <dependency>

            <groupId>org.springframework.boot</groupId>

            <artifactId>spring-boot-starter-web</artifactId>

        </dependency>

        <dependency>

            <groupId>org.springframework.cloud</groupId>

            <artifactId>spring-cloud-starter-netflix-eureka-server</artifactId>

        </dependency>

        <dependency>

            <groupId>org.springframework.boot</groupId>

            <artifactId>spring-boot-starter-test</artifactId>

            <scope>test</scope>

        </dependency>

    </dependencies>

    <dependencyManagement>

        <dependencies>

            <dependency>

                <groupId>org.springframework.cloud</groupId>

                <artifactId>spring-cloud-dependencies</artifactId>

                <version>${spring-cloud.version}</version>

                <type>pom</type>

                <scope>import</scope>

            </dependency>

        </dependencies>

    </dependencyManagement>

    <build>

        <plugins>

            <plugin>

                <groupId>org.springframework.boot</groupId>

                <artifactId>spring-boot-maven-plugin</artifactId>

            </plugin>

        </plugins>

    </build>

    <repositories>

        <repository>

            <id>spring-milestones</id>

            <name>Spring Milestones</name>

            <url>https://repo.spring.io/milestone</url>

        </repository>

    </repositories>

</project>
在启动文件中选择
@SpringBootApplication

@EnableEurekaServer

public class ServerApplication {

    public static void main(String[] args) {

        SpringApplication.run(ServerApplication.class, args);

    }

}
配置文件
server:

  port: 8000

eureka:

  instance:

    hostname: localhost

  client:

    fetch-registry: false

    register-with-eureka: false

    serviceUrl:

      defaultZone: http://localhost:8000/eureka/

spring:

  application:

    name: spring-cloud-eureka
创建完,我们去运行下,运行正常后,我们去访问localhost:8000, 到下面的界面,这样我们Eureka 注册中心就创建成功,
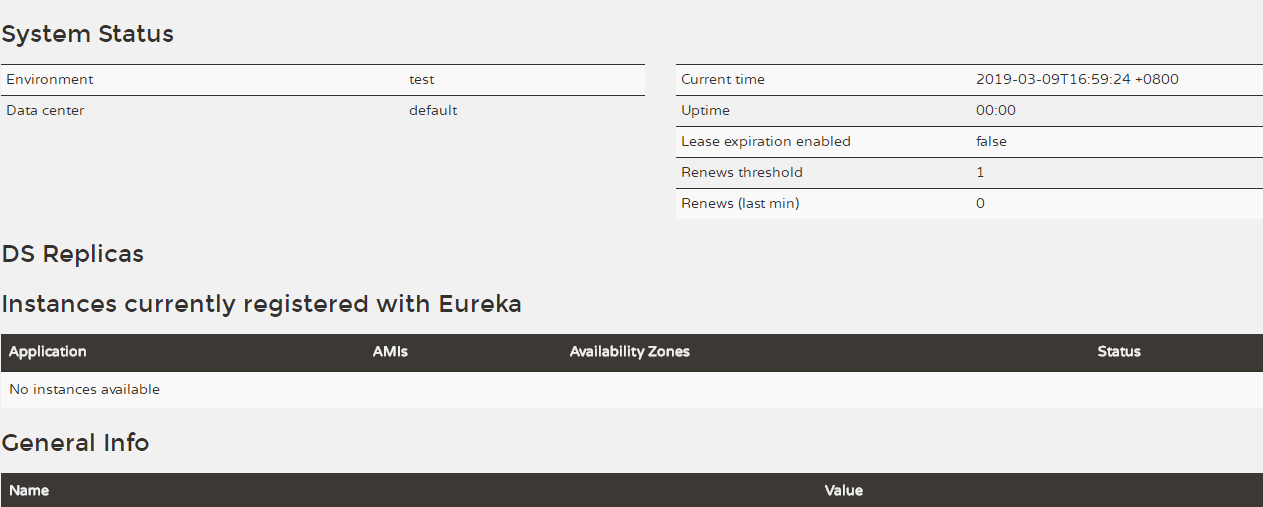
下面我们去创建server端,和client;
server端呢创建中与Eureka选择不同的在于cloud discovery中,这里需要选择cloud Discovery
然后创建完,去同步对应的pom.xml文件
在启动类编写如下
@SpringBootApplication

@EnableDiscoveryClient

public class ServeroneApplication {

    public static void main(String[] args) {

        SpringApplication.run(ServeroneApplication.class, args);

    }

}
配置文件
server:

  port: 8001

eureka:

  instance:

    hostname: localhost

  client:

    serviceUrl:

      defaultZone: http://localhost:8000/eureka/

spring:

  application:

    name: spring-serverserver
我们需要编写一个提供服务的接口
@RestController

public class HelloController {

    @RequestMapping("/hello")

    public String indesx(@RequestParam String name) {

        return "hello "+name+",this is first messge";

    }

}
这样我们就可以实现我们的server端
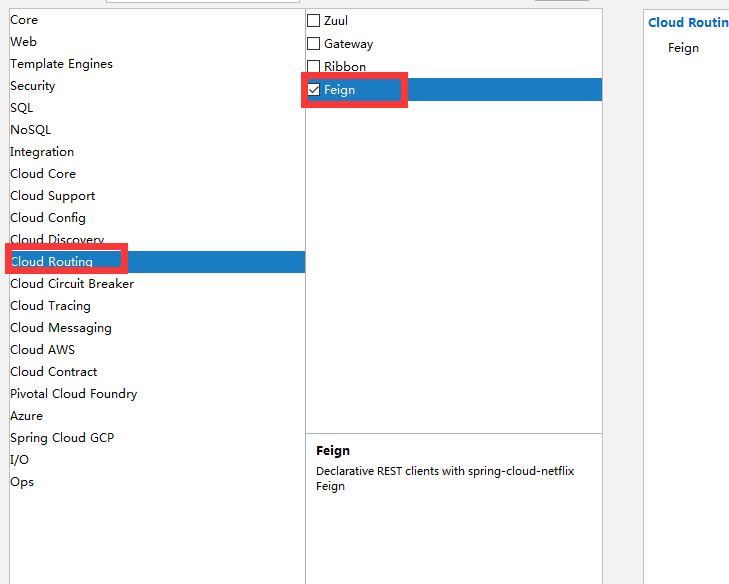
然后我们去创建client端
client端多需要在server上创建多一个Feign
那么我们在启动类,如下
@SpringBootApplication

@EnableDiscoveryClient

@EnableFeignClients

public class DemoApplication {

    public static void main(String[] args) {

        SpringApplication.run(DemoApplication.class, args);

    }

}
配置文件
server:

  port: 8002

eureka:

  instance:

    hostname: localhost

  client:

    serviceUrl:

      defaultZone: http://localhost:8000/eureka/

spring:

  application:

    name: spring-client
那么我们去写调用server的服务
@FeignClient(name= "spring-serverserver")

public interface HelloRemote {

    @RequestMapping(value = "/hello")

    public String hello(@RequestParam(value = "name") String name);

}
实现接口
@RestController

public class ConsumerController {

    @Autowired

    HelloRemote lloRemote;

    @RequestMapping("/hello/{name}")

    public String index(@PathVariable("name") String name) {

        return lloRemote.hello(name);

    }

}
这样我们就实现了服务的注册与调用。
那么我们去启动服务进行测试,服务注册成功,我们去启动服务调用端

服务调用端成功,

那么我们去测试下,我们先去测试看单独访问服务是否正常
输入http://localhost:8001/hello?name=liwanlei
显示

那么我们看下另外一个调用这个服务的服务
http://localhost:8002/hello/name
那么我们看下返回

这样我们调试成功。
户端已经成功的通过feign调用了远程服务,并且将结果返回到了浏览器。
spring cloud服务提供与调用示例的更多相关文章
- 三、spring cloud 服务提供与调用
如何使用eureka服务注册中心,搭建一个简单的服务端注册服务,客户端去调用服务使用. 案例中有三个角色:服务注册中心.服务提供者.服务消费者,eureka单机版启动既可,流程是首先启动注册中心,服务 ...
- spring-cloud:利用eureka实现服务提供与调用示例
1.运行环境 开发工具:intellij idea JDK版本:1.8 项目管理工具:Maven 4.0.0 2.GITHUB地址 https://github.com/nbfujx/springCl ...
- spring cloud服务间调用feign
参考文章:Spring Cloud Feign设计原理 1.feign是spring cloud服务间相互调用的组件,声明式.模板化的HTTP客户端.类似的HttpURLConnection.Apac ...
- Spring Cloud(三):服务提供与调用 Eureka【Finchley 版】
Spring Cloud(三):服务提供与调用 Eureka[Finchley 版] 发表于 2018-04-15 | 更新于 2018-05-07 | 上一篇文章我们介绍了 Eureka 服务 ...
- Spring Cloud 服务端注册与客户端调用
Spring Cloud 服务端注册与客户端调用 上一篇中,我们已经把Spring Cloud的服务注册中心Eureka搭建起来了,这一章,我们讲解如何将服务注册到Eureka,以及客户端如何调用服务 ...
- spring cloud 服务A调用服务B自定义token消失,记录
后端:spring cloud 前端:vue 场景:前端ajax请求,包装自定义请求头token到后台做验证,首先调用A服务,A服务通过Feign调用B服务发现自定义token没有传到B服务去; 原因 ...
- 搭建SpringCloud-Eureka 注册中心以及服务提供与调用 快速了解 SpringCloud-Eureka
原文地址: 搭建SpringCloud-Eureka 注册中心以及服务提供与调用 纸上得来终觉浅,绝知此事要躬行啊~果然看着很easy,自己搞起来就是各种坑~各位看官,容我慢慢道来~ 关于spr ...
- Spring Cloud 服务网关Zuul
Spring Cloud 服务网关Zuul 服务网关是分布式架构中不可缺少的组成部分,是外部网络和内部服务之间的屏障,例如权限控制之类的逻辑应该在这里实现,而不是放在每个服务单元. Spring Cl ...
- Spring Cloud服务注册中心交付至kubernetes
前言 服务发现原则: 各个微服务在启动时,会将自己的网络地址等信息注册到服务发现组件中,服务发现组件会存储这些信息 服务消费者可以从服务发现组件中查询到服务提供者的网络地址,并使用该地址来远程调用服务 ...
随机推荐
- DMA与cache一致性的问题
Cache和DMA本身似乎是两个毫不相关的事物.Cache被用作CPU针对内存的缓存利用程序的空间局部性和时间局部性原理,达到较高的命中率,从而避免CPU每次都必须要与相对慢速的内存交互数据来提高数据 ...
- PHP Excel导入数据到MySQL数据库
数据导出已经有了,怎么能没有数据导入呢,同样使用TP5框架,首先需要下载phpexcel.zip,放到第三方类库目录vendor目录下,然后有一个页面可以让你选择要导入的Excel文件,然后点击导入按 ...
- Windows Server 2012 RS 配置IIS8.0+发布网站
一.配置iis 8.0 IIS 8.0 是 windows server 2012 自带的服务器管理系统.相比之前版本,IIS 8.0 安装和操作都更加简单,界面也很简洁,安装也很迅速. 1. 进入w ...
- scanf函数(初学者)
scanf函数称为格式输入函数,即按用户指定的格式从键盘上把数据输入到指定的变量之中. 1.scanf函数的一般形式:scanf函数是一个标准的库函数,它的函数原型在头文件“stdio.h”中,与pr ...
- 怎样从本地删除git远程仓库里面的文件
git是大家通用的一种版本控制系统,便捷高效,各种命令需要牢记,今天小渔介绍给大家的是git的删除命令,即将文件从远程仓库中删除的操作. 方法/步骤 首先,我们打开自己的本地GIT仓库,在根目 ...
- MessageQueue 相关概念
/** * Implements a thread-local storage, that is, a variable for which each thread * has its own v ...
- 查看mysql执行的线程,并杀掉他
文章转自https://www.cnblogs.com/weiok/p/5672238.html 1.进入mysql/bin目录下输入mysqladmin processlist; 2.启动mysql ...
- JavaScript高级程序设计学习(三)之变量、作用域和内存问题
这次讲的主要是变量,作用域和内存问题. 任何一门编程语言,都涉及这三个. 变量,比如全局变量,局部变量等,作用域,也分全局作用域和方法作用域,内存问题,在java中就涉及到一个垃圾回收的问题,由于ja ...
- Qt warning: 构建目录必须和源文件目录为同级目录
从一台电脑转移项目到另一电脑, 路径发生变化,重新构建运行时会出现“QT 构建目录必须和源目录为同级目录”提示,解决办法很加单.如下: 方法一: 点击 project(项目)->然后,看看Bui ...
- Echo团队Alpha冲刺随笔 - 第二天
项目冲刺情况 进展 项目各端都已经开始正式动工,完成了框架的搭建及小部分代码的编写 问题 对于框架使用不够熟练 心得 撸起袖子加油干! 今日会议内容 黄少勇 今日进展 实现账号绑定和首页公告信息及使用 ...