tomcate+keepalived配置双机热备
环境清单:
应用1:192.168.51.101
应用2:192.168.51.75
虚拟IP:192.168.51.179
一、安装Tomcat(参照其他文档);
二、部署应用,并修改响应的端口(9090);
1、修改server.xml文件,修改后内容如下:
<?xml version='1.0' encoding='utf-8'?>
<!--
Licensed to the Apache Software Foundation (ASF) under one or more
contributor license agreements. See the NOTICE file distributed with
this work for additional information regarding copyright ownership.
The ASF licenses this file to You under the Apache License, Version 2.0
(the "License"); you may not use this file except in compliance with
the License. You may obtain a copy of the License at http://www.apache.org/licenses/LICENSE-2.0 Unless required by applicable law or agreed to in writing, software
distributed under the License is distributed on an "AS IS" BASIS,
WITHOUT WARRANTIES OR CONDITIONS OF ANY KIND, either express or implied.
See the License for the specific language governing permissions and
limitations under the License.
-->
<!-- Note: A "Server" is not itself a "Container", so you may not
define subcomponents such as "Valves" at this level.
Documentation at /docs/config/server.html
-->
<Server port="9005" shutdown="SHUTDOWN">
<Listener className="org.apache.catalina.startup.VersionLoggerListener" />
<!-- Security listener. Documentation at /docs/config/listeners.html
<Listener className="org.apache.catalina.security.SecurityListener" />
-->
<!--APR library loader. Documentation at /docs/apr.html -->
<Listener className="org.apache.catalina.core.AprLifecycleListener" SSLEngine="on" />
<!--Initialize Jasper prior to webapps are loaded. Documentation at /docs/jasper-howto.html -->
<Listener className="org.apache.catalina.core.JasperListener" />
<!-- Prevent memory leaks due to use of particular java/javax APIs-->
<Listener className="org.apache.catalina.core.JreMemoryLeakPreventionListener" />
<Listener className="org.apache.catalina.mbeans.GlobalResourcesLifecycleListener" />
<Listener className="org.apache.catalina.core.ThreadLocalLeakPreventionListener" /> <!-- Global JNDI resources
Documentation at /docs/jndi-resources-howto.html
-->
<GlobalNamingResources>
<!-- Editable user database that can also be used by
UserDatabaseRealm to authenticate users
-->
<Resource name="UserDatabase" auth="Container"
type="org.apache.catalina.UserDatabase"
description="User database that can be updated and saved"
factory="org.apache.catalina.users.MemoryUserDatabaseFactory"
pathname="conf/tomcat-users.xml" />
</GlobalNamingResources> <!-- A "Service" is a collection of one or more "Connectors" that share
a single "Container" Note: A "Service" is not itself a "Container",
so you may not define subcomponents such as "Valves" at this level.
Documentation at /docs/config/service.html
-->
<Service name="Catalina"> <!--The connectors can use a shared executor, you can define one or more named thread pools-->
<!--
<Executor name="tomcatThreadPool" namePrefix="catalina-exec-"
maxThreads="150" minSpareThreads="4"/>
--> <!-- A "Connector" represents an endpoint by which requests are received
and responses are returned. Documentation at :
Java HTTP Connector: /docs/config/http.html (blocking & non-blocking)
Java AJP Connector: /docs/config/ajp.html
APR (HTTP/AJP) Connector: /docs/apr.html
Define a non-SSL HTTP/1.1 Connector on port 8080
-->
<Connector port="9090" protocol="HTTP/1.1"
connectionTimeout="20000"
redirectPort="9443" />
<!-- A "Connector" using the shared thread pool-->
<!--
<Connector executor="tomcatThreadPool"
port="8080" protocol="HTTP/1.1"
connectionTimeout="20000"
redirectPort="8443" />
-->
<!-- Define a SSL HTTP/1.1 Connector on port 8443
This connector uses the BIO implementation that requires the JSSE
style configuration. When using the APR/native implementation, the
OpenSSL style configuration is required as described in the APR/native
documentation -->
<!--
<Connector port="8443" protocol="org.apache.coyote.http11.Http11Protocol"
maxThreads="150" SSLEnabled="true" scheme="https" secure="true"
clientAuth="false" sslProtocol="TLS" />
--> <!-- Define an AJP 1.3 Connector on port 8009 -->
<Connector port="9009" protocol="AJP/1.3" redirectPort="9443" /> <!-- An Engine represents the entry point (within Catalina) that processes
every request. The Engine implementation for Tomcat stand alone
analyzes the HTTP headers included with the request, and passes them
on to the appropriate Host (virtual host).
Documentation at /docs/config/engine.html --> <!-- You should set jvmRoute to support load-balancing via AJP ie :
<Engine name="Catalina" defaultHost="localhost" jvmRoute="jvm1">
-->
<Engine name="Catalina" defaultHost="localhost"> <!--For clustering, please take a look at documentation at:
/docs/cluster-howto.html (simple how to)
/docs/config/cluster.html (reference documentation) -->
<!--
<Cluster className="org.apache.catalina.ha.tcp.SimpleTcpCluster"/>
--> <!-- Use the LockOutRealm to prevent attempts to guess user passwords
via a brute-force attack -->
<Realm className="org.apache.catalina.realm.LockOutRealm">
<!-- This Realm uses the UserDatabase configured in the global JNDI
resources under the key "UserDatabase". Any edits
that are performed against this UserDatabase are immediately
available for use by the Realm. -->
<Realm className="org.apache.catalina.realm.UserDatabaseRealm"
resourceName="UserDatabase"/>
</Realm> <Host name="localhost" appBase="webapps"
unpackWARs="true" autoDeploy="true"> <Context path="ClusterProject" docBase="/home/ump/www/ClusterProject" reloadable="true">
</Context> <!-- SingleSignOn valve, share authentication between web applications
Documentation at: /docs/config/valve.html -->
<!--
<Valve className="org.apache.catalina.authenticator.SingleSignOn" />
--> <!-- Access log processes all example.
Documentation at: /docs/config/valve.html
Note: The pattern used is equivalent to using pattern="common" -->
<Valve className="org.apache.catalina.valves.AccessLogValve" directory="logs"
prefix="localhost_access_log." suffix=".txt"
pattern="%h %l %u %t "%r" %s %b" /> </Host>
</Engine>
</Service>
</Server>
绿色部分问修改的端口,和添加的部署的应用。两天机器都需要安装Tomcat,并且部署同一个应用,为了区分应用,修改index.jsp中的内容,用于区分。
部署两台应用服务器之后,访问效果如下:

三、两天机器上,都安装keepalived(参照其他文档);
四、配置keepalived
! Configuration File for keepalived

global_defs {

   notification_email {

     acassen@firewall.loc

     failover@firewall.loc

     sysadmin@firewall.loc

   }

   notification_email_from Alexandre.Cassen@firewall.loc

   smtp_server 192.168.200.1

   smtp_connect_timeout 30

   router_id LVS_DEVEL

}

vrrp_instance VI_1 {

    state MASTER

    interface p33p1//对应的网卡

    virtual_router_id 51//主从必须一致
   priority 100//值越大,竞争主节点可能性越大,主节点
   advert_int 1

    authentication {

        auth_type PASS

        auth_pass 1111

    }

    virtual_ipaddress {

        192.168.51.179/24//对应的虚拟IP

    }

}

virtual_server 192.168.200.100 443 {

    delay_loop 6

    lb_algo rr

    lb_kind NAT

    nat_mask 255.255.255.0

    persistence_timeout 50

    protocol TCP

    real_server 192.168.201.100 443 {

        weight 1

        SSL_GET {

            url {

              path /

              digest ff20ad2481f97b1754ef3e12ecd3a9cc

            }

            url {

              path /mrtg/

              digest 9b3a0c85a887a256d6939da88aabd8cd

            }

            connect_timeout 3

            nb_get_retry 3

            delay_before_retry 3

        }

    }

}

virtual_server 10.10.10.2 1358 {

    delay_loop 6

    lb_algo rr

    lb_kind NAT

    persistence_timeout 50

    protocol TCP

    sorry_server 192.168.200.200 1358

    real_server 192.168.200.2 1358 {

        weight 1

        HTTP_GET {

            url {

              path /testurl/test.jsp

              digest 640205b7b0fc66c1ea91c463fac6334d

            }

            url {

              path /testurl2/test.jsp

              digest 640205b7b0fc66c1ea91c463fac6334d

            }

            url {

              path /testurl3/test.jsp

              digest 640205b7b0fc66c1ea91c463fac6334d

            }

            connect_timeout 3

            nb_get_retry 3

            delay_before_retry 3

        }

    }

    real_server 192.168.200.3 1358 {

        weight 1

        HTTP_GET {

            url {

              path /testurl/test.jsp

              digest 640205b7b0fc66c1ea91c463fac6334c

            }

            url {

              path /testurl2/test.jsp

              digest 640205b7b0fc66c1ea91c463fac6334c

            }

            connect_timeout 3

            nb_get_retry 3

            delay_before_retry 3

        }

    }

}

virtual_server 10.10.10.3 1358 {

    delay_loop 3

    lb_algo rr

    lb_kind NAT

    nat_mask 255.255.255.0

    persistence_timeout 50

    protocol TCP

    real_server 192.168.200.4 1358 {

        weight 1

        HTTP_GET {

            url {

              path /testurl/test.jsp

              digest 640205b7b0fc66c1ea91c463fac6334d

            }

            url {

              path /testurl2/test.jsp

              digest 640205b7b0fc66c1ea91c463fac6334d

            }

            url {

              path /testurl3/test.jsp

              digest 640205b7b0fc66c1ea91c463fac6334d

            }

            connect_timeout 3

            nb_get_retry 3

            delay_before_retry 3

        }

    }

    real_server 192.168.200.5 1358 {

        weight 1

        HTTP_GET {

            url {

              path /testurl/test.jsp

              digest 640205b7b0fc66c1ea91c463fac6334d

            }

            url {

              path /testurl2/test.jsp

              digest 640205b7b0fc66c1ea91c463fac6334d

            }

            url {

              path /testurl3/test.jsp

              digest 640205b7b0fc66c1ea91c463fac6334d

            }

            connect_timeout 3

            nb_get_retry 3

            delay_before_retry 3

        }

    }

}
绿色部分为添加或修改的地方,其他保持默认,以上是主节点的配置,从节点的配置如下:
! Configuration File for keepalived

global_defs {

   notification_email {

     acassen@firewall.loc

     failover@firewall.loc

     sysadmin@firewall.loc

   }

   notification_email_from Alexandre.Cassen@firewall.loc

   smtp_server 192.168.200.1

   smtp_connect_timeout 30

   router_id LVS_DEVEL

}

vrrp_instance VI_1 {

    state BACKUP

    interface p33p1

    virtual_router_id 51

    priority 90

    advert_int 1

    authentication {

        auth_type PASS

        auth_pass 1111

    }

    virtual_ipaddress {

        192.168.51.179/24

    }

}

virtual_server 192.168.200.100 443 {

    delay_loop 6

    lb_algo rr

    lb_kind NAT

    nat_mask 255.255.255.0

    persistence_timeout 50

    protocol TCP

    real_server 192.168.201.100 443 {

        weight 1

        SSL_GET {

            url {

              path /

              digest ff20ad2481f97b1754ef3e12ecd3a9cc

            }

            url {

              path /mrtg/

              digest 9b3a0c85a887a256d6939da88aabd8cd

            }

            connect_timeout 3

            nb_get_retry 3

            delay_before_retry 3

        }

    }

}

virtual_server 10.10.10.2 1358 {

    delay_loop 6

    lb_algo rr

    lb_kind NAT

    persistence_timeout 50

    protocol TCP

    sorry_server 192.168.200.200 1358

    real_server 192.168.200.2 1358 {

        weight 1

        HTTP_GET {

            url {

              path /testurl/test.jsp

              digest 640205b7b0fc66c1ea91c463fac6334d

            }

            url {

              path /testurl2/test.jsp

              digest 640205b7b0fc66c1ea91c463fac6334d

            }

            url {

              path /testurl3/test.jsp

              digest 640205b7b0fc66c1ea91c463fac6334d

            }

            connect_timeout 3

            nb_get_retry 3

            delay_before_retry 3

        }

    }

    real_server 192.168.200.3 1358 {

        weight 1

        HTTP_GET {

            url {

              path /testurl/test.jsp

              digest 640205b7b0fc66c1ea91c463fac6334c

            }

            url {

              path /testurl2/test.jsp

              digest 640205b7b0fc66c1ea91c463fac6334c

            }

            connect_timeout 3

            nb_get_retry 3

            delay_before_retry 3

        }

    }

}

virtual_server 10.10.10.3 1358 {

    delay_loop 3

    lb_algo rr

    lb_kind NAT

    nat_mask 255.255.255.0

    persistence_timeout 50

    protocol TCP

    real_server 192.168.200.4 1358 {

        weight 1

        HTTP_GET {

            url {

              path /testurl/test.jsp

              digest 640205b7b0fc66c1ea91c463fac6334d

            }

            url {

              path /testurl2/test.jsp

              digest 640205b7b0fc66c1ea91c463fac6334d

            }

            url {

              path /testurl3/test.jsp

              digest 640205b7b0fc66c1ea91c463fac6334d

            }

            connect_timeout 3

            nb_get_retry 3

            delay_before_retry 3

        }

    }

    real_server 192.168.200.5 1358 {

        weight 1

        HTTP_GET {

            url {

              path /testurl/test.jsp

              digest 640205b7b0fc66c1ea91c463fac6334d

            }

            url {

              path /testurl2/test.jsp

              digest 640205b7b0fc66c1ea91c463fac6334d

            }

            url {

              path /testurl3/test.jsp

              digest 640205b7b0fc66c1ea91c463fac6334d

            }

            connect_timeout 3

            nb_get_retry 3

            delay_before_retry 3

        }

    }

}
红色部分为和主配置的不同之处,其他都一样。
五、启动keepalived
命令:
./keepalived -P -D -f /usr/local/keepalived-1.2.12/etc/keepalived/keepalived.conf
-P:只运行虚拟子系统;
-D:打印详细日志输出;查看日志命令:tail -f /var/log/messages
-f:指定keepalived.conf的位置
命令参数,详解:
[root@node101 sbin]# ./keepalived -h

Usage: ./keepalived [OPTION...]

  -f, --use-file=FILE          Use the specified configuration file

  -P, --vrrp                   Only run with VRRP subsystem

  -C, --check                  Only run with Health-checker subsystem

  -l, --log-console            Log messages to local console

  -D, --log-detail             Detailed log messages

  -S, --log-facility=[0-7]     Set syslog facility to LOG_LOCAL[0-7]

  -V, --dont-release-vrrp      Don't remove VRRP VIPs and VROUTEs on daemon stop

  -I, --dont-release-ipvs      Don't remove IPVS topology on daemon stop

  -R, --dont-respawn           Don't respawn child processes

  -n, --dont-fork              Don't fork the daemon process

  -d, --dump-conf              Dump the configuration data

  -p, --pid=FILE               Use specified pidfile for parent process

  -r, --vrrp_pid=FILE          Use specified pidfile for VRRP child process

  -c, --checkers_pid=FILE      Use specified pidfile for checkers child process

  -v, --version                Display the version number

  -h, --help                   Display this help message
将两台机器上的keepalived都启动起来。
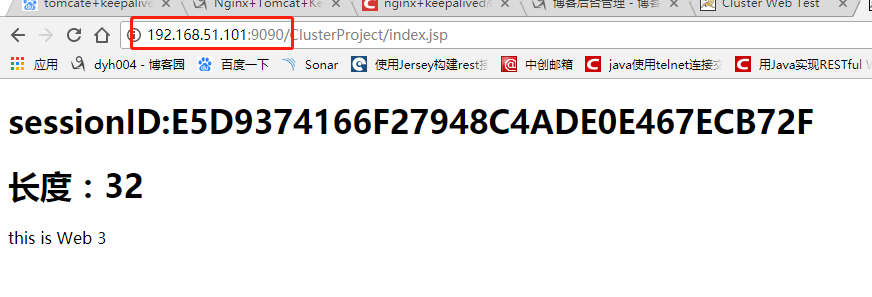
六、访问虚拟地址:http://192.168.51.179:9090/ClusterProject/index.jsp,访问效果,如下:

七,关闭主节点keepalived,刷新http://192.168.51.179:9090/ClusterProject/index.jsp,效果如下:

至此,双机热备,完成。
配置主从,如果把主节点的keepalived进程启动起来,备机重新进入备机状态,主机提供服务。
如果不想让主机启动起来后,转换主备状态,需要把备机的stat的BACKUP也改为master,两个都是master,这样不会切换。
tomcate+keepalived配置双机热备的更多相关文章
- nginx:负载均衡实战(四)nginx+keepalived配置双机热备
1.下载安装 下载keepalived地址:http://www.keepalived.org/download.html 解压安装: tar -zxvf keepalived-.tar.gz 安装o ...
- 使用keepalived实现双机热备
通常说的双机热备是指两台机器都在运行,但并不是两台机器都同时在提供服务.当提供服务的一台出现故障的时候,另外一台会马上自动接管并且提供服务,而且切换的时间非常短.下面来以keepalived结合tom ...
- keepalived+nginx双机热备+负载均衡
Reference: http://blog.csdn.net/e421083458/article/details/30092795 keepalived+nginx双机热备+负载均衡 最近因业务扩 ...
- Keepalived 实现双机热备
原理 首先有一个虚拟ip暴露给客户端,虚拟ip对应的mac地址为一台真实服务器, 即用户向虚拟ip发送一个请求,该请求会被分发到真实服务器上. 现在有2台真实服务器,一台master,一台backup ...
- nginx+keepalived实现双机热备高可用性
搭建准备: 机器两台 ip分别为192.168.100.128 192.168.100.129(能够用虚拟机測试.虚拟机网络模式为NET模式.且为静态ip) 另外须要准备一个虚拟ip对外提供服务.即通 ...
- Java技术中如何使用keepalived实现双机热备
Keepalived简介 Keepalived是Linux下一个轻量级别的高可用解决方案.高可用(High Avalilability,HA),其实两种不同的含义:广义来讲,是指整个系统的高可用行,狭 ...
- Docker下配置双机热备PXC集群
架构: 步骤: 1.安装centos7 ,设置宿主机IP:192.168.1.224 2.先更新yum软件管理器,再安装docker 1.yum -y update 2.yum install - ...
- 使用Keepalived配置主从热备实现Nginx高可用(HA)
Keepalived 简要介绍 Keepalived 是一种高性能的服务器高可用或热备解决方案,Keepalived 可以用来防止服务器单点故障的发生,通过配合 Nginx 可以实现 web 前端服务 ...
- HAproxy + keepalived 实现双机热备
一.HAProxy简介: HAProxy提供高可用性.负载均衡以及基于TCP和HTTP应用的代理,支持虚拟主机,它是免费.快速并且可靠的一种解决方案.HAProxy特别适用于那些负载特大的web站点, ...
随机推荐
- VRS生成的虚拟观测值存在的问题
目前生成的虚拟观测值. 天津的版本,如果有数据库中有天线类型,那么会对天线类型改正了两次. 解决方法:在生成虚拟观测值编码的部分,注释掉天线改正的部分. 对结果的影响:错误版本生成的虚拟观测值,移动站 ...
- 个人技术博客(α)------javaweb的学习路程
该博文大致内容是学习的一个过程,心得,并不是以技术博客为主,在此说明. 关于javaweb的学习开始的时间大概是从大二下(2017年6.7月份)的暑假开始的,在学长的介绍下加入了实验室进行学习,由于是 ...
- golang的定时任务
golang的定时任务使用的是cron这个包来解决的 官方文档地址:https://godoc.org/github.com/robfig/cron cron包的基础知识 字段名 是否必须 允许的值 ...
- [ISE 14.7] _pn.exe 崩溃问题 点击浏览崩溃问题
前言 装了大半天的ISE 14.7 结果新建工程的时候只要点击浏览文件夹,直接无响应,其实和其他_pn.exe崩溃是一样的. 解决方法 第一步:非常重要,进行文件备份,将"F:\Xilinx ...
- vue_模板渲染
渲染 当获取到后端数据后,我们会把它按照一定的规则加载到写好的模板中,输出成在浏览器中显示的HTML,这个过程就称之为渲染. vue.js是在前端(即浏览器内)进行的模板渲染. 前后端渲染对比 前端渲 ...
- Vue框架的两种使用方式
1.单页面应用:使用Vue CLI工具生成脚手架,这是最常见的使用方式,简单用模板生成一个HelloWorld Demo,可以学习Vue的SPA项目结构 2.传统多页面应用:通过script引入Vue ...
- PCB (3)创建新工程PCB
点击完成 拖进我们创建的工程中
- ethereum/EIPs-607 Hardfork Meta: Spurious Dragon硬分叉相关
eip title author type status created requires 607 Hardfork Meta: Spurious Dragon Alex Beregszaszi Me ...
- Centos 6.5配置rsync+inotify实现文件实时同步
1.安装rsync(两台机器执行相同的步骤)yum install gcc yum install rsyncd xinetd -y因为rsync是由xinetd启动的,所以需要修改一个配置vim / ...
- Google的Flutter工具允许开发者开发跨平台应用
与大多数应用程序开发人员交谈,他们会告诉你,与iOS相比,制作Android应用程序要困难得多,也更复杂,也不那么有趣.实际上,如果你要求报价,这两种软件都将单独定价,因为它们都需要单独的开发时间和团 ...