
在Android Studio进行“简单配置”单元测试(Android Junit)
- 起因
- 在Android studio 刚出。本人就想弄单元测试,可惜当时Android studio不知道抽什么风(准确来说,应该是我不会弄而已)。无法执行到相应的代码。
后来今天突然自己又抽风。又想去弄一下Android junit。 - 本文基于做过Eclipse开发使用过Android junit,如果Eclipse的Android Junit没有使用过,就我没有说过吧!
- 准备环境,配置
- 官网Demo地址:https://github.com/googlesamples/android-testing-templates.git
- 环境
- 根据demo中


- 单纯想运行java的单元测试就引入
// Dependencies for local unit tests
testCompile 'junit:junit:' + rootProject.ext.junitVersion
testCompile 'org.mockito:mockito-all:' + rootProject.ext.mockitoVersion
testCompile 'org.hamcrest:hamcrest-all:' + rootProject.ext.hamcrestVersion - 想运行Android的Junit得引入
// Android Testing Support Library's runner and rules
androidTestCompile 'com.android.support.test:runner:' + rootProject.ext.runnerVersion
androidTestCompile 'com.android.support.test:rules:' + rootProject.ext.rulesVersion - 最后在 defaultConfig 节点添加
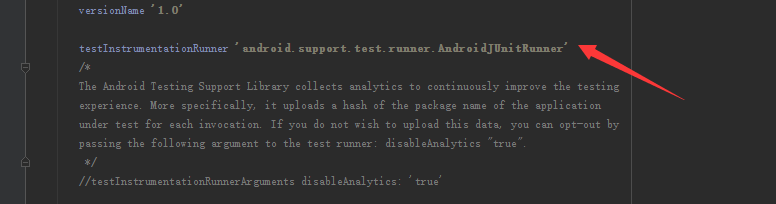

defaultConfig {
    testInstrumentationRunner 'android.support.test.runner.AndroidJUnitRunner'
} - 以上配置要配置在“启动项目中”build.gradle文件中,方可自动关联上启动项目
- Android Studio本来启动项目中的测试代码分为两个目录

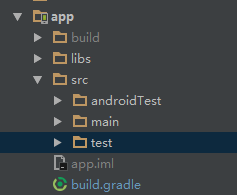
- 如果是通过更改“sourceSets”的话。那就要得重新配置注明相应的文件夹(这是Eclipse转AS导出的配置)
 sourceSets{
sourceSets{
    main{
        java.srcDirs = ['src']
    }
    androidTest{
        java.srcDirs = ['androidTest/src']
    }
    test{
        java.srcDirs = ['test/src']
    }
} - 最后就把相应的文件放入具体目录
- androidTest “Android的Junit”
- test “java的单元测试”
- 代码
- junit
public class ExampleUnitTest {
    @Test
    public void addition_isCorrect() throws Exception {
        System.out.println("123");

    }
} - Android junit
public class AndroidRuntimeCodeTest extends AndroidTestCase {

    public void testHello() throws Exception {
        System.out.println("testHello");
    }
} - 结论
- 注意事项
- 以前Eclipse做单元测试得往AndroidManifest.xml标明
- <manifest ><instrumentationandroid:name="android.test.InstrumentationTestRunner"android:targetPackage="com.example.viewtest" /></manifest>
- <application><uses-library android:name="android.test.runner" /></application>
- Android studio就要在build.gradle
- 导入相应的包
- 在
android{defaultConfig {testInstrumentationRunner 'android.support.test.runner.AndroidJUnitRunner'}}
- 还有一点:就是“测试使用的需要的包”遇到与“启动项目的包”冲突时,使用
configurations.all {
    resolutionStrategy {
        androidTestCompile 'com.android.support.test:runner:0.4.1'
        androidTestCompile 'com.android.support.test:rules:0.4.1'

        forcedModules = ['com.android.support:support-annotations:23.0.1']

    }
}
在Android Studio进行“简单配置”单元测试(Android Junit)的更多相关文章
- Android studio 安装与配置【Android学习入门】
终于下定决心认真学习Android开发了. 之前在很多平台看到很多大牛们学习Android的经验和心得,纸上得来终觉浅. 这里推荐stormzhang老师总结的Android学习之路. 为了防止电脑卡 ...
- Android Studio开发环境配置以及相关说明
版权声明:本文为HaiyuKing原创文章,转载请注明出处! 前言 这里简单记录下在开发的时候使用的Android Studio开发环境版本以及相关注意事项. 一般来讲,每隔一段时间就要检查下Andr ...
- Android studio下gradle Robolectric单元测试配置
android studio下gradle Robolectric单元测试配置 1.Robolectric Robolectric是一个基于junit之上的单元测试框架.它并不依赖于Android提供 ...
- Android Studio经常使用配置及使用技巧(二)
在<Android Studio经常使用配置及使用技巧(一)>中具体描写叙述了Android Studio的project结构和打开开源project的一些配置方法.本篇将从我个人的使用情 ...
- Android Studio NDK环境配置
本文参考:Android Studio NDK环境配置及JNI使用方法:http://blog.csdn.net/tongseng/article/details/53005123 并添加自己的实践: ...
- Android Studio一些简单设置
简单设置 1.默认主题设置 默认的 Android Studio 为灰色界面,能够选择使用炫酷的黑色界面. Settings --> Appearance --> Them ...
- 初次使用Android Studio时的配置
一.第一次安装: Android Studio安装完毕后,第一次启动AS前.为了避免又一次下载新版本号的SDK.操作例如以下: AS启动前.请先将bin文件夹的idea.properties文件里添加 ...
- Android Studio开发环境配置(win7)
由于近期,google网站封锁,导致eclipse配置android环境时,无法在线更新API和配置ADT.个人尝试之后,发现很多地方配置因为版本不合适而配置不成功,(ps:当然你FQ,或者下载到对应 ...
- 【转】Android studio安装与配置
Android studio安装与配置 1.首先下载Android studio安装包,可以从http://www.android-studio.org/下载最新版本,这里采用3.0版本进行演示,对应 ...
随机推荐
- 斯坦福第十九课:总结(Conclusion)
19.1 总结和致谢 欢迎来到<机器学习>课的最后一段视频.我们已经一起学习很长一段时间了.在最后视频中,我想快速地回顾一下这门课的主要内容,然后简单说几句想说的话. 作为这门课的结束时 ...
- struts2中的constant配置详解
<?xml version="1.0" encoding="UTF-8"?> <!DOCTYPE struts PUBLIC "-/ ...
- link,unlink,remove, rename函数
link函数:创建一个指向现有文件的链接的方法是使用 个人理解为cp命令 #include <unistd.h> int link( const char *existingpath, c ...
- Web大文件下载控件更新-Xproer.HttpDownloader
资源下载:cab安装包(x86),cab安装包(x64),xpi安装包,crx安装包,nat安装包,exe安装包,开发文档,根证书,VC库, 更新时间:2016-08-19 版本号:1,2,56, ...
- Java实验二20135104
课程:Java程序设计 班级: 1351 姓名:刘帅 学号:20135104 成绩: 指导教师:娄嘉鹏 实验日期:2 ...
- Linux下paste命令
paste 用于将多个文件按照列队列进行合并. 该命令主要用来将多个文件的内容合并,与cut命令完成的功能刚好相反. 1.原文件: 1>a.txt [root@localhost home]# ...
- halcon 常用算子中文解释说明(随时更新)
select_contours_xld (Edges, SelectedContours, 'closed', 0, 0, 0, 0) 筛选闭合边缘曲线 sub_image (ImageConvert ...
- KALI LINUX WEB 渗透测试视频教程—第十九课-METASPLOIT基础
原文链接:Kali Linux Web渗透测试视频教程—第十九课-metasploit基础 文/玄魂 目录 Kali Linux Web 渗透测试视频教程—第十九课-metasploit基础..... ...
- 解读SQL 内存数据库的细节
相信大家对内存数据库的 概念并不陌生,之前园子里也有多位大牛介绍过SQL内存数据库的创建方法,我曾仔细 拜读过,有了大致了解,不过仍有很多细节不清晰,比如: (1)内存数据库是把整个数据库放到内存中的 ...
- python 守护进程 daemon
python 守护进程 daemon # -*-coding:utf-8-*- import sys, os '''将当前进程fork为一个守护进程 注意:如果你的守护进程是由inetd启动的,不要这 ...