
QT网络编程UDP下C/S架构广播通信
QT有封装好的UDP协议的类,QUdpSocket,里面有我们想要的函数接口。感兴趣的话,可以看看。
先搞服务端吧,写一个子类,继承QDialog类,起名为UdpServer类。头文件要引用我们上边说的QUdpSocket这个类,还有我们想要的布局的类。
 #ifndef UDPSERVER_H

 #define UDPSERVER_H

 #include <QDialog>

 #include <QLabel>

 #include <QLineEdit>

 #include <QPushButton>

 #include <QVBoxLayout>

 #include <QtNetwork/QUdpSocket>

 #include <QtNetwork/QHostAddress>

 #include <QTimer>

 class UdpServer : public QDialog

 {

     Q_OBJECT

 public:

     UdpServer(QWidget *parent = ,Qt::WindowFlags f= );

     ~UdpServer();

 private:

     QLabel * TimerLabel;

     QLineEdit * TextLineEdit;

     QPushButton* StartBtn;

     QVBoxLayout * mainLayout;

  public slots:

     void StartBtnClicked();

     void timeout();

  private:

     int port;

     bool isStarted;

     QUdpSocket * udpSocket;

     QTimer *timer;

 };

 #endif // UDPSERVER_H
在.cpp文件里,我们先是把界面显示出来,然后用udp的writedategram把想要传的写进去。
 #include "udpserver.h"

 UdpServer::UdpServer(QWidget *parent,Qt::WindowFlags f)

     : QDialog(parent,f)

 {

    setWindowTitle(tr("UDP SERVER"));

    TimerLabel = new QLabel(tr("show time:"),this);

    TextLineEdit = new QLineEdit(this);

    StartBtn = new QPushButton(tr("start"),this);

    mainLayout = new QVBoxLayout(this);

    mainLayout-> addWidget(TimerLabel);

    mainLayout-> addWidget(TextLineEdit);

    mainLayout-> addWidget(StartBtn);

    connect(StartBtn,SIGNAL(clicked()),this,SLOT(StartBtnClicked()));

    port = ;

    isStarted = false;

    udpSocket = new QUdpSocket(this);

    timer = new QTimer(this);

    connect(timer,SIGNAL(timeout()),this,SLOT(timeout()));

 }

 UdpServer::~UdpServer()

 {

 }

 void UdpServer::StartBtnClicked()

 {

    if(!isStarted)

    {

       StartBtn->setText(tr("STOP"));

       timer->start();

       isStarted = true;

    }

     else

    {

        StartBtn->setText(tr("BEGIN"));

        isStarted = false;

        timer->stop();

    }

 }

 void UdpServer::timeout()

 {

     QString msg = TextLineEdit->text();

     int length=;

     if(msg=="")

     {

        return;

     }

     if((length=udpSocket->writeDatagram(msg.toLatin1(),msg.length(),QHostAddress::Broadcast,port))!=msg.length())

     {

         qDebug() << msg.toLatin1();

         return;

     }

 }
我这里用qDebug把要传的东西打印出来,进行测试,看看是否传过去了。
客户端:
 #ifndef UDPCLIENT_H

 #define UDPCLIENT_H

 #include <QDialog>

 #include <QVBoxLayout>

 #include <QTextEdit>

 #include <QPushButton>

 #include <QtNetwork/QUdpSocket>

  class UdpClient : public QDialog

 {

     Q_OBJECT

  public:

     UdpClient(QWidget *parent = );

     ~UdpClient();

  private:

     QTextEdit* ReceiceTextEdit;

     QPushButton* CloseBtn;

     QVBoxLayout* mainLayout;

  public slots:

     void CloseBtnClicked();

     void dataReceived();

  private:

     int port;

     QUdpSocket* udpSocket;

 };

 #endif // UDPCLIENT_H
客户端很简单,怎么实现布局,我就不多说了,主要是dataReceive函数。
 #include "udpclient.h"

 #include <QMessageBox>

 #include <QHostAddress>

 UdpClient::UdpClient(QWidget *parent)

     :QDialog(parent)

 {

   setWindowTitle("UDP CLIENT");

   ReceiceTextEdit = new QTextEdit(this);

   CloseBtn = new QPushButton(tr("Close"),this);

   mainLayout  = new QVBoxLayout(this);

   mainLayout->addWidget(ReceiceTextEdit);

   mainLayout->addWidget(CloseBtn);

   connect(CloseBtn,SIGNAL(clicked()),this,SLOT(CloseBtnClicked()));

   port =;

   udpSocket = new QUdpSocket(this);

   bool result = udpSocket->bind(port);

   if(!result)

   {

      QMessageBox::information(this,tr("ERROR"),tr("connect error"));

      return;

   }

   connect(udpSocket,SIGNAL(readyRead()),this,SLOT(dataReceived()));

 }

  UdpClient:: ~UdpClient()

 {

 }

 void UdpClient::CloseBtnClicked()

 {

    close();

 }

 void UdpClient::dataReceived()

 {

     while(udpSocket->hasPendingDatagrams())

     {

         QByteArray datagram;

         datagram.resize(udpSocket->pendingDatagramSize());

         udpSocket->readDatagram(datagram.data(),datagram.size());

         QString msg=datagram.data();

         ReceiceTextEdit->insertPlainText(msg);

     }

 }
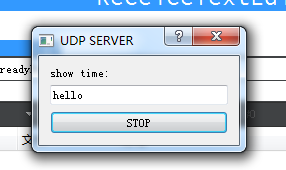
最后显示一下界面,服务端发送hello。
客户端收到的:
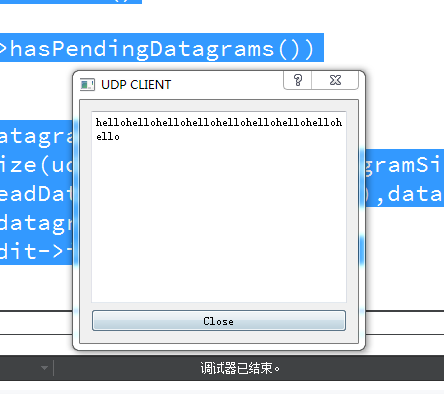
不停的在打印hello。直到点击关闭,或者服务端停止。
QT网络编程UDP下C/S架构广播通信的更多相关文章
- QT网络编程Tcp下C/S架构的即时通信
先写一个客户端,实现简单的,能加入聊天,以及加入服务器的界面. #ifndef TCPCLIENT_H #define TCPCLIENT_H #include <QDialog> #in ...
- c/c++ 网络编程 UDP 用if_nameindex和ioctl取得主机网络信息
网络编程 UDP 用if_nameindex和ioctl取得主机网络信息 getifaddrs函数取得的东西太多了,如果只想取得网卡名字和网卡编号可以用下面的2个函数. 1,if_nameindex ...
- Qt网络编程QTcpServer和QTcpSocket的理解
前一段时间通过调试Qt源码,大致了解了Qt的事件机制.信号槽机制.毕竟能力和时间有限.有些地方理解的并不是很清楚. 开发环境:Linux((fedora 17),Qt版本(qt-everywhere- ...
- c/c++ 网络编程 UDP 设定MTU
网络编程 UDP 设定MTU MTU(Maximun Transmisson Unit):一次送信的最大size. 在程序里动态改变MTU.注意:程序运行需要root权限. 程序运行的方法: sudo ...
- c/c++ 网络编程 UDP up/down 网卡
网络编程 UDP up/down 网卡 在程序里动态改变网卡的状态.注意:程序运行需要root权限. 程序运行的方法: sudo ./a.out 1,关闭网卡 #include <stdio.h ...
- c/c++ 网络编程 UDP 改变网关和网卡名字
网络编程 UDP 改变网关和网卡名字 在程序里动态改变网关和网卡名字 1,改变网卡名字 #include <stdio.h> #include <string.h> #incl ...
- c/c++ 网络编程 UDP 改变网卡的硬件地址
网络编程 UDP 改变网卡的硬件地址 在程序里动态改变网卡的硬件地址 1,取得网卡的硬件地址 #include <stdio.h> #include <string.h> #i ...
- c/c++ 网络编程 UDP 改变IP地址
网络编程 UDP 改变IP地址 在程序里动态改变主机的IP地址 1,改变ipv4的地址 #include <stdio.h> #include <string.h> #incl ...
- c/c++ 网络编程 UDP 主机网络信息取得
网络编程 UDP 主机网络信息取得 1,if_nametoindex 通过网卡名字取得网卡编号 2,if_indextoname 通过网卡编号取得网卡名字 #include <stdio.h&g ...
随机推荐
- day1-Python擅长的领域+学习内容
Python擅长的领域 WEB开发 Django Pyramid Tornado Bottle Flask WebPy 网络编程 Twisted Re ...
- Git学习系列之Git和TortoiseGit的区别
不多说,直接上干货! Git和TortoiseGit的区别: TortoiseGit的安装和使用依赖Git. Git有且只有一个,就是linux最初创建的那个叫做Git的程序.现在的维护者的名字我懒得 ...
- 【Lua】遍历目录结果输出到页面中,刷新页面后出现500 Internal Server Error
在通过lua获取目录json字符串,然后作为数据源,通过Extjs生成树的过程中,发生了一个奇怪的问题,那就是获取目录json字符串然后传递给Extjs生成树的这个过程中,一开始都是很顺利的就生成了, ...
- 转 Unity企业级支持案例与分析
Unity大中华区技术支持总监张黎明以“Unity企业级支持案例与分析”为主题进行了分享. 以下为演讲实录: 张黎明:非常感谢大家来参加今年的Unite,其实我现在看到有的朋友已经不是第一次来参加Un ...
- Windows命令计算MD5与SHA1/256值
certutil -hashfile file MD5 certutil -hashfile file SHA1 certutil -hashfile file SHA256 示例如下:
- pyquery库简介
html = '''<div><ul><li class="item-0">li0</li><li class="i ...
- jQuery ajax async
jQuery 同步调用: jQuery.ajax({ type:'POST', async: false, url:'qcTask/add', contentType:'application/jso ...
- C++命名空间使用代码
namesp.h #pragma once #include <string> namespace pers { using namespace std; struct Person { ...
- Java - Latch和Barrier的区别
之所以把Latch与Barrier放在一起比较是因为他们给人一种相似的感觉. 他们都是阻塞一些行为直至某个事件发生,但Latch是等待某个事件发生,而Barrier是等待线程. 先比较一下JCIP中对 ...
- Rabbit的直连交换机direct
直连交换机类型为:direct.加入了路由键routingKey的概念. 就是说 生产者投递消息给指定交换机的指定路由键. 只有绑定了此交换机指定路由键的消息队列才可以收到消息. 生产者: packa ...