div+css实现导航示意箭头
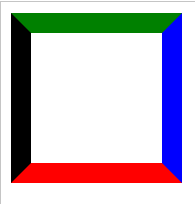
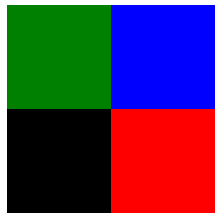
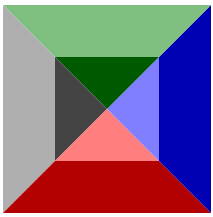
1、Div的宽高为100
 <!DOCTYPE html>

 <html xmlns="http://www.w3.org/1999/xhtml">

 <head>

     <meta http-equiv="Content-Type" content="text/html; charset=utf-8" />

     <title></title>

     <style type="text/css">

         div

         {

             border-color: green blue red black;

             border-style: solid;

             border-width: 16px;

             height: 100px;

             width: 100px;

         }

     </style>

 </head>

 <body>

     <div></div>

 </body>

 </html>
显示效果:
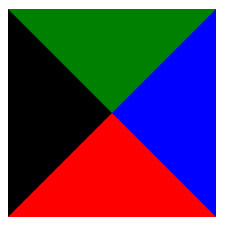
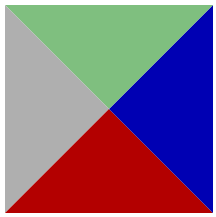
2、将宽高均设置为0
 <!DOCTYPE html>

 <html xmlns="http://www.w3.org/1999/xhtml">

 <head>

     <meta http-equiv="Content-Type" content="text/html; charset=utf-8" />

     <title></title>

     <style type="text/css">

         div

         {

             border-color: green blue red black;

             border-style: solid;

             border-width: 80px;

             height: 0px;

             width: 0px;

         }

     </style>

 </head>

 <body>

     <div></div>

 </body>

 </html>
显示效果:
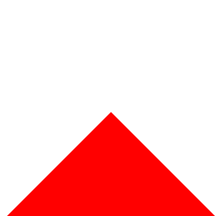
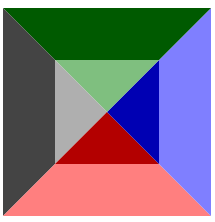
3、只显示下面的▲
半透明示意
 <!DOCTYPE html>

 <html xmlns="http://www.w3.org/1999/xhtml">

 <head>

     <meta http-equiv="Content-Type" content="text/html; charset=utf-8" />

     <title></title>

     <style type="text/css">

         div

         {

             border-color: rgba(0,100,100,0.1) rgba(20,20,20,0.1) red;

             border-style: solid;

             border-width: 80px;

             height: 0px;

             width: 0px;

         }

     </style>

 </head>

 <body>

     <div></div>

 </body>

 </html>
显示效果:

设置为全透明
 <!DOCTYPE html>

 <html xmlns="http://www.w3.org/1999/xhtml">

 <head>

     <meta http-equiv="Content-Type" content="text/html; charset=utf-8" />

     <title></title>

     <style type="text/css">

         div

         {

             border-color: rgba(0,0,0,0) rgba(0,0,0,0) red;

             border-style: solid;

             border-width: 80px;

             height: 0px;

             width: 0px;

         }

     </style>

 </head>

 <body>

     <div></div>

 </body>

 </html>
显示效果:
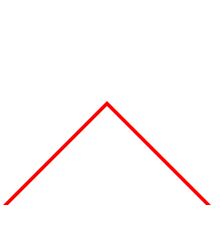
4、通过2个▲的重叠实现导航示意符号Λ
 <!DOCTYPE html>

 <html xmlns="http://www.w3.org/1999/xhtml">

 <head>

     <meta http-equiv="Content-Type" content="text/html; charset=utf-8" />

     <title></title>

     <style type="text/css">

         div.one

         {

             border-color: rgba(0,0,0,0) rgba(0,0,0,0) red;/*这里为导航符号颜色*/

             border-style: solid;

             border-width: 80px;

             height: 0px;

             width: 0px;

             position:absolute;

         }

     div.two

         {

             border-color: rgba(0,0,0,0) rgba(0,0,0,0) white;/*这里为背景色*/

             border-style: solid;

             border-width: 80px;

             height: 0px;

             width: 0px;

             position:absolute;

             margin-top:4px;/*需要一个偏移量*/

         }

     </style>

 </head>

 <body>

     <div class="one"></div>

     <div class="two"></div>

 </body>

 </html>
显示效果:
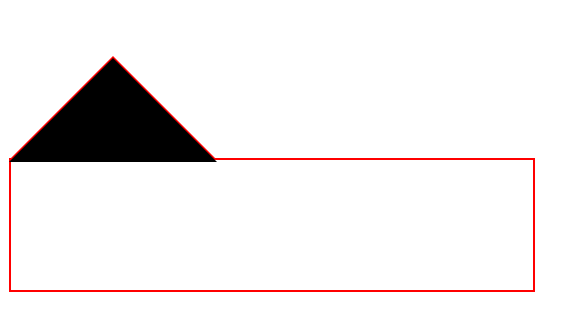
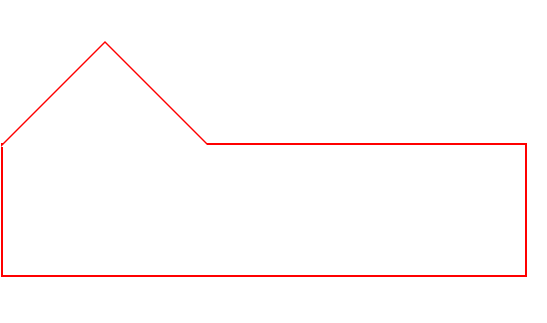
5、与下方的DIV组合
 <!DOCTYPE html>

 <html xmlns="http://www.w3.org/1999/xhtml">

 <head>

     <meta http-equiv="Content-Type" content="text/html; charset=utf-8" />

     <title></title>

     <style type="text/css">

         div.one

         {

             border-color: rgba(0,0,0,0) rgba(0,0,0,0) red;

             border-style: solid;

             border-width: 80px;

             height: 0px;

             width: 0px;

             position:absolute;

         }

     div.two

         {

             border-color: rgba(0,0,0,0) rgba(0,0,0,0) black;/*black不是背景色,便于观察*/

             border-style: solid;

             border-width: 80px;

             height: 0px;

             width: 0px;

             position:absolute;

             margin-top:2px;

             z-index:1;

         }

       div.three{

          position:absolute;

          width:400px;

          height:100px;

          border:2px solid red;/*需要设置边界宽度*/

          margin-top:158px

       }

     </style>

 </head>

 <body>

     <div class="one"></div>

     <div class="two"></div>

     <div class="three"></div>

 </body>

 </html>
便于观察的黑色背景:
改为背景色"白色"后显示效果:
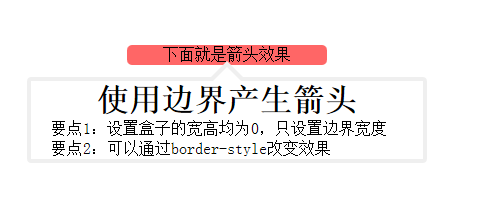
6、完整的小例子
 <!DOCTYPE html>

 <html xmlns="http://www.w3.org/1999/xhtml">

 <head>

     <meta http-equiv="Content-Type" content="text/html; charset=utf-8" />

     <title></title>

     <style>

         *

         {

             margin: 0px;

             padding: 0px;

         }

         #show

         {

             margin: 10px auto;

             position: absolute;

             top: 50px;

             left: 50px;

             text-align: center;

         }

         #some

         {

             width: 200px;

             margin-left: 100px;

             text-align: center;

             position: absolute;

             background-color: rgba(255, 0, 0,0.6);

             border-radius: 5px;

         }

         #info

         {

             width: 400px;

             height: 300px;

             position: absolute;

         }

         #outarrow

         {

             border-color: transparent transparent #efefef;

             border-style: solid;

             border-width: 16px;

             height: 0;

             width: 0;

             position: absolute;

             top: 0px;

             left: 184px;

         }

         #innerarrow

         {

             border-color: transparent transparent white;

             border-style: solid;

             border-width: 16px;

             height: 0;

             width: 0;

             position: absolute;

             top: 0px;

             left: 184px;

             margin-top: 6px;

         }

         #content

         {

             border: 4px solid;

             border-radius: 4px;

             border-color: #efefef;

             width: 400px;

             margin: 32px auto 0px;

             -moz-box-sizing: border-box;

             -webkit-box-sizing: border-box;

             box-sizing: border-box;

         }

             #content p

             {

                 text-align: left;

                 text-indent: 20px;

             }

     </style>

 </head>

 <body>

     <div id="show">

         <div id="some">下面就是箭头效果</div>

         <div id="info">

             <div id="outarrow"></div>

             <div id="innerarrow"></div>

             <div id="content">

                 <h1>使用边界产生箭头</h1>

                 <p>要点1:设置盒子的宽高均为0,只设置边界宽度</p>

                 <p>要点2:可以通过border-style改变效果</p>

             </div>

         </div>

     </div>

 </body>

 </html>
显示效果:
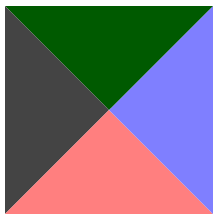
7、改变border-style 有趣的效果
   <!DOCTYPE html>

   <html xmlns="http://www.w3.org/1999/xhtml">

   <head>

       <meta http-equiv="Content-Type" content="text/html; charset=utf-8" />

       <title></title>

       <style type="text/css">

           div

           {

              border-color: green blue red black;

              border-style: dotted;/*除了solid,可以试试dotted,dashed;grooved等*/

              border-width: 80px;

              height: 0px;

              width: 0px;

          }

      </style>

  </head>

  <body>

      <div></div>

  </body>

  </html>
|
dotted |
dashed | groove |
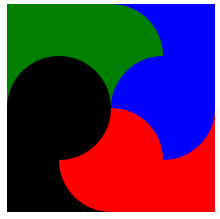 |
 |
 |
|
outset |
inset | ridge |
 |
 |
 |
div+css实现导航示意箭头的更多相关文章
- 十天学会<div+css>横向导航菜单和纵向导航菜单
纵向导航菜单及二级弹出菜单 纵向导航菜单:一级菜单 <head><style type="text/css">body { font-family: Ver ...
- CSS绘制三角形和箭头,不用再用图片了
前言 还在用图片制作箭头,三角形,那就太lou了.css可以轻松搞定这一切,而且颜色大小想怎么变就怎么变,还不用担心失真等问题. 先来看看这段代码: /**css*/.d1{ width: 0; he ...
- HTML5 div+css导航菜单
HTML5 div+css导航菜单 视频 音乐 小说 故事 作品 阅读 联系
- 【转】一个DIV+CSS代码布局的简单导航条
原文地址:http://www.divcss5.com/shili/s731.shtml 简单的DIV CSS代码布局实现导航条 一个蓝色主题的导航条布局案例,本CSS小实例,采用DIV CSS实现. ...
- 使用div+css制作简单导航 以及要注意问题
<!DOCTYPE html PUBLIC "-//W3C//DTD XHTML 1.0 Transitional//EN" "http://www.w3.org/ ...
- 43个实例xHTML+CSS(DIV+CSS)网页及导航布局
在中国,很多前端开发初学者都会把xHTML+CSS页面制作说成DIV+CSS,甚至很多人都还不知道xHTML+CSS是什么意思,只知道盲目的追求DIV+CSS,但在国外,是没有DIV+CSS这个概念的 ...
- DIV+CSS规范命名大全
网页制作中规范使用DIV+CSS命名规则,可以改善优化功效特别是团队合作时候可以提供合作制作效率,具体DIV CSS命名规则CSS命名大全内容篇. 常用DIV+CSS命名大全集合,即CSS命名规则 D ...
- DIV+CSS系统学习:转载
第一部分 HTML 第一章 职业规划和前景 职业方向规划定位: web前端开发工程师 web网站架构师 自己创业 转岗管理或其他 web前端开发的前景展望: 未来IT行业企业需求最多的人才 结合最新的 ...
- DIV+CSS命名规范-转载1
命名规则说明: 1).所有的命名最好都小写 2).属性的值一定要用双引号("")括起来,且一定要有值如class="divcss5",id="divc ...
随机推荐
- Jquery Ajax Get示例
$.ajax({ type: "GET", url:"ajax_url.php", cache: false, data:{'action':'ABC',' ...
- table表格中加入<a>标签,使内容上下居中的方法。
主要思路:定义好表格单元格的width和height,再加入<a>后,设置<a>的width=100%,height=100%填充整个单元格.那么此时设置上下左右居中样式就只需 ...
- Google 编码风格
一.Google JavaScript编码风格 简体中文版 Google JavaScript Style Guide 二.Google HTML/CSS代码风格指南 简体中文版 三.Google C ...
- jquery ajax php+mysql 无刷新分页 详细实例
最近在接触jquery和ajax,当前项目也会用到分页,为了用户体验更好一些,就准备用无刷新分页,这个demo很适合新手学习查看,写的比较清晰,话不多说,直接上代码吧. 首先是html页面,index ...
- jQuery Ajax无刷新操作
下面是“无刷新登录”的例子,采用Ashx+jQuery Ajax实现. //后台实例代码 ashx文件(可替换为从数据库中读取) public void ProcessRequest(HttpCont ...
- DataGridView 绑定数据后修改列类型
dataGridView1.DataSource = dt; dataGridView1.Columns.RemoveAt(); //删除要被替换的列 DataGridViewLinkColumn l ...
- The preview is empty because of the setting.Check the generation option.
前些日子在pd中添加存储过程, 参考:深蓝居的博文 http://www.cnblogs.com/studyzy/archive/2009/12/18/1627334.html 创建视图的时候,会在属 ...
- Python自省学习
1. 访问对象的属性 class MyClass(): a=' b=' def __init__(self): pass def write(self): print self.a,self.b my ...
- jQuery编写插件--封装全局函数的插件(一些常用的js验证表达式)
上一篇写到了jQuery插件的3种类型,介绍了第一种类型的写法--封装jQuery对象的方法插件.这一篇要介绍第二种插件类型:封装全局函数的插件:这类插件就是在jQuery命名空间内部添加函数:这类插 ...
- C++ 实现设计模式之观察者模式
1. 什么是观察者模式? 观察者模式(有时又被称为发布-订阅Subscribe>模式.模型-视图View>模式.源-收听者Listener>模式或从属者模式)是软件设计模式的一种.在 ...