
php注解使用示例
<?php

class indexController

{

    #[route('/controller/index','get')]

    public function index():void

    {

        echo "This is attribute index controller \r\n";

    }

    #[route('/controller/test','get')]

    public function test():void

    {

        echo "This is attribute test controller \r\n";

    }

}
<?php

class workController

{

    #[route('/controller/work','post')]

    public function work():void

    {

        echo "This is attribute work controller \r\n";

    }

}
<?php

#[Attribute(Attribute::IS_REPEATABLE|Attribute::TARGET_METHOD)]

class route{

    public static $all = [];

    public static $path = '';

    public static $method = 'GET';

    public static $function = '';

    public static $controller = '';

    public function __construct(){}

    public function setPath(string $path):self

    {

        $this->path = $path;

        return $this;

    }

    public function setMethod(string $method):self

    {

        $this->method = $method;

        return $this;

    }

    public function setFunction(string $function):self

    {

        $this->function = $function;

        return $this;

    }

    public function setController(string $controller):self

    {

        $this->controller = $controller;

        return $this;

    }

    public function addRoute():void

    {

        self::$all[str_replace("Controller","",$this->controller)][$this->function] = $this;

    }
<?php

    public static function setRoute($controllerClass){

        $ref = new ReflectionClass($controllerClass);

        $controller = $ref->getName();

        $methods = $ref->getMethods();

        foreach($methods as $method){

            $function = $method->getName();

            $attributes = $method->getAttributes(route::class);

            foreach($attributes as $attribute){

                 $route = $attribute->newInstance();

                // 拿到注解上的参数

                $params = $attribute->getArguments();

                $route->setController($controller)

                    ->setFunction($function)

                    ->setPath($params[0])

                    ->setMethod($params[1])

                    ->addRoute();

            }

        }

    }

}
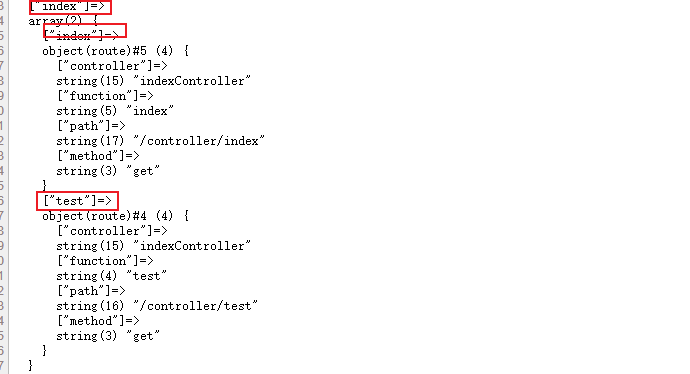
<?php

class app{

    public function appInit():self

    {

        if(glob("./controller/*.php")){

            foreach(glob("./controller/*.php") as $fileName){

                require_once($fileName);

                $className = str_replace("./controller/","",str_replace(".php","",$fileName));

                route::setRoute($className);

                //route::$all;exit();

            }

        }

        return $this;

    }

    public function run($config){

        $controller = $_GET['c']??$config['default_controller'];

        $action = $_GET['a']??$config['default_function'];

        if(isset(route::$all[$controller][$action])){

            $route = route::$all[$controller][$action];

            $className = $route->controller;

            $function = $route->function;

            (new $className)->$function();

        }else{

            exit("404 Not Found!");

        }

    }

}
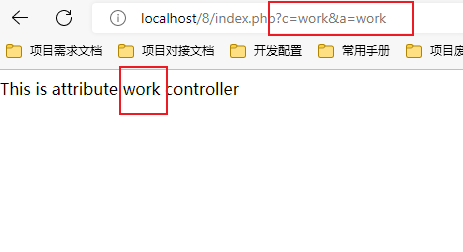
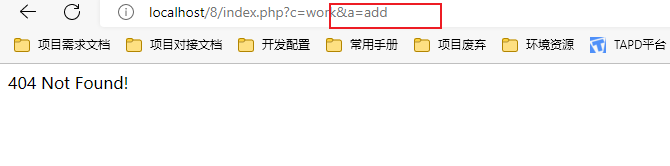
<?php

$config = array(

    'default_controller'=>'index',

    'default_function'=>'index',

);

return $config;
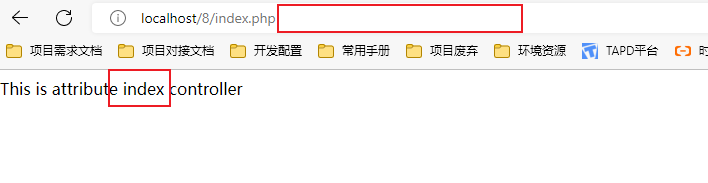
<?php

#[Attribute(Attribute::IS_REPEATABLE|Attribute::TARGET_METHOD)]

class route{

    public static $all = [];

    public static $path = '';

    public static $method = 'GET';

    public static $function = '';

    public static $controller = '';

    public function __construct(){}

    public function setPath(string $path):self

    {

        $this->path = $path;

        return $this;

    }

    public function setMethod(string $method):self

    {

        $this->method = $method;

        return $this;

    }

    public function setFunction(string $function):self

    {

        $this->function = $function;

        return $this;

    }

    public function setController(string $controller):self

    {

        $this->controller = $controller;

        return $this;

    }

    public function addRoute():void

    {

        self::$all[str_replace("Controller","",$this->controller)][$this->function] = $this;

    }

    public static function setRoute($controllerClass){

        $ref = new ReflectionClass($controllerClass);

        $controller = $ref->getName();

        $methods = $ref->getMethods();

        foreach($methods as $method){

            $function = $method->getName();

            $attributes = $method->getAttributes(route::class);

            foreach($attributes as $attribute){

                 $route = $attribute->newInstance();

                // 拿到注解上的参数

                $params = $attribute->getArguments();

                $route->setController($controller)

                    ->setFunction($function)

                    ->setPath($params[0])

                    ->setMethod($params[1])

                    ->addRoute();

            }

        }

    }

}
<?php

class app{

    public function appInit():self

    {

        if(glob("./controller/*.php")){

            foreach(glob("./controller/*.php") as $fileName){

                require_once($fileName);

                $className = str_replace("./controller/","",str_replace(".php","",$fileName));

                route::setRoute($className);

                //route::$all;exit();

            }

        }

        return $this;

    }

    public function run($config){

        $controller = $_GET['c']??$config['default_controller'];

        $action = $_GET['a']??$config['default_function'];

        if(isset(route::$all[$controller][$action])){

            $route = route::$all[$controller][$action];

            $className = $route->controller;

            $function = $route->function;

            (new $className)->$function();

        }else{

            exit("404 Not Found!");

        }

    }

}
<?php

class indexController

{

    #[route('/controller/index','get')]

    public function index():void

    {

        echo "This is attribute index controller \r\n";

    }

    #[route('/controller/test','get')]

    public function test():void

    {

        echo "This is attribute test controller \r\n";

    }

}
<?php

class workController

{

    #[route('/controller/work','post')]

    public function work():void

    {

        echo "This is attribute work controller \r\n";

    }

}
<?php

$config = array(

    'default_controller'=>'index',

    'default_function'=>'index',

);

return $config;
<?php

require_once('./config.php');

require_once('./route.php');

require_once('./init.php');

(new app)->appInit()->run($config);
php注解使用示例的更多相关文章
- MyBatis3-基于注解的示例
在基于注解的示例中,可以简化编写XML的过程,全部采用注解方式进行编写,并在注解上写SQL语句,语句和XML的语句保持一致,并且可以省略掉XML文件不用引入的好处.但还有一点,基于注解的方式还没有百分 ...
- MyBatis多参数传递之注解方式示例--转
原文地址:http://legend2011.blog.51cto.com/3018495/1015003 若映射器中的方法只有一个参数,则在对应的SQL语句中,可以采用#{参数名}的方式来引用此参数 ...
- spring注解controller示例
依赖库 spring 3.0 配置web.xml文件如下: <?xml version="1.0" encoding="UTF-8"?> <w ...
- spring mvc 注解入门示例
web.xml <?xml version="1.0" encoding="UTF-8"?> <web-app xmlns:xsi=" ...
- Hibernate注解开发示例
-------------------------------------------------------------------customer------------------------- ...
- Spring 注解学习 详细代码示例
学习Sping注解,编写示例,最终整理成文章.如有错误,请指出. 该文章主要是针对新手的简单使用示例,讲述如何使用该注释,没有过多的原理解析. 已整理的注解请看右侧目录.写的示例代码也会在结尾附出. ...
- Spring bean依赖注入、bean的装配及相关注解
依赖注入 Spring主要提供以下两种方法用于依赖注入 基于属性Setter方法注入 基于构造方法注入 Setter方法注入 例子: public class Communication { priv ...
- 基于注解的SpringMVC
相比传统的继承Controller体系中某些类的方式,SpringMVC的注解具有以下优点: 1.Controller不再需要继承某个特定类,只是简单的POJO. 2.请求映射的配置非常方便灵活. 3 ...
- 【Java EE 学习 49 下】【Spring学习第一天】【MVC】【注解回顾】
一.MVC 1.使用Spring有一个非常大的好处,那就是能够实现完全面向接口编程,传统的使用Dao.Service并不能实现完全的面向接口编程. 2.示例:https://github.com/kd ...
随机推荐
- Excel 统计函数(四):AVERAGEIF 和 AVERAGEIFS
AVERAGEIF [语法]AVERAGEIF(range, criteria, [average_range]) [参数] range:要计算平均值的一个或多个单元格: criteria:筛选条件: ...
- bind搭建内网DNS服务器架构(主从、子域授权、DNS转发器)
实验目的 模拟企业DNS服务架构服务器及原理 实验环境准备 实验架构图 实验设备 DNS服务器4台 主服务器master(centos8):IP_192.168.100.30, 从服务器slave(r ...
- 【manim】学习路径1-安装篇-windows、macOS
下一章:https://www.cnblogs.com/remyuu/p/16462369.html 本系列以大量实战讲解manim数学动画引擎. 文档编辑器推荐:Sublime Text 这里是一些 ...
- Windows平台Unity3d播放多路RTMP或RTSP流
好多开发者在做AR.VR或者教育类产品时,苦于如何在windows平台构建一个稳定且低延迟的RTSP或者RTMP播放器,如果基于Unity3d完全重新开发一个播放器,代价大.而且周期长,不适合快速出产 ...
- 微软出品自动化神器Playwright,不用写一行代码(Playwright+Java)系列(一) 之 环境搭建及脚本录制
一.前言 半年前,偶然在视频号刷到某机构正在直播讲解Playwright框架的使用,就看了一会,感觉还不错,便被种草,就想着自己有时间也可以自己学一下,这一想着就半年多过去了. 读到这,你可能就去百度 ...
- Java 多线程:锁(二)
Java 多线程:锁(二) 作者:Grey 原文地址: 博客园:Java 多线程:锁(二) CSDN:Java 多线程:锁(二) AtomicLong VS LongAddr VS Synchroni ...
- 第六章:Django 综合篇 - 12:聚合内容 RSS/Atom
Django提供了一个高层次的聚合内容框架,让我们创建RSS/Atom变得简单,你需要做的只是编写一个简单的Python类. 一.范例 要创建一个feed,只需要编写一个Feed类,然后设置一条指向F ...
- jumpserver 2222端口的使用
可以这样理解: 通过在jumpserver的web界面添加的用户,相应的也有权限通过远程使用命令的方式登陆jumpserver,进行相应的管理,只不过使用的端口是2222端口,不是常见的22端口. 一 ...
- Visual Studio 2022 开发 STM32 单片机 - 环境搭建点亮LED灯
安装VS2022社区版软件 选择基础的功能就好 安装VisualGDB软件(CSDN资源) 按照提示一步一步安装就好 VisualGDB激活软件(CSDN资源) 将如下软件放在VisualGDB的安装 ...
- 线程池底层原理详解与源码分析(补充部分---ScheduledThreadPoolExecutor类分析)
[1]前言 本篇幅是对 线程池底层原理详解与源码分析 的补充,默认你已经看完了上一篇对ThreadPoolExecutor类有了足够的了解. [2]ScheduledThreadPoolExecut ...