
WPF入门教程系列七——布局之WrapPanel与StackPanel(二)
三. WrapPanel
WrapPanel布局面板将各个控件从左至右按照行或列的顺序罗列,当长度或高度不够是就会自动调整进行换行,后续排序按照从上至下或从右至左的顺序进行。
Orientation——根据内容自动换行。当 Horizontal选项看上去类似于Windows资源管理器的缩略图视图:元素是从左向右排列的,然后自上至下自动换行。Vertical 选项看上去类似于Windows资源管理器的列表视图:元素是从上向下排列的,然后从左至右自动换行。
ItemHeight——所有子元素都一致的高度。每个子元素填充高度的方式取决于它的VerticalAlignment属性、Height属性等。任何比ItemHeight高的元素都将被截断。
ItemWidth——所有子元素都一致的宽度。每个子元素填充高度的方式取决于它的VerticalAlignment属性、Width属性等。任何比ItemWidth高的元素都将被截断。
本次的示例,效果图如下2图,图1是宽度比较小,图2就是拉长了宽度后的结果。大家可以在实际做出来之后,自行拉动窗体的宽度:
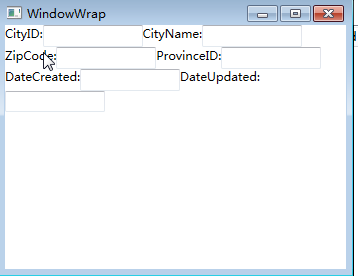
图1
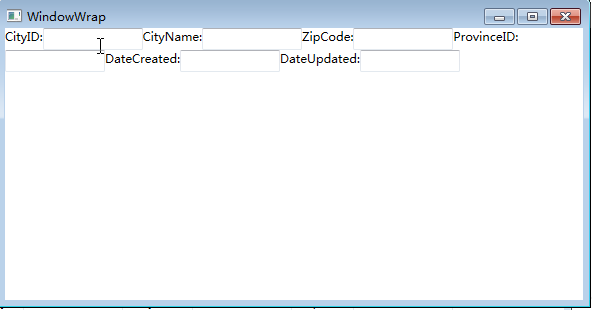
图2
上面两图的XAML代码实现:
<Window x:Class="WpfApp1.WindowWrap"

        xmlns="http://schemas.microsoft.com/winfx/2006/xaml/presentation"

        xmlns:x="http://schemas.microsoft.com/winfx/2006/xaml"

        Title="WindowWrap" Height="300" Width="400">

    <Grid>

        <WrapPanel  Orientation="Horizontal">

                <TextBlock Name="textBlock_CityID" Text="CityID:" />

                <TextBox Name="textBox_CityID" MinWidth="100" />

                <TextBlock Name="textBlock_CityName" Text="CityName:" />

                <TextBox Name="textBox_CityName" MinWidth="100" />

                <TextBlock Name="textBlock_ZipCode" Text="ZipCode:" />

                <TextBox Name="textBox_ZipCode" MinWidth="100"  />

                <TextBlock Name="textBlock_ProvinceID" Text="ProvinceID:" />

                <TextBox Name="textBox_ProvinceID" MinWidth="100"   />

                <TextBlock Name="textBlock_DateCreated" Text="DateCreated:"  />

                <TextBox Name="textBox_DateCreated" MinWidth="100"   />

                <TextBlock Name="textBlock_DateUpdated" Text="DateUpdated:" />

                <TextBox Name="textBox_DateUpdated" MinWidth="100" />

        </WrapPanel>

    </Grid>

</Window>

C#代码实现上图示例:
using System;

using System.Collections.Generic;

using System.Linq;

using System.Text;

using System.Threading.Tasks;

using System.Windows;

using System.Windows.Controls;

using System.Windows.Data;

using System.Windows.Documents;

using System.Windows.Input;

using System.Windows.Media;

using System.Windows.Media.Imaging;

using System.Windows.Shapes;

namespace WpfApp1

{

    /// <summary>

    /// WindowWrap.xaml 的交互逻辑

    /// </summary>

    public partial class WindowWrap : Window

    {

        public WindowWrap()

        {

            InitializeComponent();

        }

        private void btnAddByCode_Click(object sender, RoutedEventArgs e)

        {

            WrapPanel wp = new WrapPanel();

            //把wp添加为窗体的子控件

            this.Content = wp;

            wp.Margin = new Thickness(, , , );

            wp.Background = new SolidColorBrush(Colors.White);

            //遍历增加TextBlock

            TextBlock block;

            for (int i = ; i <= ; i++)

            {

                block = new TextBlock();

                block.Text = "后台代码添加控件:" + i.ToString();

                block.Margin = new Thickness(, , , );

                block.Width = ;

                block.Height = ;

                wp.Children.Add(block);

            }

        }

    }

}
四. StackPanel
StackPanel就是将控件按照行或列来顺序排列,但不会换行。通过设置面板的Orientation属性设置了两种排列方式:横排(Horizontal默认的)和竖排(Vertical)。纵向的StackPanel默 认每个元素宽度与面板一样宽,反之横向亦然。如果包含的元素超过了面板空间,它只会截断多出的内容。 元素的Margin属性用于使元素之间产生一定得间隔,当元素空间大于其内容的空间时,剩余空间将由HorizontalAlignment和 VerticalAlignment属性来决定如何分配。
本示例要实现的效果如下2图,图1是横排,图2是竖排。

图1
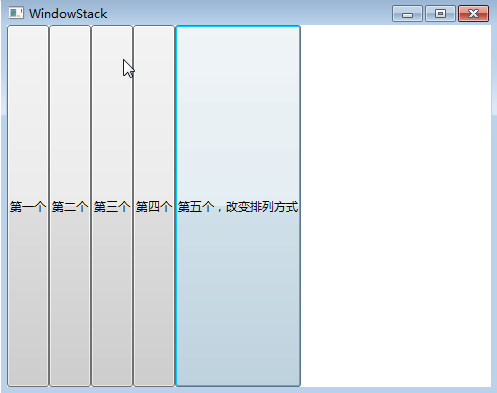
图2
上两图的XAML代码实现:
<Window x:Class="WpfApp1.WindowStack"

        xmlns="http://schemas.microsoft.com/winfx/2006/xaml/presentation"

        xmlns:x="http://schemas.microsoft.com/winfx/2006/xaml"

        Title="WindowStack" Height="400" Width="500">

    <Grid>

        <StackPanel Name="stackPanel" Margin="0,0,0,0" Background="White" Orientation="Vertical">

            <Button Content="第一个"/>

            <Button Content="第二个"/>

            <Button Content="第三个"/>

            <Button Content="第四个"/>

            <Button Content="第五个,改变排列方式" Click="Button_Click"/>

          <Button Content="后台代码实现" Click="Button_Click_1"/>

        </StackPanel>

    </Grid>

</Window>
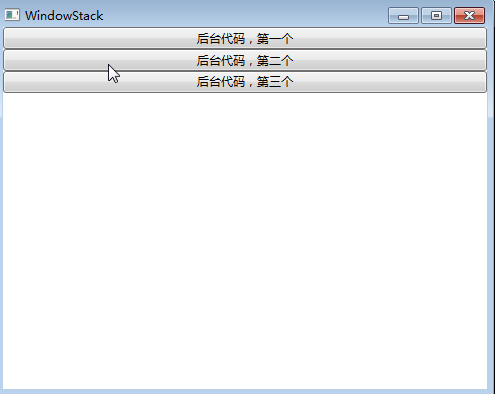
上图示例的C#代码实现:
using System;

using System.Collections.Generic;

using System.Linq;

using System.Text;

using System.Threading.Tasks;

using System.Windows;

using System.Windows.Controls;

using System.Windows.Data;

using System.Windows.Documents;

using System.Windows.Input;

using System.Windows.Media;

using System.Windows.Media.Imaging;

using System.Windows.Shapes;

namespace WpfApp1

{

    /// <summary>

    /// WindowStack.xaml 的交互逻辑

    /// </summary>

    public partial class WindowStack : Window

    {

        public WindowStack()

        {

            InitializeComponent();

        }

        private void Button_Click(object sender, RoutedEventArgs e)

        {

            stackPanel.Orientation=Orientation.Horizontal;

        }

        private void StackPanels()

        {

            StackPanel sp = new StackPanel();

            //把sp添加为窗体的子控件

            this.Content = sp;

            sp.Margin = new Thickness(, , , );

            sp.Background = new SolidColorBrush(Colors.White);

            sp.Orientation = Orientation.Vertical;

            //Button1

            Button b1 = new Button();

            b1.Content = "后台代码,第一个";

            sp.Children.Add(b1);

            //Button2

            Button b2 = new Button();

            b2.Content = "后台代码,第二个";

            sp.Children.Add(b2);

            //Button3

            Button b3 = new Button();

            b3.Content = "后台代码,第三个";

            sp.Children.Add(b3);

        }

        private void Button_Click_1(object sender, RoutedEventArgs e)

        {

            StackPanels();

        }

    }

}
注: 当把StackPanel的FlowDirection属性设置为RightToLeft,Orientation属性设置为Horizontal,StackPanel将从右向左排列元素。
WPF入门教程系列七——布局之WrapPanel与StackPanel(二)的更多相关文章
- WPF入门教程系列六——布局介绍与Canvas(一)
从这篇文章开始是对WPF中的界面如何布局做一个较简单的介绍,大家都知道:UI是做好一个软件很重要的因素,如果没有一个漂亮的UI,功能做的再好也无法吸引很多用户使用,而且没有漂亮的界面,那么普通用户会感 ...
- WPF入门教程系列九——布局之DockPanel与ViewBox(四)
七. DockPanel DockPanel定义一个区域,在此区域中,您可以使子元素通过描点的形式排列,这些对象位于 Children 属性中.停靠面板其实就是在WinForm类似于Dock属性的元 ...
- WPF入门教程系列十——布局之Border与ViewBox(五)
九. Border Border 是一个装饰的控件,此控件绘制边框及背景,在 Border 中只能有一个子控件,若要显示多个子控件,需要将一个附加的 Panel 控件放置在父 Border 中.然后可 ...
- WPF入门教程系列八——布局之Grid与UniformGrid(三)
五. Grid Grid顾名思义就是“网格”,它的子控件被放在一个一个实现定义好的小格子里面,整齐配列. Grid和其他各个Panel比较起来,功能最多也最为复杂.要使用Grid,首先要向RowDef ...
- WPF入门教程系列二十三——DataGrid示例(三)
DataGrid的选择模式 默认情况下,DataGrid 的选择模式为“全行选择”,并且可以同时选择多行(如下图所示),我们可以通过SelectionMode 和SelectionUnit 属性来修改 ...
- WPF入门教程系列(一) 创建你的第一个WPF项目
WPF入门教程系列(一) 创建你的第一个WPF项目 WPF基础知识 快速学习绝不是从零学起的,良好的基础是快速入手的关键,下面先为大家摞列以下自己总结的学习WPF的几点基础知识: 1) C#基础语法知 ...
- WPF入门教程系列(二) 深入剖析WPF Binding的使用方法
WPF入门教程系列(二) 深入剖析WPF Binding的使用方法 同一个对象(特指System.Windows.DependencyObject的子类)的同一种属性(特指DependencyProp ...
- WPF入门教程系列三——Application介绍(续)
接上文WPF入门教程系列二——Application介绍,我们继续来学习Application 三.WPF应用程序的关闭 WPF应用程序的关闭只有在应用程序的 Shutdown 方法被调用时,应用程序 ...
- WPF入门教程系列二——Application介绍
一.Application介绍 WPF和WinForm 很相似, WPF与WinForm一样有一个 Application对象来进行一些全局的行为和操作,并且每个 Domain (应用程序域)中仅且只 ...
随机推荐
- Redis多机常用架构-主从
本文内容摘录自同事Perry Zhang的讲解,如需转载须本人同意. 1.主从 命令:slaveof <IP><PORT> redis主从配置:redis支持master-sl ...
- Android adb常用指令
Android 调试桥(adb)是多种用途的工具,该工具可以帮助你你管理设备或模拟器 的状态. 可以通过下列几种方法加入adb: 在设备上运行shell命令 通过端口转发来管理模拟器或设备 从模拟器或 ...
- Asp.net使用代码修改配置文件的节点值
使用代码修改配置文件的方法: 1.打开配置文件写入的权限 2.先按节点名称长到要修改的节点,然后删除,紧接着将有新值的节点添加回去 3.关闭配置文件写入的权限 修改Appsetting节点的值,修改其 ...
- poj3368(RMQ——ST)
Frequent values Time Limit: 2000MS Memory Limit: 65536K Total Submissions: 16543 Accepted: 5985 ...
- wince mobile环境下播放WAV声音
[DllImport("coredll", EntryPoint = "PlaySound")] public static extern i ...
- Select loop
The Bash Shell also offer select Loop, the syntax is: select varName in list do command1 command2 .. ...
- (原创)古典主义——平凡之美 佳作欣赏(摄影,欣赏)
文中图片摘自腾讯文化网:www.cal.qq.com 1.Abstract 生活本就是平淡的,如同真理一般寂静.平时生活中不经意的瞬间,也有它本来的美丽.下面一组图是上上个世纪到上个世纪末一个 ...
- Activity类生命周期
Activity通常就是一个单独的屏幕.每一个活动都被实现为一个独立的类,并且从活动基类中继承而来,活动类将会显示由视图控件组成的用户接口,并对事件作出响应. 从开发者角度看,Activity是一个J ...
- zabbix3.x搭建(1)
服务器端安装配置: 1).安装: yum -y install gcc gcc-c++ autoconf httpd php mysql mysql-server php-mysql httpd-ma ...
- xampp开启php-debug
[XDebug]zend_extension = "C:\xampp\php\ext\php_xdebug.dll";xdebug.profiler_append = 0;xdeb ...