react经典进阶demo
这是我在官方文档上看到的,功能是实现(具体是什么,请往下看)
以下是json数据:
 [

   {category: "Sporting Goods", price: "$49.99", stocked: true, name: "Football"},

   {category: "Sporting Goods", price: "$9.99", stocked: true, name: "Baseball"},

   {category: "Sporting Goods", price: "$29.99", stocked: false, name: "Basketball"},

   {category: "Electronics", price: "$99.99", stocked: true, name: "iPod Touch"},

   {category: "Electronics", price: "$399.99", stocked: false, name: "iPhone 5"},

   {category: "Electronics", price: "$199.99", stocked: true, name: "Nexus 7"}

 ];
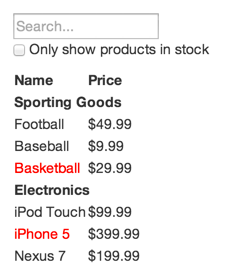
显示红色的物品,是没有库存的(stocked:false),如$29.99的basketball和$399.99的iphone5。

在我看来react的结构就像‘包饺子’,一层夹着一层,可以看一下上图的几个边框,不同颜色代表着不同区域划分。
1.(orange): contains the entirety of the example 外边的黄色区域,包含整个例子。
2.(blue): receives all user input 里面一层的蓝色框框,度用户的输入进行serach。
3.(green): displays and filters the data collection based onuser input 绿色框展示用户筛选的物品信息。
4. (turquoise): displays a heading for each category 显示产品种类,这里是sproting goods和electronics。
5.(red): displays a row for each product 红色框,每件物品。
 //这是结构的最外一层  它里面包含searchBar和producTable两个组件

 var FilterableProductTable = React.createClass({

   render: function() {

     return (

       <div>

         <SearchBar />

         <ProductTable products={this.props.products} />

       </div>

     );

   }

 });

 var PRODUCTS = [

   {category: 'Sporting Goods', price: '$49.99', stocked: true, name: 'Football'},

   {category: 'Sporting Goods', price: '$9.99', stocked: true, name: 'Baseball'},

   {category: 'Sporting Goods', price: '$29.99', stocked: false, name: 'Basketball'},

   {category: 'Electronics', price: '$99.99', stocked: true, name: 'iPod Touch'},

   {category: 'Electronics', price: '$399.99', stocked: false, name: 'iPhone 5'},

   {category: 'Electronics', price: '$199.99', stocked: true, name: 'Nexus 7'}

 ];

  //这里的prop属性定义了product  引用字上面的json数据

 ReactDOM.render(

   <FilterableProductTable products={PRODUCTS} />,

   document.getElementById('container')

 );

 //这是最简单的搜索框组件

 var SearchBar = React.createClass({

   render: function() {

     return (

       <form>

         <input type="text" placeholder="Search..." />

         <p>

           <input type="checkbox" />

           {' '}

           Only show products in stock

         </p>

       </form>

     );

   }

 });

 //关键的来了  这个productTable里面还包含了一些组件

 var ProductTable = React.createClass({

   render: function() {

     var rows = [];

     var lastCategory = null;

     //遍历json数据

     this.props.products.forEach(function(product) {

       if (product.category !== lastCategory) {  //注意这里的判断,并不是每回都要把类别加一次

        //这里有一个产品种类的组件

       rows.push(<ProductCategoryRow category={product.category} key={product.category} />);

       }

       //还有一个产品行的组件

       rows.push(<ProductRow product={product} key={product.name} />);

       lastCategory = product.category;

     });

     return (

       <table>

         <thead>

           <tr>

             <th>Name</th>

             <th>Price</th>

           </tr>

         </thead>

         <tbody>{rows}</tbody>

       </table>

     );

   }

 });

 //category在上面可以找到

 var ProductCategoryRow = React.createClass({

   render: function() {

     return (<tr><th colSpan="2">{this.props.category}</th></tr>);

   }

 });

 var ProductRow = React.createClass({

   render: function() {

     //如果没有货存  红色字体显示

    var name = this.props.product.stocked ?

       this.props.product.name :

       <span style={{color: 'red'}}>

         {this.props.product.name}

       </span>;

     return (

       <tr>

         <td>{name}</td>

         <td>{this.props.product.price}</td>

       </tr>

     );

   }

 });
就这样玩了吗?还没有,以上还没实现搜索和过滤功能。
 var ProductCategoryRow = React.createClass({

   render: function() {

     return (<tr><th colSpan="2">{this.props.category}</th></tr>);

   }

 });

 var ProductRow = React.createClass({

   render: function() {

     var name = this.props.product.stocked ?

       this.props.product.name :

       <span style={{color: 'red'}}>

         {this.props.product.name}

       </span>;

     return (

       <tr>

         <td>{name}</td>

         <td>{this.props.product.price}</td>

       </tr>

     );

   }

 });   //这里都没变

 //注意这里有改动

 var ProductTable = React.createClass({

   render: function() {

     var rows = [];

     var lastCategory = null;

     this.props.products.forEach(function(product) {

     //用于过滤产品(用户输入的关键字和库存)

       if (product.name.indexOf(this.props.filterText) === -1 || (!product.stocked && this.props.inStockOnly)) { //注意此处的逻辑

         return;

       }

       if (product.category !== lastCategory) {

         rows.push(<ProductCategoryRow category={product.category} key={product.category} />);

       }

       rows.push(<ProductRow product={product} key={product.name} />);

       lastCategory = product.category;

     }.bind(this));  //由于函数里面用到了this  这里bind一下

     return (

       <table>

         <thead>

           <tr>

             <th>Name</th>

             <th>Price</th>

           </tr>

         </thead>

         <tbody>{rows}</tbody>

       </table>

     );

   }

 });

 //serachBar现在膨胀了  这么多

 var SearchBar = React.createClass({

   handleChange: function() {

      //上面肯定有个函数  肯定在父组件上

       this.props.onUserInput(

       this.refs.filterTextInput.value,

       this.refs.inStockOnlyInput.checked  //注意这里的ref用法

     );

   },

   render: function() {

     return (

       <form>

         <input

           type="text"

           placeholder="Search..."

           value={this.props.filterText}

           ref="filterTextInput"

           onChange={this.handleChange} //文本改变回调事件  它的作用是什么?  下面有答案

         />

         <p>

           <input

             type="checkbox"

             checked={this.props.inStockOnly}

             ref="inStockOnlyInput"

             onChange={this.handleChange} //checkbox的判断

           />

           {' '}

           Only show products in stock

         </p>

       </form>

     );

   }

 });

 //关键的来了   这个里面就是饺子皮

 var FilterableProductTable = React.createClass({

   getInitialState: function() {

     return {

       filterText: '',

       inStockOnly: false

     };

   },  //这里初始化的state  文本为空  默认checkbox=false

   handleUserInput: function(filterText, inStockOnly) {

     this.setState({

       filterText: filterText,

       inStockOnly: inStockOnly

     });

   },

   render: function() {

     return (

       <div>

         <SearchBar

          //prop定义的的位置  可以对照着看

           filterText={this.state.filterText}

           inStockOnly={this.state.inStockOnly}

           onUserInput={this.handleUserInput} //这个函数用于改变初始state

         />

         //prop定义的位置  要注意这里的ProductTable里面的filterText和instockOnly  是随着serachBar的输入变动的

         <ProductTable

           products={this.props.products}

           filterText={this.state.filterText}

           inStockOnly={this.state.inStockOnly}

         />

       </div>

     );

   }

 });

 var PRODUCTS = [

   {category: 'Sporting Goods', price: '$49.99', stocked: true, name: 'Football'},

   {category: 'Sporting Goods', price: '$9.99', stocked: true, name: 'Baseball'},

   {category: 'Sporting Goods', price: '$29.99', stocked: false, name: 'Basketball'},

   {category: 'Electronics', price: '$99.99', stocked: true, name: 'iPod Touch'},

   {category: 'Electronics', price: '$399.99', stocked: false, name: 'iPhone 5'},

   {category: 'Electronics', price: '$199.99', stocked: true, name: 'Nexus 7'}

 ];

 ReactDOM.render(

   <FilterableProductTable products={PRODUCTS} />,

   document.getElementById('container')

 );
好了,代码量并不大,但是这里面的逻辑和每层之间的关系确实有点搞人呀。。。希望大家看懂了react想表达的是什么
react经典进阶demo的更多相关文章
- 【视频合集】极客时间 react实战进阶45讲 【更新中】
https://up2.v.sharedaka.com/video/ochvq0AVfpa71A24bmugS5EewhFM1553702519936.mp4 01 React出现的历史背景及特性介绍 ...
- React Native官方DEMO
官方给我们提供了UIExplorer项目,这里边包含React Native的基本所有组件的使用介绍和方法. 运行官方DEMO步骤如下 安装react native环境 React Native项目源 ...
- React问答小demo
在学习react初期,看了一些视频和资料,react基础知识差不多学完,跟着网上的一个教程,做了一个小型的问答demo. 需求看图说: 1.点击"添加"按钮,显示问题输入表单,再次 ...
- 助你了解react的小demo
React是个啥 React 是一个用于构建用户界面的 JAVASCRIPT 库. React主要用于构建UI,很多人认为 React 是 MVC 中的 V(视图). React 起源于 Facebo ...
- 一个 react 小的 demo
一.搭建开发环境: webpack构建工具. 新建一个文件夹(login),进入根目录, 1.输入命令:cnpm init,生成了一个package.json文件,这是一个标准的npm说明文件,里面蕴 ...
- react native进阶
一.前沿||潜心修心,学无止尽.生活如此,coding亦然.本人鸟窝,一只正在求职的鸟.联系我可以直接微信:jkxx123321 二.项目总结 **||**文章参考资料:1. http://blog ...
- React Native八大Demo
参考资料:http://www.cnblogs.com/shaoting/p/7148240.html 下一个项目公司也打算使用react native.大致看了下原型设计,写几个小demo先试试水. ...
- react context toggleButton demo
//toggleButton demo: //code: //1.Appb.js: import React from 'react'; import {ThemeContext, themes} f ...
- react login page demo
1. login form import React from "react"; import {Row, Col} from "antd"; import { ...
随机推荐
- asp.net linux 环境部署, jexus
cd /tmpwget linuxdot.net/down/jexus-5.8.1-x64.tar.gztar -zxvf jexus-5.8.1-x64.tar.gzsudo mv jexus /u ...
- Javascript图表插件HighCharts用法案例
最近还在忙着基于ABP的项目,但本篇博客和ABP无关,喜欢ABP框架的朋友请点击传送门. 这不,最近项目基本功能做的差不多了,现在在做一个数据统计的功能,需要绘制区域图(或折线图)和饼图.一开始,楼主 ...
- 故障排查:是什么 导致了服务器端口telnet失败?
telnet命令的主要作用是与目标端口进行TCP连接(即完成TCP三次握手). 当服务端启动后,但是telnet其监听的端口,却失败了.或者,当服务端运行了一段时间后,突然其监听的端口telnet不通 ...
- note of introduction of Algorithms(Lecture 3 - Part1)
Lecture 3(part 1) Divide and conquer 1. the general paradim of algrithm as bellow: 1. divide the pro ...
- MySQL7:视图
什么是视图 数据库中的视图是一个虚拟表.视图是从一个或者多个表中导出的表,视图的行为与表非常相似,在视图中用户可以使用SELECT语句查询数据,以及使用INSERT.UPDATE和DELETE修改记录 ...
- 自制Unity小游戏TankHero-2D(5)声音+爆炸+场景切换+武器弹药
自制Unity小游戏TankHero-2D(5)声音+爆炸+场景切换+武器弹药 我在做这样一个坦克游戏,是仿照(http://game.kid.qq.com/a/20140221/028931.htm ...
- 在Gradle中使用jaxb的xjc插件
jaxb,全称为Java Architecture for Xml Binding,是一种将java对象与xml建立起映射的技术.其主要提供两个功能,一是将java对象映射为xml,二是将xml映射为 ...
- IOS Animation-动画基础、深入
1. Model Layer Tree(模型层树)和Presentation Layer Tree(表示层树) CALayer是动画产生的地方.当我们动画添加到Layer时,是不直接修改layer的属 ...
- vue在多级联动时,一些情况不用watch而用onchange会更好
onchange事件在内容改变且失去焦点时触发,因此在一些多级联动需要清空次级内容的时候,用onchange就非常有用了,尤其是浏览器会提前加载数据的情况下.有篇文章可以看一下,链接. PS:路漫漫其 ...
- Java生成验证码原理(jsp)
验证码的作用: 验证码是Completely Automated Public Turing test to tell Computers and Humans Apart(全自动区分计算机和人类的 ...