
如何用Baas快速在腾讯云上开发小程序-系列3 :实现腾讯云COS API调用
版权声明:本文由贺嘉 原创文章,转载请注明出处:
文章原文链接:https://www.qcloud.com/community/article/640268001487425627
来源:腾云阁 https://www.qcloud.com/community
一、实验简介
本实验通过调用腾讯云对象存储(COS)接口,实现将图片上传到指定的 Bucket 功能;同时封装图片上传接口,用于上传商品图片。
二、实验目标
- 掌握 RESTFul API 接口调用和调试方法
- 掌握 RESTFul API 封装方法
三、实验步骤
3.1 添加云应用
第一步: clone xqcloud 项目
1. cd <your project path>

2. git clone https://git.oschina.net/xpmjs/xqcloud.git xqcloud
第二步: 修改远程仓库地址,提交到远程仓库
1. git remote remove origin

2. git remote add origin ssh://git@dev.appcook.cn:2222/source/xqcloud.git

3. git push origin master
3.2 调用 COS API,实现文件上传功能
第一步: 编写 Cos Model vi xqcloud/model/Cos.php
1. <?php

2. use \Tuanduimao\Mem as Mem;

3. use \Tuanduimao\Excp as Excp;

4. use \Tuanduimao\Err as Err;

5. use \Tuanduimao\Conf as Conf;

6. use \Tuanduimao\Model as Model;

7. use \Tuanduimao\Utils as Utils;

8. use \Tuanduimao\Loader\App as App;

9. /**

10. * cos对象存储11. */

12. class CosModel {

13. function __construct( $opt=[] ) {

14. $this->appid = isset($opt['appid']) ? $opt['appid'] : "";

15. $this->bucket = isset($opt['bucket']) ? $opt['bucket'] : "";

16. $this->SecretID = isset($opt['SecretID']) ? $opt['SecretID'] : "";

17. $this->SecretKey = isset($opt['SecretKey']) ? $opt['SecretKey'] : "";

18. }

19. /**

20. * 签名

21. * @param array $opt [description]

22. * @return [type] [description]

23. */

24. function sign( $opt=[] ) {

25. $randstr= $this->generateId(10);

26. $t = isset($opt['e']) ? time()+86400 : 0;

27. $a = isset($opt['appid']) ? $opt['appid'] : $this->appid;

28. $b = isset($opt['bucket']) ? $opt['bucket'] : $this->bucket;

29. $k = isset($opt['SecretID']) ? $opt['SecretID'] : $this->SecretID;

30. $e = isset($opt['e']) ? $opt['e'] : time()+3600;

31. $SecretKey = isset($opt['SecretKey']) ? $opt['SecretKey'] : $this->SecretKey;

32. $s = [

33. "a" => $a,

34. "b" => $b,

35. "k" => $k,

36. "e" => $e,

37. "t" => time(),

38. "r" => $randstr,

39. "f" =>$opt['file'],

40. ];

41. // 拼接字符串

42. $orignal = "a={$s['a']}&k={$s['k']}&e={$s['e']}&t={$s['t']}&r={$s['r']}&f={$s['f']}&b={$s['b']}";

43. $signTmp = hash_hmac( 'SHA1', $orignal, $SecretKey , true );

44. $sign = base64_encode($signTmp.$orignal);

45. return $sign;

46. }

47.

48. /**

49. * 文件转.字符串

50. * @param [type] $imageUrl [description]

51. * @param array $opt [description]

52. * @return [type] [description]

53. */

54. function uploadByUrl( $imageUrl, $opt=[] ) {

55. $imageData = file_get_contents( $imageUrl );

56. return $this->upload( $imageData, $opt );

57. }

58.

59. /**

60. * 文件上传61. * @param [type] $imageData [description]

62. * @param array $opt [description]

63. * @return [type] [description]S

64. */

65. function upload( $imageData, $opt=[] ){

66. // 生成随机数
第二步: 编写测试用控制器 vi xqcloud/controller/Cos.php
1. <?php

2. use \Tuanduimao\Loader\App as App;

3. use \Tuanduimao\Utils as Utils;

4. use \Tuanduimao\Tuan as Tuan;

5. use \Tuanduimao\Excp as Excp;

6. use \Tuanduimao\Conf as Conf;

7.

8. class CosController extends \Tuanduimao\Loader\Controller {

9.

10. function __construct() {

11. }

12.

13. function tryit() {

14.

15. $config = [

16. 'region'=>'<tj/sh/gd>',

17. 'appid'=>'<your appid>',

18. 'bucket'=>'<your bucket>',

19. 'SecretID'=>"<your SecretID>",

20. 'SecretKey'=>"<your SecretKey>"

21. ];

22. $cos = App::M('Cos',$config);

23. $content =file_get_contents("http://7xleg1.com1.z0.glb.clouddn.com/x1/2/lab/uploadit.jpg");

24. $resp = $cos->upload( $content, ['region'=>$config['region'], '

filetype'=>'jpg'] );

25. Utils::out($resp);

26. }

27.

28. }
第三步: 提交代码并更新线上
1. git add *

2. git commit -m '+COS Tryit {{pull}}' # {{pull}} feed 指令更新线上代码

3. git push
第四步: 安装 XQCloud 应用
访问 https://dev.appcook.cn/core-system/appmanager/index , 安装应用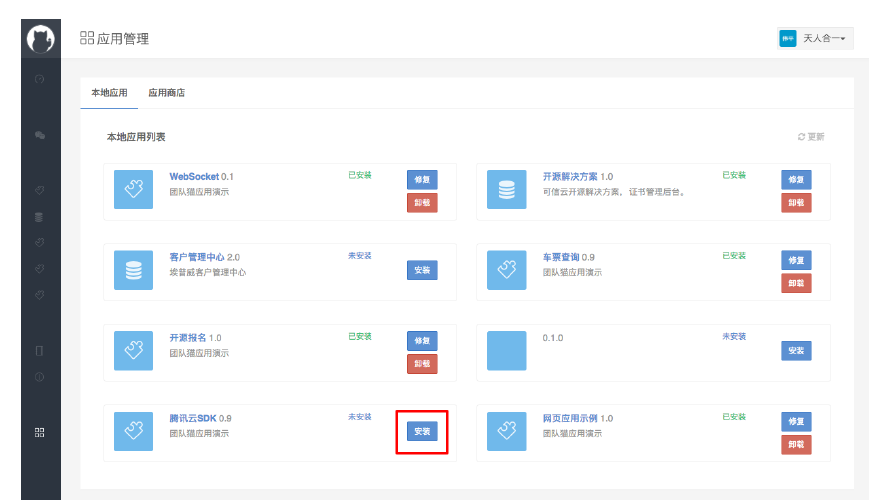
第五步: 登录云主机,运行测试
1. docker exec -it xpmjs-server /bin/bash # 进入容器

2. tdm app run /apps/xqcloud/controller/Cos.php tryit # 运行测试

3.3 封装图片上传接口
第一步: 创建配置文件 vi xqcloud/config.php
1. <?php

2. $GLOBALS['_QC'] = [

3. 'cos'=>[

4. 'region'=>'<tj/sh/gd>',

5. 'appid'=>'<your appid>',

6. 'bucket'=>'<your bucket>',

7. 'SecretID'=>"<your SecretID>",

8. 'SecretKey'=>"<your SecretKey>"

9. ]

10. ];
第二步: 修改控制器 vi xqcloud/controller/Cos.php
1. <?php

2. require_once(__DIR__ . '/../config.php');

3. use \Tuanduimao\Loader\App as App;

4. use \Tuanduimao\Utils as Utils;

5. use \Tuanduimao\Tuan as Tuan;

6. use \Tuanduimao\Excp as Excp;

7. use \Tuanduimao\Conf as Conf;

8.

9. class CosController extends \Tuanduimao\Loader\Controller {

10.

11. function __construct() {

12. }

13.

14. /**

15. * 上传文件接口

16. * @return [type] [description]

17. */

18. function upload() {

19.

20. $file = !empty($_FILES['wxfile']) ? $_FILES['wxfile'] : [];

21. $content = !empty($file['content']) ?base64_decode($file['content']) : NULL;

22. $filetype = Utils::mimes()->getExtension($file['type']);

23.

24. if ( $content == null ) {

25. echo (new Excp("未接收到文件", 502, ['_FILES'=>$_FILES]))->toJSON();

26. return;

27. }

28.

29. $config = $GLOBALS['_QC']['cos'];

30. $cos = App::M('Cos',$config);

31. try {

32. $resp = $cos->upload( $content, ['region'=>$config['region' ], 'filetype'=>$filetype] );

33. } catch( Excp $e ){

34. $extra = $e->getExtra();

35. echo (new Excp("COS API 错误", 502, ['resp'=>$resp, 'e'=>$extra]))->toJSON();

36. return;

37. }

38. if ( $resp['code'] == 0) {

39. Utils::out($resp['data']);

40. return;

41. }

42. echo (new Excp("COS API 错误", 502, ['resp'=>$resp]))->toJSON();

43. return;

44.

45. }

46. }
第三步: 提交代码更新
1. git add *

2. git commit -m '+COS Upload {{pull}}' # {{pull}} feed 指令更新线上代码

3. git push
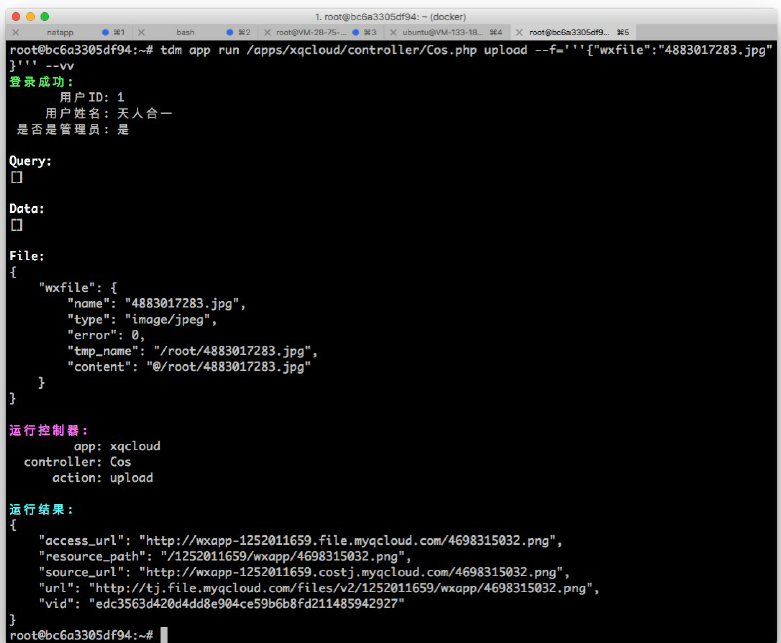
第四步: 登录云主机,运行测试
1. docker exec -it xpmjs-server /bin/bash # 进入容器

2. cd ~

3. wget http://wxapp-1252011659.file.myqcloud.com/4883017283.jpg

4. tdm app run /apps/xqcloud/controller/Cos.php upload --f='''{"wxfile":"4883017283.jpg"}''' --vv
四、实验结果
通过调用 COS 接口,掌握 RESTFul API 调用和调试的方法;通过封装图片上传接口,掌握
RESTFul API 的封装方法。
如果你看了以上的文章觉得不过瘾。想要系统性学习如何在腾讯云上开发微信小程序,建议报名参加我们的TCCE微信开发课程培训:https://www.qcloud.com/training/courses/wx-dev
如何用Baas快速在腾讯云上开发小程序-系列3 :实现腾讯云COS API调用的更多相关文章
- 如何用Baas快速在腾讯云上开发小程序-系列4:实现客户侧商品列表、商品详情页程序
版权声明:本文由贺嘉 原创文章,转载请注明出处: 文章原文链接:https://www.qcloud.com/community/article/431172001487671163 来源:腾云阁 h ...
- 如何用Baas快速在腾讯云上开发小程序-系列1:搭建API & WEB WebSocket 服务器
版权声明:本文由贺嘉 原创文章,转载请注明出处: 文章原文链接:https://www.qcloud.com/community/article/221059001487422606 来源:腾云阁 h ...
- 如何用Baas快速在腾讯云上开发小程序-系列2:搭建Phabricator开发管理平台
版权声明:本文由贺嘉 原创文章,转载请注明出处: 文章原文链接:https://www.qcloud.com/community/article/905333001487424158 来源:腾云阁 h ...
- 《腾讯游戏人生》微信小程序开发总结
为打通游戏人生擂台赛与线下商家的O2O衔接,同时响应时下日臻火热的微信小程序,项目团队决定也开发一款针对性的微信小程序,以此方便商家在我们平台入驻并进行擂台赛事的创建和奖励的核销,进一步推广擂台赛的玩 ...
- 微信小程序又一爆炸功能上线-云开发
云开发介绍 开发者可以使用云开发开发微信小程序.小游戏,无需搭建服务器,即可使用云端能力. 云开发为开发者提供完整的云端支持,弱化后端和运维概念,无需搭建服务器,使用平台提供的 API 进行核心业务开 ...
- 最强CP!阿里云联手支付宝小程序如何助力双11?
作为首次“全面上云”的双11,阿里云征服了每秒订单峰值54.4万笔的世界新记录.正是在阿里云的保驾护航下,即使访问量是平时的5到6倍,小程序也鲜少出现卡顿或者宕机的现象,“依靠阿里云,我们整个天猫双1 ...
- 微信小程序存放视频文件到阿里云用到算法js脚本文件
peterhuang007/weixinFileToaliyun: 微信小程序存放视频文件到阿里云用到算法js脚本文件 https://github.com/peterhuang007/ ...
- 微信小程序/网站 上传图片到腾讯云COS
COS简介: 腾讯云提供的一种对象存储服务,供开发者存储海量文件的分布式存储服务.可以将自己开发的应用的存储部分全部接入COS的存储桶中,有效减少应用服务器的带宽,请求等.个人也可以通过腾讯云账号免费 ...
- 腾讯云&搭建微信小程序服务
准备域名和证书 任务时间:20min ~ 40min 小程序后台服务需要通过 HTTPS 访问,在实验开始之前,我们要准备域名和 SSL 证书. 域名注册 如果您还没有域名,可以在腾讯云上选购,过程可 ...
随机推荐
- android: ADB错误“more than one device and emulator”
启动模拟器调试,执行ADB指令时,报错.C:\Users\gaojs>adb shellerror: more than one device and emulatorC:\Users\gaoj ...
- Tkinter(2.x 与3.X的区别)
1.包的引入 2.X下是 from Tkinter import * 而3.x是 from tkinter import * 否则,会报找不到tkinter的错误 Traceback (most re ...
- 谷歌、亚马逊相继宣布屏蔽 Flash 广告,又一个时代行将结束?【转载+整理】
原文地址 其实,如果你看一下乔布斯的传记,早在十几年以前,乔布斯就说过类似的话,他狠透了 Flash~ 据 InfoWorld 报道,谷歌已经正式宣布,在默认情况下,Chrome将不再自动播放Web页 ...
- Uber使用Swift重写APP的踩坑经历及解决方案(转载)
本文出自Uber移动架构和框架组负责人托马斯·阿特曼于2016年在湾区Swift峰会上的演讲,分享了使用Swfit重写Uber的好与坏.以下为译文: 我是托马斯·阿特曼,目前是Uber移动架构和框架组 ...
- JS 动态生成JSON对象
JS 动态生成JSON对象,一般用到JSON传递参数的时候,会用到. function onGeneratedRow(columnsResult) { var jsonData = {}; colum ...
- [转]MVC实用架构设计(三)——EF-Code First(3):使用T4模板生成相似代码
本文转自:http://www.cnblogs.com/guomingfeng/p/mvc-ef-t4.html 〇.目录 一.前言 二.工具准备 三.T4代码生成预热 (一) 单文件生成:Hello ...
- 4S店的潜规则内幕曝光
- [k8s]通过openssl生成证书
证书认证原理: http://www.cnblogs.com/iiiiher/p/7873737.html [root@m1 ssl]# cat master_ssl.cnf [req] req_ex ...
- JAVA和JAVAC 命令行
转自:http://www.blogjava.net/pdw2009/archive/2008/06/12/207413.html?opt=admin javac和java命令行中的-classpat ...
- Socket网络编程--epoll小结
以前使用的用于I/O多路复用为了方便就使用select函数,但select这个函数是有缺陷的.因为它所支持的并发连接数是有限的(一般小于1024),因为用户处理的数组是使用硬编码的.这个最大值为FD_ ...