OpenCV入门笔记(七) 文字区域的提取
https://blog.csdn.net/huobanjishijian/article/details/63685503
前面我们已经学了一些OpenCV中基本的图片处理的知识,可以拿来做一些小应用。比如怎样从一张图片中,把文字圈出来。这一步骤对OCR(Optical Character Recognition)非常有用,因为一般的OCR引擎只是拿来识别文字,并没有对图片做预处理,因此精度可能会收到图片质量影响。
当然,我们这里只是粗略的查找文字区域,并没有进一步地处理图片。而且对背景复杂,或者文字旋转角度过于倾斜的情况也无法自适应,因此只能给大家做参考。若要实用到项目中,还有很多工作要做。
效果图
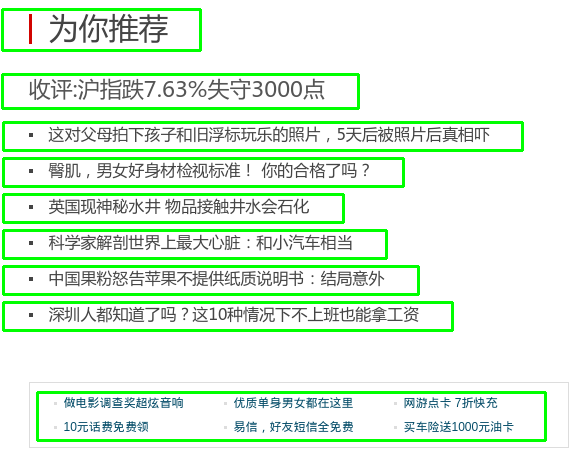
比如我们有下面的一篇文章的截图,想把其中的文字区域全部找出来。
当然这里的截图只有文字和白花花的背景,效果会非常好。绿色的的矩形框的是我们根据检测到的文字区域,手动画出来的。
原理
那么我们是怎么做到检测到区域的呢?
首先,我们会注意到,文字区域和其他的图片背景很不一样。我们用膨胀处理图片,让文字变成一块块大区域,然后识别整块的轮廓,用矩形去框住这个轮廓。
这个程序分三个子函数,detect(检测),preprocess(图片预处理),findTextRegion(查找和筛选文字区域)。即main函数调用detect函数去实际完成文字区域检测。detect函数又分成preprocess和findTextRegion两个步骤来做。
见下面的序列图,可能会清晰点。
1. Detect
先来看main函数和Detect函数
def detect(img):

    # 1.  转化成灰度图

    gray = cv2.cvtColor(img, cv2.COLOR_BGR2GRAY)

    # 2. 形态学变换的预处理,得到可以查找矩形的图片

    dilation = preprocess(gray)

    # 3. 查找和筛选文字区域

    region = findTextRegion(dilation)

    # 4. 用绿线画出这些找到的轮廓

    for box in region:

        cv2.drawContours(img, [box], 0, (0, 255, 0), 2)

    cv2.namedWindow("img", cv2.WINDOW_NORMAL)

    cv2.imshow("img", img)

    # 带轮廓的图片

    cv2.imwrite("contours.png", img)

    cv2.waitKey(0)

    cv2.destroyAllWindows()

if __name__ == '__main__':

    # 读取文件

    imagePath = sys.argv[1]

    img = cv2.imread(imagePath)

detect(img)- 1
- 2
- 3
- 4
- 5
- 6
- 7
- 8
- 9
- 10
- 11
- 12
- 13
- 14
- 15
- 16
- 17
- 18
- 19
- 20
- 21
- 22
- 23
- 24
- 25
- 26
- 27
- 28
- 29
- 1
- 2
- 3
- 4
- 5
- 6
- 7
- 8
- 9
- 10
- 11
- 12
- 13
- 14
- 15
- 16
- 17
- 18
- 19
- 20
- 21
- 22
- 23
- 24
- 25
- 26
- 27
- 28
- 29
- 1
- 2
- 3
- 4
- 5
- 6
- 7
- 8
- 9
- 10
- 11
- 12
- 13
- 14
- 15
- 16
- 17
- 18
- 19
- 20
- 21
- 22
- 23
- 24
- 25
- 26
- 27
- 28
- 29
2. Preprocess
利用数学形态学(Morphology)进行预处理。
这个过程很重要,是文字区域检测效果好坏的核心代码,尤其是一下几个参数:
- 膨胀的核函数大小,这里用了
30 x 9,可以调节 - 腐蚀的核函数大小,这里用了
24 x 6,可以调节
def preprocess(gray):

    # 1. Sobel算子,x方向求梯度

    sobel = cv2.Sobel(gray, cv2.CV_8U, 1, 0, ksize = 3)

    # 2. 二值化

    ret, binary = cv2.threshold(sobel, 0, 255, cv2.THRESH_OTSU+cv2.THRESH_BINARY)

    # 3. 膨胀和腐蚀操作的核函数

    element1 = cv2.getStructuringElement(cv2.MORPH_RECT, (30, 9))

    element2 = cv2.getStructuringElement(cv2.MORPH_RECT, (24, 6))

    # 4. 膨胀一次,让轮廓突出

    dilation = cv2.dilate(binary, element2, iterations = 1)

    # 5. 腐蚀一次,去掉细节,如表格线等。注意这里去掉的是竖直的线

    erosion = cv2.erode(dilation, element1, iterations = 1)

    # 6. 再次膨胀,让轮廓明显一些

    dilation2 = cv2.dilate(erosion, element2, iterations = 3)

    # 7. 存储中间图片

    cv2.imwrite("binary.png", binary)

    cv2.imwrite("dilation.png", dilation)

    cv2.imwrite("erosion.png", erosion)

    cv2.imwrite("dilation2.png", dilation2)

    return dilation2
- 1
- 2
- 3
- 4
- 5
- 6
- 7
- 8
- 9
- 10
- 11
- 12
- 13
- 14
- 15
- 16
- 17
- 18
- 19
- 20
- 21
- 22
- 23
- 24
- 25
- 26
- 27
- 1
- 2
- 3
- 4
- 5
- 6
- 7
- 8
- 9
- 10
- 11
- 12
- 13
- 14
- 15
- 16
- 17
- 18
- 19
- 20
- 21
- 22
- 23
- 24
- 25
- 26
- 27
- 1
- 2
- 3
- 4
- 5
- 6
- 7
- 8
- 9
- 10
- 11
- 12
- 13
- 14
- 15
- 16
- 17
- 18
- 19
- 20
- 21
- 22
- 23
- 24
- 25
- 26
- 27
3. findTextRegion
def findTextRegion(img):

    region = []

    # 1. 查找轮廓

    contours, hierarchy = cv2.findContours(img, cv2.RETR_TREE, cv2.CHAIN_APPROX_SIMPLE)

    # 2. 筛选那些面积小的

    for i in range(len(contours)):

        cnt = contours[i]

        # 计算该轮廓的面积

        area = cv2.contourArea(cnt)

        # 面积小的都筛选掉

        if(area < 1000):

            continue

        # 轮廓近似,作用很小

        epsilon = 0.001 * cv2.arcLength(cnt, True)

        approx = cv2.approxPolyDP(cnt, epsilon, True)

        # 找到最小的矩形,该矩形可能有方向

        rect = cv2.minAreaRect(cnt)

        print "rect is: "

        print rect

        # box是四个点的坐标

        box = cv2.cv.BoxPoints(rect)

        box = np.int0(box)

        # 计算高和宽

        height = abs(box[0][1] - box[2][1])

        width = abs(box[0][0] - box[2][0])

        # 筛选那些太细的矩形,留下扁的

        if(height > width * 1.2):

            continue

        region.append(box)

    return region
- 1
- 2
- 3
- 4
- 5
- 6
- 7
- 8
- 9
- 10
- 11
- 12
- 13
- 14
- 15
- 16
- 17
- 18
- 19
- 20
- 21
- 22
- 23
- 24
- 25
- 26
- 27
- 28
- 29
- 30
- 31
- 32
- 33
- 34
- 35
- 36
- 37
- 38
- 39
- 40
- 41
- 1
- 2
- 3
- 4
- 5
- 6
- 7
- 8
- 9
- 10
- 11
- 12
- 13
- 14
- 15
- 16
- 17
- 18
- 19
- 20
- 21
- 22
- 23
- 24
- 25
- 26
- 27
- 28
- 29
- 30
- 31
- 32
- 33
- 34
- 35
- 36
- 37
- 38
- 39
- 40
- 41
- 1
- 2
- 3
- 4
- 5
- 6
- 7
- 8
- 9
- 10
- 11
- 12
- 13
- 14
- 15
- 16
- 17
- 18
- 19
- 20
- 21
- 22
- 23
- 24
- 25
- 26
- 27
- 28
- 29
- 30
- 31
- 32
- 33
- 34
- 35
- 36
- 37
- 38
- 39
- 40
- 41
完整代码
加上头文件,把几个函数合并以后,贴在这里。注意开头要写明用utf8编码,不然中文注释可能不会被系统识别。而且Python没有花括号来控制流程,所以对看不见的Tab缩进很敏感,写代码的时候要规范。
直接在终端里敲下面的命令,既可以运行
python textDetection.py ./pic/1.png
代码:textDetection.py
# coding:utf8

import sys

import cv2

import numpy as np

def preprocess(gray):

    # 1. Sobel算子,x方向求梯度

    sobel = cv2.Sobel(gray, cv2.CV_8U, 1, 0, ksize = 3)

    # 2. 二值化

    ret, binary = cv2.threshold(sobel, 0, 255, cv2.THRESH_OTSU+cv2.THRESH_BINARY)

    # 3. 膨胀和腐蚀操作的核函数

    element1 = cv2.getStructuringElement(cv2.MORPH_RECT, (30, 9))

    element2 = cv2.getStructuringElement(cv2.MORPH_RECT, (24, 6))

    # 4. 膨胀一次,让轮廓突出

    dilation = cv2.dilate(binary, element2, iterations = 1)

    # 5. 腐蚀一次,去掉细节,如表格线等。注意这里去掉的是竖直的线

    erosion = cv2.erode(dilation, element1, iterations = 1)

    # 6. 再次膨胀,让轮廓明显一些

    dilation2 = cv2.dilate(erosion, element2, iterations = 3)

    # 7. 存储中间图片

    cv2.imwrite("binary.png", binary)

    cv2.imwrite("dilation.png", dilation)

    cv2.imwrite("erosion.png", erosion)

    cv2.imwrite("dilation2.png", dilation2)

    return dilation2

def findTextRegion(img):

    region = []

    # 1. 查找轮廓

    contours, hierarchy = cv2.findContours(img, cv2.RETR_TREE, cv2.CHAIN_APPROX_SIMPLE)

    # 2. 筛选那些面积小的

    for i in range(len(contours)):

        cnt = contours[i]

        # 计算该轮廓的面积

        area = cv2.contourArea(cnt)

        # 面积小的都筛选掉

        if(area < 1000):

            continue

        # 轮廓近似,作用很小

        epsilon = 0.001 * cv2.arcLength(cnt, True)

        approx = cv2.approxPolyDP(cnt, epsilon, True)

        # 找到最小的矩形,该矩形可能有方向

        rect = cv2.minAreaRect(cnt)

        print "rect is: "

        print rect

        # box是四个点的坐标

        box = cv2.cv.BoxPoints(rect)

        box = np.int0(box)

        # 计算高和宽

        height = abs(box[0][1] - box[2][1])

        width = abs(box[0][0] - box[2][0])

        # 筛选那些太细的矩形,留下扁的

        if(height > width * 1.2):

            continue

        region.append(box)

    return region

def detect(img):

    # 1.  转化成灰度图

    gray = cv2.cvtColor(img, cv2.COLOR_BGR2GRAY)

    # 2. 形态学变换的预处理,得到可以查找矩形的图片

    dilation = preprocess(gray)

    # 3. 查找和筛选文字区域

    region = findTextRegion(dilation)

    # 4. 用绿线画出这些找到的轮廓

    for box in region:

        cv2.drawContours(img, [box], 0, (0, 255, 0), 2)

    cv2.namedWindow("img", cv2.WINDOW_NORMAL)

    cv2.imshow("img", img)

    # 带轮廓的图片

    cv2.imwrite("contours.png", img)

    cv2.waitKey(0)

    cv2.destroyAllWindows()

if __name__ == '__main__':

    # 读取文件

    imagePath = sys.argv[1]

    img = cv2.imread(imagePath)

    detect(img)
- 1
- 2
- 3
- 4
- 5
- 6
- 7
- 8
- 9
- 10
- 11
- 12
- 13
- 14
- 15
- 16
- 17
- 18
- 19
- 20
- 21
- 22
- 23
- 24
- 25
- 26
- 27
- 28
- 29
- 30
- 31
- 32
- 33
- 34
- 35
- 36
- 37
- 38
- 39
- 40
- 41
- 42
- 43
- 44
- 45
- 46
- 47
- 48
- 49
- 50
- 51
- 52
- 53
- 54
- 55
- 56
- 57
- 58
- 59
- 60
- 61
- 62
- 63
- 64
- 65
- 66
- 67
- 68
- 69
- 70
- 71
- 72
- 73
- 74
- 75
- 76
- 77
- 78
- 79
- 80
- 81
- 82
- 83
- 84
- 85
- 86
- 87
- 88
- 89
- 90
- 91
- 92
- 93
- 94
- 95
- 96
- 97
- 98
- 99
- 100
- 101
- 102
- 103
- 104
- 105
- 106
- 107
- 108
- 1
- 2
- 3
- 4
- 5
- 6
- 7
- 8
- 9
- 10
- 11
- 12
- 13
- 14
- 15
- 16
- 17
- 18
- 19
- 20
- 21
- 22
- 23
- 24
- 25
- 26
- 27
- 28
- 29
- 30
- 31
- 32
- 33
- 34
- 35
- 36
- 37
- 38
- 39
- 40
- 41
- 42
- 43
- 44
- 45
- 46
- 47
- 48
- 49
- 50
- 51
- 52
- 53
- 54
- 55
- 56
- 57
- 58
- 59
- 60
- 61
- 62
- 63
- 64
- 65
- 66
- 67
- 68
- 69
- 70
- 71
- 72
- 73
- 74
- 75
- 76
- 77
- 78
- 79
- 80
- 81
- 82
- 83
- 84
- 85
- 86
- 87
- 88
- 89
- 90
- 91
- 92
- 93
- 94
- 95
- 96
- 97
- 98
- 99
- 100
- 101
- 102
- 103
- 104
- 105
- 106
- 107
- 10
OpenCV入门笔记(七) 文字区域的提取的更多相关文章
- 【opencv学习笔记七】访问图像中的像素与图像亮度对比度调整
今天我们来看一下如何访问图像的像素,以及如何改变图像的亮度与对比度. 在之前我们先来看一下图像矩阵数据的排列方式.我们以一个简单的矩阵来说明: 对单通道图像排列如下: 对于双通道图像排列如下: 那么对 ...
- OpenCV入门:(七:OpenCV取随机数以及显示文字)
1.随机颜色 OpenCV中自带了取随机数的方法,使用步骤: RNG rng( 0xFFFFFFFF ); 随机数 = rng.uniform( 下限,上限 ); 2.显示文字 , , bool bo ...
- opencv入门笔记
一.图片基本操作 1.1 显示图片 #include <opencv2/opencv.hpp> //头文件 using namespace cv; //包含cv命名空间 void main ...
- OpenCV入门笔记(二) 图片的文件操作
以下介绍一下重要的几个,设计基本 图片处理 的函数,依次来了解OpenCV的入门知识.具体的具体使用方法还是以官方的API[Official Tutorials][Python-OpenCV]为准. ...
- OpenCV入门笔记(三) 图片处理
OpenCV中提供了非常多处理图片的强大函数,能够对非常多格式的图片 加特效.有点实现Photoshop里的工具的感觉. 以下先介绍一些简单和常见的特效. 二值化(Image Threshold) 參 ...
- OpenCV入门笔记(一) Linux下的安装
关于OpenCV,有中文的官方站点.里面翻译了官网的教程和API等.中文官方Tutorials见这里:[Tutorials] 一.Ubuntu下的安装 能够选择直接从库里安装,或者手动编译安装,请參考 ...
- opencv学习笔记(七)---图像金字塔
图像金字塔指的是同一图像不同分辨率的子图的集合,有向下取样金字塔,向上取样金字塔,拉普拉斯金字塔....它是图像多尺度表达的一种,最主要的是用于图像的分割 向下取样金字塔指高分辨率图像向低分辨率图像的 ...
- OpenCV学习笔记七:opencv_nonfree模块
一,简介: 顾名思义,这个模块不是free的.主要包含: 1,SIFT implementation. The class implements SIFT algorithm by D. Lowe. ...
- OpenCV入门学习笔记
OpenCV入门学习笔记 参照OpenCV中文论坛相关文档(http://www.opencv.org.cn/) 一.简介 OpenCV(Open Source Computer Vision),开源 ...
随机推荐
- Snmp学习总结(一)——Snmp的基本概念
一.SNMP简单概述 1.1.什么是Snmp SNMP是英文"Simple Network Management Protocol"的缩写,中文意思是"简单网络管理协议& ...
- abap中结构体嵌套结构体。
1: 结构体中嵌套结构体. *&---------------------------------------------------------------------* *& Re ...
- keras学习简单线性回归【1】
转自:https://morvanzhou.github.io/tutorials/machine-learning/keras/2-1-regressor/ 总的代码的过程就是: 1.导入模块+创建 ...
- DLNg序列模型第二周NLP与词嵌入
1.使用词嵌入 给了一个命名实体识别的例子,如果两句分别是“orange farmer”和“apple farmer”,由于两种都是比较常见的,那么可以判断主语为人名. 但是如果是榴莲种植员可能就无法 ...
- ios9 适配的坑
http://www.cocoachina.com/ios/20151016/13715.html
- Eclipse+GitHub 提交代码错误 -“rejected - non-fast-forward”
Eclipse Push出现rejected - non-fast-forward错误 在 Push到服务器时有时会出现 rejected - non-fast-forward 错误,这是由于远端发生 ...
- vue--postcss插件
vue-loader里的postcss插件会帮你抹平浏览器兼容的写法
- linux申请strace ,lstrace, ptrace, dtrace
ltrace命令是用来跟踪进程调用库函数的情况. ltrace -hUsage: ltrace [option ...] [command [arg ...]]Trace library calls ...
- 从0开始搭建vue+webpack脚手架(三)
在从0开始搭建vue+webpack脚手架(二)中已经基本完成了开发环境的配置.当开发完成后,我们需要将完成的项目进行打包,接下来对打包做一些优化: 运行 $ npm run build 可生成dis ...
- python--教你做个最简单的tcp通信。。
TCP协议:建立在IP协议之上的,TCP协议,传输控制协议(英语:Transmission Control Protocol,缩写为 TCP)是一种面向连接的.可靠的.基于字节流的传输层通信协议,由I ...