Spring-boot:快速搭建微框架服务
前言:
Spring Boot是为了简化Spring应用的创建、运行、调试、部署等而出现的,使用它可以做到专注于Spring应用的开发,而无需过多关注XML的配置。
简单来说,它提供了一堆依赖打包,并已经按照使用习惯解决了依赖问题---习惯大于约定。
Spring Boot默认使用tomcat作为服务器,使用logback提供日志记录。
Spring Boot的主要优点:
- 为所有Spring开发者更快的入门
- 开箱即用,提供各种默认配置来简化项目配置
- 内嵌式容器简化Web项目
- 没有冗余代码生成和XML配置的要求
技术栈:
- Java 8
- Maven
- Spring-boot
- Mybatis
- Redis
- Lombok
- Swagger2
- Jenkins
- SonarQuber
1、使用Maven构建项目
1.1 通过 SPRING INITIALIZR 工具生产基础项目
通过访问:http://start.spring.io/ 快速创建Spring-boot 的服务框架。

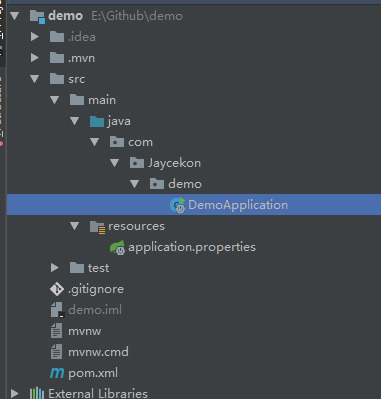
初始化相应信息后,下载压缩包。解压完成后,用IDEA打开项目,项目的目录结构:
总体流程:
- 访问:
http://start.spring.io/ - 选择构建工具
Maven Project、Spring Boot版本1.3.2以及一些工程基本信息 - 点击
Generate Project下载项目压缩包
解压项目包,并用IDE以Maven项目导入,以IntelliJ IDEA 14为例:
- 菜单中选择
File–>New–>Project from Existing Sources... - 选择解压后的项目文件夹,点击
OK - 点击
Import project from external model并选择Maven,点击Next到底为止。 - 若你的环境有多个版本的JDK,注意到选择
Java SDK的时候请选择Java 7以上的版本
1.2 导入Spring-boot 相关依赖
项目初始化时,相关依赖如下:
- spring-boot-starters:核心模块,包括自动配置支持、日志和YAML
- spring-boot-starter-test:测试模块,包括JUnit、Hamcrest、Mockito
- spring-boot-devtools:用于设置热部署
        <dependency>

            <groupId>org.springframework.boot</groupId>

            <artifactId>spring-boot-starter</artifactId>

        </dependency>

        <dependency>

            <groupId>org.springframework.boot</groupId>

            <artifactId>spring-boot-starter-test</artifactId>

            <scope>test</scope>

        </dependency>

        <!--热部署-->

        <dependency>

            <groupId>org.springframework.boot</groupId>

            <artifactId>spring-boot-devtools</artifactId>

            <optional>true</optional>

        </dependency>
这里我们需要引入Web模块,需要添加:
        <dependency>

            <groupId>org.springframework.boot</groupId>

            <artifactId>spring-boot-starter-web</artifactId>

        </dependency>
1.3 启动项目
添加首页控制层:
@RestController

public class IndexController {

    @RequestMapping("index")

    public String index() {

        return "hello world!";

    }

}
运行DemoApplication中的main方法,启动服务:
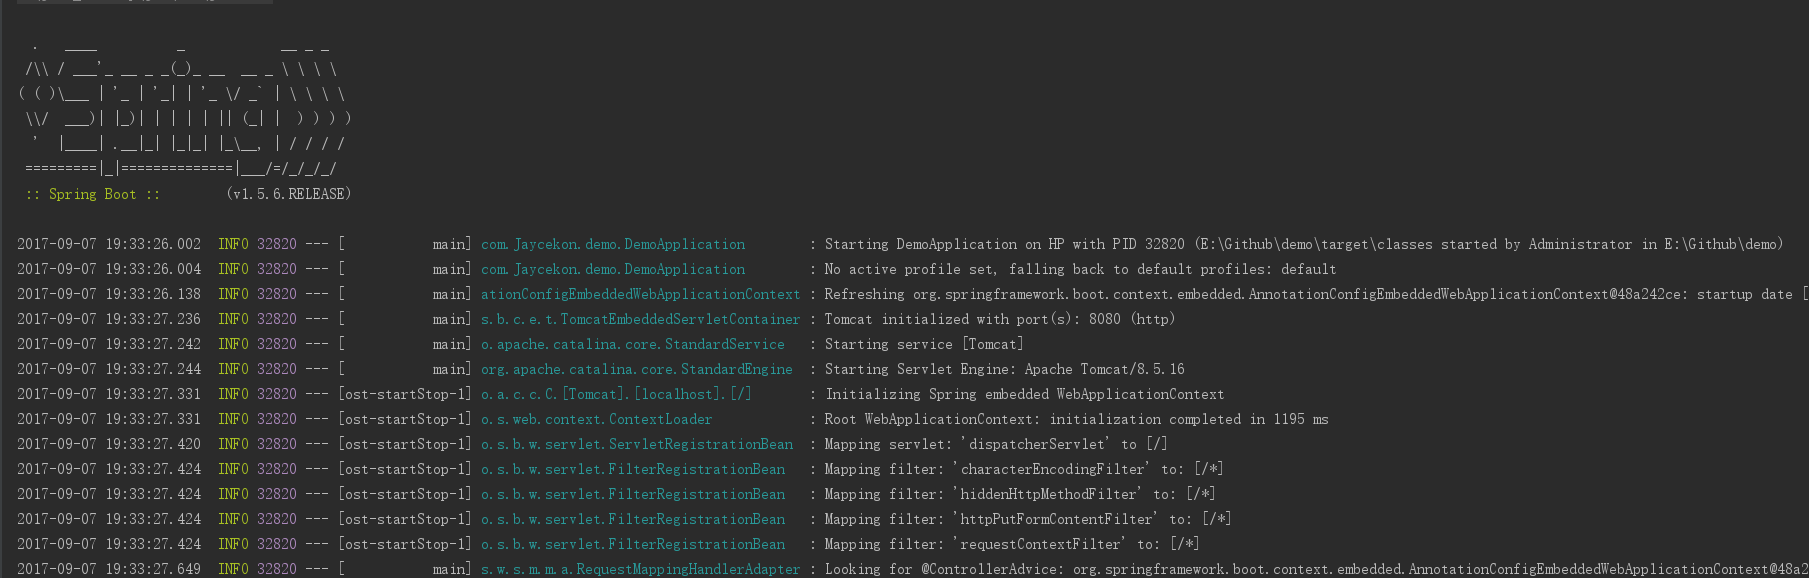
服务启动后, 访问 http://localhost:8080/index ,可以看到页面输出Hello world!。
2、整合Mybatis
2.1 项目依赖
- 引入连接mysql的必要依赖mysql-connector-java
- 引入整合MyBatis的核心依赖mybatis-spring-boot-starter
- 引入tk.mybatis 依赖,实现对实体类的增删改查的代码
- 引入pagerhelper 依赖,实现分页功能
      <dependency>

            <groupId>org.mybatis.spring.boot</groupId>

            <artifactId>mybatis-spring-boot-starter</artifactId>

            <version>1.3.0</version>

        </dependency>

        <dependency>

            <groupId>mysql</groupId>

            <artifactId>mysql-connector-java</artifactId>

             <version>5.1.43</version>

        </dependency>

         <dependency>

            <groupId>tk.mybatis</groupId>

            <artifactId>mapper-spring-boot-starter</artifactId>

            <version>1.1.3</version>

        </dependency>

        <!--pagehelper-->

        <dependency>

            <groupId>com.github.pagehelper</groupId>

            <artifactId>pagehelper-spring-boot-starter</artifactId>

            <version>1.1.2</version>

        </dependency>
2.2 项目配置
修改resources 下的application.properties文件:
spring.datasource.url=jdbc:mysql://localhost:3306/test

spring.datasource.username=root

spring.datasource.password=root

spring.datasource.driver-class-name=com.mysql.jdbc.Driver

#实体类扫描包

mybatis.type-aliases-package=com.jaycekon.demo.model

#Mapper.xml文件扫描目录

mybatis.mapper-locations=classpath:mapper/*.xml

#驼峰命名

mybatis.configuration.mapUnderscoreToCamelCase=true

#tkmapper 工具类

mapper.mappers=com.Jaycekon.demo.util.MyMapper

mapper.not-empty=false

mapper.identity=MYSQL

pagehelper.helperDialect=mysql

pagehelper.reasonable=true

pagehelper.supportMethodsArguments=true

pagehelper.params=count=countSql
2.3 单元测试
创建实体类,我们引入Lombok相关依赖,用于避免数据Get Set方法的重复创建:
        <dependency>

            <groupId>org.projectlombok</groupId>

            <artifactId>lombok</artifactId>

            <version>1.16.18</version>

            <scope>provided</scope>

        </dependency>
实体类最终的代码如下:
@Data

@NoArgsConstructor

@AllArgsConstructor

@Accessors(chain = true)

public class User {

    private int id;

    private String username;

    private String idCard;

    private String phone;

    private String password;

}
可以看出,在添加了Lombok 之后,我们的Java 实体类代码简洁了很多。
接下来,我们需要创建UserMapper 数据库处理类。由于MyMapper 已经帮我们实现了基本的CRUD操作,因此我们这里并不需要再重写操作,我可以先一个根据用户名查找的方法:
@Mapper

public interface UserMapper extends MyMapper<User> {

    @Select("select * from user where username=#{username}")

    User selectByName(String username);

}
MyMapper 类位于util 目录下:
public interface MyMapper<T> extends Mapper<T>, MySqlMapper<T> {

}
这里需要注意,MyMapper 与我们的实体类Mapper 不能放在同一个目录。
测试类:
@RunWith(SpringRunner.class)

@SpringBootTest

@MapperScan("com.Jaycekon.demo.mapper")

public class UserMapperTest {

    @Autowired

    private UserMapper mapper;

    @Test

    public void testInset() {

        User user = new User(1, "Jaycekon","1234","1234","123");

        int i = mapper.insert(user);

        Assert.assertNotEquals(0, i);

    }

    @Test

    public void testSelect(){

        User user = mapper.selectByName("Jaycekon");

        Assert.assertNotEquals(null,user);

    }

}
3、整合Redis
3.1 相关依赖
Spring Boot提供的数据访问框架Spring Data Redis基于Jedis。可以通过引入 spring-boot-starter-redis 来配置依赖关系。
<dependency>

    <groupId>org.springframework.boot</groupId>

    <artifactId>spring-boot-starter-redis</artifactId>

</dependency>
3.2 Redis 配置
1、Spring-boot 连接单机版Redis 的配置如下:
# REDIS (RedisProperties)

# Redis数据库索引(默认为0)

spring.redis.database=0

# Redis服务器地址

spring.redis.host=localhost

# Redis服务器连接端口

spring.redis.port=6379

# Redis服务器连接密码(默认为空)

spring.redis.password=

# 连接池最大连接数(使用负值表示没有限制)

spring.redis.pool.max-active=8

# 连接池最大阻塞等待时间(使用负值表示没有限制)

spring.redis.pool.max-wait=-1

# 连接池中的最大空闲连接

spring.redis.pool.max-idle=8

# 连接池中的最小空闲连接

spring.redis.pool.min-idle=0

# 连接超时时间(毫秒)

spring.redis.timeout=0
2、Spring-boot 连接Sentinel 哨兵集群配置:
# REDIS (RedisProperties)

# Redis数据库索引(默认为0)

spring.redis.database=0

# Redis服务器地址

#spring.redis.host=localhost

# Redis服务器连接端口

#spring.redis.port=6379

# Redis服务器连接密码(默认为空)

spring.redis.password=

# 连接池最大连接数(使用负值表示没有限制)

spring.redis.pool.max-active=8

# 连接池最大阻塞等待时间(使用负值表示没有限制)

spring.redis.pool.max-wait=-1

# 连接池中的最大空闲连接

spring.redis.pool.max-idle=8

# 连接池中的最小空闲连接

spring.redis.pool.min-idle=0

# 连接超时时间(毫秒)

spring.redis.timeout=0

#哨兵监听redis server名称

spring.redis.sentinel.master=cn-test-master

#哨兵的配置列表

spring.redis.sentinel.nodes=localhost:26379,localhost:36379,localhost:46379
3.3 Redis 操作工具类
1、StringRedisTemplate 工具类
StringRedisTemplate 工具类可以解决字符串级别的Redis操作。在写好配置后,可以直接通过Autowried 就可以注入对象。
@RunWith(SpringJUnit4ClassRunner.class)

@SpringApplicationConfiguration(Application.class)

public class ApplicationTests {

    @Autowired

    private StringRedisTemplate stringRedisTemplate;

    @Test

    public void test() throws Exception {

        // 保存字符串

        stringRedisTemplate.opsForValue().set("aaa", "111");

        Assert.assertEquals("111", stringRedisTemplate.opsForValue().get("aaa"));

    }

}
2、RedisTemplate<Object,Object> 工具类
可以处理大部分的序列化操作,在这里我封装了一个简化Redis工具类,后续可以继续优化。
@Component

public class RedisComponent {

    @Autowired

    //操作字符串的template,StringRedisTemplate是RedisTemplate的一个子集

    private StringRedisTemplate stringRedisTemplate;

    private Logger logger = LoggerFactory.getLogger(RedisComponent.class);

    @Autowired

    // RedisTemplate,可以进行所有的操作

    private RedisTemplate<Object, Object> redisTemplate;

    public void set(String key, String value) {

        ValueOperations<String, String> ops = this.stringRedisTemplate.opsForValue();

        boolean bExistent = this.stringRedisTemplate.hasKey(key);

        if (bExistent) {

            logger.info("this key is bExistent!");

        } else {

            ops.set(key, value);

        }

    }

    public String get(String key) {

        return this.stringRedisTemplate.opsForValue().get(key);

    }

    public void del(String key) {

        this.stringRedisTemplate.delete(key);

    }

    public void sentinelSet(String key, Object object) {

        redisTemplate.opsForValue().set(key, JSON.toJSONString(object));

    }

    public String sentinelGet(String key) {

        return String.valueOf(redisTemplate.opsForValue().get(key));

    }

}
4、整合Swagger2
4.1 添加Swagger2 依赖:
        <dependency>

            <groupId>io.springfox</groupId>

            <artifactId>springfox-swagger2</artifactId>

            <version>2.7.0</version>

        </dependency>

        <dependency>

            <groupId>io.springfox</groupId>

            <artifactId>springfox-swagger-ui</artifactId>

            <version>2.7.0</version>

        </dependency>
4.2 创建Swagger2 配置类:
在Application.java 同级创建一个Swagger2 的配置类:
@Configuration

@EnableSwagger2

public class Swagger2 {

    @Bean

    public Docket webApi() {

        return new Docket(DocumentationType.SWAGGER_2)

                .groupName("DemoAPI接口文档")

                .apiInfo(apiInfo())

                .select()

                .apis(RequestHandlerSelectors.basePackage("com.Jaycekon.demo.controller"))

                .paths(PathSelectors.any()).build();

    }

    /**

     swagger2使用说明:

     @Api:用在类上,说明该类的作用

     @ApiOperation:用在方法上,说明方法的作用

     @ApiIgnore:使用该注解忽略这个API

     @ApiImplicitParams:用在方法上包含一组参数说明

     @ApiImplicitParam:用在@ApiImplicitParams注解中,指定一个请求参数的各个方面

     paramType:参数放在哪个地方

     header-->请求参数的获取:@RequestHeader

     query-->请求参数的获取:@RequestParam

     path(用于restful接口)-->请求参数的获取:@PathVariable

     body(不常用)

     form(不常用)

     name:参数名

     dataType:参数类型

     required:参数是否必须传

     value:参数的意思

     defaultValue:参数的默认值

     @ApiResponses:用于表示一组响应

     @ApiResponse:用在@ApiResponses中,一般用于表达一个错误的响应信息

     code:数字,例如400

     message:信息,例如"请求参数没填好"

     response:抛出异常的类

     @ApiModel:描述一个Model的信息(这种一般用在post创建的时候,使用@RequestBody这样的场景,请求参数无法使用@ApiImplicitParam注解进行描述的时候)

     @ApiModelProperty:描述一个model的属性

     */

    private ApiInfo apiInfo() {

        return new ApiInfoBuilder()

                .title("Demo使用Swagger2构建RESTful APIs")

                .description("微信打卡服务")

                .contact(new Contact("Jaycekon", "http://petstore.swagger.io/v2/swagger.json", "jaycekon@163.com"))

                .version("1.0")

                .build();

    }

}
4.3 在需要生成Api 的接口添加注解:
@Api(tags = "测试用例")

@RestController

@RequestMapping(value="/users")     // 通过这里配置使下面的映射都在/users下,可去除

public class UserController {

    @ApiOperation(value="获取用户列表", notes="")

    @RequestMapping(value={""}, method= RequestMethod.GET)

    public List<User> getUserList() {

        return new ArrayList<>();

    }

    @ApiOperation(value="创建用户", notes="根据User对象创建用户")

    @ApiImplicitParam(name = "user", value = "用户详细实体user", required = true, dataType = "User")

    @RequestMapping(value="", method=RequestMethod.POST)

    public String postUser(@RequestBody User user) {

        return "success";

    }

    @ApiOperation(value="获取用户详细信息", notes="根据url的id来获取用户详细信息")

    @ApiImplicitParam(name = "id", value = "用户ID", required = true, dataType = "Long")

    @RequestMapping(value="/{id}", method=RequestMethod.GET)

    public User getUser(@PathVariable Long id) {

        return new User();

    }

    @ApiOperation(value="更新用户详细信息", notes="根据url的id来指定更新对象,并根据传过来的user信息来更新用户详细信息")

    @ApiImplicitParams({

            @ApiImplicitParam(name = "id", value = "用户ID", required = true, dataType = "Long"),

            @ApiImplicitParam(name = "user", value = "用户详细实体user", required = true, dataType = "User")

    })

    @RequestMapping(value="/{id}", method=RequestMethod.PUT)

    public String putUser(@PathVariable Long id, @RequestBody User user) {

        return "success";

    }

    @ApiOperation(value="删除用户", notes="根据url的id来指定删除对象")

    @ApiImplicitParam(name = "id", value = "用户ID", required = true, dataType = "Long")

    @RequestMapping(value="/{id}", method=RequestMethod.DELETE)

    public String deleteUser(@PathVariable Long id) {

        return "success";

    }

}
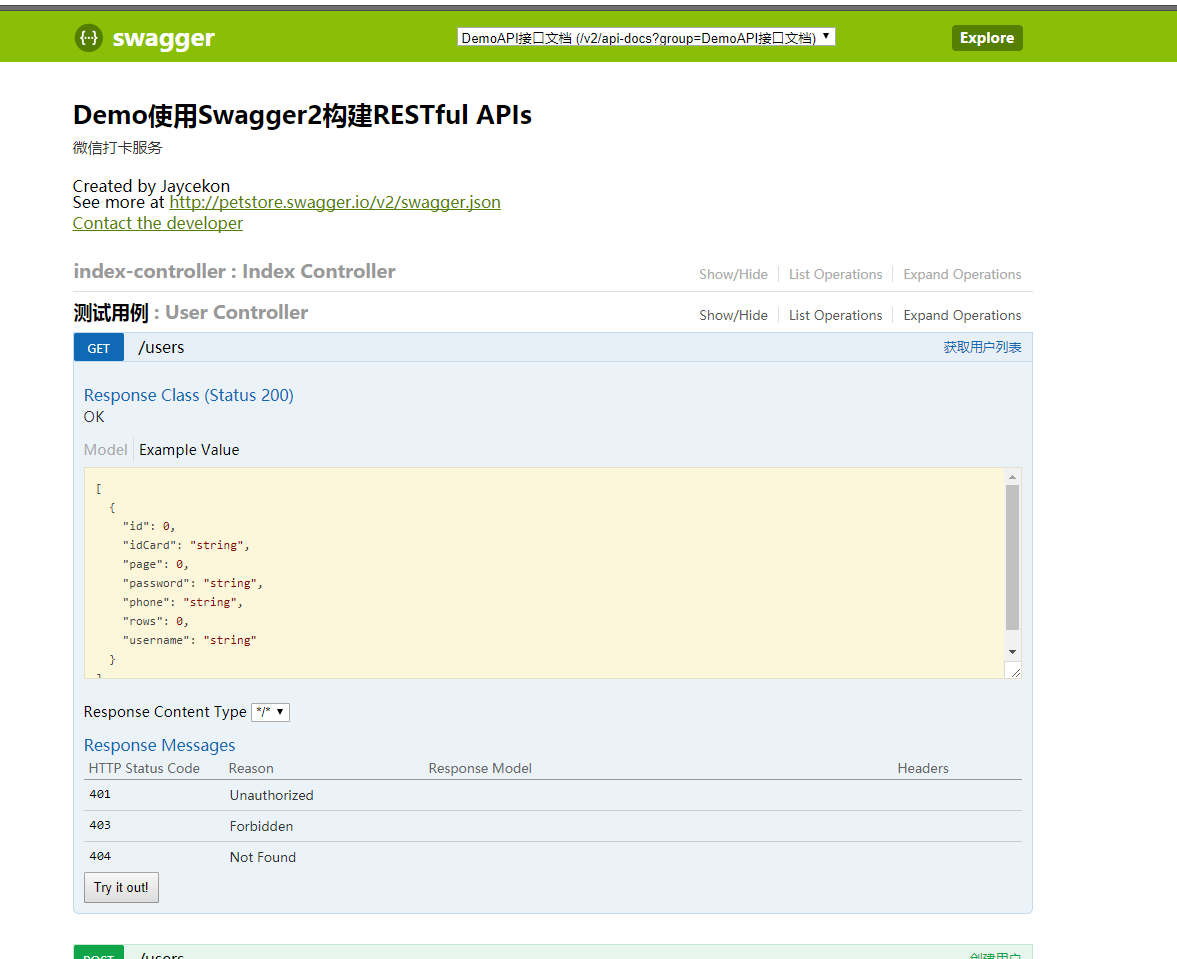
完成上述代码添加上,启动Spring Boot程序,访问:http://localhost:8080/swagger-ui.html
。就能看到前文所展示的RESTful API的页面。我们可以再点开具体的API请求,以POST类型的/users请求为例,可找到上述代码中我们配置的Notes信息以及参数user的描述信息,如下图所示。
4、接入Jenkins&SonarQube
项目框架搭建好后,我们可以通Jenkins 进行项目的自动发版,以及SonarQube 进行代码质量检测。在接入钱,我们需要将项目打包成war包,需要进行以下修改:
1、修改项目打包类型:
    <groupId>com.Jaycekon</groupId>

    <artifactId>demo</artifactId>

    <version>0.0.1-SNAPSHOT</version>

    <packaging>war</packaging>
2、修改Application.java 文件:
@SpringBootApplication

public class DemoApplication extends SpringBootServletInitializer {

    @Override

    protected SpringApplicationBuilder configure(SpringApplicationBuilder application) {

        return application.sources(DemoApplication.class);

    }

    public static void main(String[] args) {

        SpringApplication.run(DemoApplication.class, args);

    }

}
在我的上一篇博客,哆啦A梦的传送门,已经讲解了一些基本配置方法,这里为大家讲解一下,接入SonarQube 进行代码质量检测的配置(需要本地安装SonarQube服务)。
首先需要在MetaData 中,加入SonarQube 的项目名(新建的命名):
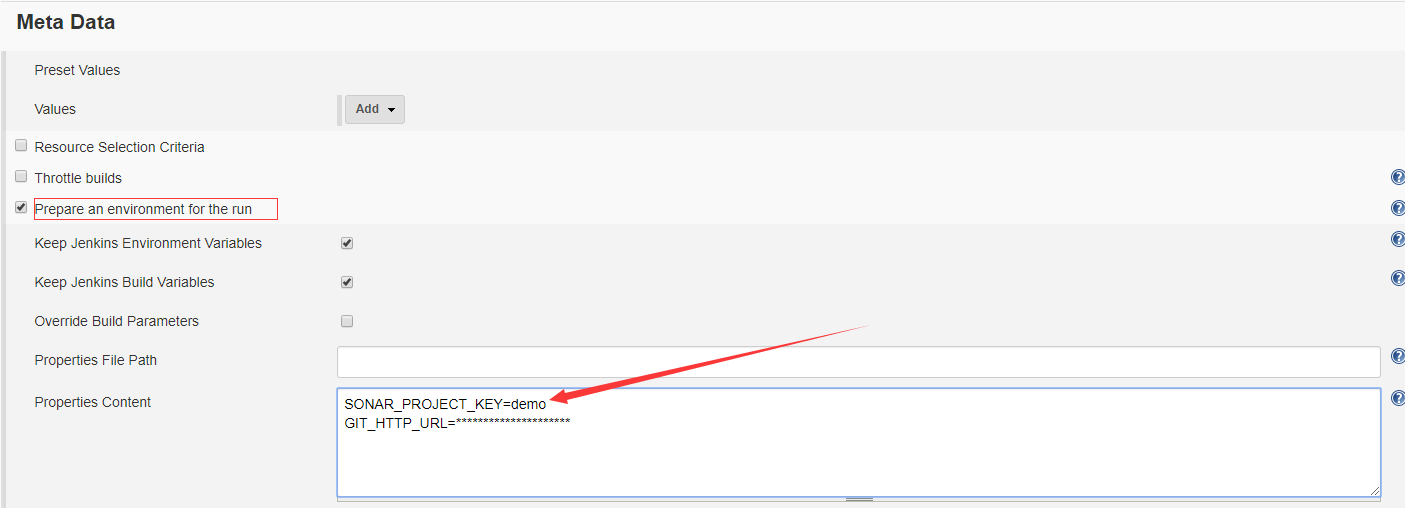
然后在Post Steps 中选择添加 Execute SonarQube Scanner:

在配置好这两项后,Jenkins 在编译文件时,就会执行SonarQube 代码质量检测。
最后,我们可以设置项目在编译完后,执行shell 脚本,进行项目的自动发版:
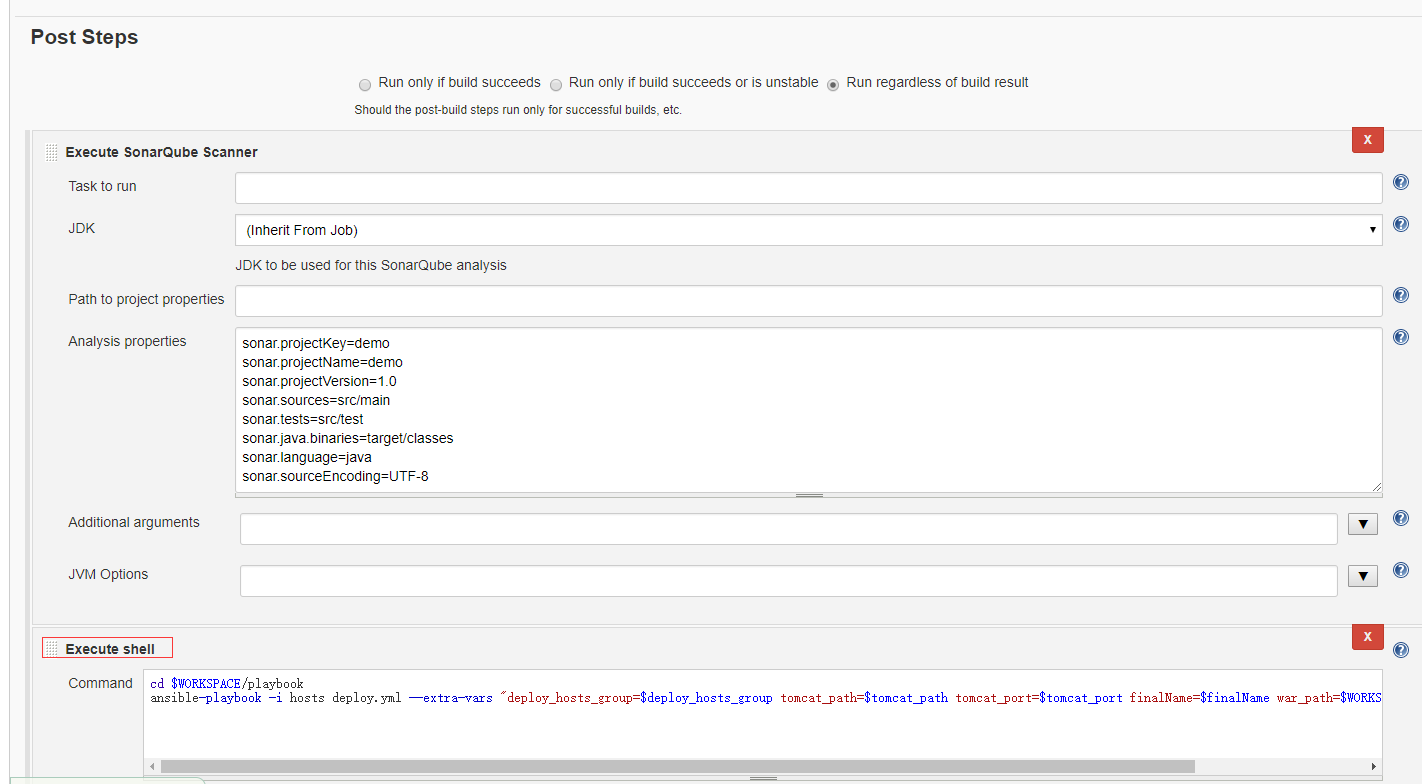
项目编译完后,会找到项目下的playbook,执行里面的脚本,将我们的项目部署到设定的服务器中。
总结 :
本篇文章为大家带来了Spring-boot 的架构搭建,主要使用到了目前较为流行的技术。
源码地址:https://github.com/jaycekon/SpringBootDemo
Spring-boot:快速搭建微框架服务的更多相关文章
- 寻找写代码感觉(一)之使用 Spring Boot 快速搭建项目
写在前面 现在已经是八月份了,我已经荒废了半年居多,不得不说谈恋爱确实是个麻烦的事,谈好了皆大欢喜,分手了就是萎靡不振,需要很长一段时间才能缓过来. 人还是要有梦想的,至于实现只不过是一个契机,但凡不 ...
- Spring Boot快速搭建Spring框架
Spring是一个开源框架,Spring是于2003 年兴起的一个轻量级的Java 开发框架,由Rod Johnson 在其著作Expert One-On-One J2EE Development a ...
- Spring Boot快速搭建Web工程
先想一下,正常我们想要创建一个web服务,首先需要下载tomcat,创建web工程,配置各种web.xml,引入spring的配置,各种配置文件一顿倒腾.....下载有了spring boot,你创建 ...
- Spring Boot 快速搭建的三种方式
方式一:http://start.spring.io/ 打开浏览器,在地址栏中输入http://start.spring.io/ 如下图: 点击generate project 然后就会有一个zip ...
- Spring Boot 快速入门(IDEA)
从字面理解,Boot是引导的意思,因此SpringBoot帮助开发者快速搭建Spring框架:SpringBoot帮助开发者快速启动一个Web容器:SpringBoot继承了原有Spring框架的优秀 ...
- Spring Boot 快速入门 史上最简单
1.Spring Boot 概述 Spring Boot 是所有基于 Spring 开发的项目的起点.Spring Boot 的设计是为了让你尽可能快的跑起来 Spring 应用程序并且尽可能减少你的 ...
- 笔记61 Spring Boot快速入门(一)
IDEA+Spring Boot快速搭建 一.IDEA创建项目 略 项目创建成功后在resources包下,属性文件application.properties中,把数据库连接属性加上,同时可以设置服 ...
- Spring boot项目搭建及简单实例
Spring boot项目搭建 Spring Boot 概述 Build Anything with Spring Boot:Spring Boot is the starting point for ...
- Spring-boot:快速搭建微服务框架
前言: Spring Boot是为了简化Spring应用的创建.运行.调试.部署等而出现的,使用它可以做到专注于Spring应用的开发,而无需过多关注XML的配置. 简单来说,它提供了一堆依赖打包,并 ...
随机推荐
- day12-13 文件操作b模式
为什么需要用到二进制的形式?我们默认的r w a 其实是rt wt at 即txt模式如果是图片,视频,音频,是无法用txt打开的,只能用b模式处理 b 模式是以字节形式打开 f = open(&qu ...
- MT【21】任意基底下的距离公式
解析: 评:$\theta=90^0$时就是正交基底下(即直角坐标系下)的距离公式.
- SharePoint 2013 批量导入、删除帐号
删除一个group里所有的帐号: cls ########################### # "Enter the site URL here" $SITEURL = &q ...
- SP1805 HISTOGRA (单调栈)
单调栈维护栈顶为高度最大的 记下来栈中每个元素入栈时顶掉的最靠左的一个位置(如果没顶掉就是它本身),那么在它出栈的时候,它所带来的面积就是(出栈位置-记录位置)*高度 (可能会有加一减一之类的细节) ...
- 【ATcoder s8pc_3 F】 寿司
http://s8pc-3.contest.atcoder.jp/tasks/s8pc_3_f (题目链接) 题意 有一个长度为$N$的数列$A$,初始为$0$.$Q$次操作,每次两个参数$x,y$. ...
- linux动态库与静态库混合连接
1, 在应用程序需要连接外部库的情况下,linux默认对库的连接是使用动态库,在找不到动态库的情况下再选择静态库.使用方式为: gcc test.cpp -L. -ltestlib 如果当前目录有 ...
- A1027. Colors in Mars
People in Mars represent the colors in their computers in a similar way as the Earth people. That is ...
- 【codevs4829】数字三角形++
题目大意:给定一个数字三角形,求从 (1,1) 到第 N 行的路径经过的权值之和加上该路径上任意一个点的权值之和的最大值. 题解:任意加一条路径上的某个值,可以看成是多了一次选择的权利,即:在每次经过 ...
- Docker从入门到飞升:基础配置安装
导读 Docker近几年非常火,因为它是容器虚拟化,更能够充分提高硬件资源的使用率.其实利用率高不算什么,它最大的优势是能给让运维人员或者开发人员快速部署和交付资源,大大提高了工作效率.几乎所有的大企 ...
- Jenkins创建job时Check-out Strategy各个选项详细说明(含图)
Check-out Strategy 第一次build 第n次build(除第一次) Use 'svn update' as much as possible 将workspace下的所有文件清空,然 ...