图像处理---《在图片上打印文字 windows+GDI+TrueType字体》
图像处理---《在图片上打印文字 windows+GDI+TrueType字体》
刚开始使用的是putText()函数做,缺陷是只能显示非中文; 接着,看大多数推荐Freetype库来做,尝试了,可以的,适合图像输入的是IPLImage格式,其他格式需要转换一下;现在,看到可以不使用Freetype库做的,也尝试了,好用:
上接前几篇,(3)“采用windows的GDI显示系统的TrueType字体,没有封装,就两个函数,分成了h和cpp文件,可以自己编辑文件名和函数名,亦可以直接将cpp的代码复制到你需要的程序中。”
//====================================================================
//
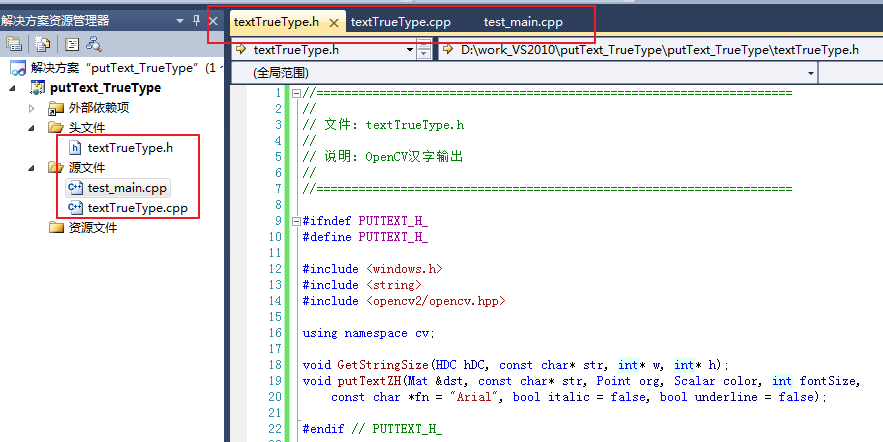
// 文件: textTrueType.h
//
// 说明: OpenCV汉字输出
//
//==================================================================== #ifndef PUTTEXT_H_
#define PUTTEXT_H_ #include <windows.h>
#include <string>
#include <opencv2/opencv.hpp> using namespace cv; void GetStringSize(HDC hDC, const char* str, int* w, int* h);
void putTextZH(Mat &dst, const char* str, Point org, Scalar color, int fontSize,
const char *fn = "Arial", bool italic = false, bool underline = false); #endif // PUTTEXT_H_
//====================================================================

//

// 文件: textTrueType.cpp

//

// 说明: OpenCV汉字输出

//

//====================================================================

//#include "putText.h"

#include "textTrueType.h"

void GetStringSize(HDC hDC, const char* str, int* w, int* h)

{

    SIZE size;

    GetTextExtentPoint32A(hDC, str, strlen(str), &size);

    if (w != ) *w = size.cx;

    if (h != ) *h = size.cy;

}

void putTextZH(Mat &dst, const char* str, Point org, Scalar color, int fontSize, const char* fn, bool italic, bool underline)

{

    CV_Assert(dst.data !=  && (dst.channels() ==  || dst.channels() == ));

    int x, y, r, b;

    if (org.x > dst.cols || org.y > dst.rows) return;

    x = org.x <  ? -org.x : ;

    y = org.y <  ? -org.y : ;

    LOGFONTA lf;

    lf.lfHeight = -fontSize;

    lf.lfWidth = ;

    lf.lfEscapement = ;

    lf.lfOrientation = ;

    lf.lfWeight = ;

    lf.lfItalic = italic;   //斜体

    lf.lfUnderline = underline; //下划线

    lf.lfStrikeOut = ;

    lf.lfCharSet = DEFAULT_CHARSET;

    lf.lfOutPrecision = ;

    lf.lfClipPrecision = ;

    lf.lfQuality = PROOF_QUALITY;

    lf.lfPitchAndFamily = ;

    strcpy_s(lf.lfFaceName, fn);

    HFONT hf = CreateFontIndirectA(&lf);

    HDC hDC = CreateCompatibleDC();

    HFONT hOldFont = (HFONT)SelectObject(hDC, hf);

    int strBaseW = , strBaseH = ;

    int singleRow = ;

    char buf[ << ];

    strcpy_s(buf, str);

    char *bufT[ << ];  // 这个用于分隔字符串后剩余的字符,可能会超出。

    //处理多行

    {

        int nnh = ;

        int cw, ch;

        const char* ln = strtok_s(buf, "\n",bufT);

        while (ln != )

        {

            GetStringSize(hDC, ln, &cw, &ch);

            strBaseW = max(strBaseW, cw);

            strBaseH = max(strBaseH, ch);

            ln = strtok_s(, "\n",bufT);

            nnh++;

        }

        singleRow = strBaseH;

        strBaseH *= nnh;

    }

    if (org.x + strBaseW <  || org.y + strBaseH < )

    {

        SelectObject(hDC, hOldFont);

        DeleteObject(hf);

        DeleteObject(hDC);

        return;

    }

    r = org.x + strBaseW > dst.cols ? dst.cols - org.x -  : strBaseW - ;

    b = org.y + strBaseH > dst.rows ? dst.rows - org.y -  : strBaseH - ;

    org.x = org.x <  ?  : org.x;

    org.y = org.y <  ?  : org.y;

    BITMAPINFO bmp = {  };

    BITMAPINFOHEADER& bih = bmp.bmiHeader;

    int strDrawLineStep = strBaseW *  %  ==  ? strBaseW *  : (strBaseW *  +  - ((strBaseW * ) % ));

    bih.biSize = sizeof(BITMAPINFOHEADER);

    bih.biWidth = strBaseW;

    bih.biHeight = strBaseH;

    bih.biPlanes = ;

    bih.biBitCount = ;

    bih.biCompression = BI_RGB;

    bih.biSizeImage = strBaseH * strDrawLineStep;

    bih.biClrUsed = ;

    bih.biClrImportant = ;

    void* pDibData = ;

    HBITMAP hBmp = CreateDIBSection(hDC, &bmp, DIB_RGB_COLORS, &pDibData, , );

    CV_Assert(pDibData != );

    HBITMAP hOldBmp = (HBITMAP)SelectObject(hDC, hBmp);

    //color.val[2], color.val[1], color.val[0]

    SetTextColor(hDC, RGB(, , ));

    SetBkColor(hDC, );

    //SetStretchBltMode(hDC, COLORONCOLOR);

    strcpy_s(buf, str);

    const char* ln = strtok_s(buf, "\n",bufT);

    int outTextY = ;

    while (ln != )

    {

        TextOutA(hDC, , outTextY, ln, strlen(ln));

        outTextY += singleRow;

        ln = strtok_s(, "\n",bufT);

    }

    uchar* dstData = (uchar*)dst.data;

    int dstStep = dst.step / sizeof(dstData[]);

    unsigned char* pImg = (unsigned char*)dst.data + org.x * dst.channels() + org.y * dstStep;

    unsigned char* pStr = (unsigned char*)pDibData + x * ;

    for (int tty = y; tty <= b; ++tty)

    {

        unsigned char* subImg = pImg + (tty - y) * dstStep;

        unsigned char* subStr = pStr + (strBaseH - tty - ) * strDrawLineStep;

        for (int ttx = x; ttx <= r; ++ttx)

        {

            for (int n = ; n < dst.channels(); ++n){

                double vtxt = subStr[n] / 255.0;

                int cvv = vtxt * color.val[n] + ( - vtxt) * subImg[n];

                subImg[n] = cvv >  ?  : (cvv <  ?  : cvv);

            }

            subStr += ;

            subImg += dst.channels();

        }

    }

    SelectObject(hDC, hOldBmp);

    SelectObject(hDC, hOldFont);

    DeleteObject(hf);

    DeleteObject(hBmp);

    DeleteDC(hDC);

}
//====================================================================
//
// 文件: test_main.cpp
//
// 说明: OpenCV汉字输出,测试主函数
//
//====================================================================
#include "opencv2/opencv.hpp" //#include "putText.h"
#include "textTrueType.h" using namespace std;
using namespace cv; /*int main()
{
Mat img = imread("D:\\005_test_4\\testImg\\road_6.png"); putTextZH(img, "Arial字体换...\n行显示!", Point(50, 50), Scalar(0, 0, 255), 30, "Arial");
putTextZH(img, "Times New Roman字体换...\n行显示!", Point(50, 50), Scalar(0, 0, 255), 30, "Times New Roman");
putTextZH(img, "微软雅黑字体换...\n行,斜体,下划线,显示!", Point(50, 100), Scalar(0, 255, 0), 30, "微软雅黑", true, true);
putTextZH(img, "楷体字体换...\n行,斜体,下划线,显示!", Point(50, 200), Scalar(128, 255, 0), 30, "楷体", true, true); imshow("test", img); waitKey(); return 0;
}*/ void main()
{
//Mat img(150,600,CV_8UC3,Scalar(255,255,255));//初始化图像
Mat img = imread("D:\\005_test_4\\testImg\\road_6.png");
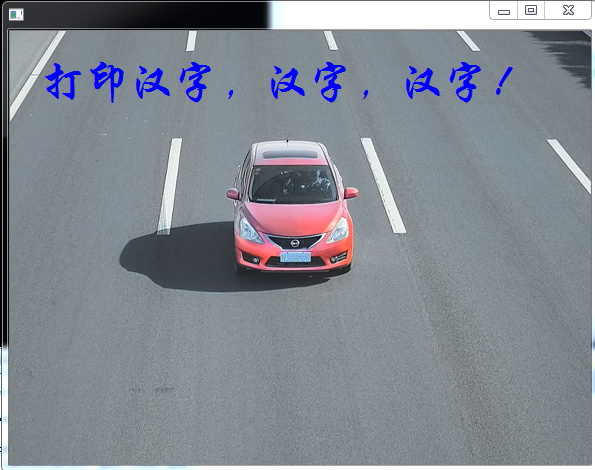
putTextZH(img, "打印汉字,汉字,汉字!", Point(, ), Scalar(, , ), , "华文行楷");
imwrite("1.png", img);
imshow("", img);
waitKey();
}

致谢:https://blog.csdn.net/wanggao_1990/article/details/52955056;https://blog.csdn.net/weixinhum/article/details/84074594;
图像处理---《在图片上打印文字 windows+GDI+TrueType字体》的更多相关文章
- 图像处理---《在图片上打印文字 FreeType库》
图像处理---<在图片上打印文字 FreeType库> 目的:想在处理之后的图像上打印输出结果.方法: (1)只在图像上打印 数字.字母的话: 1.Mat格式 ...
- 图像处理---《在图片上打印文字 putText()》
图像处理---<在图片上打印文字 putText()> 目的:想在处理之后的图像上打印输出结果. 方法: (1)只在图像上打印 数字.字母的话: 1.Mat ...
- C#图像处理(1):在图片上加文字和改变文字的方向
C#在图片上加文字,代码如下: /// <summary> /// 图片上方加文字,文字将会被180度反转 /// </summary> /// <param name= ...
- Python3.x:如何识别图片上的文字
Python3.x:如何识别图片上的文字 安装pytesseract库,必须先安装其依赖的PIL及tesseract-ocr,其中PIL为图像处理库,而后面的tesseract-ocr则为google ...
- C#实现图片叠加,图片上嵌入文字,文字生成图片的方法
/// <summary> /// 图片叠加 /// </summary> /// <param name="sender"& ...
- python 图片上添加文字
import PIL from PIL import ImageFont from PIL import Image from PIL import ImageDraw #设置字体,如果没有,也可以不 ...
- 使用Qpaint在图片上写文字
开发过程中需要实现在图片上叠加文字,可以采用Qpaint在图片上写文字,然后将图片显示在上面.再将Qlabel加到Qwidget中.效果如下 //创建对象,加载图片 QPixmap pix; pix. ...
- 函数putText()在图片上写文字
#include <iostream> #include <opencv2/opencv.hpp> using namespace std; using namespace c ...
- 把图片上的文字转换成word文字?
转换后的文字不是很如意,但是免费方便. 1.打开Office办公软件自带的OneNote工具.随便新建一个笔记页面,以方便我们接下来的操作. 2.插入图片.在菜单栏里点击[插入],选择插入[图片],找 ...
随机推荐
- MySQL创建用户、授权、删除
1.在MySQL中创建新用户 使用具有shell访问权限的root用户登录MySQL服务器并创建名为“rahul”的新用户.下面的命令只允许从localhost系统访问用户rahul的MySQL服务器 ...
- 关于RNN(Recurrent Neural Network)的一篇文章
文章链接:https://blog.csdn.net/zhaojc1995/article/details/80572098 写的很好!
- Centos7服务器环境搭建
1.Apache安装 yum install httpd systemctl start httpd.service #启动 systemctl stop httpd.service#停止 syste ...
- CF1187E Tree Painting
思路: 树形dp,首先使用dp计算以1为根的时候的最大分数,同时得到各个子树i的最大分数dp[i].然后利用前面得到的dp数组分别计算以其他每个点作为根的时候的最大分数. 实现: #include & ...
- 性能优化-屏幕常亮与CPU唤醒
Android在不使用的时候,屏幕在一段时间以后会变暗,再过一段时间就会熄屏,此时CPU就会休眠,那么在这个时候,Timer.Handler.Thread.Service等都会暂停,有时候我们需要屏幕 ...
- Java网络编程-你是GG还是MM?
第六阶段 网络编程 每一台计算机通过网络连接起来,达到了数据互动的效果,而网络编程所解决的问题就是如何让程序与程序之间实现数据的通讯与互动 在吗?你是GG还是MM? (一) 网络模型概述 (1) 两大 ...
- mysql的binlog安全删除的一种方法
指定过期天数(expire_logs_days) ---适用于单机版mysql! 该参数为全局可动态调整参数,默认值为0,即关闭,取值范围0-99. 1.3.1 参数的查看: mysql> ...
- dp 状态压缩
之前我们在讨论的dp形式当中, 大多数是对整数的动态规划, 然而对于集合而言呢 ? 我们使用 DFS 吗, 看起来也可以, 但是加上dp记忆 数组的 动态规划效率更高: 那么进一步讨论, 我们如何表示 ...
- DP_Sumsets
Farmer John commanded his cows to search for different sets of numbers that sum to a given number. T ...
- 剪花布条 HDU - 2087(kmp,求不重叠匹配个数)
Problem Description 一块花布条,里面有些图案,另有一块直接可用的小饰条,里面也有一些图案.对于给定的花布条和小饰条,计算一下能从花布条中尽可能剪出几块小饰条来呢? Input 输入 ...