
linux 安装mysql(rpm文件安装)
rpm -ivh mysql-community-libs-5.7.22-1.el7.x86_64.rpm
rpm -ivh mysql-community-client-5.7.22-1.el7.x86_64.rpm
rpm -ivh mysql-community-server-5.7.22-1.el7.x86_64.rpm
warning: mysql-community-libs-5.7.22-1.el7.x86_64.rpm: Header V3 DSA/SHA1 Signature, key ID 5072e1f5: NOKEY
error: Failed dependencies:
mysql-community-common(x86-64) >= 5.7.9 is needed by mysql-community-libs-5.7.22-1.el7.x86_64
mariadb-libs is obsoleted by mysql-community-libs-5.7.22-1.el7.x86_64
---------------------
数据库包下载:
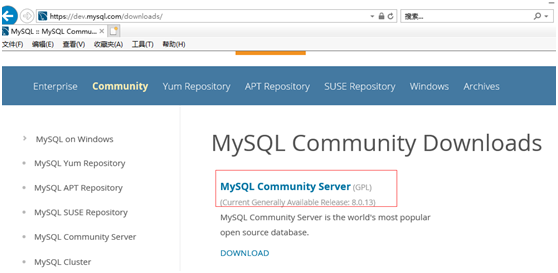
https://www.mysql.com/downloads/
在GPL开原协议的社区开源版里边下载

我们用mysql community server里边的
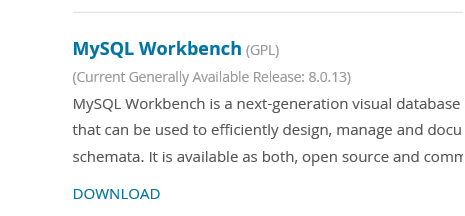
其中workbench是客户端工具
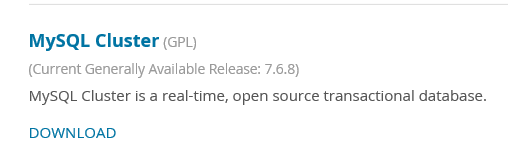
MySQL Cluster是oracle自己搞的集群版的(集成了一些开源工具和增值服务)
选择操作系统和版本
建议在linux下安装
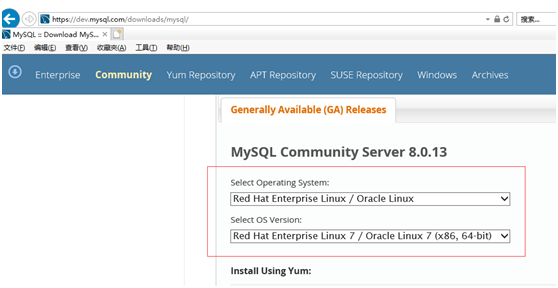
也可以选择版本

下载server包和client包
如果是server包,那架构图里的东西都有了
还要下个client utilities包,客户端包,类似connection层
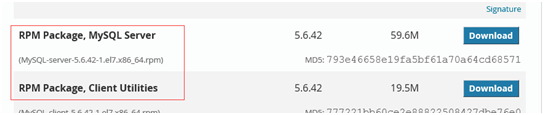
下载后用rz命令传到centos linux系统里边
rpm是包管理器
xshell可以直接拖
也可以用rz命令,没有的话安装一下: yum install lrzsz
yum是包资源管理器,可以解决包依赖的问题,把需要的包都下载下来
传到linux系统
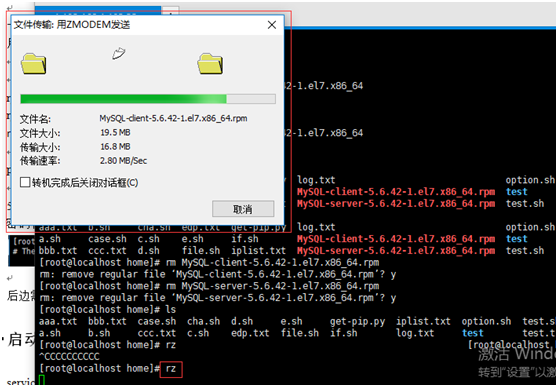
安装mysql步骤:
清理环境
centos7会自带一个mariadb
查看是否已安装
rpm -qa |grep -i mysql
rpm -qa |grep -i mariadb(centos7默认系统自带的)
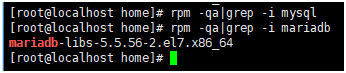
mariadb是从mysql来的,是它的一个分支,需要清理掉
清理掉mariadb包
用yum直接安装你的话,用的mariadb的yum源,它跟mysql官方正式版不太一样,我们要安装官方正式版,就需要清掉mariadb,然后手动安装自己下载的官方正式版mysql
rpm -e 加上包名,把mariadb包清掉
可以看到用rpm删除会失败,提示有依赖关系的软件需要安装
rpm -e mariadb-libs-5.5.56-2.el7.x86_64

rpm删除时如果有依赖关系,可以用yum remove + 包名来删除mariadb
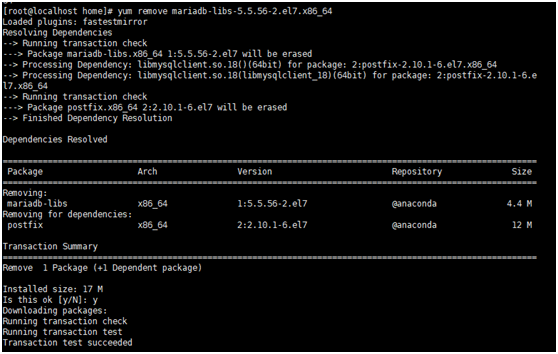
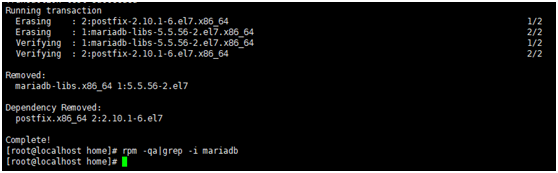
开始安装:
一般用装软件用yum直接安装也可以,但是有一个问题:用yum的话,是到默认的mariadb用的yum源去找,可能会找不到,所以我们自己来安装
rpm –ivh + 包安装所需要的包
rpm -ivh MySQL-client-5.6.42-1.el7.x86_64.rpm

rpm -ivh MySQL-server-5.6.42-1.el7.x86_64.rpm
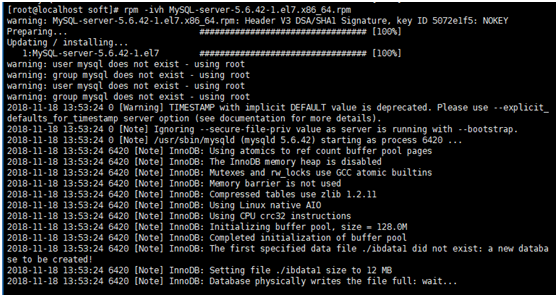
server安装成功后会输出一些信息,如下:
[root@localhost soft]# rpm -ivh MySQL-server-5.6.42-1.el7.x86_64.rpm
warning: MySQL-server-5.6.42-1.el7.x86_64.rpm: Header V3 DSA/SHA1 Signature, key ID 5072e1f5: NOKEY
Preparing... ################################# [100%]
Updating / installing...
1:MySQL-server-5.6.42-1.el7 ################################# [100%]
warning: user mysql does not exist - using root
warning: group mysql does not exist - using root
warning: user mysql does not exist - using root
warning: group mysql does not exist - using root
2018-11-18 13:53:24 0 [Warning] TIMESTAMP with implicit DEFAULT value is deprecated. Please use --explicit_defaults_for_timestamp server option (see documentation for more details).
2018-11-18 13:53:24 0 [Note] Ignoring --secure-file-priv value as server is running with --bootstrap.
2018-11-18 13:53:24 0 [Note] /usr/sbin/mysqld (mysqld 5.6.42) starting as process 6420 ...
2018-11-18 13:53:24 6420 [Note] InnoDB: Using atomics to ref count buffer pool pages
2018-11-18 13:53:24 6420 [Note] InnoDB: The InnoDB memory heap is disabled
2018-11-18 13:53:24 6420 [Note] InnoDB: Mutexes and rw_locks use GCC atomic builtins
2018-11-18 13:53:24 6420 [Note] InnoDB: Memory barrier is not used
2018-11-18 13:53:24 6420 [Note] InnoDB: Compressed tables use zlib 1.2.11
2018-11-18 13:53:24 6420 [Note] InnoDB: Using Linux native AIO
2018-11-18 13:53:24 6420 [Note] InnoDB: Using CPU crc32 instructions
2018-11-18 13:53:24 6420 [Note] InnoDB: Initializing buffer pool, size = 128.0M
2018-11-18 13:53:24 6420 [Note] InnoDB: Completed initialization of buffer pool
2018-11-18 13:53:24 6420 [Note] InnoDB: The first specified data file ./ibdata1 did not exist: a new database to be created!
2018-11-18 13:53:24 6420 [Note] InnoDB: Setting file ./ibdata1 size to 12 MB
2018-11-18 13:53:24 6420 [Note] InnoDB: Database physically writes the file full: wait...
2018-11-18 13:53:24 6420 [Note] InnoDB: Setting log file ./ib_logfile101 size to 48 MB
2018-11-18 13:53:25 6420 [Note] InnoDB: Setting log file ./ib_logfile1 size to 48 MB
2018-11-18 13:53:25 6420 [Note] InnoDB: Renaming log file ./ib_logfile101 to ./ib_logfile0
2018-11-18 13:53:25 6420 [Warning] InnoDB: New log files created, LSN=45781
2018-11-18 13:53:25 6420 [Note] InnoDB: Doublewrite buffer not found: creating new
2018-11-18 13:53:25 6420 [Note] InnoDB: Doublewrite buffer created
2018-11-18 13:53:25 6420 [Note] InnoDB: 128 rollback segment(s) are active.
2018-11-18 13:53:25 6420 [Warning] InnoDB: Creating foreign key constraint system tables.
2018-11-18 13:53:25 6420 [Note] InnoDB: Foreign key constraint system tables created
2018-11-18 13:53:25 6420 [Note] InnoDB: Creating tablespace and datafile system tables.
2018-11-18 13:53:25 6420 [Note] InnoDB: Tablespace and datafile system tables created.
2018-11-18 13:53:25 6420 [Note] InnoDB: Waiting for purge to start
2018-11-18 13:53:25 6420 [Note] InnoDB: 5.6.42 started; log sequence number 0
A random root password has been set. You will find it in '/root/.mysql_secret'.
2018-11-18 13:53:26 6420 [Note] Binlog end
2018-11-18 13:53:26 6420 [Note] InnoDB: FTS optimize thread exiting.
2018-11-18 13:53:26 6420 [Note] InnoDB: Starting shutdown...
2018-11-18 13:53:27 6420 [Note] InnoDB: Shutdown completed; log sequence number 1625977
2018-11-18 13:53:27 0 [Warning] TIMESTAMP with implicit DEFAULT value is deprecated. Please use --explicit_defaults_for_timestamp server option (see documentation for more details).
2018-11-18 13:53:27 0 [Note] Ignoring --secure-file-priv value as server is running with --bootstrap.
2018-11-18 13:53:27 0 [Note] /usr/sbin/mysqld (mysqld 5.6.42) starting as process 6444 ...
2018-11-18 13:53:27 6444 [Note] InnoDB: Using atomics to ref count buffer pool pages
2018-11-18 13:53:27 6444 [Note] InnoDB: The InnoDB memory heap is disabled
2018-11-18 13:53:27 6444 [Note] InnoDB: Mutexes and rw_locks use GCC atomic builtins
2018-11-18 13:53:27 6444 [Note] InnoDB: Memory barrier is not used
2018-11-18 13:53:27 6444 [Note] InnoDB: Compressed tables use zlib 1.2.11
2018-11-18 13:53:27 6444 [Note] InnoDB: Using Linux native AIO
2018-11-18 13:53:27 6444 [Note] InnoDB: Using CPU crc32 instructions
2018-11-18 13:53:27 6444 [Note] InnoDB: Initializing buffer pool, size = 128.0M
2018-11-18 13:53:27 6444 [Note] InnoDB: Completed initialization of buffer pool
2018-11-18 13:53:27 6444 [Note] InnoDB: Highest supported file format is Barracuda.
2018-11-18 13:53:27 6444 [Note] InnoDB: 128 rollback segment(s) are active.
2018-11-18 13:53:27 6444 [Note] InnoDB: Waiting for purge to start
2018-11-18 13:53:27 6444 [Note] InnoDB: 5.6.42 started; log sequence number 1625977
2018-11-18 13:53:27 6444 [Note] Binlog end
2018-11-18 13:53:27 6444 [Note] InnoDB: FTS optimize thread exiting.
2018-11-18 13:53:27 6444 [Note] InnoDB: Starting shutdown...
2018-11-18 13:53:29 6444 [Note] InnoDB: Shutdown completed; log sequence number 1625987
A RANDOM PASSWORD HAS BEEN SET FOR THE MySQL root USER !
You will find that password in '/root/.mysql_secret'.
You must change that password on your first connect,
no other statement but 'SET PASSWORD' will be accepted.
See the manual for the semantics of the 'password expired' flag.
Also, the account for the anonymous user has been removed.
In addition, you can run:
/usr/bin/mysql_secure_installation
which will also give you the option of removing the test database.
This is strongly recommended for production servers.
See the manual for more instructions.
Please report any problems at http://bugs.mysql.com/
The latest information about MySQL is available on the web at
http://www.mysql.com
Support MySQL by buying support/licenses at http://shop.mysql.com
WARNING: Found existing config file /usr/my.cnf on the system.
Because this file might be in use, it was not replaced,
but was used in bootstrap (unless you used --defaults-file)
and when you later start the server.
The new default config file was created as /usr/my-new.cnf,
please compare it with your file and take the changes you need.
其中有两句指明mysql安装时给root设置了一个随机的初始密码:
密码的位置放在'/root/.mysql_secret'文件中
用于第一次登陆mysql时使用的,登陆之后会强制修改一下
A RANDOM PASSWORD HAS BEEN SET FOR THE MySQL root USER !
You will find that password in '/root/.mysql_secret'.
You must change that password on your first connect,
no other statement but 'SET PASSWORD' will be accepted.
See the manual for the semantics of the 'password expired' flag.

查看该文件,可以看到我在重装mysql时新生成一个随机密码

ps –ef|grep –i mysql 看是否有mysql进程

用rpm –qa |grep –I mysql看下mysql是否安装成功了,看到两个mysql的组件,就是安装成功了

5.6以后要设置一个root账号的随机密码
密码保存到root/.mysql_secret文件里

后边需要用这个初始的密码登录mysql
启动服务:service mysql start

ps –ef |grep mysql 看有没有mysql服务

登录数据库:
mysql –uroot –p 敲回车
然后输入随机密码
登录后,提示一些信息
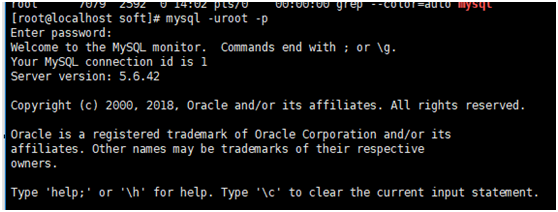
如连接线程id、版本什么的
show databases; 查看数据库有哪些库
在使用前要设置一个自己的密码
会要求重置随机密码

重置密码方法:set password=password(‘root’);
是给当前用户设置密码为root

再运行 show databases;
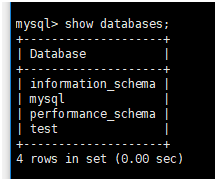
mysql会自带一些系统库:
information_schema存一些统计数据
performance_schema存一些状态数据,
mysql存的数据用于监控、权限、账号等
test是测试库,用于做测试用的
如果重新安装,数据目录没变的话,那么之前的库还是存在的
linux 安装mysql(rpm文件安装)的更多相关文章
- CentOS 安装MySQL rpm方式安装
MySQL源码方式安装:https://www.cnblogs.com/deverz/p/10997723.html 从最新版本的linux系统开始,默认的是 Mariadb而不是mysql!这里依旧 ...
- Linux下卸载和安装MySQL[rpm包]
一.卸载原来的mysql: 卸载一: 输入: #rpm -qa | grep -i mysql 显示: mysql-libs-5.1.52-1.el6_0.1.i686 卸载方法: yum -y re ...
- linux安装mysql使用yum安装
安装MySQL 安装mysql客户端: yum install mysql 安装mysql 服务器端: yum install mysql-server 至此我就可以使用Yum简单地管理MySQL更新 ...
- MySQL RPM二进制安装
+++++++++++++++++++++++++++++++++++++++++++标题:MySQL RPM二进制安装时间:2019年2月24日内容:MySQL RPM二进制安装重点:MySQL R ...
- Linux下安装mysql(离线安装和在线安装)
一:在线安装mysql 1.首先检测一下,mysql之前有没有被安装 命令:rpm -qa | grep mysql 2.删除mysql的命令: rpm -e --nodeps `rpm -qa | ...
- centos7 安装 mysql(在线安装)
在CentOS中默认安装有MariaDB,这个是MySQL的分支,但为了需要,还是要在系统中安装MySQL,而且安装完成之后可以直接覆盖掉MariaDB. 1 下载并安装MySQL官方的 Yum Re ...
- 新服务器搭建-总结: 下载nginx,jdk8,docker-compose编排(安装mysql,redis) 附安装
三明SEO: 前言 如题, 公司新买了一条4核16G的服务器, 不得不重新搭建环境, 只能一一重来, 做个记录 1.nginx : 手动安装 2.jdk8: 手动安装 3. 安装docker 及doc ...
- 在Windows上安装MySQL(免安装ZIP版)
在 Windows 上安装MySQL(免安装ZIP版) 因为一些原因,重新安装了MySQL数据库,重装时习惯性使用最新版下载 此过程中发现MySQL 5.7.12 和MySQL 5.6的安装有些区别: ...
- linux下安装mysql(rpm文件安装)
数据库包下载: https://www.mysql.com/downloads/ 在GPL开原协议的社区开源版里边下载 我们用mysql community server里边的 其中workbench ...
随机推荐
- LeetCode_231. Power of Two
231. Power of Two Easy Given an integer, write a function to determine if it is a power of two. Exam ...
- git 本地项目推送到远程服务器
3进入本地电脑的将要上传的项目的目录下面 1)git init 初始化一个git 2) vim .gitignore 新增以及编写这个文件 node_modules/ 意思就是上传的时候忽略这个文件 ...
- 03点睛Spring4.1-scope
转载:https://www.iteye.com/blog/wiselyman-2210377 3.1 scope scope描述spring容器是怎么样新建类的实例的(bean); 在spring中 ...
- upload-labs 上传漏洞靶场环境以及writeup
一个帮你总结所有类型的上传漏洞的靶场 https://github.com/c0ny1/upload-labs 靶场环境(基于phpstudy这个php集成环境) https://github.com ...
- LeetCode:打印零与奇偶数【1116】
LeetCode:打印零与奇偶数[1116] 题目描述 假设有这么一个类: class ZeroEvenOdd { public ZeroEvenOdd(int n) { ... } // 构造函数 ...
- mac的公式编辑器: mathtype/latex
mathtype 收费版,且马上不能在mac系统上使用 latex 搜索一下: ➜ ~ brew search latex ==> Formulae gnome-latex latex2html ...
- 上传大文件到腾讯云cos遇到的一些问题
讲一个开发遇到的问题. 开发中遇到一个需求,需要在后台表单页面支持上传视频.因为项目中一直用的是腾讯云的COS做第三方存储平台,所以视频也要上传到cos中保存.首先想到的是使用腾讯提供的php的SDK ...
- eNSP下配置Trunk接口实现跨交换机传递数据
当Trunk端口发送数据帧的时候,当所发送帧的VLAN ID与端口的PVID不同是,检查是否允许该VLAN通过,若允许的话,直接透传,不允许就直接丢弃:当该帧的VLAN ID与端口的PVID相同时,则 ...
- Spring之28:AliasRegistry&SimpleAliasRegistry
AliasRegistry接口定义了alias的基本操作. package org.springframework.core; public interface AliasRegistry { //对 ...
- Ribbon源
在Riibon中一个非常重要的组件为LoadBalancerClient,它作为负载均衡的一个客户端 ServiceInstance choose(String serviceId); 从负载均衡器中 ...