
Centos 7.3 搭建php7,mysql5.7,nginx1.10.1,redis
# yum update
# wget http://nginx.org/download/nginx-1.15.2.tar.gz

# tar zxvf nginx-1.15.2.tar.gz

# cd nginx-1.15.2
./configure --prefix=/usr/local/nginx \

--pid-path=/usr/local/nginx/run/nginx.pid \

--with-http_ssl_module \

--user=nginx \

--group=nginx \

--with-pcre \

--without-mail_pop3_module \

--without-mail_imap_module \

--without-mail_smtp_module
3.安装
# make

# make install
make完了就说明安装好了
刚才编译的时候讲nginx编译在了/usr/local/nginx文件夹下,过去启动一下
/usr/local/nginx/sbin/nginx
如果没有任何报错 就说明启动成功了
如果出现了下面代码:
nginx: [emerg] getpwnam("nginx") failed
说明你的服务器上没有nginx用户,新建一个用户和用户组,把nginx放进去了,然后设置不能登录就好了。命令如下:
groupadd nginx

useradd -g nginx -M nginx

-g为用户指定组 -M不自动生成home目录,毕竟我们只是让系统上有这个帐号,不给登录权限的

vi /etc/passwd

把/bin/bash改为/sbin/nologin 这样nginx就不能登录了
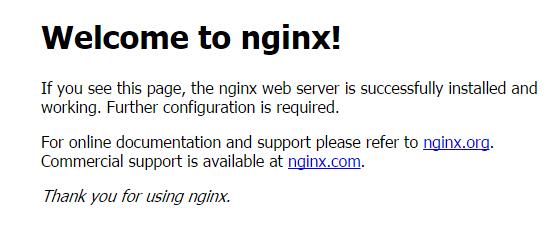
# yum localinstall http://dev.mysql.com/get/mysql57-community-release-el7-7.noarch.rpm
# yum install mysql-community-server
yum install mysql-community-devel
# service mysqld start

Redirecting to /bin/systemctl start  mysqld.service
# service mysqld status
# grep 'temporary password' /var/log/mysqld.log

# --28T02::.449839Z  [Note] A temporary password is generated for root@localhost: 8Ba=2gtz+?wx
mysql -uroot -p
mysql> ALTER USER 'root'@'localhost' IDENTIFIED BY 'MyNewPasdfs4!';
mysql> quit;

mysql> mysql -uroot -p
cd /root & wget -O php7.tar.gz http://cn2.php.net/get/php-7.0.30.tar.gz/from/this/mirror
tar -xvf php7.tar.gz
cd php-7.0.
yum install libxml2 libxml2-devel openssl openssl-devel bzip2 bzip2-devel libcurl libcurl-devel libjpeg libjpeg-devel libpng libpng-devel freetype freetype-devel gmp gmp-devel libmcrypt libmcrypt-devel readline readline-devel libxslt libxslt-devel
# ./configure --prefix=/usr/local/php --with-config-file-path=/etc --enable-fpm --with-fpm-user=nginx --with-fpm-group=nginx --enable-inline-optimization --disable-debug --disable-rpath --enable-shared --enable-soap --with-libxml-dir --with-xmlrpc --with-openssl --with-mcrypt --with-mhash --with-pcre-regex --with-sqlite3 --with-zlib --enable-bcmath --with-iconv --with-bz2 --enable-calendar --with-curl --with-cdb --enable-dom --enable-exif --enable-fileinfo --enable-filter --with-pcre-dir --enable-ftp --with-gd --with-openssl-dir --with-jpeg-dir --with-png-dir --with-zlib-dir --with-freetype-dir --enable-gd-native-ttf --enable-gd-jis-conv --with-gettext --with-gmp --with-mhash --enable-json --enable-mbstring --enable-mbregex --enable-mbregex-backtrack --with-libmbfl --with-onig --enable-pdo --with-mysqli=mysqlnd --with-pdo-mysql=mysqlnd --with-zlib-dir --with-pdo-sqlite --with-readline --enable-session --enable-shmop --enable-simplexml --enable-sockets --enable-sysvmsg --enable-sysvsem --enable-sysvshm --enable-wddx --with-libxml-dir --with-xsl --enable-zip --enable-mysqlnd-compression-support --with-pear --enable-opcache
.configure: error: xml2-config not found. Please check your libxml2 installation.

解决:# yum install libxml2 libxml2-devel
.configure: error: Cannot find OpenSSL's <evp.h>

解决:# yum install openssl openssl-devel
.configure: error: Please reinstall the BZip2 distribution

解决:# yum install bzip2 bzip2-devel
.configure: error: Please reinstall the libcurl distribution - easy.h should be in <curl-dir>/include/curl/

解决:# yum install libcurl libcurl-devel
.If configure fails try --with-webp-dir=<DIR> configure: error: jpeglib.h not found.

解决:# yum install libjpeg libjpeg-devel
.If configure fails try --with-webp-dir=<DIR>

checking for jpeg_read_header in -ljpeg... yes

configure: error: png.h not found.

解决:# yum install libpng libpng-devel
.If configure fails try --with-webp-dir=<DIR>

checking for jpeg_read_header in -ljpeg... yes

checking for png_write_image in -lpng... yes

If configure fails try --with-xpm-dir=<DIR>

configure: error: freetype-config not found.

解决:# yum install freetype freetype-devel
.configure: error: Unable to locate gmp.h

解决:# yum install gmp gmp-devel
.configure: error: mcrypt.h not found. Please reinstall libmcrypt.
解决:# yum install libmcrypt libmcrypt-devel
如果出现 No package libmcrypt available.
     No package libmcrypt-devel available.
执行:#yum install libmcrypt libmcrypt-devel mcrypt mhash epel-release
然后再安装:#yum install libmcrypt libmcrypt-devel
.configure: error: Please reinstall readline - I cannot find readline.h

解决:# yum install readline readline-devel
.configure: error: xslt-config not found. Please reinstall the libxslt >= 1.1. distribution

解决:# yum install libxslt libxslt-devel
make && make install
vim /etc/profile
PATH=$PATH:/usr/local/php/bin

export PATH
# source /etc/profile
# echo $PATH
# php -v
# cp php.ini-production /etc/php.ini

# cp /usr/local/php/etc/php-fpm.conf.default /usr/local/php/etc/php-fpm.conf

# cp /usr/local/php/etc/php-fpm.d/www.conf.default /usr/local/php/etc/php-fpm.d/www.conf

# cp sapi/fpm/init.d.php-fpm /etc/init.d/php-fpm

# chmod +x /etc/init.d/php-fpm
/etc/init.d/php-fpm start
        location ~ \.php$ {

            root           html;

            fastcgi_pass   127.0.0.1:;

            fastcgi_index  index.php;

            fastcgi_param  SCRIPT_FILENAME  /$document_root$fastcgi_script_name;

            include        fastcgi_params;

        }
service nginx reload
vim /var/www/html/php7/index.php
<?php

phpinfo();

?>

sudo yum install gcc-c++
wget http://download.redis.io/releases/redis-3.2.8.tar.gz
tar -zxvf redis-3.2..tar.gz
cd redis-3.2.
make MALLOC=libc
make install // make test

./redis-server

you have Transparent Huge Pages (THP) support enabled in your kernel. This will create latency and memory usage issues with Redis. To fix this issue run the command 'echo never > /sys/kernel/mm/transparent_hugepage/enabled' as root, and add it to your /etc/rc.local in order to retain the setting after a reboot. Redis must be restarted after THP is disabled.
echo never > /sys/kernel/mm/transparent_hugepage/enabled
mkdir -p /etc/redis

cp redis.conf /etc/redis
/usr/local/bin/redis-server /etc/redis/redis.conf
ps -ef | grep redis
redis-cli
Centos 7.3 搭建php7,mysql5.7,nginx1.10.1,redis的更多相关文章
- CentOS 7 安装 LNMP 环境(PHP7 + MySQL5.7 + Nginx1.10)
记录下在CentOS 7 安装 LNMP 环境(PHP7 + MySQL5.7 + Nginx1.10)过程笔记. 工具 VMware版本号 : 12.0.0 CentOS版本 : 7.0 一.修改 ...
- 在ubuntu16.04上安装php7 mysql5.7 nginx1.10并支持http2
安装nginx 首先更新软件包 并且安装nginx sudo apt-get update sudo apt-get install nginx 开放防火墙配置 sudo ufw allow 'Ngi ...
- lnmp环境搭建(centos6.9+mysql5.7+php7.1+nginx1.10)
安装前准备:CentOS 6.9 64位 最小化安装 yum install -y make gcc gcc-c++ perl zlib-devel libaio libpng libpng-deve ...
- CentOS 7.2.1511编译安装Nginx1.10.1+MySQL5.7.14+PHP7.0.11
准备篇 一.防火墙配置 CentOS 7.x默认使用的是firewall作为防火墙,这里改为iptables防火墙. 1.关闭firewall: systemctl stop firewalld.se ...
- CentOS 7.2mini版本下编译安装php7.0.10+MySQL5.7.14+Nginx1.10
一.安装前的准备工作 1.yum update #更新系统 2.yum install gcc gcc-c++ autoconf automake cmake bison m4 libxml2 ...
- CentOS 7.3.1611编译安装Nginx1.10.3+MySQL5.7.16+PHP7.1.2
前传: 1.CentOS 7.3.1611系统安装配置图解教程 http://www.jb51.net/os/RedHat/597874.html 2.CentOS服务器初始化设置 http://ww ...
- CentOS 7.2mini版本下编译安装php7.0.10+MySQL5.7.14+Nginx1.10.1
一.安装前的准备工作 1.yum update #更新系统 1.1)vi /etc/selinux/config # 禁止SELINUX,设置SELINUX=disabled 2.yum in ...
- CentOS 7.2下编译安装PHP7.0.10+MySQL5.7.14+Nginx1.10.1
一.安装前的准备工作 1.yum update #更新系统 2.yum install gcc gcc-c++ autoconf automake cmake bison m4 libxml2 ...
- CentOS 7.2.1511编译安装Nginx1.10.1+MySQL5.7.15+PHP7.0.11
准备篇 一.防火墙配置 CentOS 7.2默认使用的是firewall作为防火墙,这里改为iptables防火墙. 1.关闭firewall: systemctl stop firewalld.se ...
随机推荐
- flask 自定义转换器
from flask import Flask from flask import url_for from flask import redirect from werkzeug.routing i ...
- Mac 内存清理
1.清理前后的对比 清理前: 清理后: 内存多了20G 2.思路 首先,我先看了很多人的经验贴,按照他们的路子查到最后,并没有找到他们指出的大文件. 很显然,Mac的使用方式不同,其内存分配肯定也会不 ...
- vue cli脚手架使用
1.安装nodejs,npm https://www.cnblogs.com/xidianzxm/p/12036880.html 2.安装vue cli sudo npm install -g @vu ...
- 3.1 Go语言基础之指针
区别于C/C++中的指针,Go语言中的指针不能进行偏移和运算,是安全指针. 要搞明白Go语言中的指针需要先知道3个概念:指针地址.指针类型和指针取值. 一.Go语言中的指针 Go语言中的函数传参都是值 ...
- 一个有趣的BUG/按钮disabled之后还能触发click事件
一个很有意思的Bug 某天测试同学再次向我反馈,你这个删除按钮虽然置灰了,但是还是可以点击啊? 我:????(黑人问号) 卧槽?不可能啊,按钮都disabled了,怎么还可以点击?还能触发click事 ...
- kotlin使用中辍标记法调用函数
fun main(arg: Array<String>) { var str = "hello world" print(str div("l")) ...
- 阶段5 3.微服务项目【学成在线】_day03 CMS页面管理开发_10-修改页面-前端-修改页面
1.进入页面,通过钩子方法请求服务端获取页面信息,并赋值给数据模型对象 2.页面信息通过数据绑定在表单显示 3.用户修改信息点击“提交”请求服务端修改页面信息接口 3.3.3 修改页面 3.3.3.1 ...
- REPLACE 语法
转自:https://www.cnblogs.com/jiangzhengjun/p/4292994.html#_Toc411766043 REPLACE REPLACE [{FIRST OCCURR ...
- Python常用模块安装
1. python操作MySQL数据库的依赖包MySQLdb ImportError: No module named MySQLdb 安装方式: yum install MySQL-python 2 ...
- MySQL网页端在线查询工具
现在许多应用都移到云服务器上面了,数据库的远程维护.监控成为一大问题,通过TreeSoft数据库管理系统,可以方便的使用浏览器,通过网页操作的方式管理MySQL,Oracle,DB2,PostgreS ...