【Kotlin】协程
1 前言
相较于 C# 中的协程(详见 → 【Unity3D】协同程序),Kotlin 中协程更灵活,难度更大。
协程是一种并发设计模式,用于简化异步编程,它允许以顺序化的方式表达异步操作,避免回调地狱等问题。使用协程,可以将异步操作的代码像同步代码一样写,而无需显式地管理线程。
在 Kotlin 中,协程由 kotlinx.coroutines 库提供支持。它使用 suspend 修饰符来标记挂起函数(即可暂停执行并稍后恢复执行的函数),这使得编写异步代码更加直观和简单。
协程和线程具有以下异同点。
1)并发模型
- 线程:线程是操作系统提供的执行单位,一个进程可以拥有多个线程,线程之间相对独立,数据共享需要通过特殊手段(如锁)保证安全。
- 协程:协程是一种用户态的轻量级线程,由开发者控制其运行与暂停,可以在同一线程上并发执行,通过挂起和恢复的方式,实现非阻塞的并发。
2)资源消耗
- 线程:每个线程都需要分配一定的内存和系统资源,线程切换时会有一定的开销。
- 协程:协程是用户级的,由协程调度器(Coroutine Dispatcher)调度,通常会复用较少的系统资源,因此更轻量级。
3)编程模型
- 线程:多线程编程通常以共享状态和锁为基础,编写并发代码较为复杂。
- 协程:协程提供了一种结构化并发编程的方式,通过挂起函数的调用实现代码的暂停和恢复,使得异步编程更易于理解和维护。
4)错误处理
- 线程:多线程编程中,错误处理相对困难,需要开发者手动处理异常和线程间的通信。
- 协程:协程提供了更加简单和一致的错误处理方式,通过结构化的异常处理机制,可以轻松处理协程中的异常。
5)性能
- 线程:创建和管理线程可能会带来较大的开销,尤其是在大量线程同时运行时,线程切换的开销也会比较高。
- 协程:协程由于是轻量级的用户级线程,资源消耗较少,因此在大规模并发场景下可能表现更优。
总的来说,协程相比于传统的线程模型,更加灵活、轻量级,并且提供了更加简单和结构化的并发编程方式,使得异步编程更加容易和优雅。
2 协程相关类图

3 协程源码
3.1 协程作用域源码(CoroutinueScope)
协程的作用域定义了协程的作用域范围,当该作用域被销毁时,其中的协程也会被取消。协程的作用阈主要有 CoroutineScope、MainScope、GlobalScope、lifecycleScope 、viewModelScope,主要区别如下。
- CoroutineScope:CoroutineScope 是通用的协程作用域,用于定义协程的作用域范围,当该作用域被销毁时,其中的协程也会被取消。
- MainScope:MainScope 是 Kotlin 中提供的特定于 Android 的协程作用域,用于在 Android 主线程上启动协程,通常在 Android 的 Activity 或 Fragment 中使用 MainScope,以确保在主线程上运行协程,并在相关生命周期结束时取消协程。
- GlobalScope:GlobalScope 是 Kotlin 中提供的一个全局协程作用域,它是一个顶层对象,用户可以在任何地方使用 GlobalScope 启动协程,但不推荐在 Android 中使用它,因为它的生命周期很长,并且不受管理,可能导致内存泄漏等问题。
- lifecycleScope:lifecycleScope 是 Android Jetpack 中的 Lifecycle 模块提供的一个扩展属性,它的生命周期与相关的组件(如 Activity 或 Fragment)的生命周期绑定,从而避免内存泄漏等问题。
- viewModelScope:viewModelScope 是 Android Jetpack 中 Lifecycle 模块提供的一个扩展属性,它的生命周期与 ViewModel 的生命周期绑定,从而避免内存泄漏等问题。
3.1.1 CoroutineScope
public fun CoroutineScope(context: CoroutineContext): CoroutineScope =

    ContextScope(if (context[Job] != null) context else context + Job())
说明:CoroutineScope 是通用的协程作用域,用于定义协程的作用域范围,当该作用域被销毁时,其中的协程也会被取消。
3.1.2 MainScope
public fun MainScope(): CoroutineScope = ContextScope(SupervisorJob() + Dispatchers.Main)
说明:MainScope 是 Kotlin 中提供的特定于 Android 的协程作用域,用于在 Android 主线程上启动协程,通常在 Android 的 Activity 或 Fragment 中使用 MainScope,以确保在主线程上运行协程,并在相关生命周期结束时取消协程。
3.1.3 GlobalScope
public object GlobalScope : CoroutineScope
说明:GlobalScope 是 Kotlin 中提供的一个全局协程作用域,它是一个顶层对象,用户可以在任何地方使用 GlobalScope 启动协程,但不推荐在 Android 中使用它,因为它的生命周期很长,并且不受管理,可能导致内存泄漏等问题。GlobalScope 是一个单例,其作用域的生命周期跟随应用程序的生命周期,中间不能取消(cancel)。
3.1.4 lifecycleScope
public val LifecycleOwner.lifecycleScope: LifecycleCoroutineScope

    get() = lifecycle.coroutineScope

// -----------------------------------------------------------

public val Lifecycle.coroutineScope: LifecycleCoroutineScope

    get() {

        while (true) {

            val existing = mInternalScopeRef.get() as LifecycleCoroutineScopeImpl?

            if (existing != null) {

                return existing

            }

            val newScope = LifecycleCoroutineScopeImpl(this,

                SupervisorJob() + Dispatchers.Main.immediate

            )

            if (mInternalScopeRef.compareAndSet(null, newScope)) {

                newScope.register()

                return newScope

            }

        }

    }

// -----------------------------------------------------------

internal class LifecycleCoroutineScopeImpl(

    override val lifecycle: Lifecycle,

    override val coroutineContext: CoroutineContext

) : LifecycleCoroutineScope(), LifecycleEventObserver

// -----------------------------------------------------------

public abstract class LifecycleCoroutineScope internal constructor() : CoroutineScope
说明:lifecycleScope 是 Android Jetpack 中的 Lifecycle 模块提供的一个扩展属性,它的生命周期与相关的组件(如 Activity 或 Fragment)的生命周期绑定,从而避免内存泄漏等问题。
使用 lifecycleScope 时,需要在 build.gradle 中引入以下依赖。
implementation "androidx.lifecycle:lifecycle-runtime-ktx:2.5.1"
并导入包名。
import androidx.lifecycle.lifecycleScope
AppCompatActivity、FragmentActivity 与 LifecycleOwner 存在以下继承关系。因此可以在 AppCompatActivity 和 FragmentActivity 中直接访问 lifecycleScope。
AppCompatActivity → FragmentActivity → ComponentActivity → LifecycleOwner
3.1.5 viewModelScope
public val ViewModel.viewModelScope: CoroutineScope

    get() {

        val scope: CoroutineScope? = this.getTag(JOB_KEY)

        if (scope != null) {

            return scope

        }

        return setTagIfAbsent(JOB_KEY,

            CloseableCoroutineScope(SupervisorJob() + Dispatchers.Main.immediate)

        )

    }

// --------------------------------------------------------------------------

internal class CloseableCoroutineScope(context: CoroutineContext) : Closeable, CoroutineScope {

    override val coroutineContext: CoroutineContext = context

    override fun close() {

        coroutineContext.cancel()

    }

}
说明:viewModelScope 是 Android Jetpack 中 Lifecycle 模块提供的一个扩展属性,它的生命周期与 ViewModel 的生命周期绑定,从而避免内存泄漏等问题。
使用 viewModelScope 时,需要在 build.gradle 中引入以下依赖。
implementation 'androidx.lifecycle:lifecycle-viewmodel-ktx:2.5.1'
并导入包名。
import androidx.lifecycle.viewModelScope
3.2 协程调度器源码(Dispatchers)
public actual object Dispatchers {

    // 线程池, 适合执行CPU密集型任务(大量占用量CPU的任务)

    public actual val Default: CoroutineDispatcher = DefaultScheduler

    // Android中是UI线程, Swing中是invokerLater线程

    public actual val Main: MainCoroutineDispatcher get() = MainDispatcherLoader.dispatcher

    // 在当前线程上执行

    public actual val Unconfined: CoroutineDispatcher = kotlinx.coroutines.Unconfined

    // 线程池, 适合执行磁盘读写、网络IO、数据库操作等任务

    public val IO: CoroutineDispatcher = DefaultIoScheduler

    // ...

}
3.3 协程启动方式源码
协程的启动方式主要有 launch、async、runBlocking、withContext,它们的区别如下。
- launch:launch 用于启动一个新的协程,并返回一个 Job 对象,该对象代表了这个新协程;启动的协程在后台运行,不会阻塞当前线程的执行,并且不会返回协程的执行结果。
- async:async 用于启动一个新的协程,并返回一个 Deferred 对象,它是 Job 的子类,可以通过 await 函数获取协程的执行结果;启动的协程在后台运行,不会阻塞当前线程的执行。
- runBlocking:runBlocking 是一个顶层函数,用于启动一个新的协程并阻塞当前线程,直到协程执行完成; runBlocking 本质上是为了在顶层(如 main 函数)使用协程,以及在测试中使用协程;在生产代码中不推荐使用 runBlocking,因为它会阻塞当前线程,可能导致性能问题。
- withContext:withContext 用于切换协程的上下文,它会创建一个新的协程并在指定的上下文中执行,它会挂起原来的协程,待新协程执行结束后才恢复执行。
3.3.1 launch
public fun CoroutineScope.launch(

    context: CoroutineContext = EmptyCoroutineContext,

    start: CoroutineStart = CoroutineStart.DEFAULT,

    block: suspend CoroutineScope.() -> Unit

): Job {

    val newContext = newCoroutineContext(context)

    val coroutine = if (start.isLazy)

        LazyStandaloneCoroutine(newContext, block) else

        StandaloneCoroutine(newContext, active = true)

    coroutine.start(start, coroutine, block)

    return coroutine

}
说明:launch 用于启动一个新的协程,并返回一个 Job 对象,该对象代表了这个新协程;启动的协程在后台运行,不会阻塞当前线程的执行,并且不会返回协程的执行结果。
3.3.2 async
public fun <T> CoroutineScope.async(

    context: CoroutineContext = EmptyCoroutineContext,

    start: CoroutineStart = CoroutineStart.DEFAULT,

    block: suspend CoroutineScope.() -> T

): Deferred<T> {

    val newContext = newCoroutineContext(context)

    val coroutine = if (start.isLazy)

        LazyDeferredCoroutine(newContext, block) else

        DeferredCoroutine<T>(newContext, active = true)

    coroutine.start(start, coroutine, block)

    return coroutine

}
说明:async 用于启动一个新的协程,并返回一个 Deferred 对象,它是 Job 的子类,可以通过 await 函数获取协程的执行结果;启动的协程在后台运行,不会阻塞当前线程的执行。
3.3.3 runBlocking
runBlocking 官方介绍见 → runBlocking。
public actual fun <T> runBlocking(context: CoroutineContext, block: suspend CoroutineScope.() -> T): T {

    ...

    val currentThread = Thread.currentThread()

    val contextInterceptor = context[ContinuationInterceptor]

    val eventLoop: EventLoop?

    val newContext: CoroutineContext

    if (contextInterceptor == null) {

        // 如果没有指定调度器(dispatcher), 则创建或使用私有事件循环(eventLoop)

        eventLoop = ThreadLocalEventLoop.eventLoop

        newContext = GlobalScope.newCoroutineContext(context + eventLoop)

    } else {

        eventLoop = (contextInterceptor as? EventLoop)?.takeIf { it.shouldBeProcessedFromContext() }

            ?: ThreadLocalEventLoop.currentOrNull()

        newContext = GlobalScope.newCoroutineContext(context)

    }

    val coroutine = BlockingCoroutine<T>(newContext, currentThread, eventLoop)

    coroutine.start(CoroutineStart.DEFAULT, coroutine, block)

    return coroutine.joinBlocking()

}
说明:runBlocking 是一个顶层函数,用于启动一个新的协程并阻塞当前线程,直到协程执行完成; runBlocking 本质上是为了在顶层(如 main 函数)使用协程,以及在测试中使用协程;在生产代码中不推荐使用 runBlocking,因为它会阻塞当前线程,可能导致性能问题。
3.3.4 withContext
public suspend fun <T> withContext(

    context: CoroutineContext,

    block: suspend CoroutineScope.() -> T

): T {

    // ...

    return suspendCoroutineUninterceptedOrReturn sc@ { uCont ->

        val oldContext = uCont.context

        val newContext = oldContext.newCoroutineContext(context)

        newContext.ensureActive()

        if (newContext === oldContext) {

            val coroutine = ScopeCoroutine(newContext, uCont)

            return@sc coroutine.startUndispatchedOrReturn(coroutine, block)

        }

        if (newContext[ContinuationInterceptor] == oldContext[ContinuationInterceptor]) {

            val coroutine = UndispatchedCoroutine(newContext, uCont)

            withCoroutineContext(newContext, null) {

                return@sc coroutine.startUndispatchedOrReturn(coroutine, block)

            }

        }

        val coroutine = DispatchedCoroutine(newContext, uCont)

        block.startCoroutineCancellable(coroutine, coroutine)

        coroutine.getResult()

    }

}
说明:withContext 用于切换协程的上下文,它会创建一个新的协程并在指定的上下文中执行,它会挂起原来的协程,待新协程执行结束后才恢复执行。
3.4 协程启动模式源码(CoroutineStart)
public enum class CoroutineStart {

	// 立即执行协程体

    DEFAULT,

    // 只有在需要的情况下运行, 需要调用job.start()函数才启动协程

    LAZY,

    // 立即执行协程体, 但在开始运行前无法取消

    ATOMIC,

    // 立即在当前线程执行协程体, 直到第一个suspend函数调用(启动较快)

    UNDISPATCHED;

    // ...

}
4 协程应用
4.1 协程作用域应用
4.1.1 CoroutineScope
fun main() {

    println("main-start")

    CoroutineScope(Dispatchers.Default).launch {

        for (i in 1..2) {

            println("CoroutineScope-A-$i")

            delay(100)

        }

    }

    CoroutineScope(Dispatchers.IO).launch {

        for (i in 1..2) {

            println("CoroutineScope-B-$i")

            delay(100)

        }

    }

    println("main-end")

    Thread.sleep(1000) // 阻塞当前线程, 避免程序过早结束, 协程提前取消

}
打印如下。
main-start

main-end

CoroutineScope-A-1

CoroutineScope-B-1

CoroutineScope-A-2

CoroutineScope-B-2
说明:结果表明 main、CoroutineScope-A、CoroutineScope-B 并行。
4.1.2 MainScope
fun main() {

    println("main-start")

    MainScope().launch(Dispatchers.Default) {

        test("MainScope-A")

    }

    MainScope().launch(Dispatchers.IO) {

        test("MainScope-B")

    }

    println("main-end")

    Thread.sleep(1000) // 阻塞当前线程, 避免程序过早结束, 协程提前取消

}

suspend fun test(tag: String) {

    for (i in 1..2) {

        println("$tag-$i")

        delay(100)

    }

}
打印如下。
main-start

main-end

MainScope-B-1

MainScope-A-1

MainScope-A-2

MainScope-B-2
说明:结果表明 main、MainScope-A、MainScope-B 并行。
4.1.3 GlobalScope
fun main() {

    println("main-start")

    GlobalScope.launch(Dispatchers.Default, CoroutineStart.DEFAULT) {

        test("GlobalScope-A")

        test("GlobalScope-B")

    }

    println("main-end")

    Thread.sleep(1000) // 阻塞当前线程, 避免程序过早结束, 协程提前取消

}

suspend fun test(tag: String) {

    for (i in 1..2) {

        println("$tag-$i")

        delay(100)

    }

}
打印如下。
main-start

main-end

GlobalScope-A-1

GlobalScope-A-2

GlobalScope-B-1

GlobalScope-B-2
说明:结果表明 main 与 GlobalScope 并行。
4.1.4 lifecycleScope
import android.os.Bundle

import androidx.appcompat.app.AppCompatActivity

import androidx.lifecycle.lifecycleScope

import kotlinx.coroutines.launch

class MyActivity: AppCompatActivity() {

    override fun onCreate(savedInstanceState: Bundle?) {

        super.onCreate(savedInstanceState)

        setContentView(R.layout.activity_main)

        lifecycleScope.launch {

            println("lifecycleScope")

        }

    }

}
说明:使用 lifecycleScope 时,需要在 build.gradle 中引入以下依赖。
implementation "androidx.lifecycle:lifecycle-runtime-ktx:2.5.1"
4.1.5 viewModelScope
import androidx.lifecycle.ViewModel

import androidx.lifecycle.viewModelScope

import kotlinx.coroutines.launch

class MyViewModel: ViewModel() {

    init {

        viewModelScope.launch {

            println("viewModelScope")

        }

    }

}
说明:使用 viewModelScope 时,需要在 build.gradle 中引入以下依赖。
implementation 'androidx.lifecycle:lifecycle-viewmodel-ktx:2.5.1'
4.1.6 子协程
fun main() {

    println("main-start")

    CoroutineScope(Dispatchers.Default).launch {

        test("CoroutineScope-A")

        launch(Dispatchers.Default) { // 也可以通过async启动子协程

            test("CoroutineScope-B")

        }

        launch(Dispatchers.Default) { // 也可以通过async启动子协程

            test("CoroutineScope-C")

        }

    }

    println("main-end")

    Thread.sleep(1000) // 阻塞当前线程, 避免程序过早结束, 协程提前取消

}

suspend fun test(tag: String) {

    for (i in 1..2) {

        println("$tag-$i")

        delay(100)

    }

}
打印如下。
main-start

main-end

CoroutineScope-A-1

CoroutineScope-A-2

CoroutineScope-B-1

CoroutineScope-C-1

CoroutineScope-B-2

CoroutineScope-C-2
说明:结果表明 main 与 CoroutineScope-A 并行,CoroutineScope-A 运行结束后,又启动了 GlobalScope-B、CoroutineScope-C 两个子协程,它们又并行。
4.2 协程启动方式应用
4.2.1 launch
fun main() {

    println("main-start")

    MainScope().launch(Dispatchers.Default, CoroutineStart.DEFAULT) {

        test("MainScope")

    }

    println("main-end")

    Thread.sleep(1000) // 阻塞当前线程, 避免程序过早结束, 协程提前取消

}

suspend fun test(tag: String) {

    for (i in 1..2) {

        println("$tag-$i")

        delay(100)

    }

}
打印如下。
main-start

main-end

MainScope-1

MainScope-2
4.2.2 async
fun main() {

    println("main-start")

    MainScope().launch(Dispatchers.Default) {

        var deferred = async { // 启动子协程

            test("MainScope")

            "async return value"

        }

        println("MainScope-xxx")

        var res = deferred.await() // 获取子协程的返回值, 此处会挂起当前协程, 直到子协程执行完成

        println(res)

    }

    println("main-end")

    Thread.sleep(1000) // 阻塞当前线程, 避免程序过早结束, 协程提前取消

}

suspend fun test(tag: String) {

    for (i in 1..2) {

        println("$tag-$i")

        delay(100)

    }

}
打印如下。
main-start

main-end

MainScope-xxx

MainScope-1

MainScope-2

async return value
说明:结果表明 deferred.await() 会挂起当前协程(MainScope),直到子协程(async)执行完成。
4.2.3 runBlocking
fun main() {

    println("main-start")

    runBlocking {

        var deferred = async { // 启动子协程

            test("runBlocking")

            "async return value"

        }

        launch { // 启动子协程

            var res = deferred.await() // 获取子协程的返回值, 此处会挂起当前协程, 直到子协程执行完成

            println(res)

        }

        println("runBlocking-xxx")

    }

    println("main-end")

    Thread.sleep(1000) // 阻塞当前线程, 避免程序过早结束, 协程提前取消

}

suspend fun test(tag: String) {

    for (i in 1..2) {

        println("$tag-$i")

        delay(100)

    }

}
打印如下。
main-start

runBlocking-xxx

runBlocking-1

runBlocking-2

async return value

main-end
说明:结果表明 runBlocking 启动了一个新的协程(runBlocking),并阻塞了当前线程(main),直到协程执行完成;deferred.await() 会挂起当前子协程(async),直到子协程(launch)执行完成。
4.2.4 withContext
1)不使用 withContext 返回值
@OptIn(ExperimentalStdlibApi::class)

fun main() {

    println("main-start")

    runBlocking(Dispatchers.IO) {

        println("context1=${coroutineContext[CoroutineDispatcher]}")

        withContext(Dispatchers.Default) { // 启动子协程, 并挂起当前协程

            println("context2=${coroutineContext[CoroutineDispatcher]}")

            test("withContext")

        }

        println("runBlocking-xxx")

    }

    println("main-end")

    Thread.sleep(1000) // 阻塞当前线程, 避免程序过早结束, 协程提前取消

}

suspend fun test(tag: String) {

    for (i in 1..2) {

        println("$tag-$i")

        delay(100)

    }

}
打印如下。
main-start

context1=Dispatchers.IO

context2=Dispatchers.Default

withContext-1

withContext-2

runBlocking-xxx

main-end
说明:结果表明 withContext 创建了子协程,并挂起了 runBlocking 协程,直到 withContext 协程执行完毕才恢复执行。
2)使用 withContext 返回值
@OptIn(ExperimentalStdlibApi::class)

fun main() {

    println("main-start")

    runBlocking(Dispatchers.IO) {

        println("context1=${coroutineContext[CoroutineDispatcher]}")

        var res = withContext(Dispatchers.Default) { // 启动子协程, 并挂起当前协程

            println("context2=${coroutineContext[CoroutineDispatcher]}")

            "withContext return value"

        }

        println("res=$res")

    }

    println("main-end")

    Thread.sleep(1000) // 阻塞当前线程, 避免程序过早结束, 协程提前取消

}
打印如下。
main-start

context1=Dispatchers.IO

context2=Dispatchers.Default

res=withContext return value

main-end
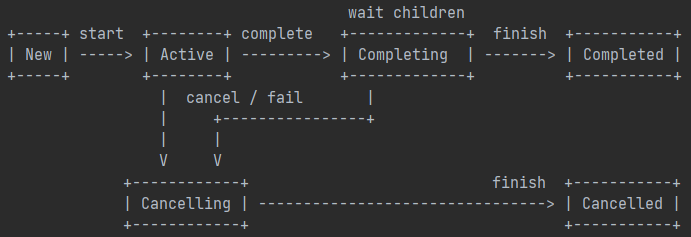
4.3 Job 应用
Job 状态流程转换如下。(图片来自 Job.kt 源码)
4.3.1 start
fun main() {

    println("main-start")

    var job = MainScope().launch(Dispatchers.Default, CoroutineStart.LAZY) {

        test("MainScope")

    }

    job.start() // 注释该行, job不会执行, test中日志将不会打印

    println("main-end")

    Thread.sleep(1000) // 阻塞当前线程, 避免程序过早结束, 协程提前取消

}

suspend fun test(tag: String) {

    for (i in 1..2) {

        println("$tag-$i")

        delay(100)

    }

}
打印如下。
main-start

main-end

MainScope-1

MainScope-2
说明:注释掉 job.start(),job 不会执行,test 中日志将不会打印。
4.3.2 cancel
fun main() {

    println("main-start")

    var job = CoroutineScope(Dispatchers.Default).launch {

        test("CoroutineScope")

    }

    job.cancel()

    println("main-end")

    Thread.sleep(1000) // 阻塞当前线程, 避免程序过早结束, 协程提前取消

}

suspend fun test(tag: String) {

    for (i in 1..2) {

        println("$tag-$i")

        delay(100)

    }

}
打印如下。
main-start

main-end

CoroutineScope-1
说明:CoroutineScope-2 未打印出来,因为协程执行到一半被取消了。
4.3.3 join
fun main() {

    println("main-start")

    var job = CoroutineScope(Dispatchers.Default).launch {

        test("CoroutineScope")

    }

    MainScope().launch(Dispatchers.Default) {

        println("MainScope-xxx")

        job.join() // 挂起当前协程, 直到job执行完成

        test("MainScope")

    }

    println("main-end")

    Thread.sleep(1000) // 阻塞当前线程, 避免程序过早结束, 协程提前取消

}

suspend fun test(tag: String) {

    for (i in 1..2) {

        println("$tag-$i")

        delay(100)

    }

}
打印如下。
main-start

main-end

MainScope-xxx

CoroutineScope-1

CoroutineScope-2

MainScope-1

MainScope-2
说明:结果表明 job.join() 挂起了 MainScope 协程,直到 CoroutineScope 协程执行完毕才恢复执行。
4.4 异常处理应用
4.4.1 try-catch 处理异常
fun main() {

    println("main-start")

    CoroutineScope(Dispatchers.IO).launch {

        try {

            var a = 1 / 0

        } catch (e: Exception) {

            println(e)

        }

    }

    println("main-end")

    Thread.sleep(1000) // 阻塞当前线程, 避免程序过早结束, 协程提前取消

}
打印如下。
main-start

main-end

java.lang.ArithmeticException: / by zero
4.4.2 CoroutineExceptionHandler 处理异常
@OptIn(ExperimentalStdlibApi::class)

fun main() {

    println("main-start")

    var exceptionHandler = CoroutineExceptionHandler { context, throwable ->

        println("context=${context[CoroutineDispatcher]}, message=${throwable}")

    }

    CoroutineScope(Dispatchers.IO + exceptionHandler).launch {

        var a = 1 / 0

    }

    println("main-end")

    Thread.sleep(1000) // 阻塞当前线程, 避免程序过早结束, 协程提前取消

}
打印如下。
main-start

main-end

context=Dispatchers.IO, message=java.lang.ArithmeticException: / by zero
5 协程并发安全
5.1 不安全的并发访问
fun main() {

    var count = 0

    CoroutineScope(Dispatchers.Default).launch {

        var jobList = List(1000) { // 创建1000个子协程

            CoroutineScope(Dispatchers.Default).launch {

                count++

            }

        }

        jobList.joinAll() // 挂起当前协程, 直到所有子协程执行完成

        println(count) // 期望打印1000, 但每次运行结果不一样, 如:990、981、995等

    }

    Thread.sleep(1000) // 阻塞当前线程, 避免程序过早结束, 协程提前取消

}
5.2 安全的并发访问
安全的并发访问工具主要有 Atomic、Mutex、Semaphore、Channel。
- Atomic:原子操作,主要接口:getAndIncrement、getAndDecrement、getAndAdd、getAndAccumulate、incrementAndGet、decrementAndGet、addAndGet、accumulateAndGet 等。
- Mutex:轻量级锁,主要接口:withLock 等。
- Semaphore:轻量级信号量,主要接口:withPermit 等。
- Channel:并发安全的消息通道,主要接口:send、receive。
5.2.1 Atomic
使用 Java 提供的原子操作类型数据,如:AtomicBoolean、AtomicInteger、AtomicLong、AtomicIntegerArray、AtomicLongArray、AtomicReference、AtomicReferenceArray,可以解决一些并发安全访问的问题。
fun main() {

    var count = AtomicInteger()

    CoroutineScope(Dispatchers.Default).launch {

        var jobList = List(1000) { // 创建1000个子协程

            CoroutineScope(Dispatchers.Default).launch {

                count.getAndIncrement()

            }

        }

        jobList.joinAll() // 挂起当前协程, 直到所有子协程执行完成

        println(count.get()) // 打印: 1000

    }

    Thread.sleep(1000) // 阻塞当前线程, 避免程序过早结束, 协程提前取消

}
5.2.2 Mutex
Mutex 是轻量级锁,它的 lock 和 unlock 从语义上与线程锁比较类似,之所以轻量是因为它在获取不到锁时不会阻塞线程,而是挂起等待锁的释放。
fun main() {

    var count = 0

    var mutex = Mutex()

    CoroutineScope(Dispatchers.Default).launch {

        var jobList = List(1000) { // 创建1000个子协程

            CoroutineScope(Dispatchers.Default).launch {

                mutex.withLock {

                    count++

                }

            }

        }

        jobList.joinAll() // 挂起当前协程, 直到所有子协程执行完成

        println(count) // 打印: 1000

    }

    Thread.sleep(1000) // 阻塞当前线程, 避免程序过早结束, 协程提前取消

}
5.2.3 Semaphore
Semaphore 是轻量级信号量,信号可以有多个,协程在获取到信号后即可执行并发操作。
fun main() {

    var count = 0

    var semaphore = Semaphore(1) // 创建一个信号量, 里面只有一个信号

    CoroutineScope(Dispatchers.Default).launch {

        var jobList = List(1000) { // 创建1000个子协程

            CoroutineScope(Dispatchers.Default).launch {

                semaphore.withPermit {

                    count++

                }

            }

        }

        jobList.joinAll() // 挂起当前协程, 直到所有子协程执行完成

        println(count) // 打印: 1000

    }

    Thread.sleep(1000) // 阻塞当前线程, 避免程序过早结束, 协程提前取消

}
说明:Semaphore 的入参表示信号个数,当 Semaphore 的参数为 1 时, 效果等价与 Mutex。
6 加载网络图片案例
build.gradle 中需要引入以下依赖。
dependencies {

    implementation 'com.github.bumptech.glide:glide:4.12.0'

    implementation "androidx.lifecycle:lifecycle-runtime-ktx:2.5.1"

    ...

}
AndroidManifest.xml 中需要配置以下权限。
<uses-permission android:name="android.permission.INTERNET" />
MainActivity.kt
package com.zhyan8.kotlinStudy

import android.os.Bundle

import android.view.View

import android.widget.Button

import android.widget.ImageView

import androidx.appcompat.app.AppCompatActivity

import androidx.lifecycle.lifecycleScope

import com.bumptech.glide.Glide

import kotlinx.coroutines.Dispatchers

import kotlinx.coroutines.launch

import kotlinx.coroutines.withContext

class MainActivity: AppCompatActivity() {

    private lateinit var imageView: ImageView

    private lateinit var button: Button

    override fun onCreate(savedInstanceState: Bundle?) {

        super.onCreate(savedInstanceState)

        setContentView(R.layout.activity_main)

        imageView = findViewById(R.id.imageView)

        button = findViewById(R.id.btn_back)

        button.setOnClickListener{

            lifecycleScope.launch(Dispatchers.IO) {

                loadImageFromUrl("https://images.cnblogs.com/cnblogs_com/blogs/787006/galleries/2393602/o_240421081243_g0001.jpg")

            }

        }

    }

    private suspend fun loadImageFromUrl(url: String) {

        val bitmap = Glide.with(this@MainActivity)

            .asBitmap()

            .load(url)

            .submit()

            .get()

        withContext(Dispatchers.Main) {

            imageView.visibility = View.VISIBLE

            button.visibility = View.GONE

            imageView.setImageBitmap(bitmap)

        }

    }

}
activity_main.xml
<?xml version="1.0" encoding="utf-8"?>

<LinearLayout xmlns:android="http://schemas.android.com/apk/res/android"

    xmlns:tools="http://schemas.android.com/tools"

    android:layout_width="match_parent"

    android:layout_height="match_parent"

    tools:context=".MainActivity"

    android:orientation="vertical"

    android:gravity="center">

   <ImageView

       android:id="@+id/imageView"

       android:layout_height="match_parent"

       android:layout_width="match_parent"

       android:scaleType="centerCrop"

       android:visibility="gone" />

   <Button

       android:id="@+id/btn_back"

       android:layout_width="250dp"

       android:layout_height="wrap_content"

       android:text="加载图片"

       android:textSize="40sp"/>

</LinearLayout>
运行效果如下。

声明:本文转自【Kotlin】协程。
【Kotlin】协程的更多相关文章
- Kotlin协程第一个示例剖析及Kotlin线程使用技巧
Kotlin协程第一个示例剖析: 上一次https://www.cnblogs.com/webor2006/p/11712521.html已经对Kotlin中的协程有了理论化的了解了,这次则用代码来直 ...
- Retrofit使用Kotlin协程发送请求
Retrofit2.6开始增加了对Kotlin协程的支持,可以通过suspend函数进行异步调用.本文简单介绍一下Retrofit中协程的使用 导入依赖 app的build文件中加入: impleme ...
- Kotlin协程基础
开发环境 IntelliJ IDEA 2021.2.2 (Community Edition) Kotlin: 212-1.5.10-release-IJ5284.40 我们已经通过第一个例子学会了启 ...
- Android Kotlin协程入门
Android官方推荐使用协程来处理异步问题.以下是协程的特点: 轻量:单个线程上可运行多个协程.协程支持挂起,不会使正在运行协程的线程阻塞.挂起比阻塞节省内存,且支持多个并行操作. 内存泄漏更少:使 ...
- Kotlin 协程一 —— 全面了解 Kotlin 协程
一.协程的一些前置知识 1.1 进程和线程 1.1.1基本定义 1.1.2为什么要有线程 1.1.3 进程与线程的区别 1.2 协作式与抢占式 1.2.1 协作式 1.2.2 抢占式 1.3 协程 二 ...
- rxjava回调地狱-kotlin协程来帮忙
本文探讨的是在tomcat服务端接口编程中, 异步servlet场景下( 参考我另外一个文章),用rxjava来改造接口为全流程异步方式 好处不用说 tomcat的worker线程利用率大幅提高,接口 ...
- Kotlin协程解析系列(上):协程调度与挂起
vivo 互联网客户端团队- Ruan Wen 本文是Kotlin协程解析系列文章的开篇,主要介绍Kotlin协程的创建.协程调度与协程挂起相关的内容 一.协程引入 Kotlin 中引入 Corout ...
- Kotlin协程通信机制: Channel
Coroutines Channels Java中的多线程通信, 总会涉及到共享状态(shared mutable state)的读写, 有同步, 死锁等问题要处理. 协程中的Channel用于协程间 ...
- Kotlin协程作用域与Job详解
Job详解: 在上一次https://www.cnblogs.com/webor2006/p/11725866.html中抛出了一个问题: 所以咱们将delay去掉,需要改造一下,先把主线程的dela ...
- Kotlin协程作用域与构建器详解
在上次我们是通过了这种方式来创建了一个协程: 接着再来看另一种创建协程的方式: 下面用它来实现上一次程序一样的效果,先来回顾一下上一次程序的代码: 好,下面改用runBlocking的方式: 运行一下 ...
随机推荐
- ASP.NET Core – Data Protection & Azure Storage + Azure Key Vault
前言 以前就写过很多篇了 Asp.net core 学习笔记 ( Data protection ) Asp.net core 学习笔记 Secret 和 Data Protect Azure key ...
- 月薪20k以上的软件测试工程师的必备知识点?全部拿走吧!
我们都知道作为一个软件测试工程师,入门相对比较简单,但是要达到技术精通,甚至薪资能达到20k以上的话,那绝对需要对测试开发有一个系统的了解,以及对这些系统的知识能够熟练掌握. 今天的话是我从阿里以为做 ...
- C++ 模板(函数模板与类模板)
模板 模板介绍 C++提供了函数模板(function template).所谓函数模板.实际上是建立一个通用函数,其函数类型和形参类型不具体制定,用一个虚拟的类型来代表.这个通用函数就称为函数模板. ...
- [TK] 矩阵取数游戏<简单版> hzoi-tg-906-2
本题是一个坐标DP问题 状态转移 首先我们注意到,一个状态只能由两种前置状态得到:取左边的数和取右边的数,因此我们以状态为阶段定义如下: \(f[a][b][c]\) 为状态转移数组,其中 \(a\) ...
- SpringCloud入门(四)Ribbon负载均衡
一.Ribbon负载均衡原理SpringCloud底层其实是利用了一个名为Ribbon的组件,来实现负载均衡功能的. SpringCloudRibbon的底层采用了一个拦截器,拦截了RestTempl ...
- 2020年度国产数据库:openGauss
根据墨天轮2020年一年的数据库流行度得分趋势变化,我们选出了流行热度增长显著的数据库为2020年度国产数据库.恭喜 华为开源关系型数据库 openGauss 荣获 "2020年度国产数据库 ...
- MySQL数据的导出
有时需要将MySQL数据库中的数据导出到外部存储文件中,MySQL数据库中的数据可以导出成sql文本文件.xml文件或者html文件.本节将介绍数据导出的常用方法. 11.4.1 使用SELECT- ...
- Qunar 云原生容器化落地实践
作者|邹晟 去哪儿网基础平台技术专家 背景 近几年,云原生和容器技术非常火爆,且日趋成熟,众多企业慢慢开始容器化建设,并在云原生技术方向上不断的探索和实践.基于这个大的趋势, 2020 年底 Quna ...
- 在 KubeSphere 中部署高可用 Redis 集群
作者:余生大大,大数据开发工程师,云原生爱好者,KubeSphere 社区用户. 前言 Redis 是在开发过程中经常用到的缓存中间件,在生产环境中为了考虑稳定性和高可用一般为集群模式的部署. 常规部 ...
- Windows 11安装跳过联网
方案1 在选择WIFI联网的界面,不要连接网络. Shift + F10(或者Fn+Shift+F10),打开cmd窗口,输入命令:oobe\BypassNRO.cmd 重启后会有一个我没有互联网的选 ...