
使用 electron 实现类似新版 QQ 的登录界面效果(阴影、背景动画、窗体3D翻转)
上文《使用 VS2017 和 js 进行桌面程序开发 - electron 之 Hello Word》介绍了如何使用 VS2017 开发 electron 桌面程序,今天来点有看头的,但是没什么技术含量,囧~~
现在什么都讲究追赶潮流,觉得 QQ 登录窗口做的效果不错,既然刚学习 electron ,那么就用 electron 模仿一下。其实主要用到的就是 CSS3 的效果:边框圆角、阴影,3D变换。对,就这么简单。先上效果:
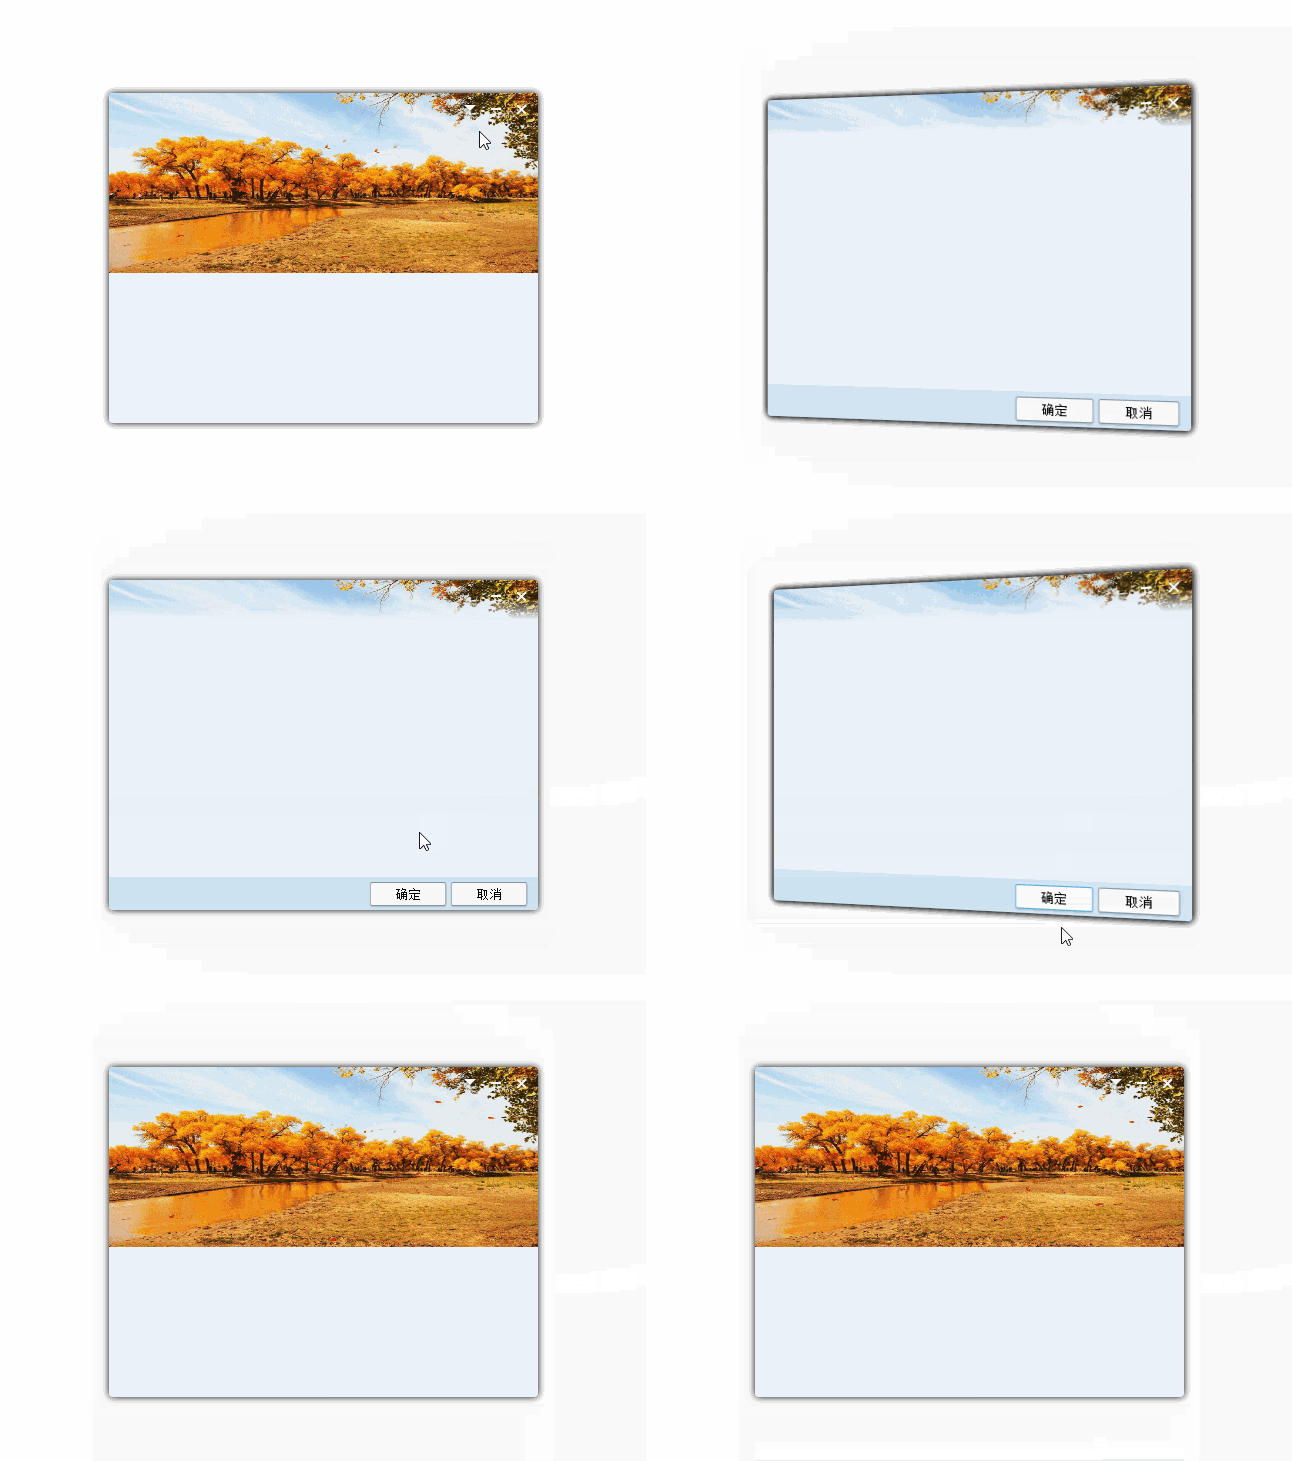
下面是关键代码:
app.js
'use strict';

const { app, BrowserWindow } = require('electron')

const path = require('path')

const url = require('url')

// Keep a global reference of the window object, if you don't, the window will

// be closed automatically when the JavaScript object is garbage collected.

let win

function createWindow() {

    // Create the browser window.

    win = new BrowserWindow({

        width: 495, height: 470, /*skipTaskbar: true,*/ frame: false,

        resizable: false, transparent: true, show: false, alwaysOnTop: true

    })

    win.once('ready-to-show', () => {

        win.show()

    })

    // and load the index.html of the app.

    win.loadURL(url.format({

        pathname: path.join(__dirname, '/app/index.html'),

        protocol: 'file:',

        slashes: true

    }))

    // Open the DevTools.

    //win.webContents.openDevTools()

    // Emitted when the window is closed.

    win.on('closed', () => {

        // Dereference the window object, usually you would store windows

        // in an array if your app supports multi windows, this is the time

        // when you should delete the corresponding element.

        win = null

    })

}

//app.disableHardwareAcceleration();

// This method will be called when Electron has finished

// initialization and is ready to create browser windows.

// Some APIs can only be used after this event occurs.

app.on('ready', createWindow)

// Quit when all windows are closed.

app.on('window-all-closed', () => {

    // On macOS it is common for applications and their menu bar

    // to stay active until the user quits explicitly with Cmd + Q

    if (process.platform !== 'darwin') {

        app.quit()

    }

})

app.on('activate', () => {

    // On macOS it's common to re-create a window in the app when the

    // dock icon is clicked and there are no other windows open.

    if (win === null) {

        createWindow()

    }

})

// In this file you can include the rest of your app's specific main process

// code. You can also put them in separate files and require them here.
index.html
<!DOCTYPE html>

<html style="margin:0; padding:0;height:100%;">

<head>

    <meta charset="UTF-8">

    <title>QQ Login</title>

    <style>

        html, body {

            margin: 0;

            padding: 0;

            width: 100%;

            height: 100%;

        }

        body {

            perspective: 800px;

            -webkit-app-region: drag;

            -webkit-user-select: none;

        }

        input[type="submit"],

        input[type="reset"],

        input[type="button"],

        input[type="text"],

        button,

        textarea {

            -webkit-app-region: no-drag;

        }

        .shadow {

            box-shadow: 0 0 10px rgba(0, 0, 0, 1);

            position: absolute;

            width: 100%;

            height: 100%;

            border-radius: 4px;

        }

        #login-back {

            position: relative;

            border-radius: 3px 3px 0 0;

            left: 0;

            right: 0;

            height: 180px;

        }

        #card {

            left: 33px;

            top: 70px;

            right: 33px;

            bottom: 70px;

            background-color: #ebf2f9;

            position: absolute;

            -webkit-transition: -webkit-transform .6s ease-in-out;

            transition: transform .6s ease-in-out;

            -webkit-transform-style: preserve-3d;

            transform-style: preserve-3d;

            border-radius: 4px;

        }

            #card.flipped {

                -webkit-transform: rotateY( 180deg );

                transform: rotateY( 180deg );

            }

            #card .front {

                background: url(imgs/login-back.gif) no-repeat;

                background-size: 100% 180px;

                position: absolute;

                transform: rotateY(0deg);

            }

            #card .back {

                position: absolute;

                background: url(imgs/login-back.gif) no-repeat;

                background-size: 100% 180px;

                -webkit-transform: rotateY( -180deg );

                transform: rotateY( -180deg );

                -webkit-backface-visibility: hidden;

                backface-visibility: hidden;

                z-index:2;

            }

        .sys-control-box {

            float:right;

            width:84px;

            border-radius: 0 3px 0 0;

        }

        .sys-btn {

            width: 28px;

            height: 28px;

            border: none;

            outline: none;

            margin: 0;

        }

        .sys-btn-mini {

            background: url(imgs/btn_mini_normal.png) no-repeat;

        }

            .sys-btn-mini:hover {

                background: url(imgs/btn_mini_highlight.png) no-repeat;

            }

            .sys-btn-mini:active {

                background: url(imgs/btn_mini_down.png) no-repeat;

            }

        .sys-btn-close {

            border-radius: 0 3px 0 0;

            background: url(imgs/btn_close_normal.png) no-repeat;

        }

            .sys-btn-close:hover {

                background: url(imgs/btn_close_highlight.png) no-repeat;

            }

            .sys-btn-close:active {

                background: url(imgs/btn_close_down.png) no-repeat;

            }

        .sys-btn-set {

            background: url(imgs/btn_set_normal.png) 1px 0 no-repeat;

        }

            .sys-btn-set:hover {

                background: url(imgs/btn_set_hover.png) 1px 0 no-repeat;

            }

            .sys-btn-set:active {

                background: url(imgs/btn_set_press.png) 1px 0 no-repeat;

            }

        .btn {

            width: 78px;

            height: 28px;

            background: url(imgs/setting_btn_normal.png) no-repeat;

            background-size: 100% 100%;

            border: none;

            outline: none;

            margin: 0;

        }

            .btn:hover, .btn:active {

                background: url(imgs/setting_btn_hover.png) no-repeat;

                background-size: 100% 100%;

            }

            .btn:focus {

                background: url(imgs/setting_btn_hover.png) no-repeat;

                background-size: 100% 100%;

            }

    </style>

</head>

<body>

    <div id="card">

        <div id="front" class="front shadow">

            <div class="sys-control-box">

                <button id="btn-set" class="sys-btn sys-btn-set" title="设置"></button><button class="sys-btn sys-btn-mini" title="最小化"></button><button class="sys-btn sys-btn-close" title="关闭"></button>

            </div>

        </div>

        <div id="back" class="back shadow">

            <div style="width:100%;height:100%; border-radius: 4px;background:-webkit-linear-gradient(top, rgba(0, 0, 0, 0.00) 0%, rgba(0, 0, 0, 0.00) 6%, #ebf2f9 12%, #ebf2f9 90%, #cde2f2 90%, #cde2f2 100%);">

                <div class="sys-control-box" style="width:56px;">

                    <button class="sys-btn sys-btn-mini" title="最小化"></button><button class="sys-btn sys-btn-close" title="关闭"></button>

                </div>

                <button id="btn-ok" style="position:absolute; right:91px; bottom:2px;" class="btn">确定</button>

                <button id="btn-cancel" style="position:absolute; right:10px; bottom:2px;" class="btn">取消</button>

            </div>

        </div>

    </div>

    <script>

        Element.prototype.hasClassName = function (a) {

            return new RegExp("(?:^|\\s+)" + a + "(?:\\s+|$)").test(this.className);

        };

        Element.prototype.addClassName = function (a) {

            if (!this.hasClassName(a)) {

                this.className = [this.className, a].join(" ");

            }

        };

        Element.prototype.removeClassName = function (b) {

            if (this.hasClassName(b)) {

                var a = this.className;

                this.className = a.replace(new RegExp("(?:^|\\s+)" + b + "(?:\\s+|$)", "g"), " ");

            }

        };

        Element.prototype.toggleClassName = function (a) {

            this[this.hasClassName(a) ? "removeClassName" : "addClassName"](a);

        };

        //var init = function () {

        //    var card = document.getElementById('card');

        //    document.getElementById('front').addEventListener('click', function () {

        //        card.toggleClassName('flipped');

        //    }, false);

        //    document.getElementById('back').addEventListener('click', function () {

        //        card.toggleClassName('flipped');

        //    }, false);

        //};

        //window.addEventListener('DOMContentLoaded', init, false);

        (function () {

            const remote = require('electron').remote;

            function init() {

                function flip() {

                    if (frontShow == 2) {

                        document.getElementById('front').style.display = 'block';

                    }

                    else {

                        document.getElementById('back').style.display = 'block';

                    }

                    card.toggleClassName('flipped');

                };

                var btn_minis = document.getElementsByClassName("sys-btn-mini");

                for (var i = 0; i < btn_minis.length; i++) {

                    btn_minis[i].addEventListener("click", function (e) {

                        const window = remote.getCurrentWindow();

                        window.minimize();

                    });

                }

                //document.getElementById("sys-btn-maxi").addEventListener("click", function (e) {

                //    const window = remote.getCurrentWindow();

                //    if (!window.isMaximized()) {

                //        window.maximize();

                //    } else {

                //        window.unmaximize();

                //    }

                //});

                var btn_closes = document.getElementsByClassName("sys-btn-close");

                for (var i = 0; i < btn_closes.length; i++) {

                    btn_closes[i].addEventListener("click", function (e) {

                        const window = remote.getCurrentWindow();

                        window.close();

                    });

                }

                var card = document.getElementById('card');

                var frontShow = 1;

                var btn_sets = document.getElementsByClassName("sys-btn-set");

                for (var i = 0; i < btn_sets.length; i++) {

                    btn_sets[i].addEventListener('click', function () { flip(); }, false);

                }

                card.addEventListener('transitionend', function () {

                    if (frontShow == 1) {

                        frontShow = 2;

                        document.getElementById('front').style.display = 'none';

                    }

                    else {

                        document.getElementById('back').style.display = 'none';

                        frontShow = 1;

                    }

                }, false);

                document.getElementById('btn-ok').addEventListener('click', function () { flip(); }, false);

                document.getElementById('btn-cancel').addEventListener('click', function () { flip(); }, false);

            };

            document.onreadystatechange = function () {

                if (document.readyState == "complete") {

                    init();

                }

            };

        })();

    </script>

</body>

</html>
最后整个项目的源代码:https://github.com/starts2000/ElectronQQLogin
使用 electron 实现类似新版 QQ 的登录界面效果(阴影、背景动画、窗体3D翻转)的更多相关文章
- iOS开发UI篇—模仿ipad版QQ空间登录界面
iOS开发UI篇—模仿ipad版QQ空间登录界面 一.实现和步骤 1.一般ipad项目在命名的时候可以加一个HD,标明为高清版 2.设置项目的文件结构,分为home和login两个部分 3.登陆界面的 ...
- 采用CSS3设计的登录界面,动态效果(动画)
与上一篇的“采用CSS3设计的登陆界面”的相同,只是样式style添加了CSS3的动画元素. style内容如下: <style> html,body,div{ margin:0; pad ...
- Android菜鸟的成长笔记(3)——给QQ登录界面说So Easy
原文:Android菜鸟的成长笔记(3)--给QQ登录界面说So Easy 上一篇:Android菜鸟的成长笔记(2)--第一个Android应用 我们前面已经做了第一个Android应用程序,虽然有 ...
- QQ联合登录(基于Oauth2.0协议)
1. 获取授权码Authorization Code https://graph.qq.com/oauth2.0/authorize?response_type=code&client_id= ...
- swing实现QQ登录界面1.0( 实现了同一张图片只加载一次)、(以及实现简单的布局面板添加背景图片控件的标签控件和添加一个关闭按钮控件)
swing实现QQ登录界面1.0( 实现了同一张图片只加载一次).(以及实现简单的布局面板添加背景图片控件的标签控件和添加一个关闭按钮控件) 代码思路分析: 1.(同一张图片仅仅需要加载一次就够了,下 ...
- iOS中三种方式实现登录界面播放视频或gif效果
现在app都做的越来越炫酷,各种动画效果,各种特效很好的提高了用户的体验.很多app在登录界面都使用了动画效果,比如Uber,Keep,QQ等等.这些动画效果基本都是使用gif或者MP4来实现的. 效 ...
- android内部培训视频_第五节(1)_OA实战之登录界面
第五节(1):OA实战之登录界面 一.登录界面布局 1.背景图片 2.文本框 3.checkbox 4.按钮 暂未实现点击切换图片效果 <RelativeLayout xmlns:androi ...
- 注册表----修改Win7登录界面
在进行操作前,需要准备好背景图片.对背景图片的要求有三点: (1)图片必须是JPG格式: (2)必须将图片命名为backgroundDefault; (3)图片的体积必须小于256KB. 按下[Win ...
- 用bootstrap做一个背景可轮转的登录界面
用bootstrap做一个背景可轮转的登录界面 一.总结 一句话总结:用css3的动画的 @keyframes 规则,制作轮转图. 1.用bootstrap做一个背景可轮转的登录界面? a.动画部分用 ...
随机推荐
- shell脚本中$参数的介绍
$$Shell本身的PID(ProcessID)$!Shell最后运行的后台Process的PID$?最后运行的命令的结束代码(返回值)$-使用Set命令设定的Flag一览$*所有参数列表.如&quo ...
- 学习笔记TF019:序列分类、IMDB影评分类
序列分类,预测整个输入序列的类别标签.情绪分析,预测用户撰写文字话题态度.预测选举结果或产品.电影评分. 国际电影数据库(International Movie Database)影评数据集.目标值二 ...
- 禁止右键,禁止选中,禁止网页复制的Js代码
document.oncontextmenu=new Function('event.returnValue=false;'); document.onselectstart=new Function ...
- charles连接手机抓包
写给我自己: 如果是使用charles抓包.一定要tm的保证手机和电脑连的是一个网. 1.proxy setting,查看charles,端口 2.勾选 3.ipconfig,查看自己电脑的ip地址 ...
- Dede CMS如何在文章中增加“附件下载”操作说明
1.进入后台--在"附件管理"中选择"上传新文件" 2.在"说明标题"输入要上传文件的名字,并在下面浏览找到要上传的文件,保存. 3.在&q ...
- Spring学习(2)---IOC
1.接口及面向接口编程 2.什么是IOC 3.Spring的Bean配置 4.Bean的初始化 5.Spring的常用注入方式 (一)接口 用于沟通的中介物的抽象化 实体把自己提供给我外接的一种抽象化 ...
- Function.prototyoe.call.apply
刚刚在一个群里看到有人问 Function.prototype.call.apply(obj, args) 如何理解,觉得挺有意思的.刚开始被惯性思维干扰了,一直都是 call 和 apply 分开用 ...
- jQuery 提供多个与 AJAX 有关的方法。
jQuery 提供多个与 AJAX 有关的方法. 通过 jQuery AJAX 方法,您能够使用 HTTP Get 和 HTTP Post 从远程服务器上请求文本.HTML.XML 或 JSON - ...
- [0] 自定义特性AttributeUsage
using System;using System.Collections.Generic;using System.Linq;using System.Text; namespace Fxframe ...
- tcp_wrapper 总结
一. 简介 tcp_wrapper:tcp包装器, 工作于库中的. 访问控制 工具/组件 : 传输层 和 接近于应用层; 仅对使用tcp协议且在开发时调用了libwrap相关的服务程序有效. 二. 判 ...