
rabbitMQ教程(三) spring整合rabbitMQ代码实例
一、开启rabbitMQ服务,导入MQ jar包和gson jar包(MQ默认的是jackson,但是效率不如Gson,所以我们用gson)
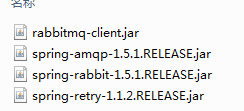

二、发送端配置,在spring配置文件中配置
<?xml version="1.0" encoding="UTF-8"?> <beans xmlns="http://www.springframework.org/schema/beans" xmlns:xsi="http://www.w3.org/2001/XMLSchema-instance" xmlns:rabbit="http://www.springframework.org/schema/rabbit" xsi:schemaLocation="http://www.springframework.org/schema/beans http://www.springframework.org/schema/beans/spring-beans-3.0.xsd http://www.springframework.org/schema/beans http://www.springframework.org/schema/beans/spring-beans-3.0.xsd http://www.springframework.org/schema/rabbit http://www.springframework.org/schema/rabbit/spring-rabbit-1.0.xsd">

 <!-- 连接服务配置 如果MQ服务器在远程服务器上,请新建用户用新建的用户名密码  guest默认不允许远程登录-->

    <rabbit:connection-factory id="connectionFactory"

        host="localhost" username="guest" password="guest" port="5672"

        virtual-host="/" channel-cache-size="5" />

  <!-- 配置爱admin,自动根据配置文件生成交换器和队列,无需手动配置 -->

    <rabbit:admin connection-factory="connectionFactory" />

    <!-- queue 队列声明 -->

    <rabbit:queue  durable="true"

        auto-delete="false" exclusive="false" name="spring.queue.tag" />

    <!-- exchange queue binging key 绑定 -->

    <rabbit:direct-exchange name="spring.queue.exchange"

        durable="true" auto-delete="false">

        <rabbit:bindings>

            <rabbit:binding queue="spring.queue.tag" key="spring.queue.tag.key" />

        </rabbit:bindings>

    </rabbit:direct-exchange>

    <!-- spring amqp默认的是jackson 的一个插件,目的将生产者生产的数据转换为json存入消息队列,由于Gson的速度快于jackson,这里替换为Gson的一个实现 -->

    <bean id="jsonMessageConverter"    class="sendMQ.Gson2JsonMessageConverter" />

    <!-- spring template声明 -->

    <rabbit:template id="amqpTemplate" exchange="spring.queue.exchange"  routing-key="spring.queue.tag.key"

        connection-factory="connectionFactory" message-converter="jsonMessageConverter" />
发送端代码:GSON配置
package sendMQ;

import java.io.IOException;

import java.io.UnsupportedEncodingException;

import org.apache.commons.logging.Log;

import org.apache.commons.logging.LogFactory;

import org.springframework.amqp.core.Message;

import org.springframework.amqp.core.MessageProperties;

import org.springframework.amqp.support.converter.AbstractJsonMessageConverter;

import org.springframework.amqp.support.converter.ClassMapper;

import org.springframework.amqp.support.converter.DefaultClassMapper;

import org.springframework.amqp.support.converter.MessageConversionException;

import com.google.gson.Gson;

public class Gson2JsonMessageConverter extends AbstractJsonMessageConverter{

      private static Log log = LogFactory.getLog(Gson2JsonMessageConverter.class);

        private static  ClassMapper classMapper =  new DefaultClassMapper();

        private static Gson gson = new Gson();

        public Gson2JsonMessageConverter() {

            super();

        }

        @Override

        protected Message createMessage(Object object,

                MessageProperties messageProperties) {

            byte[] bytes = null;

            try {

                String jsonString = gson.toJson(object);

                bytes = jsonString.getBytes(getDefaultCharset());

            }

            catch (IOException e) {

                throw new MessageConversionException(

                        "Failed to convert Message content", e);

            }

            messageProperties.setContentType(MessageProperties.CONTENT_TYPE_JSON);

            messageProperties.setContentEncoding(getDefaultCharset());

            if (bytes != null) {

                messageProperties.setContentLength(bytes.length);

            }

            classMapper.fromClass(object.getClass(),messageProperties);

            return new Message(bytes, messageProperties);

        }

        @Override

        public Object fromMessage(Message message)

                throws MessageConversionException {

            Object content = null;

            MessageProperties properties = message.getMessageProperties();

            if (properties != null) {

                String contentType = properties.getContentType();

                if (contentType != null && contentType.contains("json")) {

                    String encoding = properties.getContentEncoding();

                    if (encoding == null) {

                        encoding = getDefaultCharset();

                    }

                    try {

                            Class<?> targetClass = getClassMapper().toClass(

                                    message.getMessageProperties());

                            content = convertBytesToObject(message.getBody(),

                                    encoding, targetClass);

                    }

                    catch (IOException e) {

                        throw new MessageConversionException(

                                "Failed to convert Message content", e);

                    }

                }

                else {

                    log.warn("Could not convert incoming message with content-type ["

                            + contentType + "]");

                }

            }

            if (content == null) {

                content = message.getBody();

            }

            return content;

        }

        private Object convertBytesToObject(byte[] body, String encoding,

                Class<?> clazz) throws UnsupportedEncodingException {

            String contentAsString = new String(body, encoding);

            return gson.fromJson(contentAsString, clazz);

        }

}
发送类接口:
public interface MQProducer {

    /**

     * 发送消息到指定队列

     * @param queueKey

     * @param object

     */

    public void sendDataToQueue(String queueKey, Object object);

}
实现类:test是测试用的。
package sendMQ;

import java.util.HashMap;

import java.util.Map;

import org.junit.Test;

import org.junit.runner.RunWith;

import org.springframework.amqp.core.AmqpTemplate;

import org.springframework.beans.factory.annotation.Autowired;

import org.springframework.context.ApplicationContext;

import org.springframework.context.support.ClassPathXmlApplicationContext;

import org.springframework.stereotype.Component;

import org.springframework.test.context.ContextConfiguration;

import org.springframework.test.context.junit4.SpringJUnit4ClassRunner;

@RunWith(value = SpringJUnit4ClassRunner.class)

@ContextConfiguration(locations = {

    "classpath:/spring-common.xml"})

@Component

public class MQProducerImpl implements MQProducer {

    @Autowired

    private  AmqpTemplate amqpTemplate;

        @Override

        public void sendDataToQueue(String queueKey, Object object) {

            System.out.println("--"+amqpTemplate);

            try {

                amqpTemplate.convertAndSend(object);

                System.out.println("------------消息发送成功");

            } catch (Exception e) {

                System.out.println(e);

            }

        }

        @Test

      public  void test() {

            Map<String,Object> msg = new HashMap<>();

            msg.put("data","hello,456");

            while(true){

            amqpTemplate.convertAndSend(msg);

            try {

                Thread.sleep(2000);

            } catch (InterruptedException e) {

                // TODO 自动生成的 catch 块

                e.printStackTrace();

            }

            }

        }

}
接收端配置:
  <!-- 连接服务配置  -->

    <rabbit:connection-factory id="connectionFactory" host="localhost" username="guest"

        password="guest" port="5672" virtual-host="/"  channel-cache-size="5" />

   <rabbit:admin connection-factory="connectionFactory"/>

   <!-- queue 队列声明-->

   <rabbit:queue durable="true" auto-delete="false" exclusive="false" name="spring.queue.tag"/>

   <!-- exchange queue binging key 绑定 -->

    <rabbit:direct-exchange name="spring.queue.exchange" durable="true" auto-delete="false">

        <rabbit:bindings>

            <rabbit:binding queue="spring.queue.tag" key="spring.queue.tag.key"/>

        </rabbit:bindings>

    </rabbit:direct-exchange>

    <bean id="receiveMessageListener"

        class="receiveMQ.QueueListenter" />

    <!-- queue litener  观察 监听模式 当有消息到达时会通知监听在对应的队列上的监听对象-->

    <rabbit:listener-container connection-factory="connectionFactory" acknowledge="auto" >

        <rabbit:listener queues="spring.queue.tag" ref="receiveMessageListener" />

    </rabbit:listener-container>
接收端代码:
package receiveMQ;

import java.io.UnsupportedEncodingException;

import org.springframework.amqp.core.Message;

import org.springframework.amqp.core.MessageListener;

public class QueueListenter implements MessageListener{

    @Override

    public void onMessage(Message msg) {

         try {

            System.out.print("-------------------"+new String(msg.getBody(),"UTF-8"));

        } catch (UnsupportedEncodingException e) {

            // TODO 自动生成的 catch 块

            e.printStackTrace();

        }

    }

}
接收端测试启动:
package receiveMQ;

import org.springframework.context.support.ClassPathXmlApplicationContext;

public class ConsumerMain {

    public static void main(String[] args) {

        new ClassPathXmlApplicationContext("spring-common.xml");

    }

}
上面代码均有注释,应该不难看懂,复制即可使用,实现了MQ的简单功能。
说明:可以配置多个接收端,spring默认的是负载均衡机制,每个接收端接收一条的来,这些扩展功能待后面有时间再讲解
rabbitMQ教程(三) spring整合rabbitMQ代码实例的更多相关文章
- RabbitMQ学习总结(7)——Spring整合RabbitMQ实例
1.RabbitMQ简介 RabbitMQ是流行的开源消息队列系统,用erlang语言开发.RabbitMQ是AMQP(高级消息队列协议)的标准实现. 官网:http://www.rabbitmq. ...
- RabbitMQ入门到进阶(Spring整合RabbitMQ&SpringBoot整合RabbitMQ)
1.MQ简介 MQ 全称为 Message Queue,是在消息的传输过程中保存消息的容器.多用于分布式系统 之间进行通信. 2.为什么要用 MQ 1.流量消峰 没使用MQ 使用了MQ 2.应用解耦 ...
- activiti自定义流程之Spring整合activiti-modeler5.16实例(三):流程模型列表展示
注:(1)环境搭建:activiti自定义流程之Spring整合activiti-modeler5.16实例(一):环境搭建 (2)创建流程模型:activiti自定义流程之Spring ...
- activiti自定义流程之Spring整合activiti-modeler5.16实例(九):历史任务查询
注:(1)环境搭建:activiti自定义流程之Spring整合activiti-modeler5.16实例(一):环境搭建 (2)创建流程模型:activiti自定义流程之Spring ...
- activiti自定义流程之Spring整合activiti-modeler5.16实例(八):完成个人任务
注:(1)环境搭建:activiti自定义流程之Spring整合activiti-modeler5.16实例(一):环境搭建 (2)创建流程模型:activiti自定义流程之Spring ...
- activiti自定义流程之Spring整合activiti-modeler5.16实例(七):任务列表展示
注:(1)环境搭建:activiti自定义流程之Spring整合activiti-modeler5.16实例(一):环境搭建 (2)创建流程模型:activiti自定义流程之Spring ...
- activiti自定义流程之Spring整合activiti-modeler5.16实例(六):启动流程
注:(1)环境搭建:activiti自定义流程之Spring整合activiti-modeler5.16实例(一):环境搭建 (2)创建流程模型:activiti自定义流程之Spring ...
- activiti自定义流程之Spring整合activiti-modeler5.16实例(五):流程定义列表
注:(1)环境搭建:activiti自定义流程之Spring整合activiti-modeler5.16实例(一):环境搭建 (2)创建流程模型:activiti自定义流程之Spring ...
- activiti自定义流程之Spring整合activiti-modeler5.16实例(四):部署流程定义
注:(1)环境搭建:activiti自定义流程之Spring整合activiti-modeler5.16实例(一):环境搭建 (2)创建流程模型:activiti自定义流程之Spring ...
- activiti自己定义流程之Spring整合activiti-modeler5.16实例(四):部署流程定义
注:(1)环境搭建:activiti自己定义流程之Spring整合activiti-modeler5.16实例(一):环境搭建 (2)创建流程模型:activiti自己定义流程之Spr ...
随机推荐
- struts2 action接收请求参数和类型转换
1,action接收请求参数 在struts2中action是什么?(struts2是一个mvc框架) V:jsp M:action C:action ...
- Centos 安装boost库
1.在http://www.boost.org/下载boost安装包boost_1_65_1.tar.gz 2.在Centos上解压tar -zxvf boost_1_65_1.tar.gz后,cd ...
- Webpack飞行手册
前言 在学习 Webpack 之前,我们需要了解一个概念:模块. 何为模块? 如果你曾学过 Java , C# 之类的语言,一定会知道 Java 中的 import 或 C# 中的 using 吧? ...
- cinder块存储 后端采用lvm、nfs安装配置
#cinder块存储 后端采用lvm.nfs安装配置 openstack pike 安装 目录汇总 http://www.cnblogs.com/elvi/p/7613861.html #cinder ...
- leetcode算法题2: 合并两个二叉树。递归,如何切入并保持清醒?
/* Given two binary trees and imagine that when you put one of them to cover the other, some nodes o ...
- TFS2017持续发布中调用PowerShell启停远程应用程序
目前团队项目中有多个Web.服务以及与大数据平台对接接口等应用,每次的发布和部署采用手工的方式进行.停止应用程序,拷贝发布包,启动应用程序,不停的循环着,并且时不时地会出现一些人为错误性问题.这种模式 ...
- java 之 适配器模式(大话设计模式)
适配器模式,笔者不是很推荐在项目初期阶段使用,在笔者看来这个设计模式就是套接了一层,从而达到能够迎合现有的外部接口规范. 先来简单的看下类图: 大话设计模式-类图 这个模式理解起来非常简单,A→B因为 ...
- 16. 使用Exhibitor管理ZooKeeper
Exhibitor是管理ZooKeeper服务实例的主管服务.由Netflix开发和开放源码,对于ZooKeeper的实例监控.备份/恢复.清理和可视化非常有用. Note Netflix Exhib ...
- 自己动手编写IOC框架(一)
博客创建了2年多了,一直没敢写点东西,怕技术不够误导了别人.2年多后的今天我已经很有信心能够为需要帮助的人做点微薄的贡献了.这是我第一次写博客,先自我介绍一下.本人网名泪滴,一个非常伤心的名字,生活中 ...
- codeforces #447 894A QAQ 894B Ralph And His Magic Field 894C Marco and GCD Sequence
A.QAQ 题目大意:从给定的字符串中找出QAQ的个数,三个字母的位置可以不连续 思路:暴力求解,先找到A的位置,往前扫,往后扫寻找Q的个数q1,q2,然 后相乘得到q1*q2,这就是这个A能够找到的 ...