SpringBoot笔记(4)
一、请求处理
1.1 常用参数注解使用
| 注解 | 使用 |
|---|---|
| @PathVariable | 获取URI模板指定请求,并赋值到变量中,不指定可以将所有请求放到map中,但是健值都为String |
| @RequestHeader | 获取指定请求头,不指定可以获取所有到map中 |
| @RequestParam | 用于获取简单数据类型的参数如String、List<Integer>等 |
| @CookieValue | 获取cookie的值,String或Cookie类型 |
| @RequestBody | 获取请求体数据 |
| @ResposeBody | 将对象转换为json格式并写入response的body区中 |
| @RequestAttribute | 相当于request.getAttribute(), 获取请求域中的值 |
矩阵变量:参数之间用;分割
SpringBoot默认不开启矩阵变量, 需要实现或重写webMvcConfigurer,将urlPathHelper的setRemoveSemicolonContent 设置为false
可用于重写url,cookie被禁用时传入jesessionId
参数前面要用{}的路径变量【/cars/{path};low=20;band=zhangsan,lisi】
二、视图解析器与模板引擎
1.模板引擎-Thymeleaf
1、thymeleaf简介
Thymeleaf is a modern server-side Java template engine for both web and standalone environments, capable of processing HTML, XML, JavaScript, CSS and even plain text.
现代化、服务端Java模板引擎
2、基本语法
1、表达式
| 表达式名字 | 语法 | 用途 |
|---|---|---|
| 变量取值 | ${...} | 获取请求域、session域、对象等值 |
| 选择变量 | *{...} | 获取上下文对象值 |
| 消息 | #{...} | 获取国际化等值 |
| 链接 | @{...} | 生成链接 |
| 片段表达式 | ~{...} | jsp:include 作用,引入公共页面片段 |
2、字面量
文本值: 'one text' , 'Another one!' ,…数字: 0 , 34 , 3.0 , 12.3 ,…布尔值: true , false
空值: null
变量: one,two,.... 变量不能有空格
3、文本操作
字符串拼接: +
变量替换: |The name is ${name}|
4、数学运算
运算符: + , - , * , / , %
5、布尔运算
运算符: and , or
一元运算: ! , not
**
**
6、比较运算
比较: > , < , >= , <= ( gt , lt , ge , le )等式: == , != ( eq , ne )
7、条件运算
If-then: (if) ? (then)
If-then-else: (if) ? (then) : (else)
Default: (value) ?: (defaultvalue)
8、特殊操作
无操作: _
3、设置属性值-th:attr
设置单个值
<form action="subscribe.html" th:attr="action=@{/subscribe}">

  <fieldset>

    <input type="text" name="email" />

    <input type="submit" value="Subscribe!" th:attr="value=#{subscribe.submit}"/>

  </fieldset>

</form>
设置多个值
<img src="../../images/gtvglogo.png" th:attr="src=@{/images/gtvglogo.png},title=#{logo},alt=#{logo}" />
以上两个的代替写法 th:xxxx
<input type="submit" value="Subscribe!" th:value="#{subscribe.submit}"/>

<form action="subscribe.html" th:action="@{/subscribe}">
所有h5兼容的标签写法
https://www.thymeleaf.org/doc/tutorials/3.0/usingthymeleaf.html#setting-value-to-specific-attributes
4、迭代
<tr th:each="prod : ${prods}">

        <td th:text="${prod.name}">Onions</td>

        <td th:text="${prod.price}">2.41</td>

        <td th:text="${prod.inStock}? #{true} : #{false}">yes</td>

</tr>
<tr th:each="prod,iterStat : ${prods}" th:class="${iterStat.odd}? 'odd'">

  <td th:text="${prod.name}">Onions</td>

  <td th:text="${prod.price}">2.41</td>

  <td th:text="${prod.inStock}? #{true} : #{false}">yes</td>

</tr>
5、条件运算
<a href="comments.html"

th:href="@{/product/comments(prodId=${prod.id})}"

th:if="${not #lists.isEmpty(prod.comments)}">view</a>
<div th:switch="${user.role}">

  <p th:case="'admin'">User is an administrator</p>

  <p th:case="#{roles.manager}">User is a manager</p>

  <p th:case="*">User is some other thing</p>

</div>
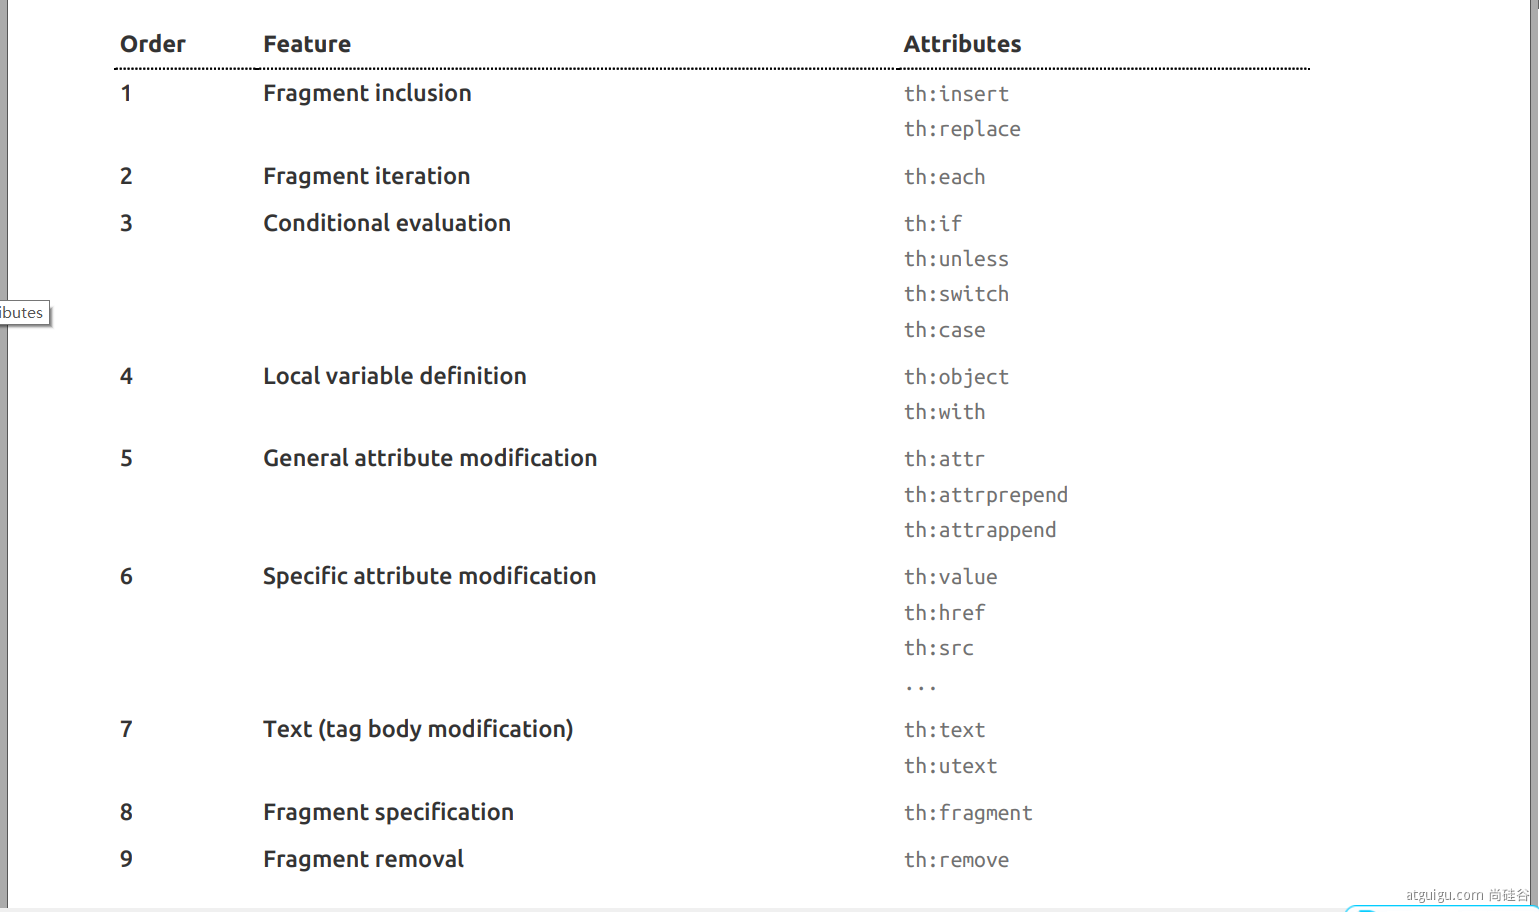
6、属性优先级
2.Thymeleaf的使用
1、引入Starter
        <dependency>

            <groupId>org.springframework.boot</groupId>

            <artifactId>spring-boot-starter-thymeleaf</artifactId>

        </dependency>
SpringBoot已经自动配置好了,
1、所有thymeleaf的配置值都在 ThymeleafProperties
2、配置好了 SpringTemplateEngine
3、配好了 ThymeleafViewResolver
4、我们只需要直接开发页面
放在templates下,后缀为html
    public static final String DEFAULT_PREFIX = "classpath:/templates/";

    public static final String DEFAULT_SUFFIX = ".html";  //xxx.html
5、导入命名空间
2、编写controller层
@Controller

public class ViewTestController {

    @RequestMapping("/success")

    public String ViewTest(Model model){

        model.addAttribute("msg","郜宇博,你好");

        model.addAttribute("link","http://www.baidu.com");

        //已经自动配置添加后缀

        return "success";

    }

}
3、编写页面
<!DOCTYPE html>

<html lang="en" xmlns:th="http://www.thymeleaf.org">

<head>

    <meta charset="UTF-8">

    <title>Title</title>

</head>

<body>

    <h1 th:text="${msg}">nihao</h1>

    <a href="www.hao123.com" th:href="${link}">百度</a>

</body>

</html>
三、 拦截器
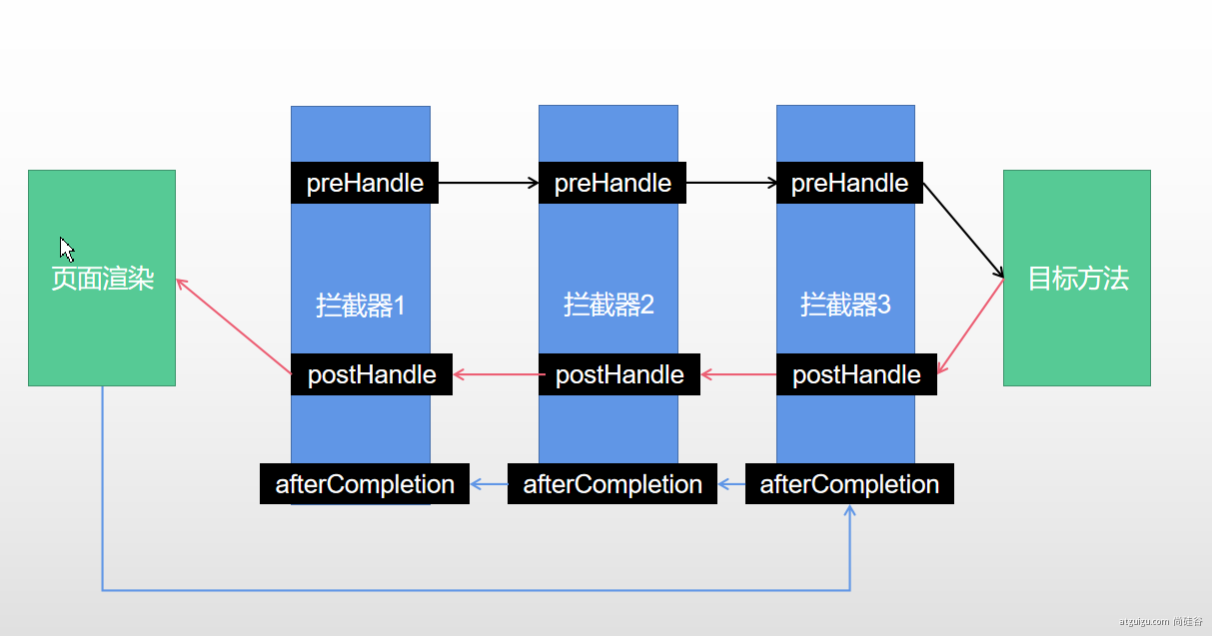
0、拦截器原理
1、根据当前请求,找到HandlerExecutionChain【可以处理请求的handler以及handler的所有 拦截器】
2、先来顺序执行 所有拦截器的 preHandle方法
- 1、如果当前拦截器prehandler返回为true。则执行下一个拦截器的preHandle
- 2、如果当前拦截器返回为false。直接 倒序执行所有已经执行了的拦截器的 afterCompletion;
3、如果任何一个拦截器返回false。直接跳出不执行目标方法
4、所有拦截器都返回True。执行目标方法
5、倒序执行所有拦截器的postHandle方法。
6、前面的步骤有任何异常都会直接倒序触发 afterCompletion
7、页面成功渲染完成以后,也会倒序触发 afterCompletion
1、 HandlerInterceptor接口
/**

 * 登录检查

 * 1、配置好拦截器要拦截哪些请求

 * 2、把这些配置放在容器中

 */

@Slf4j

public class LoginInterceptor implements HandlerInterceptor {

    /**

     * 目标方法执行之前

     * @param request

     * @param response

     * @param handler

     * @return

     * @throws Exception

     */

    @Override

    public boolean preHandle(HttpServletRequest request, HttpServletResponse response, Object handler) throws Exception {

        String requestURI = request.getRequestURI();

        log.info("preHandle拦截的请求路径是{}",requestURI);

        //登录检查逻辑

        HttpSession session = request.getSession();

        Object loginUser = session.getAttribute("loginUser");

        if(loginUser != null){

            //放行

            return true;

        }

        //拦截住。未登录。跳转到登录页

        request.setAttribute("msg","请先登录");

//        re.sendRedirect("/");

        request.getRequestDispatcher("/").forward(request,response);

        return false;

    }

    /**

     * 目标方法执行完成以后

     * @param request

     * @param response

     * @param handler

     * @param modelAndView

     * @throws Exception

     */

    @Override

    public void postHandle(HttpServletRequest request, HttpServletResponse response, Object handler, ModelAndView modelAndView) throws Exception {

        log.info("postHandle执行{}",modelAndView);

    }

    /**

     * 页面渲染以后

     * @param request

     * @param response

     * @param handler

     * @param ex

     * @throws Exception

     */

    @Override

    public void afterCompletion(HttpServletRequest request, HttpServletResponse response, Object handler, Exception ex) throws Exception {

        log.info("afterCompletion执行异常{}",ex);

    }

}
2. 配置拦截器
/**

 * 1、编写一个拦截器实现HandlerInterceptor接口

 * 2、拦截器注册到容器中(实现WebMvcConfigurer的addInterceptors)

 * 3、指定拦截规则【如果是拦截所有,静态资源也会被拦截】

 */

@Configuration

public class AdminWebConfig implements WebMvcConfigurer {

    @Override

    public void addInterceptors(InterceptorRegistry registry) {

        registry.addInterceptor(new LoginInterceptor())

                .addPathPatterns("/**")  //所有请求都被拦截包括静态资源

                .excludePathPatterns("/","/login","/css/**","/fonts/**","/images/**","/js/**"); //放行的请求

    }

}
四、文件上传
1、页面表单
<form method="post" action="/upload" enctype="multipart/form-data">

    <input type="file" name="file"><br>

    <input type="submit" value="提交">

</form>
2、文件上传代码
    /**

     * MultipartFile 自动封装上传过来的文件

     * @param email

     * @param username

     * @param headerImg

     * @param photos

     * @return

     */

    @PostMapping("/upload")

    public String upload(@RequestParam("email") String email,

                         @RequestParam("username") String username,

                         @RequestPart("headerImg") MultipartFile headerImg,

                         @RequestPart("photos") MultipartFile[] photos) throws IOException {

        log.info("上传的信息:email={},username={},headerImg={},photos={}",

                email,username,headerImg.getSize(),photos.length);

        if(!headerImg.isEmpty()){

            //保存到文件服务器,OSS服务器

            String originalFilename = headerImg.getOriginalFilename();

            headerImg.transferTo(new File("H:\\cache\\"+originalFilename));

        }

        if(photos.length > 0){

            for (MultipartFile photo : photos) {

                if(!photo.isEmpty()){

                    String originalFilename = photo.getOriginalFilename();

                    photo.transferTo(new File("H:\\cache\\"+originalFilename));

                }

            }

        }

        return "main";

    }
五、异常处理
1、默认规则
默认情况下,Spring Boot提供
/error处理所有错误的映射对于机器客户端,它将生成JSON响应,其中包含错误,HTTP状态和异常消息的详细信息。对于浏览器客户端,响应一个“ whitelabel”错误视图,以HTML格式呈现相同的数据

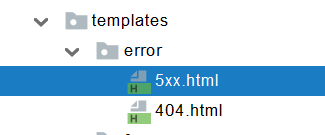
error/下的4xx,5xx页面会被自动解析;
SpringBoot笔记(4)的更多相关文章
- SpringBoot笔记十六:ElasticSearch
目录 ElasticSearch官方文档 ElasticSearch安装 ElasticSearch简介 ElasticSearch操作数据,RESTful风格 存储 检查是否存在 删除 查询 更新 ...
- SpringBoot笔记一
1 开始 1.1 spring介绍 Spring Boot使开发独立的,产品级别的基于Spring的应用变得非常简单,你只需"just run". 我们为Spring平台及第三方库 ...
- 【SpringBoot笔记】SpringBoot整合Druid数据连接池
废话少说,按SpringBoot的老套路来. [step1]:添加依赖 <!-- 数据库连接池 --> <dependency> <groupId>com.alib ...
- SpringBoot笔记十七:热部署
目录 什么是热部署 Devtools热部署 什么是热部署 热部署,就是在应用正在运行的时候升级软件,却不需要重新启动应用. 举个例子,王者荣耀的更新有时候就是热部署,热更新,就是他提示你更新,更新40 ...
- SpringBoot笔记十四:消息队列
目录 什么是消息队列 消息队列的作用 异步通信 应用解耦 流量削峰 RabbitMQ RabbitMQ流程简介 RabbitMQ的三种模式 安装RabbitMQ RabbitMQ交换器路由和队列的创建 ...
- SpringBoot笔记十三:引入webjar资源和国际化处理
目录 什么是webjar 怎么使用webjar 国际化 新建国际化配置文件 配置配置文件 使用配置文件 我们先来看一个html,带有css的,我们就以这个为准来讲解. 资源可以去我网盘下载 链接:ht ...
- springboot笔记1(转载于puresmile)
构建微服务:Spring boot 入门篇 什么是spring boot Spring Boot是由Pivotal团队提供的全新框架,其设计目的是用来简化新Spring应用的初始搭建以及开发过程.该框 ...
- SpringBoot笔记
官网: http://springboot.fun/ 收集到一个比较全的: https://blog.csdn.net/xiaoyu411502/article/details/52474037 Id ...
- springboot笔记05——profile多环境配置切换
前言 一个应用程序从开发到上线,往往需要经历几个阶段,例如开发.测试.上线.每个阶段所用到的环境的配置可能都是不一样的,Springboot 应用可以很方便地在各个环境中对配置进行切换.所以,今天主要 ...
- springboot笔记09——使用aop
什么是AOP? aop(Aspect Oriented Programming)面向切面编程,是OOP(Object-Oriented Programing,面向对象编程)的补充和完善.OOP引入封装 ...
随机推荐
- Python自动化测试面试题-经验篇
目录 Python自动化测试面试题-经验篇 Python自动化测试面试题-用例设计篇 Python自动化测试面试题-Linux篇 Python自动化测试面试题-MySQL篇 Python自动化测试面试 ...
- 查看python中所有的关键字
import keyword keyword.kwlist ['False', 'None', 'True', 'and', 'as', 'assert', 'async', 'await', 'br ...
- vue知识点---element el-date-picker 插件默认时间属性default-value怎么赋值?
参考网址: http://www.imooc.com/wenda/detail/509359 默认值,你放到 v-model里面就好. v-model="time" data(){ ...
- Java中9种常见的CMS GC问题分析与解决
1. 写在前面 | 本文主要针对 Hotspot VM 中"CMS + ParNew"组合的一些使用场景进行总结.重点通过部分源码对根因进行分析以及对排查方法进行总结,排查过程会省 ...
- rsync(873)未授权访问
cd vulhub-master/rsync/common docker -composeup -d 检测 1.列出目标服务器的同步目录 rsync 192.168.244.129:: 2.查看模块文 ...
- Spring Cloud分区发布实践(5)--定制ServiceInstanceListSupplier
现在我们简单地来定制二个 ServiceInstanceListSupplier, 都是zone-preference的变种. 为了方便, 我重新调整了一下项目的结构, 把一些公用的类移动到hello ...
- ElasticSearch入门检索
前面简介说到 elsatic是通过RestFul API接口操作数据的,可以通过postman模拟接口请求测试一下 一._cat 1.GET /_cat/nodes:查看所有节点 2.GET /_ca ...
- 打造自己的Vue组件文档生成工具
程序员最讨厌的两件事情,第一种是写文档,另一种是别人没有写文档.有没有直接根据vue组件生成文档的呢?当然是有的的.但第三方使用起来不一定能和现有项目结合使用,往往需要额外的注释用来标记提取信息.使用 ...
- CC攻击和C2的区别
[一]背景 今天被旁边姐姐问C2.CC是什么,虽然平时老看到这个词,身边也有自己写C2工具的大佬.但好像突然被问到有点懵,不知道怎么回答. [二]内容 CC ( Challenge Collapsar ...
- Kerberos委派攻击
域委派 就是指将域内用户的权限委派给服务账号,使得服务账号能以用户的权限在域内展开活动. 在域中一般只有主机账号和服务账号才具有委派属性 主机账号:主机账号就是AD(活动目录)中Computers中的 ...