Mybatis学习之自定义持久层框架(三) 自定义持久层框架:读取并解析配置文件
前言
前两篇文章分别讲解了JDBC和Mybatis的基本知识,以及自定义持久层框架的设计思路,从这篇文章开始,我们正式来实现一个持久层框架。
新建一个项目
首先我们新建一个maven项目,将其命名为IPersistence,创建以下目录结构:
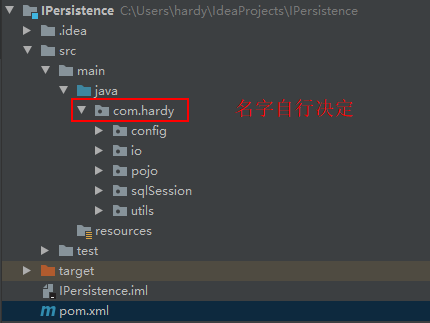
完成目录创建工作后,我们首先在pom.xml文件中引入相关依赖:
 1 <?xml version="1.0" encoding="UTF-8"?>

 2 <project xmlns="http://maven.apache.org/POM/4.0.0"

 3          xmlns:xsi="http://www.w3.org/2001/XMLSchema-instance"

 4          xsi:schemaLocation="http://maven.apache.org/POM/4.0.0 http://maven.apache.org/xsd/maven-4.0.0.xsd">

 5     <modelVersion>4.0.0</modelVersion>

 6

 7     <groupId>com.hardy</groupId>

 8     <artifactId>IPersistence</artifactId>

 9     <version>1.0-SNAPSHOT</version>

10

11     <properties>

12         <project.build.sourceEncoding>UTF-8</project.build.sourceEncoding>

13         <maven.compiler.encoding>UTF-8</maven.compiler.encoding>

14         <java.version>1.8</java.version>

15         <maven.compiler.source>1.8</maven.compiler.source>

16         <maven.compiler.target>1.8</maven.compiler.target>

17     </properties>

18

19     <dependencies>

20         <dependency>

21             <groupId>mysql</groupId>

22             <artifactId>mysql-connector-java</artifactId>

23             <version>8.0.19</version>

24         </dependency>

25         <dependency>

26             <groupId>c3p0</groupId>

27             <artifactId>c3p0</artifactId>

28             <version>0.9.1.2</version>

29         </dependency>

30         <dependency>

31             <groupId>log4j</groupId>

32             <artifactId>log4j</artifactId>

33             <version>1.2.16</version>

34         </dependency>

35         <dependency>

36             <groupId>junit</groupId>

37             <artifactId>junit</artifactId>

38             <version>4.12</version>

39         </dependency>

40         <dependency>

41             <groupId>dom4j</groupId>

42             <artifactId>dom4j</artifactId>

43             <version>1.6.1</version>

44         </dependency>

45         <dependency>

46             <groupId>jaxen</groupId>

47             <artifactId>jaxen</artifactId>

48             <version>1.1.6</version>

49         </dependency>

50     </dependencies>

51

52 </project>
下面,就可以开始正式的编码工作了。
读取配置文件
前面讲到了,第一步是要读取数据库配置的相关信息,以流的形式将其存放在内存中。那么首先我们就要在上图“io”包下创建一个Resources类,编写如下代码:
 1 package com.hardy.io;

 2

 3 import java.io.InputStream;

 4

 5 public class Resources {

 6

 7     // 根据配置文件的路径,将配置文件加载成字节输入流,存储在内存中

 8     public static InputStream getResourceAsStream(String path) {

 9         InputStream resourceAsStream = Resources.class.getClassLoader().getResourceAsStream(path);

10         return resourceAsStream;

11     }

12 }
这个类的调用方法十分简单,直接传递配置文件的路径名作为参数即可。
解析配置文件
创建容器对象
上面读取完配置文件的信息后,仅仅是将其以输入流的形式存放在内存中,而我们在项目开发过程中,需要调用到这些配置信息中的很多不同属性,如果每次都从内存中读取数据流,是很不方便的。
这里我们将配置文件分为核心配置文件(提供存放数据库核心配置的信息)和映射配置文件(提供sql配置信息(包括sql语句、参数类型和返回类型))。因此,我们可以在“pojo”包下创建两个容器对象类,分别命名为Configuration(存放核心配置信息)和MappedStatement(存放映射配置信息),编写如下代码:
 1 package com.hardy.pojo;

 2

 3 import javax.sql.DataSource;

 4 import java.util.HashMap;

 5 import java.util.Map;

 6

 7 /*

 8     Configuration:

 9     核心配置类,存放数据库基本信息

10     即sqlMapConfig.xml解析出来的内容

11     */

12 public class Configuration {

13

14     private DataSource dataSource;

15

16     /*

17         key: statementId value: 封装好的mappedStatement对象

18         */

19     Map<String, MappedStatement> mappedStatementMap = new HashMap<>();

20

21     public DataSource getDataSource() {

22         return dataSource;

23     }

24

25     public void setDataSource(DataSource dataSource) {

26         this.dataSource = dataSource;

27     }

28

29     public Map<String, MappedStatement> getMappedStatementMap() {

30         return mappedStatementMap;

31     }

32

33     public void setMappedStatementMap(Map<String, MappedStatement> mappedStatementMap) {

34         this.mappedStatementMap = mappedStatementMap;

35     }

36

37 }
 1 package com.hardy.pojo;

 2

 3 // Mapper.xml文件中一个select标签对应一个MappedStatement对象

 4

 5 /*

 6     映射配置类:

 7     存放sql语句、statement类型、输入参数java类型、输出参数java类型

 8     即Mapper.xml解析出来的内容

 9     */

10 public class MappedStatement {

11

12     // id标识

13     private String id;

14

15     // sql语句

16     private String sql;

17

18     // 输入参数值类型

19     private String parameterType;

20

21     // 返回结果集类型

22     private String resultType;

23

24     public String getId() {

25         return id;

26     }

27

28     public void setId(String id) {

29         this.id = id;

30     }

31

32     public String getSql() {

33         return sql;

34     }

35

36     public void setSql(String sql) {

37         this.sql = sql;

38     }

39

40     public String getParameterType() {

41         return parameterType;

42     }

43

44     public void setParameterType(String parameterType) {

45         this.parameterType = parameterType;

46     }

47

48     public String getResultType() {

49         return resultType;

50     }

51

52     public void setResultType(String resultType) {

53         this.resultType = resultType;

54     }

55

56 }
创建配置文件解析类
上面创建了存放配置文件信息的两个容器对象,但配置文件信息不会自动存放到容器对象中,因此我们还需要编写两个配置文件信息的解析类,可以在“config”包下分别创建XMLConfigBuilder和XMLMapperBuilder,编写以下代码:
 1 package com.hardy.config;

 2

 3 import com.hardy.io.Resources;

 4 import com.hardy.pojo.Configuration;

 5 import com.mchange.v2.c3p0.ComboPooledDataSource;

 6 import org.dom4j.Document;

 7 import org.dom4j.DocumentException;

 8 import org.dom4j.Element;

 9 import org.dom4j.io.SAXReader;

10

11 import java.beans.PropertyVetoException;

12 import java.io.InputStream;

13 import java.util.List;

14 import java.util.Properties;

15

16 public class XMLConfigBuilder {

17

18     private Configuration configuration;

19

20     public XMLConfigBuilder(Configuration configuration) {

21         this.configuration = new Configuration();

22     }

23

24     /*

25     该方法就是使用dom4j对配置文件进行解析,封装成Configuration

26     */

27     public Configuration parseConfiguration(InputStream inputStream) throws DocumentException, PropertyVetoException, ClassNotFoundException {

28

29         // 1、解析sqlMapConfig.xml

30         /*

31         * 这里需要注意一下:Document和Element等类用的都是org.dom4j库中的类,而不是javax.swing的

32         * 若编译器自动导入了javax.swing,需要手动删除,否则会报错

33         * */

34         Document document = new SAXReader().read(inputStream);

35         //<configuation>

36         Element rootElement = document.getRootElement();

37         List<Element> propertyElements =

38                 rootElement.selectNodes("//property");

39         Properties properties = new Properties();

40         for (Element propertyElement : propertyElements) {

41             String name = propertyElement.attributeValue("name");

42             String value = propertyElement.attributeValue("value");

43             properties.setProperty(name,value);

44         }

45         // 连接池

46         ComboPooledDataSource comboPooledDataSource = new

47                 ComboPooledDataSource();

48         comboPooledDataSource.setDriverClass(properties.getProperty("driverClass"));

49         comboPooledDataSource.setJdbcUrl(properties.getProperty("jdbcUrl"));

50         comboPooledDataSource.setUser(properties.getProperty("username"));

51         comboPooledDataSource.setPassword(properties.getProperty("password"));

52

53         // 填充configuration

54         configuration.setDataSource(comboPooledDataSource);

55

56         // 2、解析UserMapper.xml:拿到路径——获取字节输入流——使用dom4j进行解析

57         List<Element> mapperElements = rootElement.selectNodes("//mapper");

58         XMLMapperBuilder xmlMapperBuilder = new XMLMapperBuilder(configuration);

59         for (Element element : mapperElements) {

60             String mapperPath = element.attributeValue("resource");

61             InputStream resourceAsStream = Resources.getResourceAsStream(mapperPath);

62             xmlMapperBuilder.parse(resourceAsStream);

63         }

64

65         return configuration;

66     }

67 }
 1 package com.hardy.config;

 2

 3 import com.hardy.pojo.Configuration;

 4 import com.hardy.pojo.MappedStatement;

 5 import com.hardy.pojo.SqlOperationEnum;

 6 import org.dom4j.Document;

 7 import org.dom4j.DocumentException;

 8 import org.dom4j.Element;

 9 import org.dom4j.io.SAXReader;

10

11 import java.io.InputStream;

12 import java.util.List;

13

14 public class XMLMapperBuilder {

15

16     private Configuration configuration;

17

18     public XMLMapperBuilder(Configuration configuration) {

19         this.configuration = configuration;

20     }

21

22     // 解析mapper.xml文件

23     public void parse(InputStream inputStream) throws DocumentException {

24         Document document = new SAXReader().read(inputStream);

25         Element rootElement = document.getRootElement();

26

27         String namespace = rootElement.attributeValue("namespace");

28

29         List<Element> elementList = rootElement.elements();

30         for (Element element : elementList) {

31             // id的值

32             String id = element.attributeValue("id");

33             // 输入参数类型

34             String parameterType = element.attributeValue("parameterType");

35             // 返回结果集类型

36             String resultType = element.attributeValue("resultType");

37             // sql语句

38             String sqlText = element.getTextTrim();

39

40             // 封装mappedStatement

41             MappedStatement mappedStatement = new MappedStatement();

42             mappedStatement.setId(id);

43             mappedStatement.setParameterType(parameterType);

44             mappedStatement.setResultType(resultType);

45             mappedStatement.setSql(sqlText);

46

47             // 获取sql操作名,并将其转换为大写

48             String elementName = element.getName();

49             mappedStatement.setSqlOperationEnum(SqlOperationEnum.valueOf(elementName.toUpperCase()));

50

51             // statementId

52             String key = namespace + "." + id;

53

54             //填充configuration

55             configuration.getMappedStatementMap().put(key, mappedStatement);

56

57         }

58     }

59

60 }
总结
本篇文章中,我们创建了IPersistence项目,做了一些必要的准备工作,然后完成了读取数据库配置信息及解析数据库配置信息的编码工作。
到这里,我们就可以调用我们自定义的工具来读取和解析数据库配置信息了,下一篇文章会讲解如何调用这些工具。
Mybatis学习之自定义持久层框架(三) 自定义持久层框架:读取并解析配置文件的更多相关文章
- Mybatis框架三:DAO层开发、Mapper动态代理开发
这里是最基本的搭建:http://www.cnblogs.com/xuyiqing/p/8600888.html 接下来做到了简单的增删改查:http://www.cnblogs.com/xuyiqi ...
- 第三章、drf框架 - 序列化组件 | Serializer
目录 第三章.drf框架 - 序列化组件 | Serializer 序列化组件 知识点:Serializer(偏底层).ModelSerializer(重点).ListModelSerializer( ...
- Mybatis学习之自定义持久层框架(二) 自定义持久层框架设计思路
前言 上一篇文章讲到了JDBC的基本用法及其问题所在,并提出了使用Mybatis的好处,那么今天这篇文章就来说一下该如何设计一个类似Mybatis这样的持久层框架(暂时只讲思路,具体的代码编写工作从下 ...
- Mybatis学习之自定义持久层框架(四) 自定义持久层框架:生产sqlSession
前言 上一回我们完成了数据库配置文件的读取和解析工作,有了这些准备工作,我们就可以与数据库创建连接和会话了,所谓sqlSession就是数据库的会话,一切增删查改操作都是在与数据库的会话中完成,下面我 ...
- Mybatis(一):手写一套持久层框架
作者 : 潘潘 未来半年,有幸与导师们一起学习交流,趁这个机会,把所学所感记录下来. 「封面图」 自毕业以后,自己先创业后上班,浮沉了近8年,内心着实焦躁,虽一直是走科班路线,但在技术道路上却始终没静 ...
- mybatis 学习笔记(三):mapper 代理开发 dao 层
mybatis 学习笔记(三):mapper 代理开发 dao 层 优势 通过使用mapper 代理,我们可以不需要去编写具体的实现类(使用 getMapper() 方法自动生成),只需编写接口即可, ...
- mybatis学习笔记之基础框架(2)
mybatis学习笔记之基础框架(2) mybatis是一个持久层的框架,是apache下的顶级项目. mybatis让程序将主要精力放在sql上,通过mybatis提供的映射方式,自由灵活生成满足s ...
- 【MyBatis学习01】宏观上把握MyBatis框架
今天开始学习mybatis框架,博客主要记录学习过程中的一些总结,如有错误之处,欢迎留言指正~先用mybatis的鸟鸟来镇个楼,咳咳~~ mybatis框架是一个持久层框架,是Apache下的顶级项目 ...
- 应用程序框架实战三十:表现层及ASP.NET MVC介绍(一)
本文将介绍表现层及ASP.NET MVC的一些要点,特别是ASP.NET MVC的一些抽象和封装技巧,如果你对MVC还不了解,可以参考<ASP.NET MVC4 高级编程>,作者Jon G ...
随机推荐
- Cable Protection
题目大意:求一颗基环树的最小点覆盖. 题解:其实是一道比较板子的树形dp,dp[i][0/1]表示取或者不取i点的最小点.但是首先我们要把基环树断开,然后分别考虑a被覆盖和b被覆盖的情况. dp[i] ...
- 让你弄懂js中的闭包
目录 闭包 闭包如何产生 闭包是什么 常见的闭包 闭包的作用 闭包的生命周期 闭包的应用 闭包的缺点 内存泄露 内存溢出 闭包面试题 闭包 之前在我执行上下文执行上下文栈这篇文章中,出现了这样一个题目 ...
- Android Studio 有关 RecycleView 的使用
•导入相关包 右击File->Project Structure: 搜索 com.android.support: 找到 recyclerview: 导入好后 Sync Now 同步一下,到这 ...
- EfficientNet & EfficientDet 论文解读
概述 总体而言,这两篇论文都在追求一件事,那就是它们名字中都有的 efficient.只是两篇文章的侧重点不一样,EfficientNet 主要时研究如何平衡模型的深度 (depth).宽度 (wid ...
- 从谷歌CRE谈起,运维如何培养服务意识?
从谷歌CRE谈起,运维如何培养服务意识? 2016年10月,谷歌云平台博客(Google Cloud Platform Blog)上更新了一篇文章,谷歌宣布了一个新的专业岗位,CRE(Customer ...
- (十二)struts2的类型转换
所有的MVC框架,都属于表现层的解决方案,都需要负责收集用户请求参数,并将请求参数传给应用的控制器组件. 这时问题出现了,所有的请求参数都是字符串类型数据,因此MVC框架必须具备将这些字符串请求参数转 ...
- 使用Vue-TreeSelect组件的时候,用watch变量方式解决弹出编辑对话框界面无法触发更新的问题
在前篇随笔<使用Vue-TreeSelect组件实现公司-部门-人员级联下拉列表的处理>中介绍了Vue-TreeSelect组件的使用,包括使用v-modal绑定值,normalizer ...
- 自动化kolla-ansible部署ubuntu20.04+openstack-victoria之裸金属-20
自动化kolla-ansible部署ubuntu20.04+openstack-victoria之裸金属-20 欢迎加QQ群:1026880196 进行交流学习 近期我发现网上有人转载或者复制原创博客 ...
- redhat7.6 安装 Python 3
redhat7.6 默认安装了python2.7. 查看已安装python情况 cd / # 定位到根目录 whereis python # 查看python所在目录 /usr/bin cd /usr ...
- Kubernetes删除一直处于Terminating状态的namespace
问题现象: 删除namespace,一直处于Terminating,并且用--force --grace-period=0 也删除不了 develop Terminating 4d9h Error f ...