Centos 6.5 GitLab安装配置搭建详细过程
GitLab搭建详细过程
一、前提
- 系统:Centos 6.5
- 软件版本:gitlab-7.8.4
- Selinux:关闭
- 防火墙规则:先清空(搭建好了后续自己添加相关放行规则)
二、yum源配置和相关依赖包
1.添加epel源和PUIAS_6_computational源
|
1
|
# yum -y install epel-release |
创建该文件并添加以下内容:
|
1
2
3
4
5
6
7
|
# vim /etc/yum.repos.d/PUIAS_6_computational.repo[PUIAS_6_computational]name=PUIAS computational Base $releasever - $basearchmirrorlist=http://puias.math.ias.edu/data/puias/computational/$releasever/$basearch/mirrorlist#baseurl=http://puias.math.ias.edu/data/puias/computational/$releasever/$basearchgpgcheck=1gpgkey=file:///etc/pki/rpm-gpg/RPM-GPG-KEY-puias |
获取和导入相关验证文件
|
1
2
3
|
# wget -O /etc/pki/rpm-gpg/RPM-GPG-KEY-puias http://springdale.math.ias.edu/data/puias/6/x86_64/os/RPM-GPG-KEY-puias# rpm --import /etc/pki/rpm-gpg/RPM-GPG-KEY-puias# yum repolist |
2.安装依赖包
|
1
2
3
4
5
6
7
|
# yum install -y vim lrzsz wget gcc gcc-c++ make makeconf cmake# yum -y update# yum -y groupinstall 'Development Tools'# yum -y install readline readline-devel ncurses-devel gdbm-devel glibc-devel tcl-devel openssl-devel curl-devel expat-devel db4-devel byacc sqlite-devel libyaml libyaml-devel libffi libffi-devel libxml2 libxml2-devel libxslt libxslt-devel libicu libicu-devel system-config-firewall-tui redis sudo wget crontabs logwatch logrotate perl-Time-HiRes git cmake libcom_err-devel.i686 libcom_err-devel.x86_64 nodejs cmake libicu-devel libicu openssl openssl-devel查看安装的git版本,需要1.7.12以上,有PUIAS源会装1.8# git --version |
三、安装Ruby
1.查看是否安装有Ruby
|
1
|
# rpm -qa | grep ruby |
2.安装Ruby
|
1
2
3
4
5
6
|
# mkdir /tmp/ruby && cd /tmp/ruby# curl --progress ftp://ftp.ruby-lang.org/pub/ruby/2.1/ruby-2.1.2.tar.gz | tar xz# cd ruby-2.1.2# ./configure --disable-install-rdoc# make# make prefix=/usr/local install |
3.安装Bundler Gem
|
1
|
# gem install bundler --no-doc |
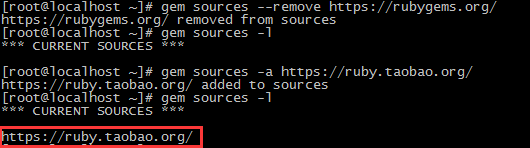
可能会报以下错误,这是因为国内网络导致rubygems.org存放在Amazon S3上面的资源文件间接性链接失败,用国内的RubyGems镜像(参见http://ruby.taobao.org/)替换官方镜像

更换镜像地址:
|
1
2
|
# gem sources --remove https://rubygems.org/ # 删除原镜像地址# gem sources -a https://ruby.taobao.org/ # 添加新镜像地址 |
查看是否更换成功:
再次安装:

四、创建系统用户git
|
1
2
3
4
5
6
7
8
9
10
11
|
# adduser --system --shell /bin/bash --comment 'GitLab' --create-home --home-dir /home/git/ git让git用户可以找到/usr/local/bin命令,并可以使用sudo# visudo找到这一行:Defaults secure_path = /sbin:/bin:/usr/sbin:/usr/bin在后面添加 /usr/local/bin :Defaults secure_path = /sbin:/bin:/usr/sbin:/usr/bin:/usr/local/bin再找到这一行:root ALL=(ALL) ALL在下一行添加:git ALL=(ALL) ALL |
五、安装MySQL
1.前提
这里的数据库需要安装Mysql 5.5以上的版本,而epel源默认只有5.1,所以需要添加有Mysql 5.5的源
|
1
2
3
4
5
|
# rpm -qa | grep mysql # 查看是否安装比较低版本的mysql,然后卸载# yum remove -y mysql*# yum install -y mysql55-server mysql55-devel mysql55 postfix # 安装5.5版本# chkconfig mysqld on # 设置开机启动# service mysqld start |
要求是InnoDB引擎,登陆查看是否为InnoDB引擎
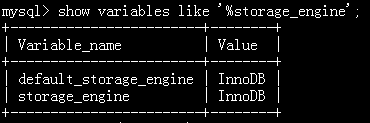
如果不是可以用SET storage_engine=INNODB设置,或者修改my.cnf文件后重启mysql
2.配置GitLab使用的数据库
|
1
2
3
4
5
|
> CREATE DATABASE IF NOT EXISTS `gitlabhq_production` DEFAULT CHARACTER SET `utf8` COLLATE `utf8_unicode_ci`;> GRANT SELECT, LOCK TABLES, INSERT, UPDATE, DELETE, CREATE, DROP, INDEX, ALTER ON `gitlabhq_production`.* TO 'git'@'localhost' identified by 'git';> GRANT SELECT, LOCK TABLES, INSERT, UPDATE, DELETE, CREATE, DROP, INDEX, ALTER ON `gitlabhq_production`.* TO 'git'@'127.0.0.1' identified by 'git';> flush privileges;> exit; |
六、安装Redis
安装Reids
|
1
2
3
|
# yum -y install redis# chkconfig redis on# cp /etc/redis.conf /etc/redis.conf.orig |
下面这条命令会把redis.conf的端口设置为0,而redis.conf.orig不变
|
1
2
3
|
# sed 's/^port .*/port 0/' /etc/redis.conf.orig | sudo tee /etc/redis.conf# echo 'unixsocket /var/run/redis/redis.sock' | sudo tee -a /etc/redis.conf# echo -e 'unixsocketperm 0770' | sudo tee -a /etc/redis.conf |
授权/var/run/redis给redis权限
|
1
2
3
|
# mkdir -p /var/run/redis/# chown redis:redis /var/run/redis# chmod 755 /var/run/redis |
将git加入redis组,并启动Redis
|
1
2
|
# usermod -aG redis git# service redis start |
七、安装GitLab
1.克隆GitLab
|
1
2
3
|
# su - git# cd /home/git# git clone https://gitlab.com/larryli/gitlab.git -b 7-8-zh gitlab |
2.配置
切换至GitLab目录下面,复制一份配置文件
|
1
2
|
# cd gitlab# cp config/gitlab.yml.example config/gitlab.yml |
确保GitLab可以对 log 和 tmp 目录有写入权限
|
1
2
3
4
|
# chown -R git log/# chown -R git tmp/# chmod -R u+rwX log/# chmod -R u+rwX tmp/ |
为satelites创建目录
|
1
2
|
# mkdir /home/git/gitlab-satellites# chmod u+rwx,g=rx,o-rwx /home/git/gitlab-satellites |
确保GitLab可以对 tmp/pids、tmp/sockets、public/uploads目录有写入权限
|
1
2
3
|
# chmod -R u+rwX tmp/pids/# chmod -R u+rwX tmp/sockets/# chmod -R u+rwX public/uploads |
从配置案例复制一份unicorn配置文件,并修改配置文件中的timeout选项的值为600(防止仓库文件太大,拉取时间过长出现超时)
|
1
2
3
4
5
|
# su -# cd /home/git/gitlab# sudo -u git -H cp config/unicorn.rb.example config/unicorn.rb# vim gitlab/config/unicorn.rb修改timeout 600 |
从配置案例复制一份rack attack配置文件
|
1
|
# sudo -u git -H cp config/initializers/rack_attack.rb.example config/initializers/rack_attack.rb |
为git用户配置git全局配置
|
1
2
3
|
# sudo -u git -H git config --global user.name "GitLab"# sudo -u git -H git config --global user.email "xxxxxx@qq.com"# sudo -u git -H git config --global core.autocrlf input |
配置redis连接
|
1
|
# sudo -u git -H cp config/resque.yml.example config/resque.yml |
配置GitLab数据库设置
|
1
2
|
# sudo -u git cp config/database.yml.mysql config/database.yml# vim config/database.yml |
只需配置生产的部分(第一部分),用户名和密码
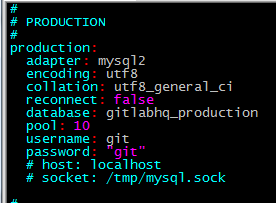
配置好以后运行该命令
|
1
|
# sudo -u git -H chmod o-rwx config/database.yml |
配置GitLab绑定的域名或者IP
|
1
2
3
|
# vim config/gitlab.yml修改host为gitlab的域名为你主机的IP地址(有两项,test一项应该没有影响,不过也修改吧)host:主机IP |
安装Gems
|
1
|
# sudo -u git -H bundle install --deployment --without development test postgres aws |
可能会报错,还是大陆访问官网的问题,替换成https://ruby.taobao.org,然后再安装

替换命令:
|
1
|
# sed -i '/^source/s/https\:\/\/rubygems\.org/https\:\/\/ruby\.taobao\.org/' Gemfile |
安装GitLab shell
|
1
|
# sudo -u git -H bundle exec rake gitlab:shell:install[v2.5.4] REDIS_URL=unix:/var/run/redis/redis.sock RAILS_ENV=production |
初始化数据库
|
1
|
# sudo -u git -H bundle exec rake gitlab:setup RAILS_ENV=production |
如果想要自己设置GitLab的root默认登陆密码则运行以下命令:
|
1
|
# sudo -u git -H bundle exec rake gitlab:setup RAILS_ENV=production GITLAB_ROOT_PASSWORD=yourpassword |
默认登陆账号密码
|
1
2
|
login.........rootpassword......5iveL!fe |
配置启动脚本
|
1
|
# cp lib/support/init.d/gitlab /etc/init.d/ |
配置日志切割
|
1
|
# cp lib/support/logrotate/gitlab /etc/logrotate.d/gitlab |
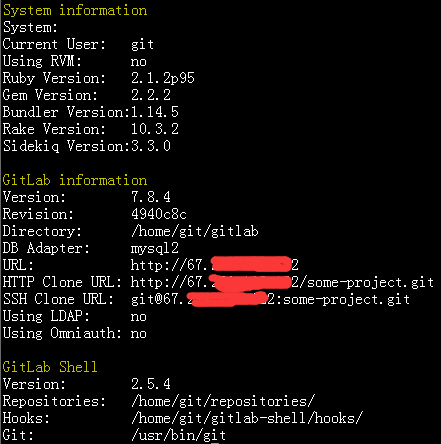
运行命令检测GitLab和它的环境是否正确
|
1
|
# sudo -u git -H bundle exec rake gitlab:env:info RAILS_ENV=production |
运行命令结果截图如下:
拉取GitLab静态资源文件
|
1
|
# sudo -u git -H bundle exec rake assets:precompile RAILS_ENV=production |
修改配置文件的gitlab_url为主机IP或者域名
|
1
|
# vim /home/git/gitlab-shell/config.yml |
启动GitLab实例
|
1
|
# service gitlab start |
八、配置Nginx
安装和配置开机启动(这里用yum安装,也可以自己编译安装)
|
1
2
|
# yum install -y nginx# chkconfig nginx on |
下载Nginx配置文件,并命名为gitlab.conf
|
1
|
# wget -O /etc/nginx/conf.d/gitlab.conf https://gitlab.com/gitlab-org/gitlab-ce/raw/master/lib/support/nginx/gitlab |
把nginx加入到git组
|
1
2
|
# usermod -a -G git nginx# chmod g+rx /home/git/ |
修改gitlab.conf文件
|
1
2
3
4
5
|
# vim /etc/nginx/conf.d/gitlab.confserver unix:/home/git/gitlab/tmp/sockets/gitlab-workhorse.socket fail_timeout=0; 修改为 server unix:/home/git/gitlab/tmp/sockets/gitlab.socket fail_timeout=0;listen 0.0.0.0:80 default_server; 修改为 listen 80;listen [::]:80 default_server; 该行删除server_name YOUR_SERVER_FQDN; 修改为 server_name 主机IP |
启动Nginx
|
1
|
# service nginx start |
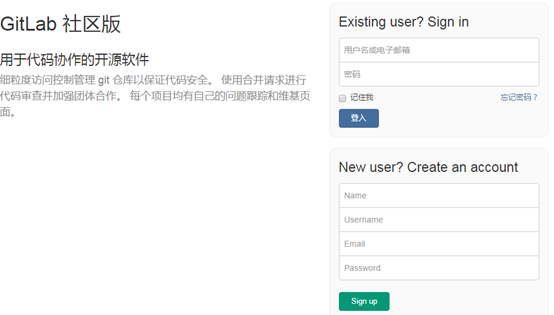
九、访问
访问地址,http://主机IP或者域名,第一次登陆后就需要修改root用户的密码,然后再去掉GitLab的用户注册功能。到此GitLab搭建完毕!
Centos 6.5 GitLab安装配置搭建详细过程的更多相关文章
- CentOS gitlab 安装配置
CentOS gitlab 安装配置 2018-11-02 11:23:09 Visit 5 在/etc/yum.repos.d 目录下创建文件gitlab-ce.repo,使用国内的安装源 b ...
- CentOS下使用yum安装配置和使用svn
安装说明 系统环境:CentOS-6.3安装方式:yum install (源码安装容易产生版本兼容的问题)安装软件:系统自动下载SVN软件 检查已安装版本 ? 1 2 3 4 5 6 7 8 9 1 ...
- JDK下载安装配置教程(详细)
JDK下载安装配置教程(详细) 版权声明:本文为原创文章,转载请附上原文出处链接和本声明.https://www.cnblogs.com/mxxbc/p/11844885.html 因为最近需要在Wi ...
- CentOS 7 Xinetd服务安装配置
CentOS 7 Xinetd服务安装配置 目录 CentOS 7 Xinetd服务安装配置 一.Linux守护进程与初始化进程 1. 什么是守护进程 2. 什么是初始化 二.Linux独立启动进程和 ...
- Centos 7环境下安装配置Hadoop 3.0 Beta1简记
前言 由于以前已经写过一篇Centos 7环境下安装配置2.8的随笔,因此这篇写得精简些,只挑选一些重要环节记录一下. 安装环境为:两台主机均为Centos 7.*操作系统,两台机器配置分别为: 主机 ...
- 在linux下安装配置rabbitMQ详细教程
在linux下安装配置rabbitMQ详细教程 2017年12月20日 17:34:47 阅读数:7539 安装Erlang 由于RabbitMQ依赖Erlang, 所以需要先安装Erlang. Er ...
- [ci]gitlab安装配置(含gitlab邮件配置)
gitlab安装配置 参考: https://www.unixhot.com/article/48 原则:简单维护为准,故yum安装gitlab 1,gitlab安装 2,gitlab邮箱配置 1,g ...
- 阿里云服务器 ECS 部署lamp:centos+apache+mysql+php安装配置方法 (centos7)
阿里云服务器 ECS 部署lamp:centos+apache+mysql+php安装配置方法 (centos7) 1.效果图 1 2. 部署步骤 1 1. mysql安装附加(centos7) 7 ...
- Windows和Centos下Docker的安装配置
Windows和Centos下Docker的安装配置 windows环境下的安装(win10) 在Windows系统上需要利用toolbox来安装Docker,现在 Docker 有专门的 Win10 ...
随机推荐
- CentOS7开放端口以及常用的使用命令记录整理
CentOS7与以前常用的CentOS6还是有一些不同之处的,比如在设置开放端口的时候稍许有些不同,常用的iptables命令已经被firewalld代替.这几天正好有在CentOS7系统中玩Seaf ...
- Linux是一个基于POSIX和Unix的多用户、多任务、支持多线程和多CPU的性能稳定的操作系统,可免费使用并自由传播。
Linux是一个基于POSIX和Unix的多用户.多任务.支持多线程和多CPU的性能稳定的操作系统,可免费使用并自由传播. Linux是众多操作系统之一 , 目前流行的服务器和 PC 端操作系统有 L ...
- Ansible_编写循环和条件任务
一.利用循环迭代任务 1️⃣:Ansible支持使用loop关键字对一组项目迭代任务,可以配置循环以利用列表中的各个项目.列表中各个文件的内容.生成的数字序列或更为复杂的结构来重复任务 1.简单循环 ...
- Mysql不知道默认密码情况下登录/重置/忘记密码
场景一: 基础系统:linux 镜像:LAMP环境(Ubuntu 18.04 Apache PHP7.0) 问题:ERROR 1405 (28000): Access denied for user ...
- IT菜鸟之VTP应用项目
项目拓扑 项目要求 PC0和PC2能通信,PC1和PC3能通信,其余不能通信. 项目分析 可以通过vlan来实现相同网段不能通信:而相同vlan可以通信,不同vlan不能通信:同时需要用到trunk封 ...
- shell基础之后台运行脚本
使shell脚本后台执行,基本的方法有两种,第一种为在脚本后面追加&符号,第二种为在脚本前面使用nohup命令,结尾再追加&符号 一.后台运行脚本1 1.执行脚本test.sh:./t ...
- Git常用命令+本地连接远程仓库
一.git命令整理 git config --global user.email "邮箱名":绑定GitHub邮箱 git config --global user.name &q ...
- Django(43)restful接口规范
restful接口规范 什么是接口规范?接口规范就是为了采用不同的后台语言,也能使用同样的接口获取到同样的数据.如何写接口:接口规范是规范化书写接口的,写接口要写url.响应数据 注:如果将 ...
- Sqlflow 之隐私政策(Privacy plolicy)介绍
在大数据技术流行的今天,SQLFlow 可以通过分析各种数据库对象的定义给开发和管理者带来很大的助力.能够让您在大数据时代应对自如,如虎添翼. 在之前的文章中我们已经详细介绍过SQLFlow是什么.能 ...
- 策略模式干掉if-else,switch
1.传统if -else 写法 String nodeModelStr = ""; if (nodeType == NodeType.START){ StartModel star ...