Springboot 加载配置文件源码分析
Springboot 加载配置文件源码分析
本文的分析是基于springboot 2.2.0.RELEASE。
本篇文章的相关源码位置:https://github.com/wbo112/blogdemo/tree/main/springbootdemo/springboot-profiles
springboot加载配置文件如application.yml是通过org.springframework.boot.context.config.ConfigFileApplicationListener这个类来完成的。这个类的加载也是通过spring.factories文件中来加载的。

ConfigFileApplicationListener这个类同时实现了EnvironmentPostProcessor、ApplicationListener这两个接口。
EnvironmentPostProcessor接口需要实现的postProcessEnvironment方法,这个方法主要就是用来对Environment来进行增强处理的。而Environment主要是用来表示当前应用程序运行环境的接口。在我们这里来说读取的配置文件最终也会放到这里面来。
简单的调用关系就是下面的图来,具体是怎么调到onApplicationEvent的,比较简单,就不和大家一起看了。直接看本次的重点吧。
下面的方法都是ConfigFileApplicationListener这个类中
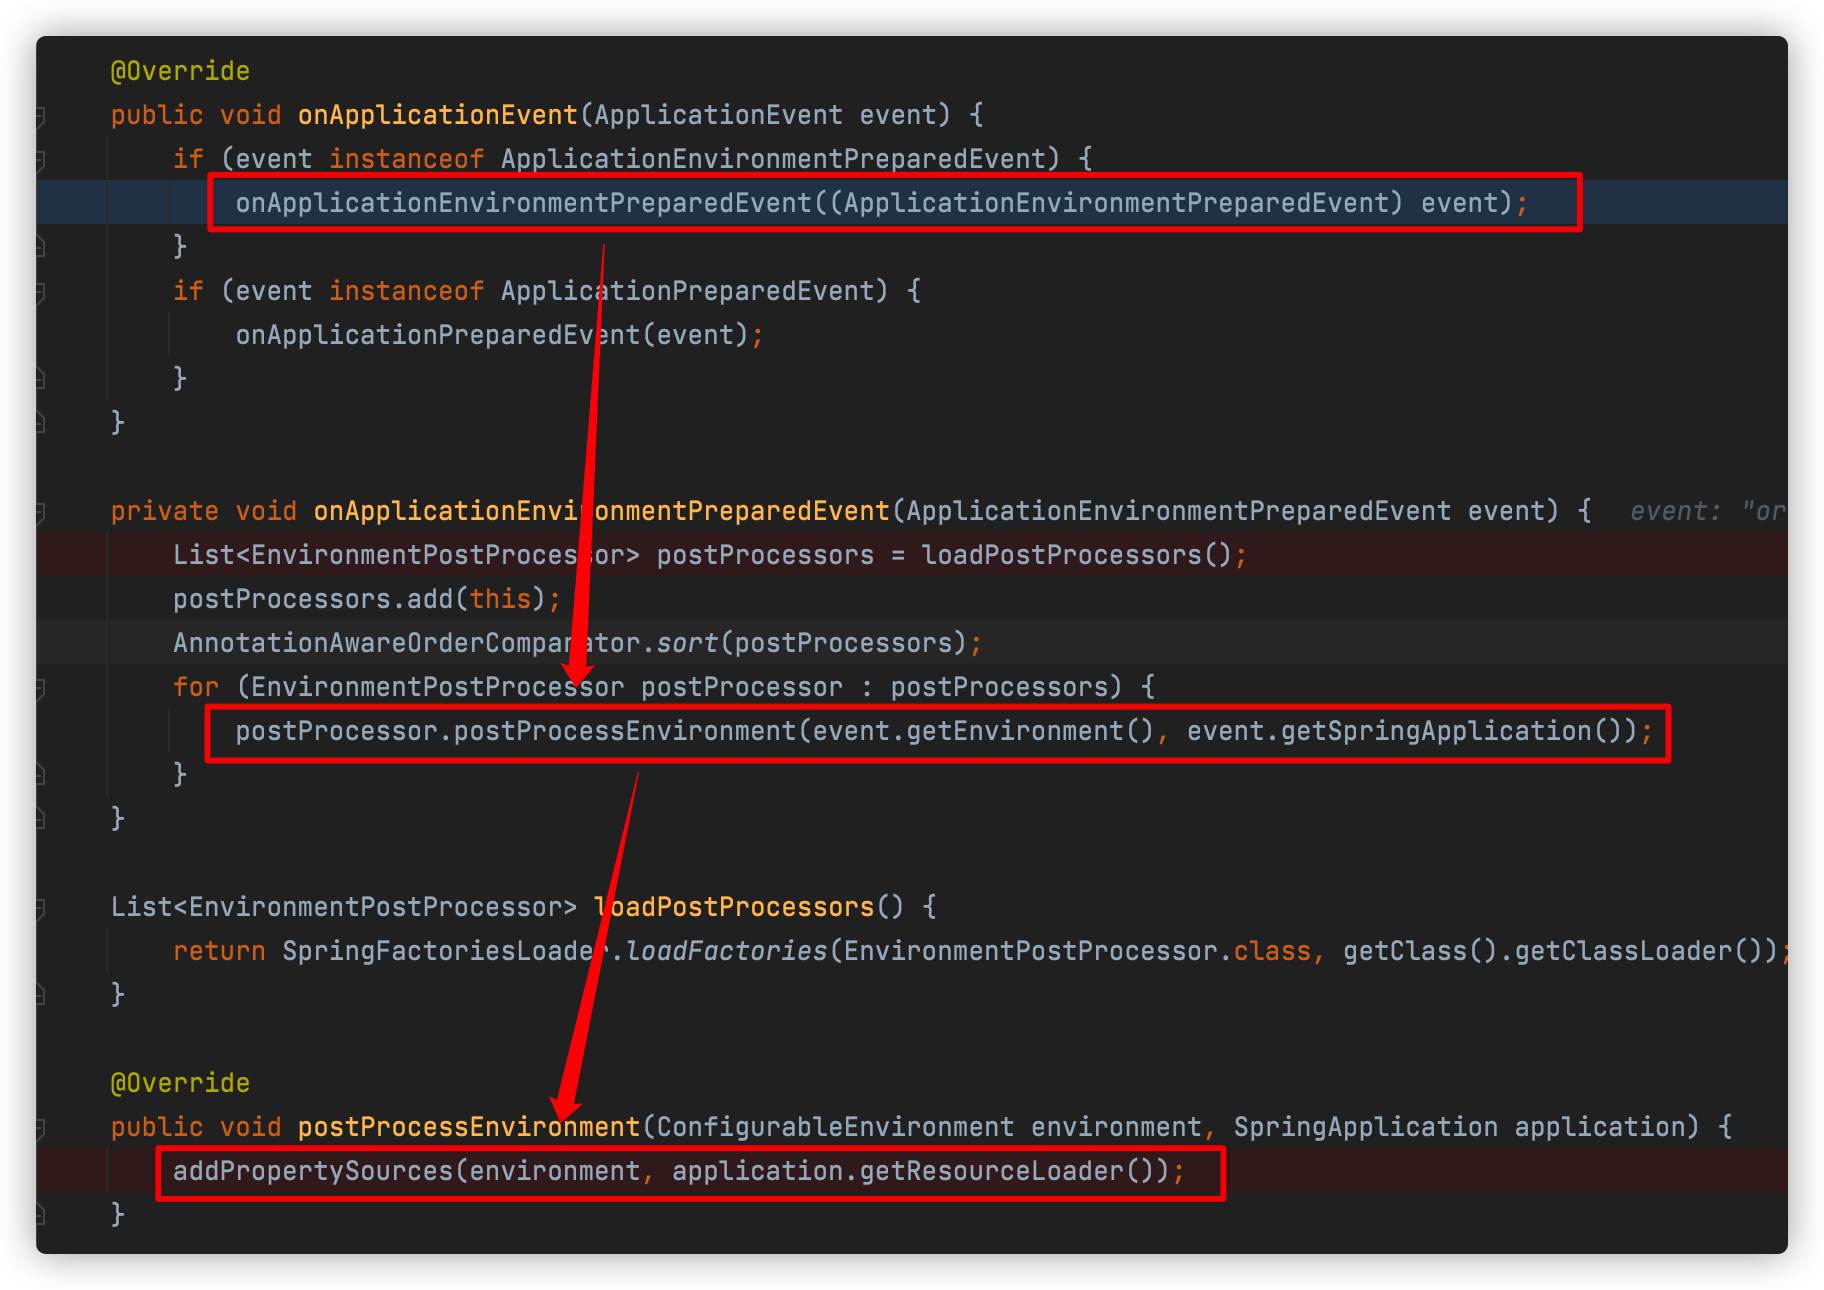
在addPropertySources中首先会添加一个用来处理生成随机数的RandomValuePropertySource,然后就会通过内部类Loader来加载配置文件。所以我们本次的主要是看Loader类的load方法的执行流程

下面我们来具体看看load方法的执行流程
		void load() {

      //配置文件的加载就是通过这里来完成的。

      //DEFAULT_PROPERTIES = "defaultProperties";

      //LOAD_FILTERED_PROPERTY是一个set<String>,里面有两个元素{"spring.profiles.active","spring.profiles.include"}

			FilteredPropertySource.apply(this.environment, DEFAULT_PROPERTIES, LOAD_FILTERED_PROPERTY,

         //下面这里是一个lambda表达式,这里暂时省略,后面具体调用到这里我们再具体看。

					(defaultProperties) -> {

						......

					});

		}
上面的会调用到FilteredPropertySource的静态方法,这个也比较简单,就几行代码。最终又会调用到上面我们的省略的lambda表达式
static void apply(ConfigurableEnvironment environment, String propertySourceName, Set<String> filteredProperties,

      Consumer<PropertySource<?>> operation) {

   //这个是获取到当前程序的运行时环境。主要就是当前系统的环境变量、当前程序的环境变量等等,下面放个图一起看看

   MutablePropertySources propertySources = environment.getPropertySources();

  //这里是从运行时环境中查找key=defaultProperties的属性值,一般情况下,我们没有配置这个属性,获取到的original就是null,就会走到下面的if分支中,回到我们的lambda表达式中,我们就看这个分支吧

   PropertySource<?> original = propertySources.get(propertySourceName);

   if (original == null) {

      operation.accept(null);

      return;

   }

   propertySources.replace(propertySourceName, new FilteredPropertySource(original, filteredProperties));

   try {

      operation.accept(original);

   }

   finally {

      propertySources.replace(propertySourceName, original);

   }

}
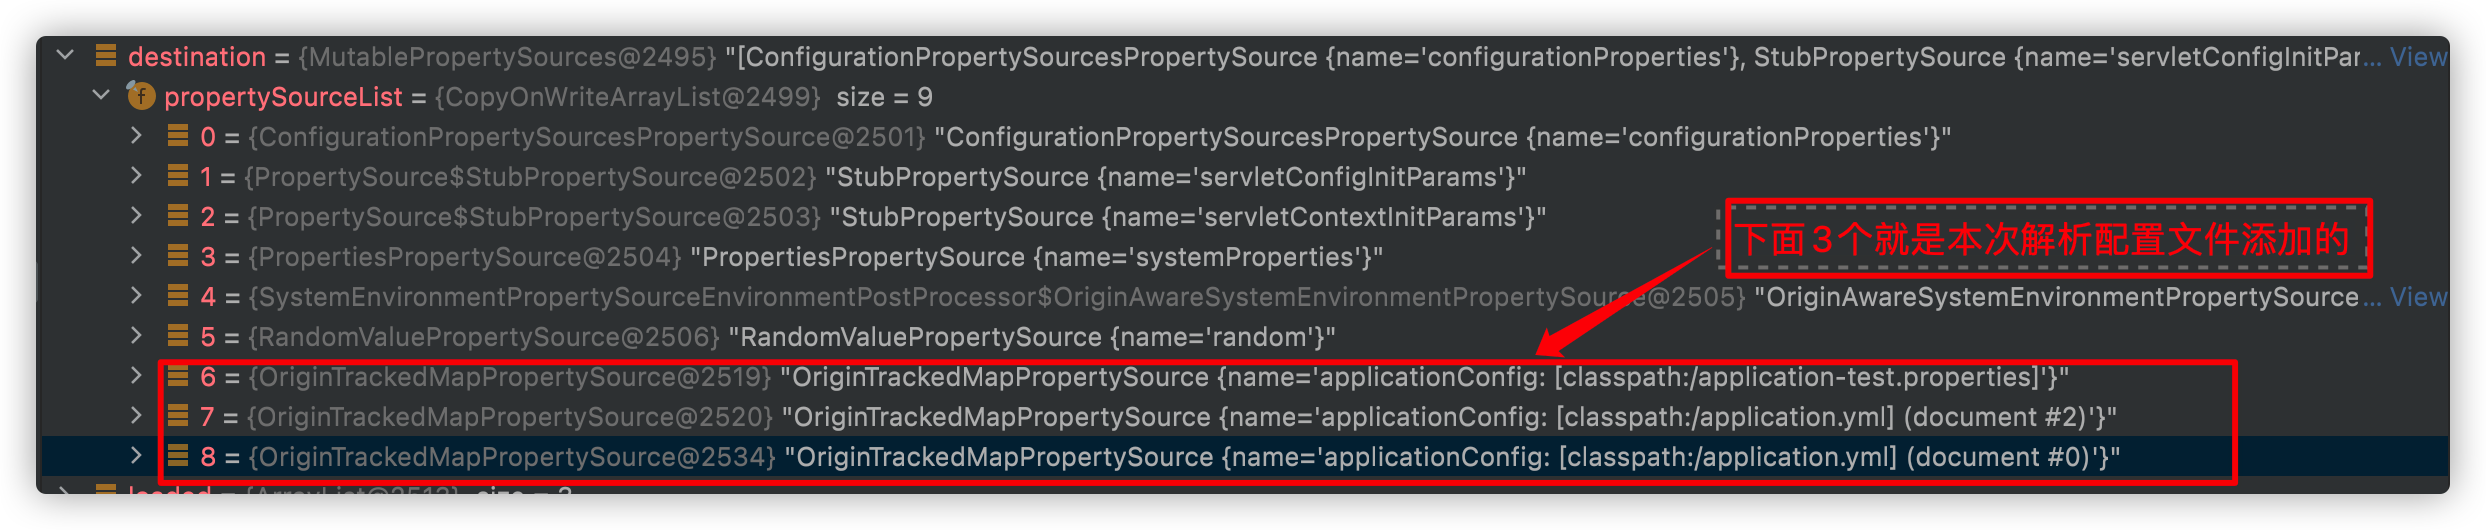
我们看看上面的MutablePropertySources propertySources = environment.getPropertySources();里面的内容

可以看到它里面有个propertySourceList,里面有6个对象,里面具体内容不打开看了。我们最终读取的配置文件也会添加到这个列表里面去
我们再回到上面的代码,看看lambda表达式中的调用吧
				//这个就是上面load方法中我们之前省略掉的lambda表达式了

				//这里的入参defaultProperties是null

				(defaultProperties) -> {

          	//这里定义一个profiles,用来存放我们需要加载的profile的名字。

						this.profiles = new LinkedList<>();

						this.processedProfiles = new LinkedList<>();

						this.activatedProfiles = false;

						this.loaded = new LinkedHashMap<>();

          //这个方法首先会在profiles中添加一个null的空对象。代表一个全局的profile,这个它一定会加载。

          //后面会继续从environment中查找属性为"spring.profiles.active","spring.profiles.include"的值通过属性绑定的形式转化成profile,也添加到profiles中来,我们这里没有定义这两个属性,所以也就不会添加了

          //继续判断profiles的size,如果只有一个null的话,会在里面添加一个名为default的profile,作为默认的profile

						initializeProfiles();

          //到这里我们的profiles中已经有两个对象了,一个全局的null,一个默认的default。

          //如果我们没有定义自己的profile,那就会使用保留默认的;

          //如果我们定义了自己的profile,就会删除掉默认的名为default的profile

						while (!this.profiles.isEmpty()) {

							Profile profile = this.profiles.poll();

              //首先这里的profile的是null,不会进入下面的if分支

							if (isDefaultProfile(profile)) {

                //这里会判断如果不是默认的profile,就会加入到environment激活的Profile列表中

								addProfileToEnvironment(profile.getName());

							}

              //在这里就会去加载配置文件。

              //这里有3个参数

              //1. 我们本次的profile

              //2. 是个lambda表达式,主要是对要加载的配置文件进行过滤。如果不符合需要,就不会加载

              //3. 也是个lambda表达式,主要是是解析后的文档进行一个处理(加入到临时列表中)

              //这个方法比较重要。我们进这个方法去看看

							load(profile, this::getPositiveProfileFilter,

									addToLoaded(MutablePropertySources::addLast, false));

							this.processedProfiles.add(profile);

						}

						load(null, this::getNegativeProfileFilter, addToLoaded(MutablePropertySources::addFirst, true));

						addLoadedPropertySources();

						applyActiveProfiles(defaultProperties);

					});
			//这个方法就是从指定的位置去查找配置文件进行加载

			private void load(Profile profile, DocumentFilterFactory filterFactory, DocumentConsumer consumer) {

			//getSearchLocations()获取的要查找配置文件的目录位置

      //默认的会从下面4个位置去查找file:./config/, file:./, classpath:/config/, classpath:/

      getSearchLocations().forEach((location) -> {

				boolean isFolder = location.endsWith("/");

        //由于我们上面的查找路径都是/结束的,所以查找的是目录,这里会返回需要查找的文件名application

				Set<String> names = isFolder ? getSearchNames() : NO_SEARCH_NAMES;

        //下面的方法就是从指定位置,使用profile,根据指定的名字去查找配置文件进行加载

				names.forEach((name) -> load(location, name, profile, filterFactory, consumer));

			});

		}
上面看到getSearchLocations(),getSearchNames()分别是指定配置文件查找位置和具体的文件名。在ConfigFileApplicationListener类中也提供了对应的set方法,说明我们也可以根据自己的需要来进行指定。
从上面也能看到我们idea开发中在resource目录中配置的application.yml中目录和文件名分别是通过getSearchLocations()和getSearchNames()指定的。
从上面也能看到默认会在file:./config/, file:./, classpath:/config/, classpath:/这4个位置去寻找文件名为application的配置文件。下面就是具体去查找并加载配置文件了
	private void load(String location, String name, Profile profile, DocumentFilterFactory filterFactory,

				DocumentConsumer consumer) {

     //我们这里的name ="application",所以就不会走到这个分支

			if (!StringUtils.hasText(name)) {

				......

			}

			Set<String> processed = new HashSet<>();

    // this.propertySourceLoaders就是具体来负责加载配置文件的。它是在ConfigFileApplicationListener构造方法中赋值的,

    //具体的代码是下面这行

    //this.propertySourceLoaders = SpringFactoriesLoader.loadFactories(PropertySourceLoader.class,getClass().getClassLoader());

    //当前的有两个类PropertiesPropertySourceLoader,YamlPropertySourceLoader

    //PropertiesPropertySourceLoader来加载后缀"properties", "xml" 的配置文件

    //YamlPropertySourceLoader来加载后缀为"yml", "yaml"的配置文件

			for (PropertySourceLoader loader : this.propertySourceLoaders) {

				for (String fileExtension : loader.getFileExtensions()) {

					if (processed.add(fileExtension)) {

            //具体在这里就会遍历PropertySourceLoader,来加载配置文件

            //loader就是PropertySourceLoader

            //location + name就是文件前缀了。如file:./config/application

            //"." + fileExtension是文件后缀

            //后面几个参数都是入口传入的

						loadForFileExtension(loader, location + name, "." + fileExtension, profile, filterFactory,

								consumer);

					}

				}

			}

		}
在这里就是分别使用PropertiesPropertySourceLoader,YamlPropertySourceLoader去做具体的加载解析了
private void loadForFileExtension(PropertySourceLoader loader, String prefix, String fileExtension,

      Profile profile, DocumentFilterFactory filterFactory, DocumentConsumer consumer) {

   //这里是生成文档过滤器

   //第一次进来的profile==null,不会走进下面的if分支

  //下面这有两个DocumentFilter,它们有什么区别呢?

  //第一个defaultFilter传入的是null,也就是说如果当前加载的配置文件中如果没有spring.profiles这个属性,那就会被加载

  //第二个profileFilter传入的是profile,那就需要配置文件中的spring.profiles包含了当前的profile,且处于激活状态

   DocumentFilter defaultFilter = filterFactory.getDocumentFilter(null);

   DocumentFilter profileFilter = filterFactory.getDocumentFilter(profile);

   if (profile != null) {

      // Try profile-specific file & profile section in profile file (gh-340)

     	//这里就会去查找类似我们工程中的配置文件application-test.properties了

      String profileSpecificFile = prefix + "-" + profile + fileExtension;

      load(loader, profileSpecificFile, profile, defaultFilter, consumer);

      load(loader, profileSpecificFile, profile, profileFilter, consumer);

      // Try profile specific sections in files we've already processed

     //这个情况就是类似我们配置文件application-test.properties的情况了

     //虽然profile==test时会去加载application-test.properties,但是由于application-test.properties配置文件中的			             			//spring.profiles=sitdba,是不能被profile=test的profileFilter匹配到的,

     //但是可以被profiles=sitdbaprofileFilter匹配匹配到,也就是会在下面的for循环中被加载到

      for (Profile processedProfile : this.processedProfiles) {

         if (processedProfile != null) {

            String previouslyLoaded = prefix + "-" + processedProfile + fileExtension;

            load(loader, previouslyLoaded, profile, profileFilter, consumer);

         }

      }

   }

  //第一次profile==null,就会加载类似application.yml这种,文件名中没有包含profile的配置文件

   // Also try the profile-specific section (if any) of the normal file

   load(loader, prefix + fileExtension, profile, profileFilter, consumer);

}
在这里就是具体拼接文件名:如application.yml,application-xxx.properties这种配置文件具体去加载了
private void load(PropertySourceLoader loader, String location, Profile profile, DocumentFilter filter,

      DocumentConsumer consumer) {

   try {

     //这里就是使用资源加载器去加载指定位置上的资源,也就是加载我们的配置文件。

     //如果找不到配置文件就直接返回,如果能找到就进行后面配置文件的加载了

      Resource resource = this.resourceLoader.getResource(location);

      if (resource == null || !resource.exists()) {

         if (this.logger.isTraceEnabled()) {

            StringBuilder description = getDescription("Skipped missing config ", location, resource,

                  profile);

            this.logger.trace(description);

         }

         return;

      }

      if (!StringUtils.hasText(StringUtils.getFilenameExtension(resource.getFilename()))) {

         if (this.logger.isTraceEnabled()) {

            StringBuilder description = getDescription("Skipped empty config extension ", location,

                  resource, profile);

            this.logger.trace(description);

         }

         return;

      }

      String name = "applicationConfig: [" + location + "]";

     	//这里会将配置文件转化成Document。

     	//yml文件中会用---进行区分成不同的文件,所以这里就是一个list,表示加载多个

      List<Document> documents = loadDocuments(loader, name, resource);

     //例如一个空的文件,就会走到这里,返回

      if (CollectionUtils.isEmpty(documents)) {

         if (this.logger.isTraceEnabled()) {

            StringBuilder description = getDescription("Skipped unloaded config ", location, resource,

                  profile);

            this.logger.trace(description);

         }

         return;

      }

      List<Document> loaded = new ArrayList<>();

     //这里会对Document进行过滤,对于符合条件的进行后续处理

      for (Document document : documents) {

        //这个过滤的话主要有两点

        //1.如果profile是null,那么就需要document的document.getProfiles()为空,就是配置文件中没有spring.profiles

        //2.如果profile不是null,那么就判断document的profiles中包含profile,且当前激活的profile包含了document的profile

         if (filter.match(document)) {

           	//这个是查找document中的spring.profiles.active加入到profiles中,在入口的lambda表达式就会继续从profiles中去遍历查找配置文件

           //在这个方法中只会添加一次,后面再添加的话,判断之前已经有添加,就会直接返回。同时在添加完了激活的profile后,会删除掉开始加入的名为default的默认的profile

            addActiveProfiles(document.getActiveProfiles());

           //这个是通过spring.profiles.include属性添加引入的外部文件的profile

            addIncludedProfiles(document.getIncludeProfiles());

           //将document加入到loaded列表中

            loaded.add(document);

         }

      }

     //这里对上面的document顺序进行反转

      Collections.reverse(loaded);

      if (!loaded.isEmpty()) {

        	//在这里会将document加载到成员变量loaded(它的结构是Map<Profile, MutablePropertySources>,下面的图就是当前loaded中的内容)中

         loaded.forEach((document) -> consumer.accept(profile, document));

         if (this.logger.isDebugEnabled()) {

            StringBuilder description = getDescription("Loaded config file ", location, resource, profile);

            this.logger.debug(description);

         }

      }

   }

   catch (Exception ex) {

      throw new IllegalStateException("Failed to load property source from location '" + location + "'", ex);

   }

}
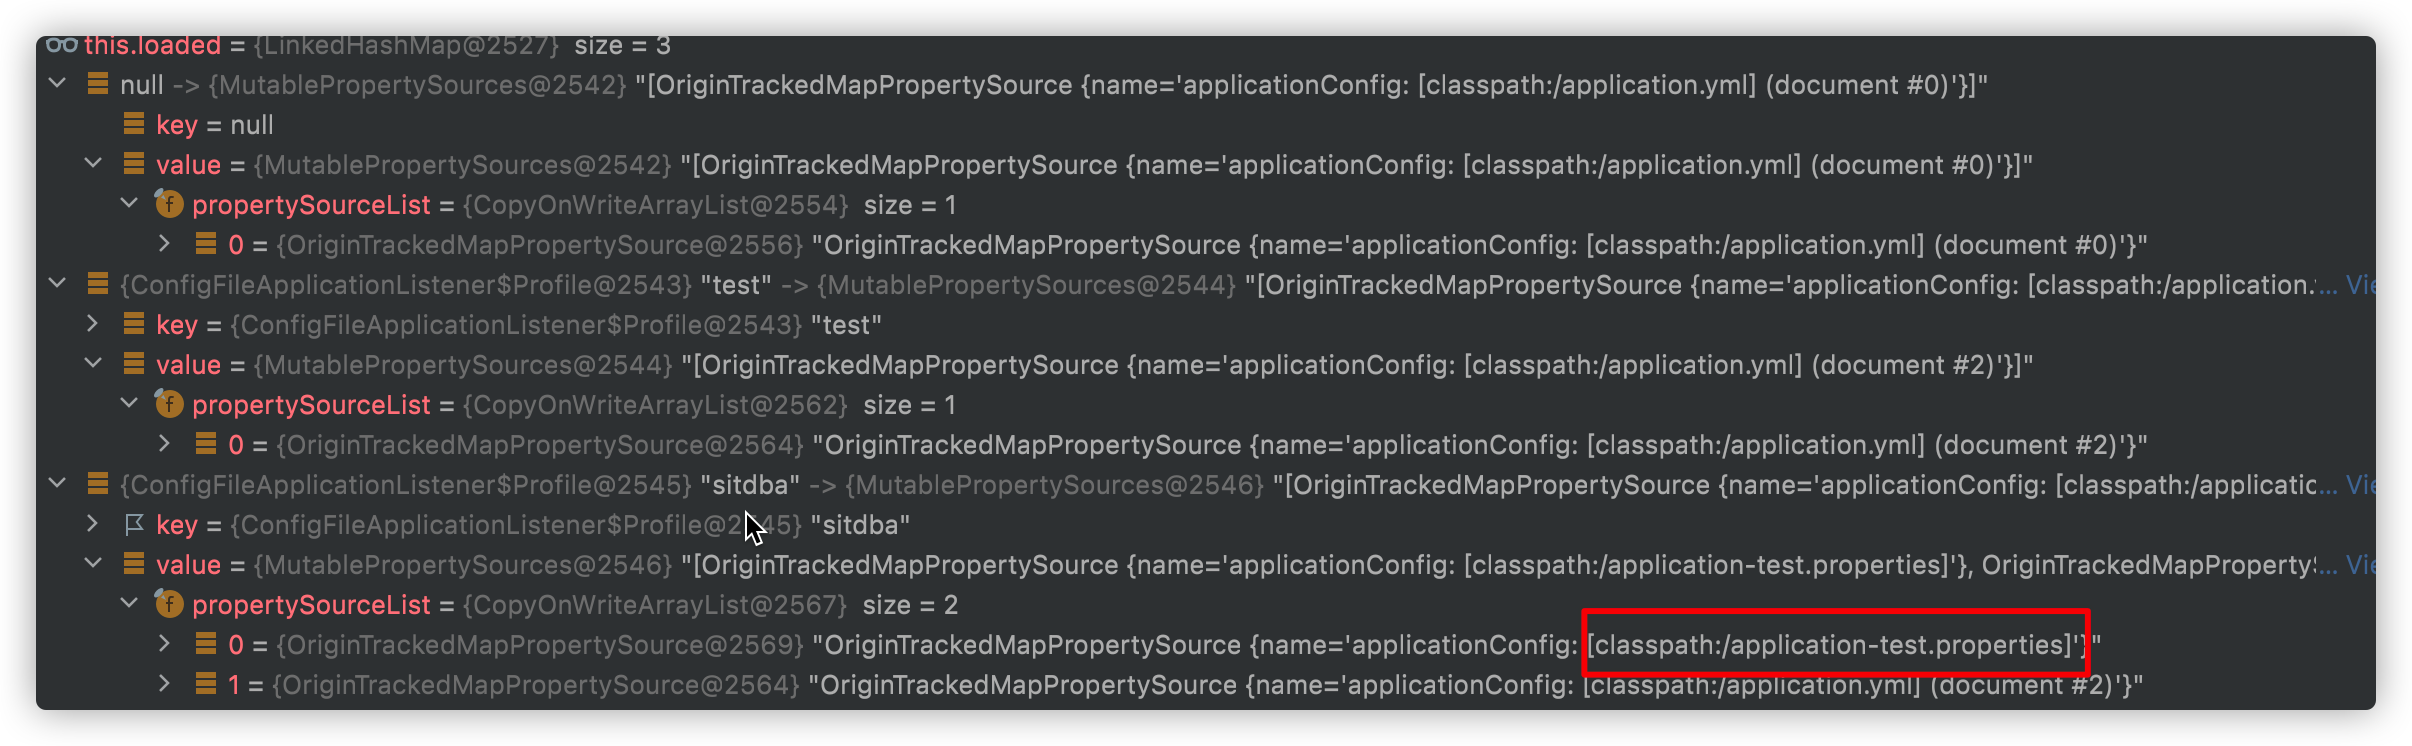
从上面的图上也能看到application-test.propertie并没有在profile=test下面,而是在profile=sitdba下面
我们再次回到之前开头的位置
					(defaultProperties) -> {

						this.profiles = new LinkedList<>();

						this.processedProfiles = new LinkedList<>();

						this.activatedProfiles = false;

						this.loaded = new LinkedHashMap<>();

						initializeProfiles();

						while (!this.profiles.isEmpty()) {

							Profile profile = this.profiles.poll();

							if (isDefaultProfile(profile)) {

								addProfileToEnvironment(profile.getName());

							}

							load(profile, this::getPositiveProfileFilter,

									addToLoaded(MutablePropertySources::addLast, false));

              //将激活并已经解析过的profile添加到列表中,最后会将这个列表中的profile作为environment中激活的profile

							this.processedProfiles.add(profile);

						}

            //这个是什么场景呢?

						load(null, this::getNegativeProfileFilter, addToLoaded(MutablePropertySources::addFirst, true));

            //这里就会将我们加载的配置文件都添加到this.environment.getPropertySources()属性上

						addLoadedPropertySources();

            //将上面的this.processedProfiles作为激活的profile

						applyActiveProfiles(defaultProperties);

					}
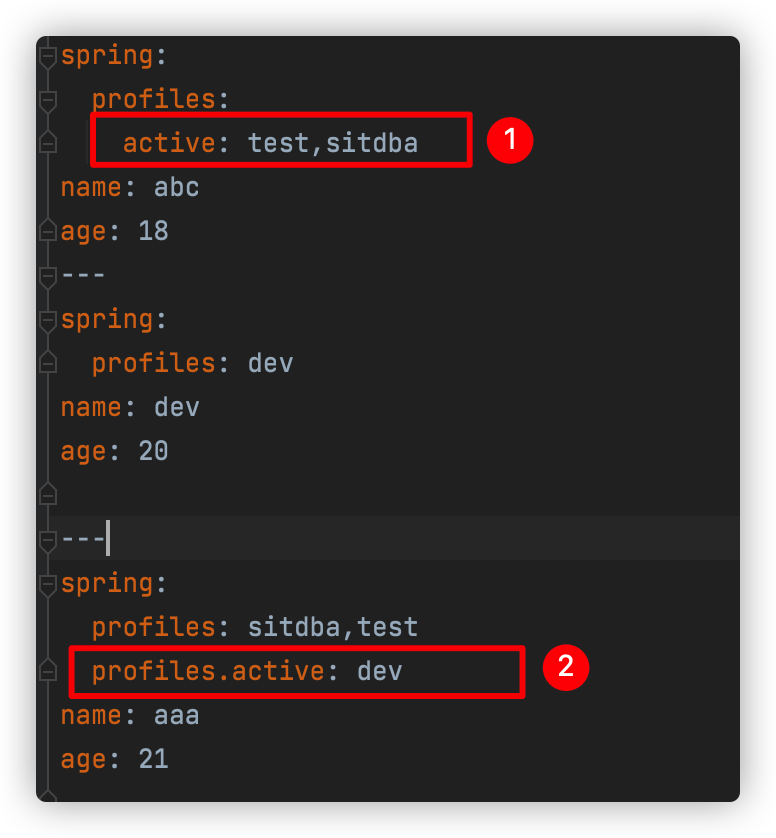
上面是我们的application.yml。
图1标注的顺序也是很重要的,如果写成sitdba,test。那样是不会加载application-test.properties这个配置文件的。
图2标注的dev这个profile并不会被加载。原因我们上面的也说过了,因为
addActiveProfiles只会添加一次。
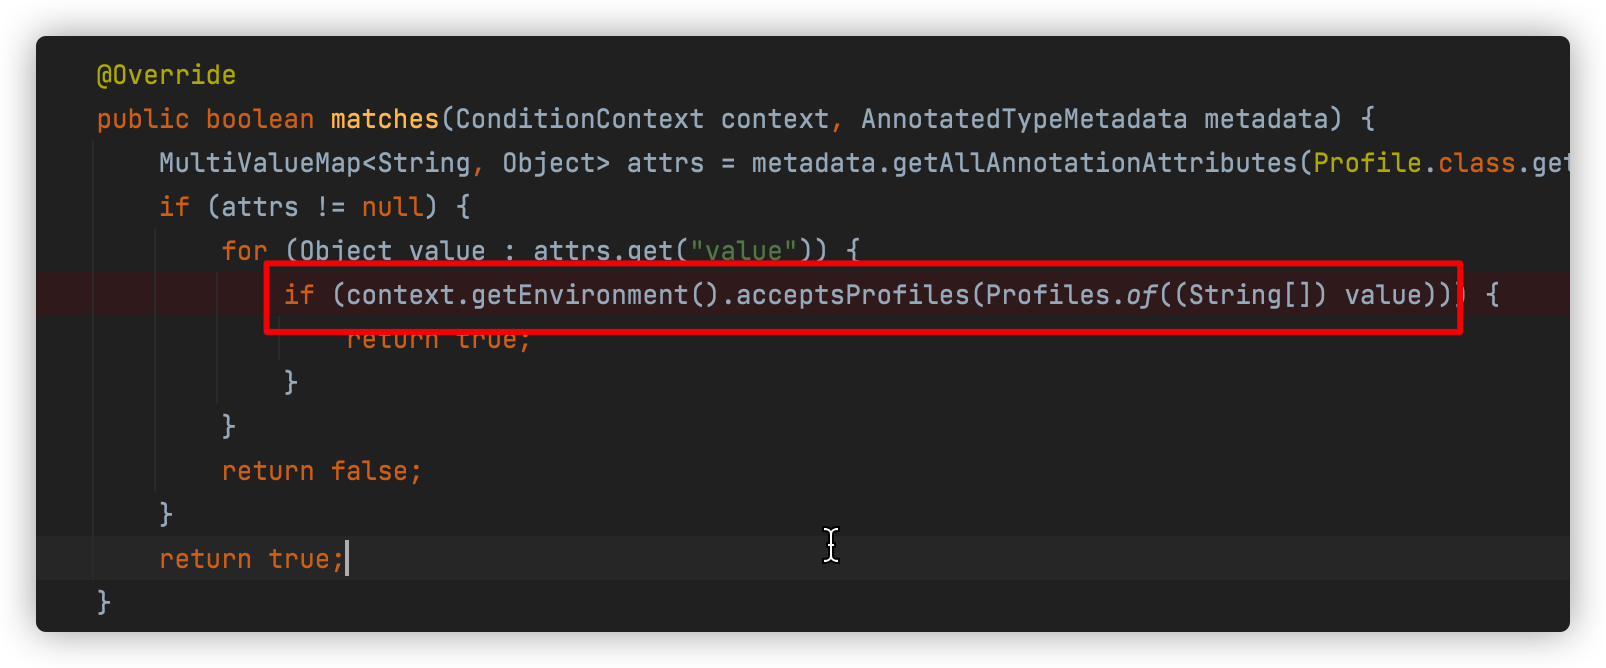
profile也可以通过它来过滤我们不同环境中加载的不同的bean,如下图这样

具体的过滤是通过ProfileCondition来实现的。也是查看当前profile注解中的值是否属于当前激活的profile
最终所有的配置文件属性等都会添加到Environment中,关于Environment,下篇文章和大家一起看看它的作用吧。
Springboot 加载配置文件源码分析的更多相关文章
- 微服务架构 | *2.3 Spring Cloud 启动及加载配置文件源码分析(以 Nacos 为例)
目录 前言 1. Spring Cloud 什么时候加载配置文件 2. 准备 Environment 配置环境 2.1 配置 Environment 环境 SpringApplication.prep ...
- Springboot学习04-默认错误页面加载机制源码分析
Springboot学习04-默认错误页面加载机制源码分析 前沿 希望通过本文的学习,对错误页面的加载机制有这更神的理解 正文 1-Springboot错误页面展示 2-Springboot默认错误处 ...
- ElasticSearch 启动时加载 Analyzer 源码分析
ElasticSearch 启动时加载 Analyzer 源码分析 本文介绍 ElasticSearch启动时如何创建.加载Analyzer,主要的参考资料是Lucene中关于Analyzer官方文档 ...
- springboot Properties加载顺序源码分析
关于properties: 在spring框架中properties为Environment对象重要组成部分, springboot有如下几种种方式注入(优先级从高到低): 1.命令行 java -j ...
- Spring Cloud Nacos实现动态配置加载的源码分析
理解了上述Environment的基本原理后,如何从远程服务器上加载配置到Spring的Environment中. NacosPropertySourceLocator 顺着前面的分析思路,我们很自然 ...
- jQuery实现DOM加载方法源码分析
传统的判断dom加载的方法 使用 dom0级 onload事件来进行触发所有浏览器都支持在最初是很流行的写法 我们都熟悉这种写法: window.onload=function(){ ... } 但 ...
- Spring boot加载REACTIVE源码分析
一,加载REACTIVE相关自动配置 spring boot通过判断含org.springframework.web.reactive.DispatcherHandler字节文件就确定程序类型是REA ...
- spring启动component-scan类扫描加载过程---源码分析
http://blog.csdn.net/xieyuooo/article/details/9089441#comments
- Spring加载流程源码分析03【refresh】
前面两篇文章分析了super(this)和setConfigLocations(configLocations)的源代码,本文来分析下refresh的源码, Spring加载流程源码分析01[su ...
随机推荐
- Serverless:这真的是未来吗?(二)
原文 | https://www.pulumi.com/blog/is_serverless_the_future_part_2/ 作者 | Lee Briggs & Piers Karsen ...
- Java初步学习——2021.09.23每日报告,第三周周四
(1)今天做了什么: (2)明天准备做什么? (3)遇到的问题,如何解决? 学习数组,编写了一个随机选牌的代码.自己最开始一直想只设置一个字符串数组,利用随机数来输出,但那样对字符串赋值会比较麻烦.可 ...
- javascript-jquery选择器
jquery选择器用来获得jquery对象 我们用一个实例来演示jquery与原生的区别 <div id="title">123</div>原生获得元素的方 ...
- BPMN 學習實例
什麼是業務流程圖? What is BPMN 業務流程建模符號(BPMN)是業務流程建模的一種方法.它基於統一建模語言(UML)中活動圖的概念,以圖形符號(業務流程圖)支持業務流程的規範.BPMN為企 ...
- [Beta]the Agiles Scrum Meeting 3
会议时间:2020.5.14 20:00 1.每个人的工作 今天已完成的工作 成员 已完成的工作 yjy 实现前端界面美化 tq 实现查看.删除测试点功能的前端修复功能中的bug wjx 升级系统实现 ...
- OO第二单元电梯作业总结
目录 目录一.第一次作业分析设计策略基于度量分析程序结构二.第二次作业分析设计策略基于度量分析程序结构三.第三次作业分析设计策略基于度量分析程序结构四.分析自己程序的bug五.发现别人程序bug所采用 ...
- VUE调用子窗口弹窗或组件弹窗,关闭弹窗刷新父级页面主页面,通过this.$emit来实现
this.$emit是父级向自己传值 第一步在父级页面创建自己页面的引用 <template> <div> <edit ref="edit" @ref ...
- Prometheus的单机部署
Prometheus的单机部署 一.什么是Prometheus 二.Prometheus的特性 三.支持的指标类型 1.Counter 计数器 2.Gauge 仪表盘 3.Histogram 直方图 ...
- Noip模拟12 2021.7.12
T1 interval 亏得昨天晚上改掉了T3并且理解了单调栈,今天一扫这题目就知道要用啥了. 先预处理出以a[i]为最大值的最大左右区间.然后再将a[i]取%!!!是的,要不然会影响单调栈的使用.. ...
- VMware Workstation 16.2 Pro for Linux SLIC 2.6 & Unlocker
请访问原文链接:https://sysin.org/blog/vmware-workstation-16-linux-slic/,查看最新版.原创作品,转载请保留出处. 作者:gc(at)sysin. ...