
Part 23 to 26 Routing in Angular
Part 23 AngularJS routing tutorial
In general, as the application becomes complex you will have more than one view in the application. Let's say you are building a single page application for a training institute and you have the following views
- Home
- Courses
- Students
We can take advantage of the Angular routing feature, to have a single layout page, and then inject and swap out different views depending on the URL the end user has requested.
So in our application we will have the following views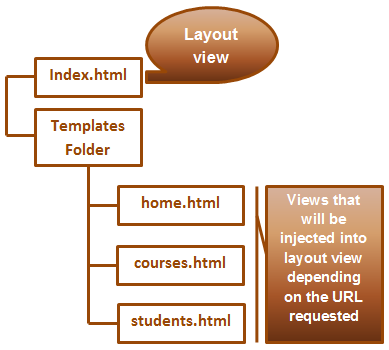
index.html is the layout view
home.html, courses.html & students.html will be injected into the layout view(index.html) depending on the URL the end user has requested
For example, if the user has requested http://localhost:51983/home, then home.html will be injected into the layout view (index.html). Similarly if the user has requestedhttp://localhost:51983/courses, then courses.html will be injected into the layout view (index.html).
Preparing the angular application application to use routing : The AngularJS Route module is present in a separate JavaScript file. You can either download it from AngularJs.org and use it in the application or you can use the CDN link.
Part 24 Angular layout template
The layout page for our example should be as shown below.
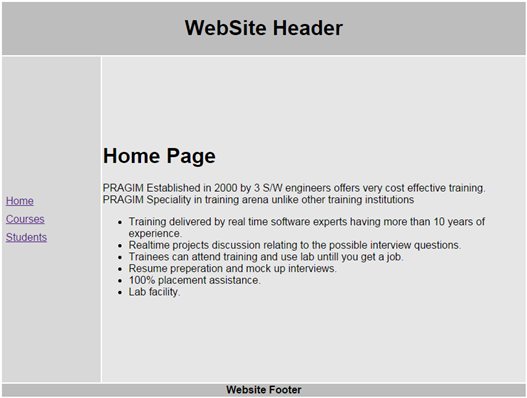
Here are the steps
Step 1 : Copy and paste the following HTML in the body section of the page.
<table style="font-family: Arial">

    <tr>

        <td colspan="2" class="header">

            <h1>

                WebSite Header

            </h1>

        </td>

    </tr>

    <tr>

        <td class="leftMenu">

            <a href="#/home">Home</a>

            <a href="#/courses">Courses</a>

            <a href="#/students">Students</a>

        </td>

        <td class="mainContent">

            <ng-view></ng-view>

        </td>

    </tr>

    <tr>

        <td colspan="2" class="footer">

            <b>Website Footer</b>

        </td>

    </tr>

</table>
Please note :
1. The partial templates (home.html, courses.html & students.html) will be injected into the location where we have ng-view directive.
2. For linking to partial templates we are using # symbol in the href attribute. This tells the browser not to navigate away from index.html. In a later video we will discuss how to get rid of the # symbol.
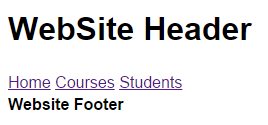
At this point, if you navigate to index.html, the page looks as shown below. This is because we do not have the styles applied yet.
Step 2 : Add a stylesheet to your project. Name it styles.css. Copy and paste the following.
.header {

    width: 800px;

    height: 80px;

    text-align: center;

}

.footer {

    text-align: center;

}

.leftMenu {

    height: 500px;

    width: 150px;

}

.mainContent {

    height: 500px;

    width: 650px;

}

a{

    display:block;

    padding:5px

}
Step 3 : Finally add a reference to styles.css in index.html page. At this point the HTML in the layout page (index.html) should be as shown below.
<!DOCTYPE html>

<html xmlns="http://www.w3.org/1999/xhtml" ng-app="Demo">

<head>

    <title></title>

    <script src="Scripts/angular.min.js"></script>

    <script src="Scripts/angular-route.min.js"></script>

    <link href="Styles.css" rel="stylesheet" />

</head>

<body>

    <table style="font-family: Arial">

        <tr>

            <td colspan="2" class="header">

                <h1>

                    WebSite Header

                </h1>

            </td>

        </tr>

        <tr>

            <td class="leftMenu">

                <a href="#/home">Home</a>

                <a href="#/courses">Courses</a>

                <a href="#/students">Students</a>

            </td>

            <td class="mainContent">

                <ng-view></ng-view>

            </td>

        </tr>

        <tr>

            <td colspan="2" class="footer">

                <b>Website Footer</b>

            </td>

        </tr>

    </table>

</body>

</html>
Part 25 Angularjs partial templates
One important thing to keep in mind is that, since we have all the surrounding HTML (i.e html, head, body etc) in the layout view (index.html), there is no need to include that same surrounding HTML again in the partial templates.
All our partial templates are going to be in Templates folder. So first add Templates folder to the project's root folder.
home.html : Right click on the Templates folder and add a new HTML file. Name it home.html. Copy and paste the following. The homeController will set the message property on the $scope object. We will discuss creating the homeController in a later video.
<h1>{{message}}</h1>

<div>

    PRAGIM Established in 2000 by 3 S/W engineers offers very cost effective training. PRAGIM Speciality in training arena unlike other training institutions

</div>

<ul>

    <li>Training delivered by real time software experts having more than 10 years of experience.</li>

    <li>Realtime projects discussion relating to the possible interview questions.</li>

    <li>Trainees can attend training and use lab untill you get a job.</li>

    <li>Resume preperation and mock up interviews.</li>

    <li>100% placement assistance.</li>

    <li>Lab facility.</li>

</ul>
courses.html : The coursesController will set the courses property on the $scope object. We will discuss creating the coursesController in a later video.
<h1>Courses we offer</h1>

<ul>

    <li ng-repeat="course in courses">

        {{course}}

    </li>

</ul>
students.html : The students data is going to come from a database table. So here are the steps
Step 1 : Create the database table (tblStudents) and populate it with test data.
Create table tblStudents

(

    Id int primary key identity,

    Name nvarchar(50),

    Gender nvarchar(10),

    City nvarchar(20)

)

Go

Insert into tblStudents values ('Mark', 'Male', 'London')

Insert into tblStudents values ('John', 'Male', 'Chennai')

Insert into tblStudents values ('Sara', 'Female', 'Sydney')

Insert into tblStudents values ('Tom', 'Male', 'New York')

Insert into tblStudents values ('Pam', 'Male', 'Los Angeles')

Insert into tblStudents values ('Catherine', 'Female', 'Chicago')

Insert into tblStudents values ('Mary', 'Female', 'Houston')

Insert into tblStudents values ('Mike', 'Male', 'Phoenix')

Insert into tblStudents values ('Rosie', 'Female', 'Manchester')

Insert into tblStudents values ('Sasha', 'Female', 'Hyderabad')

Go
Step 2 : Include the following configuration in web.config file. Notice we have a connection string to the database. We also have enabled HttpGet protocol for ASP.NET web services.
<?xml version="1.0" encoding="utf-8"?>

<configuration>

  <connectionStrings>

    <add name="DBCS"

         connectionString="server=(local);database=SampleDB; integrated security=true"

         providerName="System.Data.SqlClient" />

  </connectionStrings>

  <system.web>

    <webServices>

      <protocols>

        <add name="HttpGet" />

      </protocols>

    </webServices>

  </system.web>

</configuration>
Step 3 : Add a class file to the project. Name it Student.cs. Copy and paste the following code.
namespace Demo

{

    public class Student

    {

        public int id { get; set; }

        public string name { get; set; }

        public string gender { get; set; }

        public string city { get; set; }

    }

}
Step 4 : Add an ASMX web service to the project. Name it StudentService.asmx. Copy and paste the following code.
using System;

using System.Collections.Generic;

using System.Configuration;

using System.Data.SqlClient;

using System.Web.Script.Serialization;

using System.Web.Services;

namespace Demo

{

    [WebService(Namespace = "http://tempuri.org/")]

    [WebServiceBinding(ConformsTo = WsiProfiles.BasicProfile1_1)]

    [System.ComponentModel.ToolboxItem(false)]

    [System.Web.Script.Services.ScriptService]

    public class StudentService : System.Web.Services.WebService

    {

        [WebMethod]

        public void GetAllStudents()

        {

            List<Student> listStudents = new List<Student>();

            string cs = ConfigurationManager.ConnectionStrings["DBCS"].ConnectionString;

            using (SqlConnection con = new SqlConnection(cs))

            {

                SqlCommand cmd = new SqlCommand("Select * from tblStudents", con);

                con.Open();

                SqlDataReader rdr = cmd.ExecuteReader();

                while (rdr.Read())

                {

                    Student student = new Student();

                    student.id = Convert.ToInt32(rdr["Id"]);

                    student.name = rdr["Name"].ToString();

                    student.gender = rdr["Gender"].ToString();

                    student.city = rdr["City"].ToString();

                    listStudents.Add(student);

                }

            }

            JavaScriptSerializer js = new JavaScriptSerializer();

            Context.Response.Write(js.Serialize(listStudents));

        }

    }

}
Step 5 : Right click on the Templates folder and add a new HTML file. Name it students.html. Copy and paste the following. The studentsController will set the students property on the $scope object. We will discuss creating the studentsController in a later video.
<h1>List of Students</h1>

<ul>

    <li ng-repeat="student in students">

        {{student.name}}

    </li>

</ul>
Part 26 Angularjs route configuration
Right click on the Scripts folder and add a new JavaScript file. Name it script.js. Copy and paste the following code.
/// <reference path="angular.min.js" />

var app = angular

            .module("Demo", ["ngRoute"])

            .config(function ($routeProvider) {

                $routeProvider

                    .when("/home", {

                        templateUrl: "Templates/home.html",

                        controller: "homeController"

                    })

                    .when("/courses", {

                        templateUrl: "Templates/courses.html",

                        controller: "coursesController"

                    })

                    .when("/students", {

                        templateUrl: "Templates/students.html",

                        controller: "studentsController"

                    })

            })

            .controller("homeController", function ($scope) {

                $scope.message = "Home Page";

            })

            .controller("coursesController", function ($scope) {

                $scope.courses = ["C#", "VB.NET", "ASP.NET", "SQL Server"];

            })

             .controller("studentsController", function ($scope, $http) {

                 $http.get("StudentService.asmx/GetAllStudents")

                                        .then(function (response) {

                                            $scope.students = response.data;

                                        })

             })
2 Changes to index.html
1. Add a reference to the script.js file in the layout template i.e index.html.
2. Set ng-app="Demo" on the root html element
At this point, depending on the URL, the respective partial template will be injected into the layout template in the location where we have ng-view directive. For example if you have index.html#/home, then home.html is injected into index.html. Similarly if you are on index.html#/courses, then course.html is injected into index.html.
Part 23 to 26 Routing in Angular的更多相关文章
- [Angular 2] ROUTING IN ANGULAR 2 REVISITED
Let's say we have a list of contacts, click each contact, we can render a new route to get the detai ...
- ZJOI2019Day2余姚中学游记(4.23~4.26)
前言 \(Day2\),又是一场噩梦. 前段时间去做了挺多十二省联考和\(HNOI2019\)的题目,还订正掉了\(Day1\)的\(T1\)和\(T2\)(\(T3\)动态\(DP\)完全不想订正啊 ...
- angular 4 http 之web api 服务
Angular Http是获取和保存数据的.主要是为了取到我json文件里的数据. 直接上代码吧: 1. 先介绍Promise模式的:(直接代码) heroes.json: 1 2 3 4 5 6 ...
- 来自 Thoughtram 的 Angular 2 系列资料
Angular 2 已经正式 Release 了,Thoughtram 已经发布了一系列的文档,对 Angular 2 的各个方面进行深入的阐释和说明. 我计划逐渐将这个系列翻译出来,以便对大家学习 ...
- Angular快速学习笔记(2) -- 架构
0. angular 与angular js angular 1.0 google改名为Angular js 新版本的,2.0以上的,继续叫angular,但是除了名字还叫angular,已经是一个全 ...
- AngularJS - 路由 routing 基础示例
AngularJS 路由 routing 能够从页面的一个视图跳转到另外一个视图,对单页面应用来讲是至关重要的.当应用变得越来越复杂时,我们需要一个合理的方式来管理用户在使用过程中看到的界面.Angu ...
- 26. 60s快速定位服务器性能问题
60s迅速发现性能问题 uptime dmesg | tail vmstat 1 mpstat -P ALL 1 pidstat 1 iostat -xz 1 free -m sar -n DEV 1 ...
- Ubuntu14.04+RabbitMQ3.6.3+Golang的最佳实践
目录 [TOC] 1.RabbitMQ介绍 1.1.什么是RabbitMQ? RabbitMQ 是由 LShift 提供的一个 Advanced Message Queuing Protocol ...
- EEG: electrode positions & Broadmann atlas
Source: http://www.brainm.com/software/pubs/dg/BA_10-20_ROI_Talairach/nearesteeg.htm Area LEFT RIG ...
随机推荐
- 前端规范之CSS规范(Stylelint)
代码规范是软件开发领域经久不衰的话题,几乎所有工程师在开发过程中都会遇到或思考过这一问题.而随着前端应用的大型化和复杂化,越来越多的前端团队也开始重视代码规范.同样,前段时间,笔者所在的团队也开展了一 ...
- Powerful Number 学习笔记
定义 对于一个正整数 \(n\) ,若完全分解之后不存在指数 \(=1\) ,则称 \(n\) 为 \(\text{Powerful Number}\) . 可以发现的是,在 \([1,n]\) 中, ...
- Miller-Rabin学习笔记
首先给出两个定理: 1.费马小定理 设p是一个素数,a是一个整数,且不是p的倍数,那么 \(a^{p−1} \equiv\ 1 \pmod p\) 2.二次探测定理 若\(p\)是素数,\(x\)是一 ...
- 关于SSTI的坑
SSTI注入 进过几天的CSDN和博客园以及个人博客的查询,我大概讲一下我对SSTI模板注入的理解. SSTI注入指的是模板注入(应该翻译就是模板注入) 就站在我所了解的知识水平(大概就是大一随便水了 ...
- 5分钟让你掌握Vuex,深入浅出
5分钟让你掌握Vuex,深入浅出 一.什么是Vuex? 概念:Vuex 是一个专为 Vue.js 应用程序开发的状态管理模式.它采用集中式存储管理应用的所有组件的状态,并以相应的规则保证状态以一种可预 ...
- Android构建工具--AAPT2源码解析(一)
一.什么是AAPT2 在Android开发过程中,我们通过Gradle命令,启动一个构建任务,最终会生成构建产物"APK"文件.常规APK的构建流程如下: (引用自Google官方 ...
- 免费UML工具介绍 - 基于云技术
现在,我们的时间很短,无法完成我们的项目.我们不想花时间在软件配置.安装上,而是集中精力解决问题,对吗? 今天我想给大家介绍一个非常特殊的IT专业人员工具.软件开发.战略分析.客户行程映射等灵活的免费 ...
- kivy布局(一)
# import kivy from kivy.app import App # 导入应用 from kivy.uix.label import Label # 导入标签 from kivy.uix. ...
- 计算机网络:HTTP
计算机网络基础:HTTP 先验知识 HTTP和其他协议的关系 通过下图,了解IP协议,TCP协议,DNS服务在使用HTTP协议通信过程中各自发挥的作用: 服务器处理流程 接受客户端连接 ------& ...
- 看动画学算法之:队列queue
目录 简介 队列的实现 队列的数组实现 队列的动态数组实现 队列的链表实现 队列的时间复杂度 简介 队列Queue是一个非常常见的数据结构,所谓队列就是先进先出的序列结构. 想象一下我们日常的排队买票 ...