深入了解SpringMVC源码解析
Spring MVC源码解析
Spring MVC的使用原理其实是通过配置一个Servlet来接管所有的请求,所有的请求由这个Servlet来进行分发处理。
我们可以从web.xml里面看出这一点
<servlet>

        <servlet-name>springmvc</servlet-name>

        <servlet-class>org.springframework.web.servlet.DispatcherServlet</servlet-class>

        <init-param>

            <param-name>contextConfigLocation</param-name>

            <param-value>classpath:springmvc.xml</param-value>

        </init-param>

    </servlet>
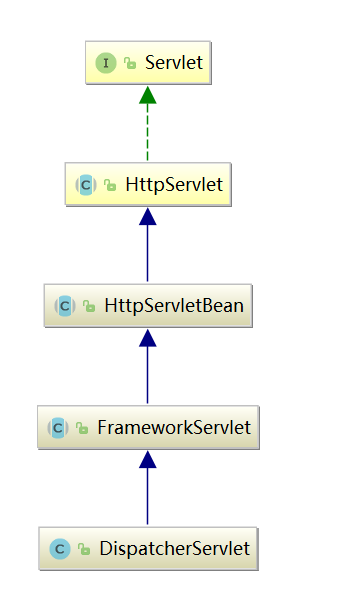
这个Servlet就是Spring MVC提供的DispatcherServlet,它的继承图如下:
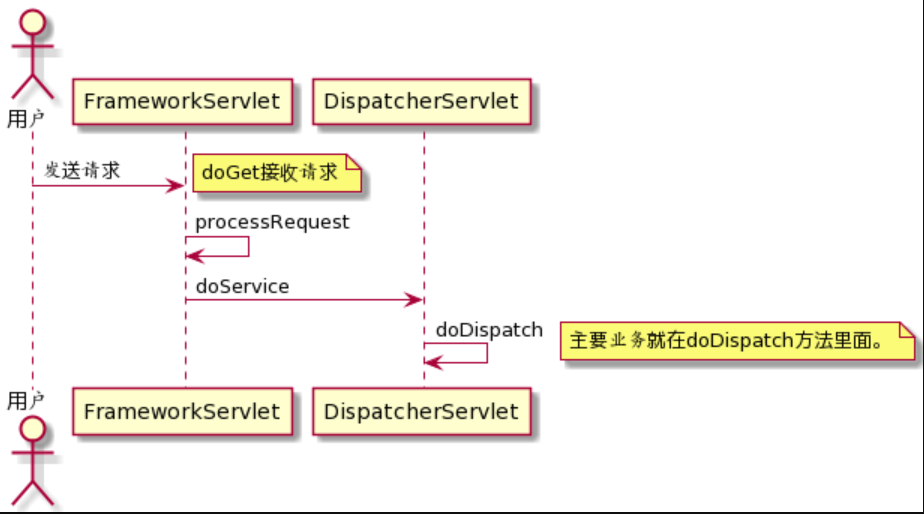
DispatcherServlet大致接收请求的时序图如下:
下面我们先设定几个问题然后再去看源码。
- DispatcherServlet初始化的时机?
我们将断点打在DispatcherServlet中的onRefresh方法上
,然后启动项目。
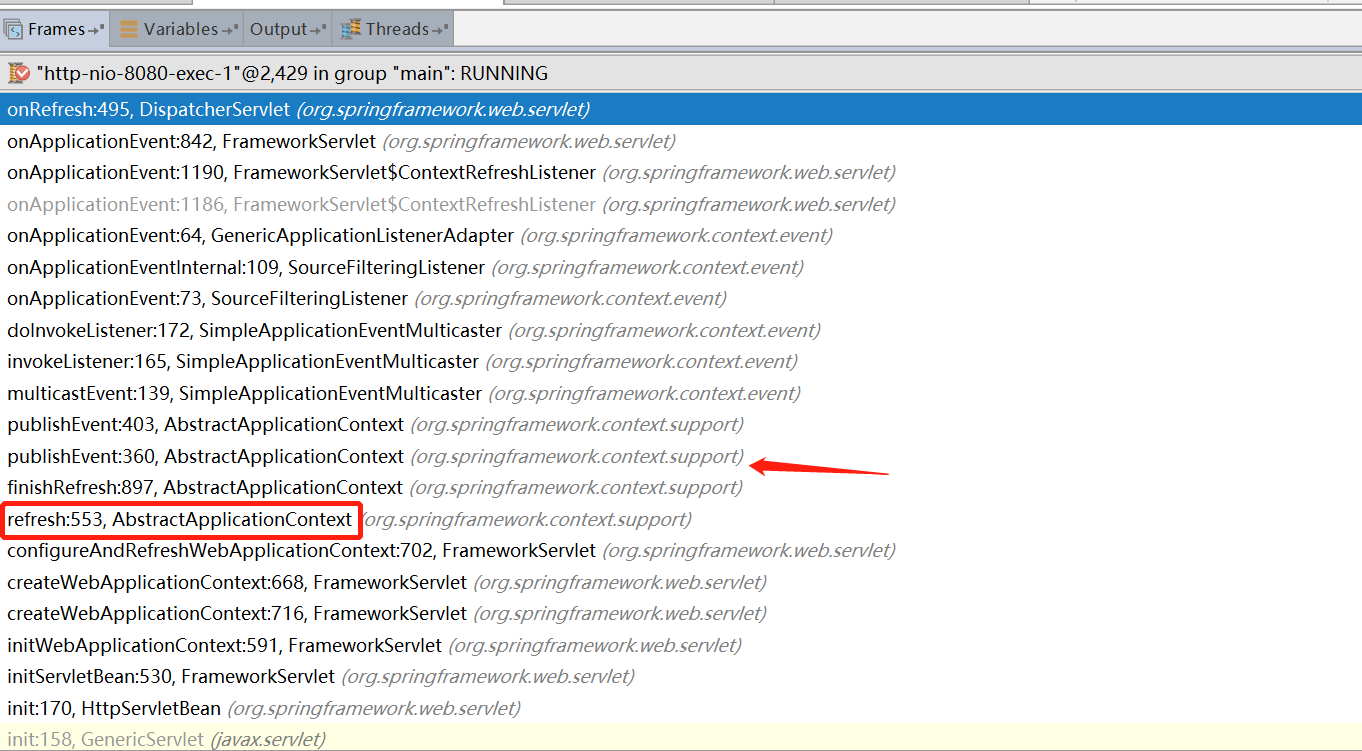
从这个堆栈的图可以看出,最开始是HttpServletBean的init方法执行,然后启动Spring容器,Spring容器初始化的最后一步finishRefresh里面进行了事件通知。
FrameworkServlet里有个内部类ContextRefreshListener,实现了ApplicationListener接口,接收到了上面的事件通知,执行onApplicationEvent方法。
private class ContextRefreshListener implements ApplicationListener<ContextRefreshedEvent> {

		@Override

		public void onApplicationEvent(ContextRefreshedEvent event) {

			FrameworkServlet.this.onApplicationEvent(event);

		}

	}
继续跟踪onApplicationEvent方法
public void onApplicationEvent(ContextRefreshedEvent event) {

		this.refreshEventReceived = true;

		synchronized (this.onRefreshMonitor) {

			onRefresh(event.getApplicationContext());

		}

	}
发现最终是由onRefresh方法来进行具体处理的,并且这个onRefresh方法在FrameworkServlet里面是个空方法,是由它的子类DispatcherServlet来实现的。
我们来看DispatcherServlet里的onRefresh方法
protected void onRefresh(ApplicationContext context) {

		initStrategies(context);

	}
protected void initStrategies(ApplicationContext context) {

		initMultipartResolver(context);

		initLocaleResolver(context);

		initThemeResolver(context);

		initHandlerMappings(context);

		initHandlerAdapters(context);

		initHandlerExceptionResolvers(context);

		initRequestToViewNameTranslator(context);

		initViewResolvers(context);

		initFlashMapManager(context);

	}
这样就把SpringMVC的九大组件给初始化了。
- 我们的@RequestMapping注解在方法上,SpringMVC是怎么根据这个注解就能将对应的请求执行到这个方法上的?
从上面可以看到有个initHandlerMappings方法:
private void initHandlerMappings(ApplicationContext context) {

		this.handlerMappings = null;

		if (this.detectAllHandlerMappings) {

			// 找所有实现了HandlerMapping接口的类

			Map<String, HandlerMapping> matchingBeans =

					BeanFactoryUtils.beansOfTypeIncludingAncestors(context, HandlerMapping.class, true, false);

			if (!matchingBeans.isEmpty()) {

				this.handlerMappings = new ArrayList<>(matchingBeans.values());

				// We keep HandlerMappings in sorted order.

				AnnotationAwareOrderComparator.sort(this.handlerMappings);

			}

		}

		else {

			try {

				HandlerMapping hm = context.getBean(HANDLER_MAPPING_BEAN_NAME, HandlerMapping.class);

				this.handlerMappings = Collections.singletonList(hm);

			}

			catch (NoSuchBeanDefinitionException ex) {

				// Ignore, we'll add a default HandlerMapping later.

			}

		}

		// Ensure we have at least one HandlerMapping, by registering

		// a default HandlerMapping if no other mappings are found.

		if (this.handlerMappings == null) {

		//默认情况下,我们是使用的这个方法。

			this.handlerMappings = getDefaultStrategies(context, HandlerMapping.class);

			if (logger.isTraceEnabled()) {

				logger.trace("No HandlerMappings declared for servlet '" + getServletName() +

						"': using default strategies from DispatcherServlet.properties");

			}

		}

	}
继续跟踪getDefaultStrategies方法
protected <T> List<T> getDefaultStrategies(ApplicationContext context, Class<T> strategyInterface) {

		String key = strategyInterface.getName();

		String value = defaultStrategies.getProperty(key);

		if (value != null) {

			String[] classNames = StringUtils.commaDelimitedListToStringArray(value);

			List<T> strategies = new ArrayList<>(classNames.length);

			for (String className : classNames) {

				try {

					Class<?> clazz = ClassUtils.forName(className, DispatcherServlet.class.getClassLoader());

					Object strategy = createDefaultStrategy(context, clazz);

					strategies.add((T) strategy);

				}

			//省略部分代码...

			}

			return strategies;

		}

		else {

			return new LinkedList<>();

		}

	}
可以看出对classNames进行了遍历,这里有两个值,
BeanNameUrlHandlerMapping和RequestMappingHandlerMapping,我们一般用的是RequestMappingHandlerMapping。
RequestMappingHandlerMapping的父类AbstractHandlerMethodMapping实现了InitializingBean接口,我们来看看它实现的afterPropertiesSet方法。
public void afterPropertiesSet() {

		this.config = new RequestMappingInfo.BuilderConfiguration();

		this.config.setUrlPathHelper(getUrlPathHelper());

		this.config.setPathMatcher(getPathMatcher());

		this.config.setSuffixPatternMatch(this.useSuffixPatternMatch);

		this.config.setTrailingSlashMatch(this.useTrailingSlashMatch);

		this.config.setRegisteredSuffixPatternMatch(this.useRegisteredSuffixPatternMatch);

		this.config.setContentNegotiationManager(getContentNegotiationManager());

		super.afterPropertiesSet();

	}
前面都是一些配置,后面是调用父类的afterPropertiesSet方法,此方法里只有initHandlerMethods一个方法
protected void initHandlerMethods() {

		for (String beanName : getCandidateBeanNames()) {

			if (!beanName.startsWith(SCOPED_TARGET_NAME_PREFIX)) {

				processCandidateBean(beanName);

			}

		}

		handlerMethodsInitialized(getHandlerMethods());

	}
主要看processCandidateBean方法
protected void processCandidateBean(String beanName) {

		Class<?> beanType = null;

		try {

			beanType = obtainApplicationContext().getType(beanName);

		}

		catch (Throwable ex) {

			// An unresolvable bean type, probably from a lazy bean - let's ignore it.

			if (logger.isTraceEnabled()) {

				logger.trace("Could not resolve type for bean '" + beanName + "'", ex);

			}

		}

		if (beanType != null && isHandler(beanType)) {

			detectHandlerMethods(beanName);

		}

	}
继续跟踪detectHandlerMethods方法
protected void detectHandlerMethods(Object handler) {

		Class<?> handlerType = (handler instanceof String ?

				obtainApplicationContext().getType((String) handler) : handler.getClass());

		if (handlerType != null) {

			Class<?> userType = ClassUtils.getUserClass(handlerType);

			//利用工具,取出类里面的方法并组装成map

			Map<Method, T> methods = MethodIntrospector.selectMethods(userType,

					(MethodIntrospector.MetadataLookup<T>) method -> {

						try {

							return getMappingForMethod(method, userType);

						}

						catch (Throwable ex) {

							throw new IllegalStateException("Invalid mapping on handler class [" +

									userType.getName() + "]: " + method, ex);

						}

					});

			if (logger.isTraceEnabled()) {

				logger.trace(formatMappings(userType, methods));

			}

			//遍历map,处理里面的方法

			methods.forEach((method, mapping) -> {

				Method invocableMethod = AopUtils.selectInvocableMethod(method, userType);

				registerHandlerMethod(handler, invocableMethod, mapping);

			});

		}

	}
继续跟踪里面的register方法
public void register(T mapping, Object handler, Method method) {

			this.readWriteLock.writeLock().lock();

			try {

				HandlerMethod handlerMethod = createHandlerMethod(handler, method);

				assertUniqueMethodMapping(handlerMethod, mapping);

				this.mappingLookup.put(mapping, handlerMethod);

				List<String> directUrls = getDirectUrls(mapping);

				for (String url : directUrls) {

					this.urlLookup.add(url, mapping);

				}

				String name = null;

				if (getNamingStrategy() != null) {

					name = getNamingStrategy().getName(handlerMethod, mapping);

					addMappingName(name, handlerMethod);

				}

				CorsConfiguration corsConfig = initCorsConfiguration(handler, method, mapping);

				if (corsConfig != null) {

					this.corsLookup.put(handlerMethod, corsConfig);

				}

				this.registry.put(mapping, new MappingRegistration<>(mapping, handlerMethod, directUrls, name));

			}

			finally {

				this.readWriteLock.writeLock().unlock();

			}

		}
可以看出mappingLookup、urlLookup、registry都放入了值。这时我也不知道每个的具体作用。我把断点打到这3个属性上。然后前端发起一个get请求。
- 请求匹配的过程?
前端发起请求,断点停在了AbstractHandlerMethodMapping.MappingRegistry#getMappingsByUrl方法上,以前端发起的请求路径,从urlLookup上获取对应的值。

最后看看请求分发的主流程,也是springMVC最核心的代码
protected void doDispatch(HttpServletRequest request, HttpServletResponse response) throws Exception {

		HttpServletRequest processedRequest = request;

		HandlerExecutionChain mappedHandler = null;

		boolean multipartRequestParsed = false;

		WebAsyncManager asyncManager = WebAsyncUtils.getAsyncManager(request);

		try {

			ModelAndView mv = null;

			Exception dispatchException = null;

			try {

				//multipart请求处理

				processedRequest = checkMultipart(request);

				multipartRequestParsed = (processedRequest != request);

				// 获取合适的HandlerExecutionChain

				mappedHandler = getHandler(processedRequest);

				if (mappedHandler == null) {

					noHandlerFound(processedRequest, response);

					return;

				}

				//获取合适的HandlerAdapter

				HandlerAdapter ha = getHandlerAdapter(mappedHandler.getHandler());

				// Process last-modified header, if supported by the handler.

				String method = request.getMethod();

				boolean isGet = "GET".equals(method);

				if (isGet || "HEAD".equals(method)) {

					long lastModified = ha.getLastModified(request, mappedHandler.getHandler());

					if (new ServletWebRequest(request, response).checkNotModified(lastModified) && isGet) {

						return;

					}

				}

				if (!mappedHandler.applyPreHandle(processedRequest, response)) {

					return;

				}

				// handle执行调用(核心)

				mv = ha.handle(processedRequest, response, mappedHandler.getHandler());

				if (asyncManager.isConcurrentHandlingStarted()) {

					return;

				}

				applyDefaultViewName(processedRequest, mv);

				mappedHandler.applyPostHandle(processedRequest, response, mv);

			}

			catch (Exception ex) {

				dispatchException = ex;

			}

			catch (Throwable err) {

				// As of 4.3, we're processing Errors thrown from handler methods as well,

				// making them available for @ExceptionHandler methods and other scenarios.

				dispatchException = new NestedServletException("Handler dispatch failed", err);

			}

			//视图解析并渲染到页面

			processDispatchResult(processedRequest, response, mappedHandler, mv, dispatchException);

		}

		catch (Exception ex) {

			triggerAfterCompletion(processedRequest, response, mappedHandler, ex);

		}

		catch (Throwable err) {

			triggerAfterCompletion(processedRequest, response, mappedHandler,

					new NestedServletException("Handler processing failed", err));

		}

		finally {

			if (asyncManager.isConcurrentHandlingStarted()) {

				// Instead of postHandle and afterCompletion

				if (mappedHandler != null) {

					mappedHandler.applyAfterConcurrentHandlingStarted(processedRequest, response);

				}

			}

			else {

				// Clean up any resources used by a multipart request.

				if (multipartRequestParsed) {

					cleanupMultipart(processedRequest);

				}

			}

		}

	}
总结:
tomcat的Servlet调起Spring容器启动,Spring容器启动完,事件通知到SpringMVC的DispatcherServlet。
这时会扫描所有的bean,将注解了@Controller和@RequestMapping的解析出来。
前端请求发过来,DispatcherServlet接收到(因为它是个servlet,配置在web.xml的),根据上一步处理好的映射关系,找到对应的方法来处理。
如通过/test能找到test方法
@RequestMapping("/test")

	public String test(String name, HttpServletRequest request,Model model){

		System.out.println("name");

		model.addAttribute("date",new Date());

		return "success";

	}
- 找到对应的方法后,反射调用
method.invoke(Object obj,Object... args)
- 组装modelAndView渲染视图到前端
深入了解SpringMVC源码解析的更多相关文章
- SpringMVC源码解析- HandlerAdapter - ModelFactory(转)
ModelFactory主要是两个职责: 1. 初始化model 2. 处理器执行后将modle中相应参数设置到SessionAttributes中 我们来看看具体的处理逻辑(直接充当分析目录): 1 ...
- springMVC源码解析--ViewResolver视图解析器执行(三)
之前两篇博客springMVC源码分析--ViewResolver视图解析器(一)和springMVC源码解析--ViewResolverComposite视图解析器集合(二)中我们已经简单介绍了一些 ...
- SpringMVC源码解析- HandlerAdapter - ModelFactory
ModelFactory主要是两个职责: 1. 初始化model 2. 处理器执行后将modle中相应参数设置到SessionAttributes中 我们来看看具体的处理逻辑(直接充当分析目录): 1 ...
- springMVC源码解析--ViewResolverComposite视图解析器集合(二)
上一篇博客springMVC源码分析--ViewResolver视图解析器(一)中我们介绍了一些springMVC提供的很多视图解析器ViewResolver,在开发的一套springMVC系统中是可 ...
- springMVC源码解析--HandlerMethodArgumentResolverComposite参数解析器集合(二)
上一篇博客springMVC源码分析--HandlerMethodArgumentResolver参数解析器(一)中我们已经介绍了参数解析相关的东西,并且也提到了HandlerMethodArgume ...
- springmvc源码解析MvcNamespaceHandler之<mvc:view-resolvers>
说在前面 本次主要介绍springmvc配置解析. springmvc配置解析 本次介绍MvcNamespaceHandler. 进入到这个方法org.springframework.web.serv ...
- SpringMVC源码解析
一:springmvc运行过程: 1. dispatcherServlet 通过 HandlerMapping 找到controller2. controller经过后台逻辑处理得到结果集modela ...
- SpringMVC源码解析- HandlerAdapter初始化
HandlerAdapter初始化时,主要是进行注解解析器初始化注册;返回值处理类初始化;全局注解@ControllerAdvice内容读取并缓存. 目录: 注解解析器初始化注册:@ModelAttr ...
- springmvc源码解析-初始化
1. 概述 对于Web开发者,MVC模型是大家再熟悉不过的了,SpringMVC中,满足条件的请求进入到负责请求分发的DispatcherServlet,DispatcherServlet根 ...
随机推荐
- Fiddler抓包一键生成代码
首先我们的需求场景是 用Fiddler抓到某个接口调用后,用代码来模拟调用,一般我们写代码会有3个步骤: 1设置http请求相关的参数:header,method,url,cookie等 2设置pos ...
- 超详细的Ribbon源码解析
Ribbon简介 什么是Ribbon? Ribbon是springcloud下的客户端负载均衡器,消费者在通过服务别名调用服务时,需要通过Ribbon做负载均衡获取实际的服务调用地址,然后通过http ...
- Vim合并行
日常常用到多行合并的功能,记录如下: 第一种, 多行合并成一行,即: AAAAABBBBBCCCCC 合并为:AAAAA BBBBB CCCCC 方法1: normal状态下 3J 其中的3是范围,可 ...
- 3.3 Execution Flow of a DDD Based Application 基于DDD的应用程序执行流程
3.3 Execution Flow of a DDD Based Application 基于DDD的应用程序执行流程 The figure below shows a typical reques ...
- MySQL:提高笔记-5
MySQL:提高笔记-5 学完基础的语法后,进一步对 MySQL 进行学习,前几篇为: MySQL:提高笔记-1 MySQL:提高笔记-2 MySQL:提高笔记-3 MySQL:提高笔记-4 MySQ ...
- 【二食堂】Beta - Scrum Meeting 1
Scrum Meeting 1 例会时间:5.13 18:30~18:50 进度情况 组员 当前进度 今日任务 李健 1. 查阅资料,解决划词勾选和右键菜单的问题issue2. 修复了Alpha阶段的 ...
- Noip模拟43 2021.8.18
T1 地一体 可以树形$dp$,但考场没写出来,只打了没正确性的贪心水了$30$ 然后讲题的时候B哥讲了如何正确的贪心,喜出望外的学习了一下 不难发现 每次士兵都会直接冲到叶子节点 从深的点再返回到另 ...
- Xpath语法学习记录
高级参考:https://blog.csdn.net/wudaoshihun/article/details/82226122 举例: 1 <!DOCTYPE html> 2 <ht ...
- 全志Tina_dolphin播放音视频裸流(h264,pcm)验证
最近在验证tina对裸流音视频的支持,主要指h264视频裸流及pcm音频裸流. 在原始sdk中有针对很多video和audio类型的parser,但就是没有找到pcm和h264的parser,所以需要 ...
- dhcpd:bad subnet number/mask combination. subnet
今天在调试wifi热点启动hdcpd服务时出现报错"bad subnet number/mask combination. subnet 192.168.1.1", Interne ...