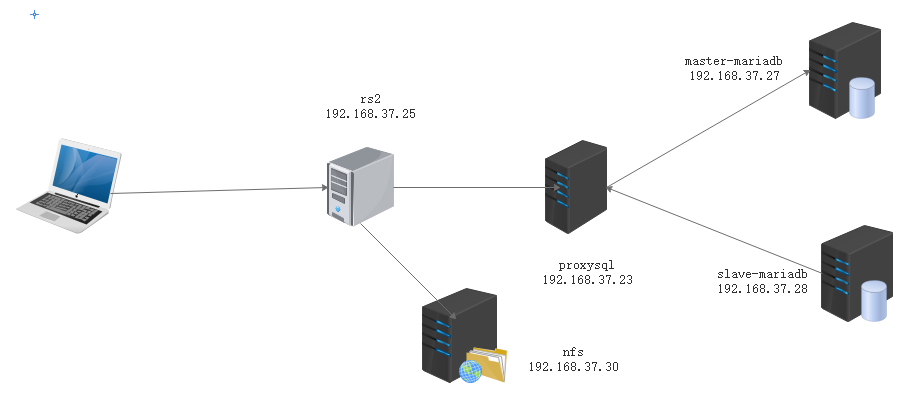
mysql读写分离(proxySQL) lamp+proxysql+nfs
先在主从节点安装mysql
[root@master-mariadb ~]# yum install mariadb-server -y

[root@slave-mariadb ~]# yum install mariadb-server -y
配置主节点和从节点
[root@master-mariadb ~]# vim /etc/my.cnf

[mysqld]

datadir=/var/lib/mysql

socket=/var/lib/mysql/mysql.sock

server_id=27

log-bin=master-log

skip_name_resolve=ON

innodb_file_per_table=ON
datadir=/var/lib/mysql
socket=/var/lib/mysql/mysql.sock
relay-log=slave-log
read_only=1
skip_name_resolve=ON
innodb_file_per_table=ON
配置主节点做成master
[root@master-mariadb ~]# mysql

Welcome to the MariaDB monitor.  Commands end with ; or \g.

Your MariaDB connection id is 3

Server version: 5.5.60-MariaDB MariaDB Server

Copyright (c) 2000, 2018, Oracle, MariaDB Corporation Ab and others.

Type 'help;' or '\h' for help. Type '\c' to clear the current input statement.

MariaDB [(none)]> show master logs;

+-------------------+-----------+

| Log_name          | File_size |

+-------------------+-----------+

| master-log.000001 |     30358 |

| master-log.000002 |   1038814 |

| master-log.000003 |       245 |

+-------------------+-----------+

3 rows in set (0.00 sec)

MariaDB [(none)]> grant all on *.* to 'repluser'@'192.168.37.%' identified by 'centos';

Query OK, 0 rows affected (0.00 sec)

MariaDB [(none)]> flush privileges;

Query OK, 0 rows affected (0.00 sec)
配置从服务器同步主节点
[root@slave-mariadb ~]# mysql

Welcome to the MariaDB monitor.  Commands end with ; or \g.

Your MariaDB connection id is 5

Server version: 5.5.60-MariaDB MariaDB Server

Copyright (c) 2000, 2018, Oracle, MariaDB Corporation Ab and others.

Type 'help;' or '\h' for help. Type '\c' to clear the current input statement.

MariaDB [(none)]> change master to master_host='192.168.37.27',master_user='repluser',master_password='centos',master_log_file='master-log.000003',master_log_pos=245;

MariaDB [(none)]> start slave;
配置PorxySQL服务器的Yum源安装proxysql
[root@msyql-proxy ~]# cat <<EOF | tee /etc/yum.repos.d/proxysql.repo

> [proxysql_repo]

> name= ProxySQL YUM repository

> baseurl=http://repo.proxysql.com/ProxySQL/proxysql-1.4.x/centos/\$releasever

> gpgcheck=1

> gpgkey=http://repo.proxysql.com/ProxySQL/repo_pub_key

> EOF

[root@msyql-proxy ~]# yum install proxysql -y
[root@msyql-proxy ~]# systemctl start proxysql

[root@msyql-proxy ~]# mysql -uadmin -padmin -P 6032 -h127.0.0.1
Query OK, 1 row affected (0.00 sec)
Query OK, 1 row affected (0.00 sec) #:将主从加入到proxysql
Query OK, 0 rows affected (0.00 sec)
Query OK, 0 rows affected (0.01 sec)
在master节点添加一个监控后端服务器的用户
 MariaDB [(none)]> grant replication client on *.* to monitor@'192.168.37.%' identified by 'magedu';

Query OK, 0 rows affected (0.00 sec)

MariaDB [(none)]> flush privileges;

Query OK, 0 rows affected (0.00 sec)
在proxysql服务器添加监控后端服务器的用户
MySQL [(none)]> set mysql-monitor_username='monitor';

Query OK, 1 row affected (0.00 sec)

MySQL [(none)]> set mysql-monitor_password='magedu';

Query OK, 1 row affected (0.00 sec)
Query OK, 0 rows affected (0.00 sec)
Query OK, 97 rows affected (0.00 sec)
Query OK, 1 row affected (0.00 sec) #设置分组
Query OK, 0 rows affected (0.00 sec)
Query OK, 0 rows affected (0.01 sec)
在主节点创建一个用户可以让该用户操作主从节点的数据库
MariaDB [(none)]> grant all on *.* to sqluser@'192.168.8.%' identified by 'magedu';

Query OK, 0 rows affected (0.00 sec)

MariaDB [(none)]> flush privileges;

Query OK, 0 rows affected (0.00 sec)
在proxysql服务器,将该用户添加到proxysql表里
MySQL [(none)]> insert into mysql_users(username,password,default_hostgroup) values('sqluser','magedu',10);

Query OK, 1 row affected (0.00 sec)

MySQL [(none)]> load mysql users to runtime;

Query OK, 0 rows affected (0.00 sec)

MySQL [(none)]> save mysql users to disk

    -> ;

Query OK, 0 rows affected (0.00 sec)
在proxysql上配置路由规则
MySQL [(none)]> insert into mysql_query_rules

    -> (rule_id,active,match_digest,destination_hostgroup,apply)VALUES

    -> (1,1,'^SELECT.*FOR UPDATE$',10,1),(2,1,'^SELECT',20,1);

Query OK, 2 rows affected (0.01 sec)

MySQL [(none)]> load mysql query rules to runtime;

Query OK, 0 rows affected (0.00 sec)

MySQL [(none)]> save mysql query rules to disk;

Query OK, 0 rows affected (0.00 sec)
在rs2服务器安装httpd php-fpm php-mysql
[root@rs2 ~]# yum install php-fpm php-mysql httpd -y
在rs2服务器配置httpd
[root@rs2 html]# vim /etc/httpd/conf/httpd.conf

<IfModule dir_module>

    DirectoryIndex index.phpindex.html

</IfModule>

AddType application/x-httpd-php .php

AddType application/x-httpd-php-source .phps

ProxyPassMatch "^/(.*\.php)$" "fcgi://127.0.0.1:9000/var/www/html/$1"
[root@rs2 html]# systemctl restart httpd
然后配置nfs服务器
[root@NFS ~]# yum install nfs-util rpcbind -y

[root@NFS ~]# useradd apache  #创建映射用户

[root@NFS ~]# id apache

uid=1000(apache) gid=1000(apache) groups=1000(apache)

[root@NFS ~]# vim /etc/exports.d/httpd.exports    #将目录共享给http服务器

/data/httpd 192.168.37.25(rw,async,all_squash,anonuid=1000,anongid=1000)

/data/httpd 192.168.37.24(rw,async,all_squash,anonuid=1000,anongid=1000)

[root@NFS ~]# mkdir /data/httpd/  #创建目录
[root@NFS wordpress]# systemctl start nfs
将wordpress程序移动到nfs服务器目录并解压然后修改目录权限
[root@NFS httpd]# ls

index.html  wordpress  wordpress-5.0.4-zh_CN.tar.gz
[root@NFS httpd]# setfacl -Rm u:apache:rwx /data/httpd/
在master-mysql服务器授权wordpress账户
MariaDB [(none)]> create database wordpress

    -> ;

Query OK, 1 row affected (0.00 sec)

MariaDB [(none)]> grant all on wordpress.* to 'wordpress'@'192.168.37.%' identified by 'centos';

Query OK, 0 rows affected (0.00 sec)

MariaDB [(none)]> flush privileges;

Query OK, 0 rows affected (0.01 sec)
在Proxysql 服务器将用户添加到msyql_user表中
MySQL [(none)]> insert into mysql_users(username,password,default_hostgroup) values ('wordpress','centos',10);

Query OK, 1 row affected (0.00 sec)

MySQL [(none)]> load mysql users to runtime;

Query OK, 0 rows affected (0.00 sec)

MySQL [(none)]> load mysql users to disk;

ERROR 1045 (#2800): near "load": syntax error

MySQL [(none)]> save mysql users to disk;

Query OK, 0 rows affected (0.00 sec)
在nfs服务器配置wordpress的配置文件
[root@NFS wordpress]# cp wp-config-sample.php wp-config.php
[root@NFS wordpress]# vim wp-config.php
define('DB_NAME', 'wordpress'); /** MySQL?版.搴..?峰. */
define('DB_USER', 'wordpress'); /** MySQL?版.搴..?.*/
define('DB_PASSWORD', 'centos'); /** MySQL涓绘. */
define('DB_HOST', '192.168.37.23:6033'); /** ?.缓?版.琛ㄦ.榛..?..瀛.??.*/
define('DB_CHARSET', 'utf8'); /** ?版.搴..?.被?..?涓.‘瀹..?挎.??*/
define('DB_COLLATE', '');
mysql读写分离(proxySQL) lamp+proxysql+nfs的更多相关文章
- mysql中间件proxysql实现mysql读写分离
目录 1. mysql实现读写分离的方式 2. ProxySQL简介 3. ProxySQL安装 4. ProxySQL的Admin管理接口 5. 和admin管理接口相关的变量 5.1 admin- ...
- mysql读写分离(PHP类)
mysql读写分离(PHP类) 博客分类: php mysql 自己实现了php的读写分离,并且不用修改程序 优点:实现了读写分离,不依赖服务器硬件配置,并且都是可以配置read服务器,无限扩展 ...
- amoeba实现MySQL读写分离
amoeba实现MySQL读写分离 准备环境:主机A和主机B作主从配置,IP地址为192.168.131.129和192.168.131.130,主机C作为中间件,也就是作为代理服务器,IP地址为19 ...
- PHP代码实现MySQL读写分离
关于MySQL的读写分离有几种方法:中间件,Mysql驱动层,代码控制 关于中间件和Mysql驱动层实现Mysql读写分离的方法,今天暂不做研究, 这里主要写一点简单的代码来实现由PHP代码控制MyS ...
- 转:Mysql读写分离实现的三种方式
1 程序修改mysql操作类可以参考PHP实现的Mysql读写分离,阿权开始的本项目,以php程序解决此需求.优点:直接和数据库通信,简单快捷的读写分离和随机的方式实现的负载均衡,权限独立分配缺点:自 ...
- 使用Atlas实现MySQL读写分离+MySQL-(Master-Slave)配置
参考博文: MySQL-(Master-Slave)配置 本人按照博友北在北方的配置已成功 我使用的是 mysql5.6.27版本. 使用Atlas实现MySQL读写分离 数据切分——Atlas读 ...
- MySQL读写分离技术
1.简介 当今MySQL使用相当广泛,随着用户的增多以及数据量的增大,高并发随之而来.然而我们有很多办法可以缓解数据库的压力.分布式数据库.负载均衡.读写分离.增加缓存服务器等等.这里我们将采用读写分 ...
- php实现MySQL读写分离
MySQL读写分离有好几种方式 MySQL中间件 MySQL驱动层 代码控制 关于 中间件 和 驱动层的方式这里不做深究 暂且简单介绍下 如何通过PHP代码来控制MySQL读写分离 我们都知道 &q ...
- [记录]MySQL读写分离(Atlas和MySQL-proxy)
MySQL读写分离(Atlas和MySQL-proxy) 一.阿里云使用Atlas从外网访问MySQL(RDS) (同样的方式修改配置文件可以实现代理也可以实现读写分离,具体看使用场景) 1.在跳板机 ...
- docker环境 mysql读写分离 mycat maxscale
#mysql读写分离测试 环境centos 7.4 ,docker 17.12 ,docker-compose mysql 5.7 主从 mycat 1.6 读写分离 maxscale 2.2.4 读 ...
随机推荐
- 攻防世界 Misc 新手练习区 gif Writeup
攻防世界 Misc 新手练习区 gif Writeup 题目介绍 题目考点 仔细联想 字符转换 Writeup 下载附件并打开 104张黑白图 发现是一堆黑色和白色的图片,按某种规律排列,猜想flag ...
- 1. 处理静态资源 2. controller如何接受请求得参数 3. 如何把controller得数据保存到view. 4. 在controller如何完成重定向到指定路径 5. controller返回json数据
1. 1. 处理静态资源2. controller如何接受请求得参数3. 如何把controller得数据保存到view.4. 在controller如何完成重定向到指定路径5. controller ...
- 【SVG】SVG的夺命利器——path
[SVG]SVG的夺命利器--path 博客说明 文章所涉及的资料来自互联网整理和个人总结,意在于个人学习和经验汇总,如有什么地方侵权,请联系本人删除,谢谢! 说明 昨天一发布,突然看到有朋友留言,希 ...
- Mysql - 整数类型的存储字节数和范围
MySQL 整数类型的存储字节数和范围 type 存储字节数 有符号最小值 无符号最小值 有符号最大值 无符号最大值 TINYINT 1 -128 0 127 255 SMALLINT 2 -3276 ...
- java.lang.NoSuchFieldError: REFLECTION
2020-09-14 09:13:21.415 INFO org.apache.cxf.service.factory.ReflectionServiceFactoryBean Line:457 - ...
- More Effective C++笔记(一)(精心整理)
一.基础议题 条款1:仔细区别pointers和references 指针使用*和->,引用使用"." 引用必须指向一个已初始化的对象,不能为null,而指针可以指向某个对象 ...
- [atARC122F]Domination
如果一个红石头在另一个红石头的左下方(包括左和下),那么在后者的限制满足时,前者也一定满足,因此可以删去前者,再将其按照$rx_{i}$排序,即有$rx_{1}<rx_{2}<...< ...
- [cf1491F]Magnets
首先,只需要找到一个有磁性的位置,就可以通过$n-1$次判断其余磁铁是否有磁性,因此也就是要在$\lfloor\log_{2}n\rfloor+1$次中找到一个有磁性的位置 有一个$n-1$次的做法, ...
- [bzoj3170]松鼠聚会
这个距离就是切比雪夫距离,有一个神奇的东西是说将(x,y)变成(x+y,x-y),然后就是曼哈顿距离,因此转化后对x坐标和y坐标分别统计排序和求和(求前缀和预处理+二分) 1 #include< ...
- c语言是如何解析表达式语句"2+3*4;"的?
1. 要编译的测试代码: int main(void) { 2+3*4; } 2. 词法分析 词法分析将字符变成token,其中很重要的是token的类型,如字符2的token类型为TK_NUM,这 ...