
netty系列之:Bootstrap,ServerBootstrap和netty中的实现
简介
虽然netty很强大,但是使用netty来构建程序却是很简单,只需要掌握特定的netty套路就可以写出强大的netty程序。每个netty程序都需要一个Bootstrap,什么是Bootstrap呢?Bootstrap翻译成中文来说就是鞋拔子,在计算机世界中,Bootstrap指的是引导程序,通过Bootstrap可以轻松构建和启动程序。
在netty中有两种Bootstrap:客户端的Bootstrap和服务器端的ServerBootstrap。两者有什么不同呢?netty中这两种Bootstrap到底是怎么工作的呢? 一起来看看吧。
Bootstrap和ServerBootstrap的联系
首先看一下Bootstrap和ServerBootstrap这两个类的继承关系,如下图所示:
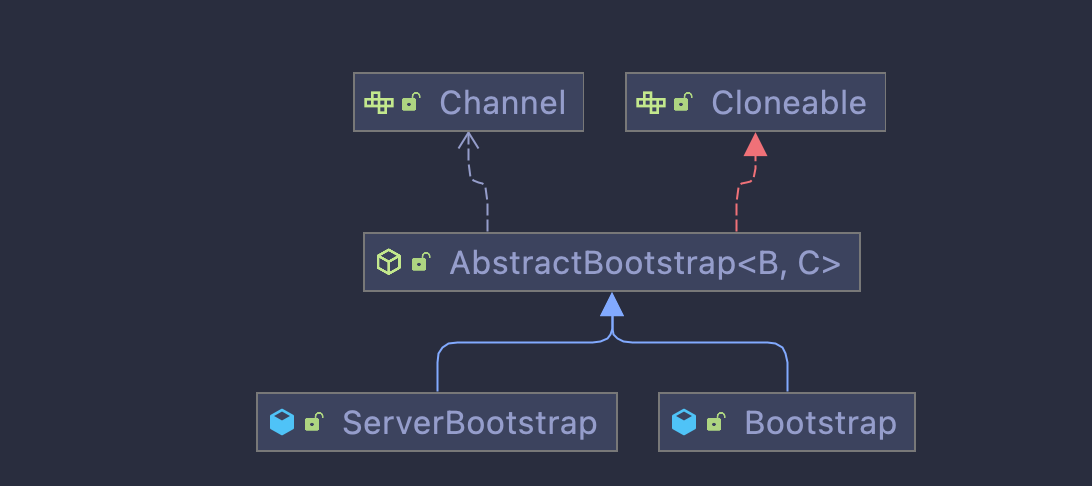
可以看到Bootstrap和ServerBootstrap都是继承自AbstractBootstrap,而AbstractBootstrap则是实现了Cloneable接口。
AbstractBootstrap
有细心的同学可能会问了,上面图中还有一个Channel,channel跟AbstractBootstrap有什么关系呢?
我们来看下AbstractBootstrap的定义:
public abstract class AbstractBootstrap<B extends AbstractBootstrap<B, C>, C extends Channel> implements Cloneable
AbstractBootstrap接受两个泛型参数,一个是B继承自AbstractBootstrap,一个是C继承自Channel。
我们先来观察一下一个简单的Bootstrap启动需要哪些元素:
EventLoopGroup bossGroup = new NioEventLoopGroup();

        EventLoopGroup workerGroup = new NioEventLoopGroup();

        try {

            ServerBootstrap b = new ServerBootstrap();

            b.group(bossGroup, workerGroup)

                    .channel(NioServerSocketChannel.class)

                    .childHandler(new ChannelInitializer<SocketChannel>() {

                        @Override

                        public void initChannel(SocketChannel ch) throws Exception {

                            ch.pipeline().addLast(new FirstServerHandler());

                        }

                    })

                    .option(ChannelOption.SO_BACKLOG, 128)

                    .childOption(ChannelOption.SO_KEEPALIVE, true);

            // 绑定端口并开始接收连接

            ChannelFuture f = b.bind(port).sync();

            // 等待server socket关闭

            f.channel().closeFuture().sync();
上面的代码是一个最基本也是最标准的netty服务器端的启动代码。可以看到和Bootstrap相关的元素有这样几个:
- EventLoopGroup,主要用来进行channel的注册和遍历。
- channel或者ChannelFactory,用来指定Bootstrap中使用的channel的类型。
- ChannelHandler,用来指定具体channel中消息的处理逻辑。
- ChannelOptions,表示使用的channel对应的属性信息。
- SocketAddress,bootstrap启动是绑定的ip和端口信息。
目前看来和Bootstrap相关的就是这5个值,而AbstractBootstrap的构造函数中也就定义了这些属性的赋值:
    AbstractBootstrap(AbstractBootstrap<B, C> bootstrap) {

        group = bootstrap.group;

        channelFactory = bootstrap.channelFactory;

        handler = bootstrap.handler;

        localAddress = bootstrap.localAddress;

        synchronized (bootstrap.options) {

            options.putAll(bootstrap.options);

        }

        attrs.putAll(bootstrap.attrs);

    }
示例代码中的group,channel,option等方法实际上都是向这些属性中赋值,并没有做太多的业务操作。
注意,AbstractBootstrap中只存在一个group属性,所以两个group属性是在ServerBootstrap中添加的扩展属性。
在Bootstrap中,channel其实是有两种赋值方法,一种是直接传入channel,另外一种方法是传入ChannelFactory。两者的本质都是一样的,我们看下channel是怎么转换成为ChannelFactory的:
    public B channel(Class<? extends C> channelClass) {

        return channelFactory(new ReflectiveChannelFactory<C>(

                ObjectUtil.checkNotNull(channelClass, "channelClass")

        ));

    }
channelClass被封装在一个ReflectiveChannelFactory中,最终还是设置的channelFactory属性。
AbstractBootstrap中真正启动服务的方法就是bind,bind方法传入的是一个SocketAddress,返回的是ChannelFuture,很明显,bind方法中会创建一个channel。我们来看一下bind方法的具体实现:
   private ChannelFuture doBind(final SocketAddress localAddress) {

        final ChannelFuture regFuture = initAndRegister();

        final Channel channel = regFuture.channel();

        if (regFuture.cause() != null) {

            return regFuture;

        }

        if (regFuture.isDone()) {

            // At this point we know that the registration was complete and successful.

            ChannelPromise promise = channel.newPromise();

            doBind0(regFuture, channel, localAddress, promise);

            return promise;

        } else {

            // Registration future is almost always fulfilled already, but just in case it's not.

            final PendingRegistrationPromise promise = new PendingRegistrationPromise(channel);

            regFuture.addListener(new ChannelFutureListener() {

                @Override

                public void operationComplete(ChannelFuture future) throws Exception {

                    Throwable cause = future.cause();

                    if (cause != null) {

                        // Registration on the EventLoop failed so fail the ChannelPromise directly to not cause an

                        // IllegalStateException once we try to access the EventLoop of the Channel.

                        promise.setFailure(cause);

                    } else {

                        // Registration was successful, so set the correct executor to use.

                        // See https://github.com/netty/netty/issues/2586

                        promise.registered();

                        doBind0(regFuture, channel, localAddress, promise);

                    }

                }

            });

            return promise;

        }

    }
在doBind方法中,首先调用initAndRegister方法去初始化和注册一个channel。
channel是通过channelFactory的newChannel方法来创建的:
channel = channelFactory.newChannel();
接着调用初始化channel的init方法。这个init方法在AbstractBootstrap中并没有实现,需要在具体的实现类中实现。
有了channel之后,通过调用EventLoopGroup的register方法将channel注册到 EventLoop中,并将注册生成的ChannelFuture返回。
然后通过判断返回的regFuture的状态,来判断channel是否注册成功,如果注册成功,最后调用doBind0方法,完成最后的绑定工作:
    private static void doBind0(

            final ChannelFuture regFuture, final Channel channel,

            final SocketAddress localAddress, final ChannelPromise promise) {

        // This method is invoked before channelRegistered() is triggered.  Give user handlers a chance to set up

        // the pipeline in its channelRegistered() implementation.

        channel.eventLoop().execute(new Runnable() {

            @Override

            public void run() {

                if (regFuture.isSuccess()) {

                    channel.bind(localAddress, promise).addListener(ChannelFutureListener.CLOSE_ON_FAILURE);

                } else {

                    promise.setFailure(regFuture.cause());

                }

            }

        });

    }
因为eventLoop本身是一个Executor,所以可以执行一个具体的命令的,在它的execute方法中,传入了一个新的Runnable对象,在其中的run方法中执行了channel.bind方法,将channel跟SocketAddress进行绑定。
到此,Bootstrap的bind方法执行完毕。
我们再来回顾一下bind方法的基本流程:
- 通过ChannelFactory创建一个channel。
- 将channel注册到Bootstrap中的EventLoopGroup中。
- 如果channel注册成功,则调用EventLoopGroup的execute方法,将channel和SocketAddress进行绑定。
是不是很清晰?
讲完AbstractBootstrap,接下来,我们再继续探讨一下Bootstrap和ServerBootstrap。
Bootstrap和ServerBootstrap
首先来看下Bootstrap,Bootstrap主要使用在客户端使用,或者UDP协议中。
先来看下Bootstrap的定义:
public class Bootstrap extends AbstractBootstrap<Bootstrap, Channel>
Bootstrap和AbstractBootstrap相比,主要多了一个属性和一个方法。
多的一个属性是resolver:
private static final AddressResolverGroup<?> DEFAULT_RESOLVER = DefaultAddressResolverGroup.INSTANCE;

private volatile AddressResolverGroup<SocketAddress> resolver =

            (AddressResolverGroup<SocketAddress>) DEFAULT_RESOLVER;
AddressResolverGroup里面有一个IdentityHashMap,它的key是EventExecutor,value是AddressResolver:
    private final Map<EventExecutor, AddressResolver<T>> resolvers =

            new IdentityHashMap<EventExecutor, AddressResolver<T>>();
实际上AddressResolverGroup维护了一个EventExecutor和AddressResolver的映射关系。
AddressResolver主要用来解析远程的SocketAddress的地址。因为远程的SocketAddress可能并不是一个IP地址,所以需要使用AddressResolver解析一下。
这里的EventExecutor实际上就是channel注册的EventLoop。
另外Bootstrap作为一个客户端的应用,它需要连接到服务器端,所以Bootstrap类中多了一个connect到远程SocketAddress的方法:
    public ChannelFuture connect(SocketAddress remoteAddress) {

        ObjectUtil.checkNotNull(remoteAddress, "remoteAddress");

        validate();

        return doResolveAndConnect(remoteAddress, config.localAddress());

    }
connect方法和bind方法的逻辑类似,只是多了一个resolver的resolve过程。
解析完毕之后,会调用doConnect方法,进行真正的连接:
    private static void doConnect(

            final SocketAddress remoteAddress, final SocketAddress localAddress, final ChannelPromise connectPromise) {

        // This method is invoked before channelRegistered() is triggered.  Give user handlers a chance to set up

        // the pipeline in its channelRegistered() implementation.

        final Channel channel = connectPromise.channel();

        channel.eventLoop().execute(new Runnable() {

            @Override

            public void run() {

                if (localAddress == null) {

                    channel.connect(remoteAddress, connectPromise);

                } else {

                    channel.connect(remoteAddress, localAddress, connectPromise);

                }

                connectPromise.addListener(ChannelFutureListener.CLOSE_ON_FAILURE);

            }

        });

    }
可以看到doConnect方法和doBind方法很类似,都是通过当前channel注册的eventLoop来执行channel的connect或许bind方法。
再看一下ServerBootstrap的定义:
public class ServerBootstrap extends AbstractBootstrap<ServerBootstrap, ServerChannel>
因为是ServerBootstrap用在服务器端,所以不选Bootstrap那样去解析SocketAddress,所以没有resolver属性。
但是对应服务器端来说,可以使用parent EventLoopGroup来接受连接,然后使用child EventLoopGroup来执行具体的命令。所以在ServerBootstrap中多了一个childGroup和对应的childHandler:
    private volatile EventLoopGroup childGroup;

    private volatile ChannelHandler childHandler;
因为ServerBootstrap有两个group,所以ServerBootstrap包含一个含有两个EventLoopGroup的group方法:
public ServerBootstrap group(EventLoopGroup parentGroup, EventLoopGroup childGroup)
还记得bind方法需要实现的init方法吗? 我们看下ServerBootstrap中init的具体逻辑:
   void init(Channel channel) {

        setChannelOptions(channel, newOptionsArray(), logger);

        setAttributes(channel, newAttributesArray());

        ChannelPipeline p = channel.pipeline();

        final EventLoopGroup currentChildGroup = childGroup;

        final ChannelHandler currentChildHandler = childHandler;

        final Entry<ChannelOption<?>, Object>[] currentChildOptions = newOptionsArray(childOptions);

        final Entry<AttributeKey<?>, Object>[] currentChildAttrs = newAttributesArray(childAttrs);

        p.addLast(new ChannelInitializer<Channel>() {

            @Override

            public void initChannel(final Channel ch) {

                final ChannelPipeline pipeline = ch.pipeline();

                ChannelHandler handler = config.handler();

                if (handler != null) {

                    pipeline.addLast(handler);

                }

                ch.eventLoop().execute(new Runnable() {

                    @Override

                    public void run() {

                        pipeline.addLast(new ServerBootstrapAcceptor(

                                ch, currentChildGroup, currentChildHandler, currentChildOptions, currentChildAttrs));

                    }

                });

            }

        });

    }
首先是设置channel的一些属性,然后通过channel.pipeline方法获得channel对应的pipeline,然后向pipeline中添加channelHandler。
这些都是常规操作,我们要注意的是最后通过channel注册到的eventLoop,将ServerBootstrapAcceptor加入到了pipeline中。
很明显ServerBootstrapAcceptor本身应该是一个ChannelHandler,它的主要作用就是用来接受连接:
private static class ServerBootstrapAcceptor extends ChannelInboundHandlerAdapter
我们来看一下它的channelRead方法:
        public void channelRead(ChannelHandlerContext ctx, Object msg) {

            final Channel child = (Channel) msg;

            child.pipeline().addLast(childHandler);

            setChannelOptions(child, childOptions, logger);

            setAttributes(child, childAttrs);

            try {

                childGroup.register(child).addListener(new ChannelFutureListener() {

                    @Override

                    public void operationComplete(ChannelFuture future) throws Exception {

                        if (!future.isSuccess()) {

                            forceClose(child, future.cause());

                        }

                    }

                });

            } catch (Throwable t) {

                forceClose(child, t);

            }

        }
因为server端接受的是客户端channel的connect操作,所以对应的channelRead中的对象实际上是一个channel。这里把这个接受到的channel称作child。通过给这个child channel添加childHandler,childOptions和childAttrs,一个能够处理child channel请求的逻辑就形成了。
最后将child channel注册到childGroup中,至此整个ServerBootstrapAcceptor接受channel的任务就完成了。
这里最妙的部分就是将客户端的channel通过server端的channel传到server端,然后在server端为child channel配备handler进行具体的业务处理,非常巧妙。
总结
通过具体分析AbstractBootstrap,Bootstrap和ServerBootstrap的结构和实现逻辑,相信大家对netty服务的启动流程有了大概的认识,后面我们会详细讲解netty中的channel和非常重要的eventLoop。
本文已收录于 http://www.flydean.com/03-1-netty-boots…-serverbootstrap/
最通俗的解读,最深刻的干货,最简洁的教程,众多你不知道的小技巧等你来发现!
欢迎关注我的公众号:「程序那些事」,懂技术,更懂你!
netty系列之:Bootstrap,ServerBootstrap和netty中的实现的更多相关文章
- netty系列之:EventLoop,EventLoopGroup和netty的默认实现
目录 简介 EventLoopGroup和EventLoop EventLoopGroup在netty中的默认实现 EventLoop在netty中的默认实现 总结 简介 在netty中不管是服务器端 ...
- netty系列之:真正的平等–UDT中的Rendezvous
目录 简介 建立支持Rendezvous的服务器 处理不同的消息 节点之间的交互 总结 简介 在我们之前提到的所有netty知识中,netty好像都被分为客户端和服务器端两部分.服务器端监听连接,并对 ...
- netty系列之:channel,ServerChannel和netty中的实现
目录 简介 channel和ServerChannel netty中channel的实现 AbstractChannel和AbstractServerChannel LocalChannel和Loca ...
- netty系列之:EventExecutor,EventExecutorGroup和netty中的实现
目录 简介 EventExecutorGroup EventExecutor EventExecutorGroup在netty中的基本实现 EventExecutor在netty中的基本实现 总结 简 ...
- netty系列之:protobuf在UDP协议中的使用
目录 简介 UDP在netty中的表示 DatagramPacketEncoder DatagramPacketDecoder 总结 简介 netty中提供的protobuf编码解码器可以让我们直接在 ...
- netty系列之:在netty中使用protobuf协议
目录 简介 定义protobuf 定义handler 设置ChannelPipeline 构建client和server端并运行 总结 简介 netty中有很多适配不同协议的编码工具,对于流行的goo ...
- netty系列之:netty中的懒人编码解码器
目录 简介 netty中的内置编码器 使用codec要注意的问题 netty内置的基本codec base64 bytes compression json marshalling protobuf ...
- netty系列之:netty中的核心解码器json
目录 简介 java中对json的支持 netty对json的解码 总结 简介 程序和程序之间的数据传输方式有很多,可以通过二进制协议来传输,比较流行的像是thrift协议或者google的proto ...
- Netty 系列(三)Netty 入门
Netty 系列(三)Netty 入门 Netty 是一个提供异步事件驱动的网络应用框架,用以快速开发高性能.高可靠性的网络服务器和客户端程序.更多请参考:Netty Github 和 Netty中文 ...
随机推荐
- css画叉叉(一般用于关闭按钮)
css 一般用于右上角关闭弹窗 #pdclose { width: 18px; height: 18px; cursor: pointer; float: right; position: relat ...
- 【刷题-LeetCode】190 Reverse Bits
Reverse Bits Reverse bits of a given 32 bits unsigned integer. Example 1: Input: 0000001010010100000 ...
- 【记录一个问题】redis中执行事务出现错误“EXECABORT Transaction discarded because of previous errors”
执行事务的大致代码如下: redisClient := GetRedisClient() pipe := redisClient.TxPipeline() err := pipe.ZAdd(k, ar ...
- unity3d录音
using System.Collections; using System.Collections.Generic; using UnityEngine; public class record : ...
- Ajax_Json用法
Ajax_Json用法 关于json的服务端代码 //首先在方法里面设置一个响应json数据对象 const data = { name:'chenxigua' } //因为 s ...
- Vue框架怎么使用mediainfo.js来检测视频文件是否有音轨?
啥是MediaInfo? 简而言之,MediaInfo是一个能读取音频和视频文件并分析和输出音视频信息的工具,能输出的内容包括视频信息,音轨,字幕等. MediaInfo也可以在web端使用,需要使用 ...
- golang中的标准库反射
反射 反射是指程序在运行期对程序本身访问和修改的能力 变量的内在机制 变量包含类型信息和值信息 var arr [10]int arr[0] = 10 类型信息:是静态的元信息,是预先定义好的 值信息 ...
- golang中的go get命令
### 下载指定版本 go get k8s.io/klog@v1.0.0 go get 命令可以借助代码管理工具通过远程拉取或更新代码包及其依赖包,并自动完成编译和安装. 这个命令在内部实际上分成了两 ...
- jdk11+安装(win)
jdk11+安装(win) 官网下载 官网下载地址:https://adoptopenjdk.net/index.html 选择合适的版本 安装 运行下载的 MSI 包 下一步 选择安装位置,下一步 ...
- linux不使用useradd添加新用户
不使用useradd创建新的用户 1.进入用户特征信息:/etc/passwd 编辑: vim /etc/passwd 命令模式 :G 进入末行 进入编辑模式 :在最后添加新用户信息: 例:new_u ...