Entity Framework管理实体关系(一):管理一对一关系
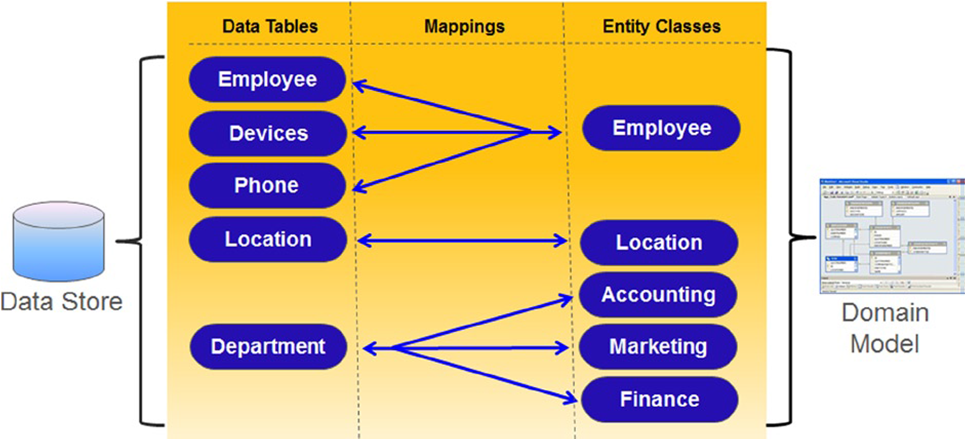
我们现在已经知道如何使用Code First来定义简单的领域类,并且如何使用DbContext类来执行数据库操作。现在我们来看下数据库理论中的多样性关系,我们会使用Code First来实现下面的几种关系:
1、一对一关系: one to one
2、一对多关系: one to many
3、多对多关系::many to many
首先要明确关系的概念。关系就是定义两个或多个对象之间是如何关联的。它是由关系两端的多样性值识别的,比如,一对多意味着在关系的一端,只有一个实体,我们有时称为父母;在关系的另一端,可能有多个实体,有时称为孩子。EF API将那些端分别称为主体和依赖。一对多关系也叫做一或零对多(One-or-Zero-to-Many),这意味着一个孩子可能有或可能没有父母。一对一关系也稍微有些变化,就是关系的两端都是可选的。
一、EF里的实体关系配置
Has方法

With方法

配置实体关系:

一对一表关系设计:

一对一关系并不常用,但是偶尔也会出现。如果一个实体有一些可选的数据,那么你可以选择这种设计。
二、使用数据注解配置一对一关系
示例中Person表作为主表,IDCard表作为从表。
1、新建实体类
Person实体类结构如下:
 using System;

 using System.Collections.Generic;

 using System.ComponentModel.DataAnnotations;

 using System.ComponentModel.DataAnnotations.Schema;

 using System.Linq;

 using System.Text;

 using System.Threading.Tasks;

 namespace 配置一对一实体关系.Model

 {

     /// <summary>

     /// 主表

     /// </summary>

     [Table("Person")]

     public class Person

     {

         [Key]

         public int PersonId { get; set; }

         public string Name { get; set; }

         public int Sex { get; set; }

         public int Age { get; set; }

         /// <summary>

         /// virtual 表示是导航属性 启用贪懒加载

         /// </summary>

         [ForeignKey("PersonId")]

         public virtual IDCard IDCard { get; set; }

     }

 }
IDCard实体类结构如下:
 using System;

 using System.Collections.Generic;

 using System.ComponentModel.DataAnnotations;

 using System.Linq;

 using System.Text;

 using System.Threading.Tasks;

 namespace 配置一对一实体关系.Model

 {

     public class IDCard

     {

         [Key]

         public int PersonId { get; set; }

         public string IDCardNo { get; set; }

         public DateTime DataIssue { get; set; }

         public DateTime ValidTime { get; set; }

         public string IssuingAuthority { get; set; }

         /// <summary>

         /// 导航属性

         /// </summary>

         public virtual Person Person { get; set; }

     }

 }
2、创建EF数据上下文类
 using System;

 using System.Collections.Generic;

 using System.Data.Entity;

 using System.Linq;

 using System.Text;

 using System.Threading.Tasks;

 using 配置一对一实体关系.Model;

 namespace 配置一对一实体关系.EF

 {

     public class EFDbContext :DbContext

     {

         public EFDbContext()

             : base("name=CodeFirstApplication")

         {

         }

         public DbSet<Person> Persons { get; set; }

         public DbSet<IDCard> IDCards { get; set; }

     }

 }
3、使用数据迁移的方式创建数据库
在使用数据迁移的过程中报错:Unable to determine the principal end of an association between the types '配置一对一实体关系.Model.Person' and '配置一对一实体关系.Model.IDCard'. The principal end of this association must be explicitly configured using either the relationship fluent API or data annotations。通过查找资料,解决办法如下:添加Required数据注解,修改后的Person类结构如下:
 using System;

 using System.Collections.Generic;

 using System.ComponentModel.DataAnnotations;

 using System.ComponentModel.DataAnnotations.Schema;

 using System.Linq;

 using System.Text;

 using System.Threading.Tasks;

 namespace 配置一对一实体关系.Model

 {

     /// <summary>

     /// 主表

     /// </summary>

     [Table("Person")]

     public class Person

     {

         [Key]

         public int PersonId { get; set; }

         public string Name { get; set; }

         public int Sex { get; set; }

         public int Age { get; set; }

         /// <summary>

         /// virtual 表示是导航属性 启用贪懒加载

         /// </summary>

         [ForeignKey("PersonId")]

         [Required]

         public virtual IDCard IDCard { get; set; }

     }

 }
4、查看生成的数据库表结构
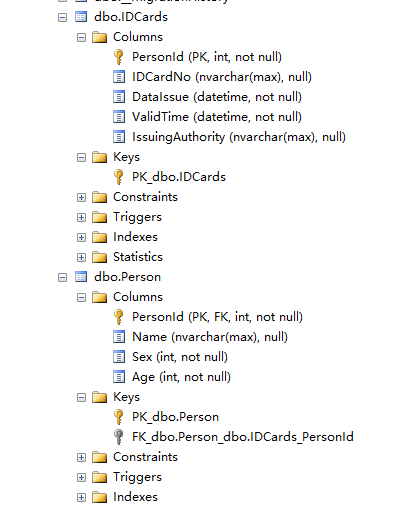
通过查看数据库表结构,发现Person表和IDCards表建立了主外键关系。
总结:使用数据注解配置一对一关系的步骤:
1、使用数据注解Key标识主键。
2、两个实体之间的主键Key必须相同。
3、两个实体之间有相互引用的导航属性(使用virtual)。
4、在主表中设置外键关系[ForeignKey("PersonId")]。
三、使用Fluent API来配置一对一关系
1、创建A实体类结构如下:
 using System;

 using System.Collections.Generic;

 using System.Linq;

 using System.Text;

 using System.Threading.Tasks;

 namespace 使用FluentAPI实现.Model

 {

     public class A

     {

         public int AId { get; set; }

         public string Name { get; set; }

         public virtual B B { get; set; }

     }

 }
2、创建B实体类结构如下:
 using System;

 using System.Collections.Generic;

 using System.Linq;

 using System.Text;

 using System.Threading.Tasks;

 namespace 使用FluentAPI实现.Model

 {

     public class B

     {

         public int AId { get; set; }

         public string Name { get; set; }

         public virtual A A { get; set; }

     }

 }
3、使用Fluent API实现
 using System;

 using System.Collections.Generic;

 using System.Data.Entity;

 using System.Linq;

 using System.Text;

 using System.Threading.Tasks;

 using 使用FluentAPI实现.Model;

 namespace 使用FluentAPI实现.EF

 {

     public class EFDbContext :DbContext

     {

         public EFDbContext()

             : base("name=CodeFirstApplication")

         { }

         protected override void OnModelCreating(DbModelBuilder modelBuilder)

         {

             modelBuilder.Entity<IDCard>().ToTable("IDCard").HasKey(p => p.PersonId);

             modelBuilder.Entity<Person>().ToTable("Person").HasKey(p => p.PersonId);

             #region 1.0 默认一对一配置

             //modelBuilder.Entity<Person>().HasRequired(p => p.IDCard).WithOptional();

             #endregion

             #region 2.0 指定谁是主体对象谁是依赖对象

             // 指定当前Person对象依赖IDCard对象,外键会创建到IDCard对象中,而IDCard对象是独立存在的表,这种依赖关系配置是错误的。

             //modelBuilder.Entity<Person>().HasRequired(p => p.IDCard).WithRequiredDependent(t => t.Person);

             // 正确的依赖配置如下:

             //modelBuilder.Entity<IDCard>().HasRequired(p => p.Person).WithRequiredDependent(t => t.IDCard);

             //modelBuilder.Entity<A>().HasRequired(p => p.B).WithRequiredDependent(d=>d.A);//WithRequiredDependent A依赖对象(A依赖B,B可以对立存在,A会被建立外键)

             #endregion   指定谁是主要的对象

             modelBuilder.Entity<IDCard>().HasRequired(p => p.Person).WithRequiredPrincipal(t => t.IDCard);

             //WithRequiredPrincipal A 主体对象,执行A对象为被继承者,也就是父级,B继承A,A独立存在

             //modelBuilder.Entity<A>().HasRequired(p => p.B).WithRequiredPrincipal(d => d.A);

             #region MyRegion

             #endregion

             base.OnModelCreating(modelBuilder);

         }

     }

 }
这里使用了HasKey方法,指定了一个表的主键,换言之,这是一个允许我们找到一个实体的独一无二的值。之前我们没有用这个方法是因为我们要么用了Key特性或者遵守了EF的默认约定(如果属性名是由类名加上"Id"后缀或者只是"Id"组成,那么EF会计算出该主键)。因为我们现在使用了PersonId作为主键,所以我们现在需要给运行时提供额外的提示,这就是HasKey派生用场的地方。最后子表中的主键会成为父表中的外键。
因为该关系是可选的,所以它也称为一或零对一(One-or-Zero-to-One)。关系的两端都是必须要存在的关系称为一对一。比如,每个人必须要有一个单独的login,这是强制性的。你也可以使用WithRequiredDepentent或者WithRequiredPrincipal方法来代替WithOptional方法。
注意:我们可以总是从该关系的主体端或者依赖端来配置关系。我们总是需要配置一对一关系的两端(即两个实体),使用Has和With方法确保一对一关系的创建。
Entity Framework管理实体关系(一):管理一对一关系的更多相关文章
- [转]Entity Framework 的实体关系
通过 Entiy Framework实践系列 文章,理了理 Entity Framework 的实体关系. 为什么要写文章来理清这些关系?“血”的教训啊,刚开始使用 Entity Framework ...
- Entity Framework(实体框架 EF)
什么是Entity Framework呢(下面简称EF)? EF(实体框架)是ADO.NET中的一组支持开发面向数据的软件应用程序的技术,是微软的一个ORM框架.ORM(对象关系映射框架):指的是面向 ...
- Entity Framework关联实体的三种加载方法
推荐文章 EF性能之关联加载 总结很好 一:介绍三种加载方式 Entity Framework作为一个优秀的ORM框架,它使得操作数据库就像操作内存中的数据一样,但是这种抽象是有性能代价的,故鱼和熊掌 ...
- Entity Framework 4.1:多对多的关系
这篇文章讨论多对多的关系. 让我们从最简单的例子开始.我们让 EF4.1 来推断表的映射.我在订单和雇员之间建模多对多的关系. )] publicstring CustomerName { get; ...
- Entity framework 7通过代码添加外键关系的方法
这几天研究Asp.net5,也试着写了一些示例代码,因为网上的资料实在是太少了,所以在此把一些问题的解决方法记录下来,以备后查. 问题: 在EF7中,假如数据库已经存在,并且两个表具有外键关系,但是实 ...
- Entity Framework -- 添加,删除,修改,关系依附,关系摘除,验证操作
数据库模型 这个基本上是浓缩 Jerry Tom博客的内容,作为参考http://www.cnblogs.com/mbailing/archive/2012/07/31/2616779.html 说明 ...
- Entity Framework 6 实体某些字段根据模型状态进行自动更新内容
1.定义基础实体对象 public class BaseEntity { public int Id { get; set; } public DateTime? CreateTime { get; ...
- Entity Framework 新增实体,新增抽象实体
抽象实体不能new 抽象类:人,实体类:学生 人 p_人= new 学生(); 添加数据,学生和人都添加 抽象类可以提供一个抽象的方法,但是并没有实现,类似接口,但又不同于接口.子类继承父类时必须 ...
- 【mybatis xml】数据层框架应用--Mybatis(三)关系映射之一对一关系映射
实际的开发中,对数据库的操作常常会涉及到多张表,这在面向对象中就涉及到了对象与对象之间的关联关系. 针对多表之间的操作,MyBatis提供了关联映射,通过关联映射就可以很好的处理对象与对象之间的关联关 ...
随机推荐
- 马老师 LNMP生产环境Web架构 笔记
http协议和缓存原理.多路IO模型: MIME机制,Multipurpose Internet Mail Extensions,多用户互联网邮件扩展.MIME使用一个简单的字符串组成,最初是为了标识 ...
- 制作IOS 后台极光推送时,遇到的小问题
推送广义上分为两种, 一种是 程序在前台的时候,不想在任务栏里面显示通知,直接在app中进行某种操作.这个叫做自定义消息.这个是在前台时,app与极光后台建立了一个长链接. 另一种是 程序处于前. ...
- URL 长度有限制吗?
众所周知,传递小量参数(在没有其他原因,例如隐藏参数值的情况下)推荐使用GET方法,传递大量参数推荐使用POST方法.原因是什么呢? 原因是传说GET方法是通过URL来传递,而URL的长度是受限的,而 ...
- jquery中 $ 和 jQuery 及 $() 的区别
用过jquery的人都知道,jquery有两种用法,一种是$,还有一种是jQuery,那么这两种方式在使用上有什么区别呢? 答案是这两种用法没什么区别,只是别名而已,用$要比jQuery简短一些.方便 ...
- C# GridView 给某行或某列绑定点击事件和鼠标事件
protected void GridViewEx1_RowDataBound(object sender, GridViewRowEventArgs e) { if (e.Row.RowType = ...
- python 报错 SyntaxError: Non-ASCII character
报错: SyntaxError: Non-ASCII character 概意思是,默认文件是ASCII格式,需要更改文件编码,操作是在文件首行加上 #!/usr/bin/python # -*- c ...
- 机器学习 Top 20 Python 开源项目
转自:http://mp.weixin.qq.com/s?__biz=MzA4MjEyNTA5Mw==&mid=2652565022&idx=1&sn=9aa035097120 ...
- 32个最热CPLD-FPGA论坛
1. OPENCORES.ORG这里提供非常多,非常好的PLD了内核,8051内核就可以在里面找到.进入后,选择project或者由http//www.opencores.org/browse.cgi ...
- 可靠的功能測试--Espresso和Dagger2
欢迎Follow我的GitHub, 关注我的CSDN. 可靠的功能測试, 意味着在不论什么时候, 获取的測试结果均同样, 这就须要模拟(Mock)数据. 測试框架能够使用Android推荐的Espre ...
- git 从远程git服务上拉代码 git服务器非默认端口
从服务器上拉代码有如下报错: fatal: Not a git repository (or any of the parent directories): .git 初始代本地版本库: [root@ ...