Android ActionBar自定义
关于自定义的ActionBar的实现过程,这里做下笔记以供之后查看。
1.默认状态
使用Android Studio新建一个名为“ActionBar”的应用,默认actionbar如图(1)所示。

图1
2.自定义
自定义actionbar可以通过以下代码实现:
    @Override

    protected void onCreate(Bundle savedInstanceState) {

        super.onCreate(savedInstanceState);

        setContentView(R.layout.activity_main);

        ActionBar actionBar = getActionBar();

        if (actionBar != null) {

            actionBar.setDisplayOptions(ActionBar.DISPLAY_SHOW_CUSTOM); //Enable自定义的View

            actionBar.setCustomView(R.layout.actionbar_custom);//设置自定义的布局:actionbar_custom

        }

    }
其中ActionBar布局文件actionbar_custom.xml如下:
<?xml version="1.0" encoding="utf-8"?>

<LinearLayout xmlns:android="http://schemas.android.com/apk/res/android"

    android:orientation="vertical" android:layout_width="match_parent"

    android:layout_height="@dimen/actionbar_hight"

    android:background="@color/customBackgroung">

    <TextView

        android:id="@+id/action_bar_title"

        android:layout_width="match_parent"

        android:layout_height="match_parent"

        android:text="Custom ActionBar"

        android:textColor="@android:color/black"

        android:textSize="16sp"

        android:gravity="center"/>

</LinearLayout>
但是真正显示自定义ActionBar如图(2),布局周围还有Margin,这个应该是需要修改Theme中对应项。

图2
  <!-- 自定义的ActionBar Style-->
    <style name="CustomActionBarStyle" parent="@android:style/Widget.DeviceDefault.Light.ActionBar">

        <item name="android:contentInsetEnd">0dp</item><!--右边距为0-->

        <item name="android:contentInsetStart">0dp</item><!--左边距为0-->

    </style>

  <!-- 自定义的Theme-->

    <style name="CustomTheme" parent="@android:style/Theme.DeviceDefault.Light.DarkActionBar">

        <item name="android:colorPrimary">@color/colorPrimary</item>

        <item name="android:colorPrimaryDark">@color/colorPrimaryDark</item>

        <item name="android:colorAccent">@color/colorAccent</item>

        <item name="android:actionBarSize">@dimen/actionbar_hight</item><!--设置ActionBar的高度-->

        <item name="android:actionBarStyle">@style/CustomActionBarStyle</item>

        <item name="android:statusBarColor">@color/customBackgroung</item><!--效果和colorPrimary一样-->

        <item name="android:windowLightStatusBar">true</item><!--设置StatusBar上Icon高亮-->

        <item name="android:windowTranslucentNavigation">false</item>

    </style>
最后在AndroidManifest.xml中将自定义的主题应用到对应的Activity or Application中。
<?xml version="1.0" encoding="utf-8"?>

<manifest xmlns:android="http://schemas.android.com/apk/res/android"

    package="com.example.steve.customactionbar">

    <application

        android:allowBackup="true"

        android:icon="@mipmap/ic_launcher"

        android:label="@string/app_name"

        android:supportsRtl="true">

        <activity android:name=".MainActivity"

            android:theme="@style/CustomTheme">

            <intent-filter>

                <action android:name="android.intent.action.MAIN" />

                <category android:name="android.intent.category.LAUNCHER" />

            </intent-filter>

        </activity>

    </application>

</manifest>
最终就可以得到想要的结果,如图3。

图3
ps:关于colorPrimary & colorPrimaryDark & colorAccent颜色的作用,如图4所示:
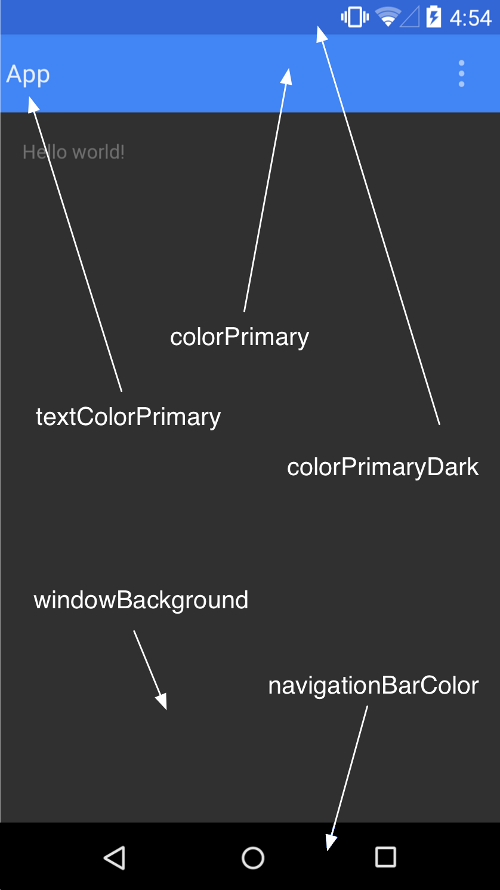
图4
参考文章:http://www.cnblogs.com/tianzhijiexian/p/4081562.html
Android ActionBar自定义的更多相关文章
- Android ActionBar详解
Android ActionBar详解 分类: Android2014-04-30 15:23 1094人阅读 评论(0) 收藏 举报 androidActionBar 目录(?)[+] 第4 ...
- Android 自定义View修炼-【2014年最后的分享啦】Android实现自定义刮刮卡效果View
一.简介: 今天是2014年最后一天啦,首先在这里,我祝福大家在新的2015年都一个个的新健康,新收入,新顺利,新如意!!! 上一偏,我介绍了用Xfermode实现自定义圆角和椭圆图片view的博文& ...
- Android ActionBar应用实战,高仿微信主界面的设计
转载请注明出处:http://blog.csdn.net/guolin_blog/article/details/26365683 经过前面两篇文章的学习,我想大家对ActionBar都已经有一个相对 ...
- Android ActionBar完全解析,使用官方推荐的最佳导航栏(下) .
转载请注明出处:http://blog.csdn.net/guolin_blog/article/details/25466665 本篇文章主要内容来自于Android Doc,我翻译之后又做了些加工 ...
- ActionBar 自定义布局定义
ActionBar 自定义布局定义 Android系统中ActionBar默认的布局不美观且难于控制,通过为ActionBar自定义布局的方式可以灵活控制ActionBar. 效果: 工具/原料 ...
- Android RatingBar 自定义样式
Android RatingBar 自定义样式 1.先定义Style: <style name="RadingStyle" parent="@android:sty ...
- Android实现自定义带文字和图片的Button
Android实现自定义带文字和图片的Button 在Android开发中经常会需要用到带文字和图片的button,下面来讲解一下常用的实现办法. 一.用系统自带的Button实现 最简单的一种办法就 ...
- Android Studio 自定义debug签名文件keystore
Android Studio 自定义debug签名文件keystore
- Android读取自定义View属性
Android读取自定义View属性 attrs.xml : <?xml version="1.0" encoding="utf-8"?> < ...
随机推荐
- docker学习-docker仓库
docker仓库中心:https://hub.docker.com/ 网易蜂巢仓库中心:https://c.163.com/hub#/m/home/
- linux下jdk,tomcat的安装
一.安装jdk 1.jdk下载地址: http://www.oracle.com/technetwork/java/javase/downloads/jdk7-downloads-1880260.ht ...
- AJAX同步设置以及请求代码
全局设置ajax同步 更正一点:这个的同步,针对的是ajax请求的返回,而不是ajax-success返回后所有进行处理后才进行下一步.所以,window.location.href转跳这个在执行的时 ...
- 【Mysql】 case ... when ... 用法
sql语句查询时给某个空字段赋值 SELECT CASE WHEN field= '' THEN ' WHEN fieldIS NULL THEN ' ELSE field END FROM tabl ...
- 【Laravel】Mac下玩转Laravel
1 apache 首先Mac系统是自带了Apache,只需要执行 sudo apachectl start 就可以打开Apache服务,然后访问 http://localhost 就可以访问到,it' ...
- 开发人员必读openstack网络基础2:交换机、路由器、DHCP
我们在使用openstack的过程中,会遇到创建虚拟机路由器.交换机等,那么1.他们的作用到底是什么?2.DHCP为什么会产生,它的作用是什么? 个人总结:交换机:一般用在同一网段,工作在数据链路层, ...
- linux动态查看某组进程状态的办法
这里记录一下我监控某组进程的解决办法. 1.首先要获取要监控的进程的进程id,如果你要勇ps grep 那你就out了,强大的linux系统有一个pidof命令,用来查找相关进程的进程id,其实还有一 ...
- eclipse中切换jdk版本
安装了jdk1.8,但是项目使用的是jdk1.7,需要更改eclipse中的jdk版本 右键项目propeties --- Project facets
- java父类可以强制转化成子类吗?
转自:http://blog.csdn.net/ld422586546/article/details/9707997 Java中父类强制转换成子类的原则:父类型的引用指向的是哪个子类的实例,就能转换 ...
- mac必装工具以及mac使用介绍
必装工具 Scroll Reverserhttp://pilotmoon.com/scrollreverser/:一款可以使得鼠标使用方式和windows系统一致的软件 编程工具 ,,,,, 常用快捷 ...