用 CocosCreator 快速开发推箱子游戏
游戏总共分为4个功能模块:
- 开始游戏(menuLayer)
- 关卡选择(levelLayer)
- 游戏(gameLayer)
- 游戏结算(gameOverLayer)
Creator内组件效果如下:
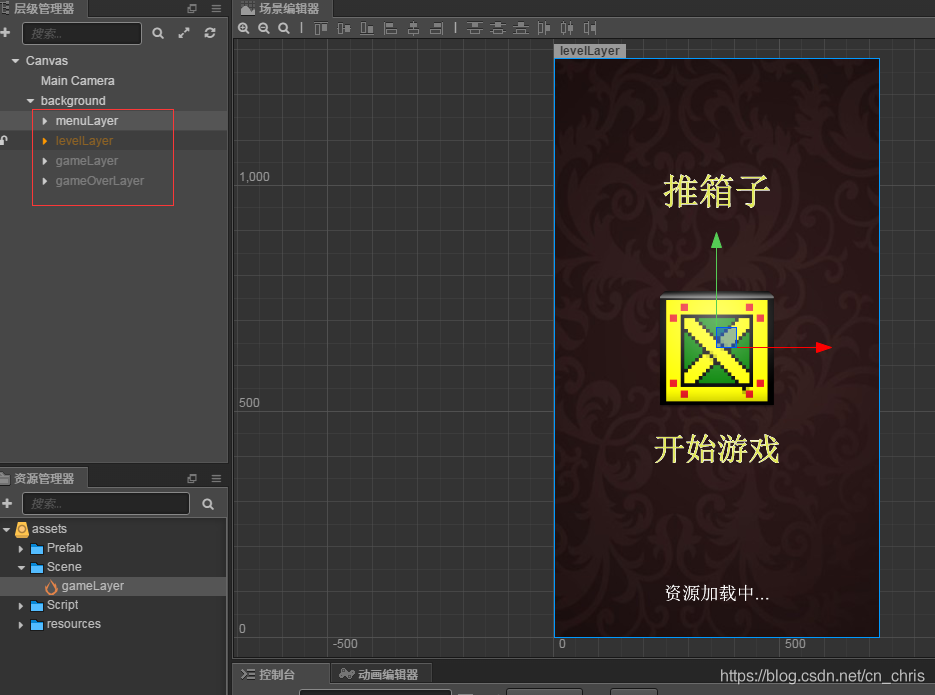

游戏开始默认显示menuLayer,游戏中,通过控制各个层级的显示和隐藏,实现不同模块的切换。例如开始游戏,点击开始以后,触发回调函数,切换到游戏关卡选择界面,绑定关系如下图:

实现代码如下:
// 开始按钮回调
startBtnCallBack(event, customEventData){
    if(this.curLayer == 1){
        return;
    }
    this.curLayer = 1;

    this.playSound(sound.BUTTON);

    this.menuLayer.runAction(cc.sequence(
        cc.fadeOut(0.1),
        cc.callFunc(() => {
            this.startBtn.stopAllActions();
            this.startBtn.scale = 1.0;
            this.menuLayer.opacity = 255;
            this.menuLayer.active = false;
        }
    )));

    this.levelLayer.active = true;
    this.levelLayer.opacity = 0;
    this.levelLayer.runAction(cc.sequence(
        cc.delayTime(0.1),
        cc.fadeIn(0.1),
        cc.callFunc(() => {
            this.updateLevelInfo();
        }
    )));
},
其他功能模块实现类似。以下将分4个模块分别讲述各个模块的实现。
1. 开始游戏 menuLayer
开始游戏模块,开始游戏后默认显示,其他模块隐藏,功能实现相对简单,界面布局完成以后,开始游戏按钮添加响应事件即可,实现代码如上,在此界面添加了一个小动画,让开始游戏按钮不断的放大缩小,代码如下:
// 主界面动画
menuLayerAni(){
    this.startBtn.scale = 1.0;
    this.startBtn.runAction(cc.repeatForever(cc.sequence(
        cc.scaleTo(0.6, 1.5),
        cc.scaleTo(0.6, 1.0)
    )));
},
实现后的效果:
2. 关卡选择 levelLayer
关卡选择分两步:第一步,界面显示,通过配置文件,加载预制文件,显示所有关卡;第二步,根据游戏情况,更新每一关卡信息。
2.1 第一步显示关卡
游戏中所有关卡置于ScrollView控件上,每一个关卡,使用一个预制文件(levelItem),通过读取关卡配置文件,加载所有关卡,加载完成后重新计算ScrollView内容的高度,加载关卡代码如下:
// 创建关卡界面子元素
createLavelItem (){
    // 进入关卡level
    let callfunc = level => {
        this.selectLevelCallBack(level);
    };

    for(let i = 0; i < this.allLevelCount; i++){
        let node = cc.instantiate(this.levelItemPrefab);
        node.parent = this.levelScroll;
        let levelItem = node.getComponent("levelItem");
        levelItem.levelFunc(callfunc);
        this.tabLevel.push(levelItem);
    }
    // 设置容器高度
    this.levelContent.height = Math.ceil(this.allLevelCount / 5) * 135 + 20;
},
下图即是所有关卡预制的父节点:

预制脚本挂在到预制上:

2.2 第二步更新关卡
每一个levelItem预制上挂一个levelItem脚本组件,levelItem脚本组件负责更新信息,主要控制是否可点击、通关星数、关卡等级、点击进入,levelItem脚本组件更新UI代码如下:
/**
 * @description: 显示星星数量
 * @param {boolean} isOpen 是否开启
 * @param {starCount} 星星数量
 * @param {cc.SpriteAtlas} levelImgAtlas 纹理图
 * @param {number} level 关卡
 * @return:
 */
showStar(isOpen, starCount, levelImgAtlas, level){
    this.itemBg.attr({"_level_" : level});
    if(isOpen){
        this.itemBg.getComponent(cc.Sprite).spriteFrame = levelImgAtlas.getSpriteFrame("pass_bg");
        this.starImg.active = true;
        this.starImg.getComponent(cc.Sprite).spriteFrame = levelImgAtlas.getSpriteFrame("point" + starCount);
        this.levelTxt.opacity = 255;
        this.itemBg.getComponent(cc.Button).interactable = true;
    }
    else{
        this.itemBg.getComponent(cc.Sprite).spriteFrame = levelImgAtlas.getSpriteFrame("lock");
        this.starImg.active = false;
        this.levelTxt.opacity = 125;
        this.itemBg.getComponent(cc.Button).interactable = false;
    }
    this.levelTxt.getComponent(cc.Label).string = level;
},
玩家的通过的信息,通过配置存储文件,保存玩家通关信息,分为已通关、刚开启和未开启三种状态,具体实现如下:
// 刷新关卡上的信息
updateLevelInfo(){
    let finishLevel = parseInt(cc.sys.localStorage.getItem("finishLevel") || 0);  //已完成关卡
    for(let i = 1; i <= this.allLevelCount; i++){
        // 完成的关卡
        if(i <= finishLevel){
            let data = parseInt(cc.sys.localStorage.getItem("levelStar" + i) || 0);
            this.tabLevel[i - 1].showStar(true, data, this.levelImgAtlas, i);
        }
        // 新开的关卡
        else if(i == (finishLevel + 1)){
            this.tabLevel[i - 1].showStar(true, 0, this.levelImgAtlas, i);
        }
        // 未开启关卡图
        else{
            this.tabLevel[i - 1].showStar(false, 0, this.levelImgAtlas, i);
        }
    }
},
最终的显示效果如下图:

3. 游戏 gameLayer
游戏也分为两步:第一步,显示界面;第二步,游戏操作判断
3.1 显示界面
游戏内使用levelConfig.json配置每一关卡信息,每个关卡游戏部分由多行多列的方格组成,每一个关卡信息包含content、allRow、allCol、heroRow、heroCol、allBox属性,allRow和allCol记录总共行数和列数,heroRow、heroCol记录英雄所在位置,allBox记录箱子的总数,content是核心,记录每个方格的属性,根据不同的属性显示不同的物体,如墙面、地面、物体、箱子,可以通过修改配置,增加任意关卡。
读取关卡所有数据,并根据每一个位置的属性,显示不同的实物。
根据配置创建关卡信息
// 创建关卡
createLevelLayer(level){
    this.gameControlLayer.removeAllChildren();
    this.setLevel();
    this.setCurNum();
    this.setBestNum();

    let levelContent = this.allLevelConfig[level].content;
    this.allRow = this.allLevelConfig[level].allRow;
    this.allCol = this.allLevelConfig[level].allCol;
    this.heroRow = this.allLevelConfig[level].heroRow;
    this.heroCol = this.allLevelConfig[level].heroCol;

    // 计算方块大小
    this.boxW = this.allWidth / this.allCol;
    this.boxH = this.boxW;

    // 计算起始坐标
    let sPosX = -(this.allWidth / 2) + (this.boxW / 2);
    let sPosY = (this.allWidth / 2) - (this.boxW / 2);

    // 计算坐标的偏移量,运算规则(宽铺满,设置高的坐标)
    let offset = 0;
    if(this.allRow > this.allCol){
        offset = ((this.allRow - this.allCol) * this.boxH) / 2;
    }
    else{
        offset = ((this.allRow - this.allCol) * this.boxH) / 2;
    }
    this.landArrays = [];   //地图容器
    this.palace = [];       //初始化地图数据
    for(let i = 0; i < this.allRow; i++){
        this.landArrays[i] = [];
        this.palace[i] = [];
    }

    for(let i = 0; i < this.allRow; i++){    //每行
        for(let j = 0; j < this.allCol; j++){     //每列
            let x = sPosX + (this.boxW * j);
            let y = sPosY - (this.boxH * i) + offset;
            let node = this.createBoxItem(i, j, levelContent[i * this.allCol + j], cc.v2(x, y));
            this.landArrays[i][j] = node;
            node.width = this.boxW;
            node.height = this.boxH;
        }
    }

    // 显示人物
    this.setLandFrame(this.heroRow, this.heroCol, boxType.HERO);
},
根据类型创建元素:
// 创建元素
createBoxItem(row, col, type, pos){
    let node = new cc.Node();
    let sprite = node.addComponent(cc.Sprite);
    let button = node.addComponent(cc.Button);
    sprite.spriteFrame = this.itemImgAtlas.getSpriteFrame("p" + type);
    node.parent = this.gameControlLayer;
    node.position = pos;
    if(type == boxType.WALL){  //墙面,//墙面,命名为wall_row_col
        node.name = "wall_" + row + "_" + col;
        node.attr({"_type_" : type});
    }
    else if(type == boxType.NONE){  //空白区域,//墙面,命名为none_row_col
        node.name = "none_" + row + "_" + col;
        node.attr({"_type_" : type});
    }
    else{  //游戏界面,命名为land_row_col
        node.name = "land_" + row + "_" + col;
        node.attr({"_type_" : type});
        node.attr({"_row_" : row});
        node.attr({"_col_" : col});
        button.interactable = true;
        button.target = node;
        button.node.on('click', this.clickCallBack, this);
        if(type == boxType.ENDBOX){  //在目标点上的箱子,直接将完成的箱子数加1
            this.finishBoxCount += 1;
        }
    }
    this.palace[row][col] = type;

    return node;
},
游戏的所有元素,放置在下图中gameControlLayer的上:

游戏开始后,显示的效果如下(第一关,其他关类似)

3.2 游戏操作判断
路线计算好后,玩家移动,若玩家点击的是箱子区域,先检测箱子前方是否有障碍物,若没有则推动箱子,通过切换地图的图片和修改位置类型达到推动箱子的效果。
点击地图位置,获取最优路径,人物跑到指定点,实现如下:
// 点击地图元素
clickCallBack : function(event, customEventData){
    let target = event.target;
    //最小路径长度
    this.minPath = this.allCol * this.allRow + 1;
    //最优路线
    this.bestMap = [];

    //终点位置
    this.end = {};
    this.end.row  = target._row_;
    this.end.col = target._col_;

    //起点位置
    this.start = {};
    this.start.row = this.heroRow;
    this.start.col = this.heroCol;

    //判断终点类型
    let endType = this.palace[this.end.row][this.end.col];
    if((endType == boxType.LAND) || (endType == boxType.BODY)){  //是空地或目标点,直接计算运动轨迹
        this.getPath(this.start, 0, []);

        if(this.minPath <= this.allCol * this.allRow){
            cc.log("从起点[", this.start.row, ",", this.start.col, "]到终点[",
            this.end.row, ",", this.end.col, "]最短路径长为:", this.minPath, "最短路径为:");

            cc.log("[", this.start.row, ",", this.start.col, "]");
            for(let i = 0; i< this.bestMap.length;i++){
                cc.log("=>[",this.bestMap[i].row,",",this.bestMap[i].col,"]");
            }
            this.bestMap.unshift(this.start);
            this.runHero();
        }else{
            console.log("找不到路径到达");
        }
    }
    else if((endType == boxType.BOX) || (endType == boxType.ENDBOX)){ //是箱子,判断是否可以推动箱子
        //计算箱子和人物的距离
        let lr = this.end.row - this.start.row;
        let lc = this.end.col - this.start.col;
        if((Math.abs(lr) + Math.abs(lc)) == 1){  //箱子在人物的上下左右方位
            //计算推动方位是否有障碍物
            let nextr = this.end.row + lr;
            let nextc = this.end.col + lc;
            let t = this.palace[nextr][nextc];
            if(t && (t != boxType.WALL) && (t != boxType.BOX) && (t != boxType.ENDBOX)){  //前方不是障碍物,也不是墙壁,推动箱子
                this.playSound(sound.PUSHBOX);
                //人物位置还原
                this.setLandFrame(this.start.row, this.start.col, this.palace[this.start.row][this.start.col]);

                //箱子位置类型
                let bt = this.palace[this.end.row][this.end.col];
                if(bt == boxType.ENDBOX){      //有目标物体的箱子类型,还原成目标点
                    this.palace[this.end.row][this.end.col] = boxType.BODY;
                    this.finishBoxCount -= 1;
                }
                else{
                    this.palace[this.end.row][this.end.col] = boxType.LAND;
                }
                //箱子位置变成人物图,但类型保存为空地或目标点
                this.setLandFrame(this.end.row, this.end.col, boxType.HERO);

                //箱子前面位置变成箱子
                let nt = this.palace[nextr][nextc];
                if(nt == boxType.BODY){  //有目标点,将箱子类型设置成有目标箱子
                    this.palace[nextr][nextc] = boxType.ENDBOX;
                    this.finishBoxCount += 1;
                }
                else {
                    this.palace[nextr][nextc] = boxType.BOX;
                }
                this.setLandFrame(nextr, nextc, this.palace[nextr][nextc]);

                this.curStepNum += 1;
                //刷新步数
                this.setCurNum();

                //刷新人物位置
                this.heroRow = this.end.row;
                this.heroCol = this.end.col;

                this.checkGameOver();
            }
            else{
                this.playSound(sound.WRONG);
                console.log("前方有障碍物");
            }
        }
        else{   //目标点错误
            this.playSound(sound.WRONG);
            console.log("目标点错误");
        }
    }
},
获取最优路径算法:
//curPos记录当前坐标,step记录步数
getPath : function(curPos, step, result){
    //判断是否到达终点
    if((curPos.row == this.end.row) && (curPos.col == this.end.col)){
        if(step < this.minPath){
            this.bestMap = [];
            for(let i = 0; i < result.length; i++){
                this.bestMap.push(result[i]);
            }
            this.minPath = step; //如果当前抵达步数比最小值小,则修改最小值
            result = [];
        }
    }

    //递归
    for(let i = (curPos.row - 1); i <= (curPos.row + 1); i++){
        for(let j = (curPos.col - 1); j <= (curPos.col + 1); j++){
            //越界跳过
            if((i < 0) || (i >= this.allRow) || (j < 0) || (j >= this.allCol)){
                continue;
            }
            if((i != curPos.row) && (j != curPos.col)){//忽略斜角
                continue;
            }
            else if(this.palace[i][j] && ((this.palace[i][j] == boxType.LAND) || (this.palace[i][j] == boxType.BODY))){
                let tmp = this.palace[i][j];
                this.palace[i][j] = boxType.WALL;  //标记为不可走

                //保存路线
                let r = {};
                r.row = i;
                r.col = j;
                result.push(r);

                this.getPath(r, step + 1, result);
                this.palace[i][j] = tmp;  //尝试结束,取消标记
                result.pop();
            }
        }
    }
},
4. 游戏结算 gameOverLayer
游戏结束后,根据成功推到箱子数,判断游戏是否成功,游戏成功以后,更新关卡信息即可。
判断逻辑如下:
// 游戏结束检测
checkGameOver(){
    let count = this.allLevelConfig[this.curLevel].allBox;
    // 全部推到了指定位置
    if(this.finishBoxCount == count){
        this.gameOverLayer.active = true;
        this.gameOverLayer.opacity = 1;
        this.gameOverLayer.runAction(cc.sequence(
            cc.delayTime(0.5),
            cc.fadeIn(0.1)
        ));

        // 刷新完成的关卡数
        let finishLevel = parseInt(cc.sys.localStorage.getItem("finishLevel") || 0);
        if(this.curLevel > finishLevel){
            cc.sys.localStorage.setItem("finishLevel", this.curLevel);
        }

        // 刷新星星等级
        cc.sys.localStorage.setItem("levelStar" + this.curLevel, 3);

        // 刷新最优步数
        let best = parseInt(cc.sys.localStorage.getItem("levelBest" + this.curLevel) || 0);
        if((this.curStepNum < best) || (best == 0)){
            cc.sys.localStorage.setItem("levelBest" + this.curLevel, this.curStepNum);
        }
        this.playSound(sound.GAMEWIN);
        this.clearGameData();
    }
},
Creator组件布局如下:

本游戏免费提供游戏源码,需要源码请关注公众号『一枚小工』获取


用 CocosCreator 快速开发推箱子游戏的更多相关文章
- CocosCreator 快速开发推箱子游戏,附代码
游戏总共分为4个功能模块: - 开始游戏(menuLayer) - 关卡选择(levelLayer) - 游戏(gameLayer) - 游戏结算(gameOverLayer) Creator内组件效 ...
- [转]Flash ActionScript2.0面向对象游戏开发-推箱子
本文转自:http://www.alixixi.com/Dev/W3C/Flash/2007/2007070868666.html 概述: Flash ActionScript2.0是一种面向对向的编 ...
- JavaScript写一个小乌龟推箱子游戏
推箱子游戏是老游戏了, 网上有各种各样的版本, 说下推箱子游戏的简单实现,以及我找到的一些参考视频和实例: 推箱子游戏的在线DEMO : 打开 如下是效果图: 这个拖箱子游戏做了移动端的适配, 我使用 ...
- 用HTML5+原生js实现的推箱子游戏
<!DOCTYPE html> <html> <head> <meta charset="UTF-8"> <title> ...
- C# 推箱子游戏&对战游戏
推箱子游戏提纲,只有向右向上的操作,向左向下同理,后期需完善. namespace 推箱子 { class Program { static void Main(string[] args) { // ...
- 【CCpp程序设计2017】推箱子游戏
我的还……支持撤销!用链表实现! 题目:推箱子小游戏(基于console) 功能要求: 将p09迷宫游戏改造为“推箱子”游戏: 在地图中增加箱子.箱子目标位置等图形: 当玩家将所有箱子归位,则显示玩家 ...
- JavaScript 推箱子游戏
推箱子游戏的 逻辑非常简单,但是如果不动手的话,还是不太清楚.我在这里讲一下自己的思路. 制作推箱子,首先要有自己的设计素材.如下我也是网上找的素材 第二步,理清游戏的规则. 游戏规则: 1.小人将箱 ...
- three.js 制作一个三维的推箱子游戏
今天郭先生发现大家更喜欢看我发的three.js小作品,今天我就发一个3d版本推箱子的游戏,其实webGL有很多框架,three.js并不合适做游戏引擎,但是可以尝试一些小游戏.在线案例请点击博客原文 ...
- 用C写一个简单的推箱子游戏(二)
下面接着上一篇随笔<用C写一个简单的推箱子游戏(一)>来写 tuidong()函数是用来判断游戏人物前方情况的函数,是推箱子游戏中非常重要的一个函数,下面从它开始继续介绍推箱子的小程序怎么 ...
随机推荐
- 带你入门SpringCloud服务发现 | Eurka搭建和使用
前言 服务注册与发现是微服务中最为基础的环节,而 Eureka 就是一个可以帮助你实现服务注册与发现的选择之一.如果你对 Eureka 和服务发现了解甚少,那么该篇博客将会帮助到你.文中通过具体操作带 ...
- spring-cloud-kubernetes官方demo运行实战
关于spring-cloud-kubernetes spring-cloud-kubernetes是springcloud官方推出的开源项目,用于将Spring Cloud和Spring Boot应用 ...
- JavaScript String 字符串方法
JavaScript String 字符串方法汇总 1.str.indexOf() 方法查找字符串中的字符串 返回 字符串中指定文本首次出现的索引(位置) JavaScript ...
- Delphi - Indy TIdMessage和TIdSMTP实现邮件的发送
idMessage / idSMTP 首先对idMessage类的各种属性进行赋值(邮件的基本信息,如收件人.邮件主题.邮件正文等),其次通过idSMTP连接邮箱服务器,最后通过idSMTP的Send ...
- String类中intern方法的原理分析
一,前言 昨天简单整理了JVM内存分配和String类常用方法,遇到了String中的intern()方法.本来想一并总结起来,但是intern方法还涉及到JDK版本的问题,内容也相对较多,所以今 ...
- Nacos高可用集群解决方案-Docker版本
文章主旨 本文目的是配置高可用的Nacos集群 架构图 整体架构为:Nginx + 3 x Nacos +高可用MySQL 高可用MySQL使用主从复制结构的可以参考Docker搭建MySQL主从集群 ...
- 设置VS2015背景图片(转载)
设置方法很简单:安装扩展ClaudiaIDE 1.在这里下载扩展,https://visualstudiogallery.msdn.microsoft.com/9ba50f8d-f30c-4e33-a ...
- 转载-Spring Boot应用监控实战
概述 之前讲过Docker容器的可视化监控,即监控容器的运行情况,包括 CPU使用率.内存占用.网络状况以及磁盘空间等等一系列信息.同样利用SpringBoot作为微服务单元的实例化技术选型时,我们不 ...
- 对git使用的初步总结
使用git也才一周多,就已经深深爱上这款软件了. 之前公司一直用的是clearcase,一款老到除了公司内部的人和曾经开发这款软件的人,估计再也不会有人知道了吧! (当然也许还会有其他公司也会使用,因 ...
- mybatis plus使用redis作为二级缓存
建议缓存放到 service 层,你可以自定义自己的 BaseServiceImpl 重写注解父类方法,继承自己的实现.为了方便,这里我们将缓存放到mapper层.mybatis-plus整合redi ...