炫酷的CSS3响应式表单
原创YouTube@ Online Tutorials
css代码:
* {

    margin: 0;

    padding: 0;

    box-sizing: border-box;

    font-family: 'Poppins', sans-serif;

}

body {

    display: flex;

    justify-content: center;

    align-items: center;

    min-height: 100vh;

    background: #03080a;

}

.container {

    width: 80%;

    padding: 20px;

}

.container h2 {

    width: 100%;

    color: #45f3ff;

    font-size: 36px;

    text-align: center;

    margin-bottom: 10px;

}

.container .row100 {

    position: relative;

    width: 100%;

    display: grid;

    grid-template-columns: repeat(auto-fit, minmax(300px, 1fr));

}

.container .row100 .col {

    position: relative;

    width: 100%;

    padding: 0 10px;

    margin: 30px 0 10px;

    transition: 0.5s;

}

.container .row100 .inputBox {

    position: relative;

    width: 100%;

    height: 40px;

    color: #45f3ff;

}

.container .row100 .inputBox input,

.container .row100 .inputBox textarea {

    position: absolute;

    width: 100%;

    height: 100%;

    background: transparent;

    box-shadow: none;

    border: none;

    outline: none;

    font-size: 18px;

    padding: 0 10px;

    z-index: 1;

    color: #000;

}

.container .row100 .inputBox .text {

    position: absolute;

    top: 0;

    left: 0;

    line-height: 40px;

    font-size: 18px;

    padding: 0 10px;

    display: block;

    transition: 0.5s;

    pointer-events: none;

}

.container .row100 .inputBox input:focus+.text,

.container .row100 .inputBox input:valid+.text {

    top: -35px;

    left: -10px;

}

.container .row100 .inputBox .line {

    position: absolute;

    bottom: 0;

    display: block;

    width: 100%;

    height: 2px;

    background-color: #45f3ff;

    transition: 0.5s;

    border-radius: 2px;

    pointer-events: none;

}

.container .row100 .inputBox input:focus~.line,

.container .row100 .inputBox input:valid~.line {

    height: 100%;

}

.container .row100 .inputBox .textarea {

    position: relative;

    width: 100%;

    height: 100px;

    padding: 10px 0;

}

.container .row100 .inputBox textarea {

    height: 100%;

    resize: none;

    /* background-color: #000; */

}

.container .row100 .inputBox textarea:focus+.text,

.container .row100 .inputBox textarea:valid+.text {

    top: -35px;

    left: -10px;

}

.container .row100 .inputBox textarea:focus~.line,

.container .row100 .inputBox textarea:valid~.line {

    height: 100%;

}

input[type="submit"] {

    border: none;

    padding: 7px 35px;

    cursor: pointer;

    /* outline設置边框样式 */

    outline: none;

    background-color: #45f3ff;

    color: #000;

    font-size: 18px;

    border-radius: 2px;

}
html源码:
<!DOCTYPE html>

<html lang="en">

<head>

    <meta charset="UTF-8">

    <meta name="viewport" content="width=device-width, initial-scale=1.0">

    <meta http-equiv="X-UA-Compatible" content="ie=edge">

    <title>Document</title>

    <link rel="stylesheet" href="index.css">

</head>

<body>

    <div class="container">

        <h2>Contact Us</h2>

        <div class="row100">

            <div class="col">

                <div class="inputBox">

                    <input type="text" required="required">

                    <span class="text">First Name</span>

                    <span class="line"></span>

                </div>

            </div>

            <div class="col">

                <div class="inputBox">

                    <input type="text" required="required">

                    <span class="text">Last Name</span>

                    <span class="line"></span>

                </div>

            </div>

        </div>

        <div class="row100">

            <div class="col">

                <div class="inputBox">

                    <input type="text" required="required">

                    <span class="text">Email</span>

                    <span class="line"></span>

                </div>

            </div>

            <div class="col">

                <div class="inputBox">

                    <input type="text" required="required">

                    <span class="text">Mobile</span>

                    <span class="line"></span>

                </div>

            </div>

        </div>

        <div class="row100">

            <div class="col">

                <div class="inputBox textarea">

                    <textarea required="required"></textarea>

                    <span class="text">Type your message Here...</span>

                    <span class="line"></span>

                </div>

            </div>

        </div>

        <div class="row100">

            <div class="col">

                <input type="submit" value="Send">

            </div>

        </div>

    </div>

</body>

</html>
效果展示:
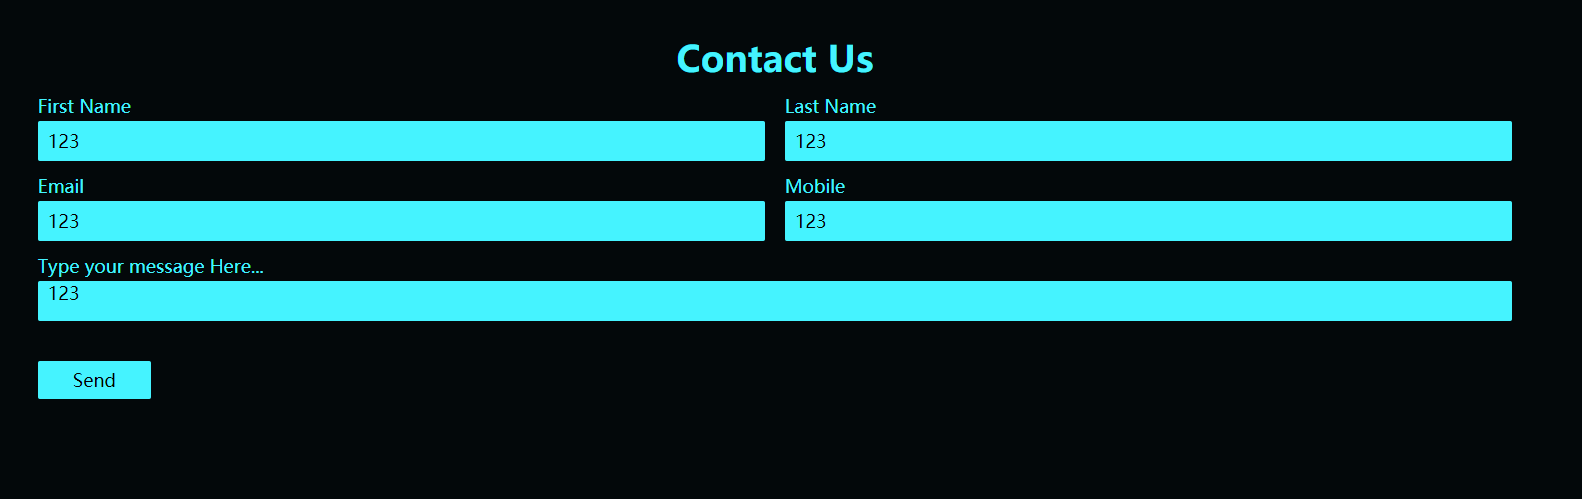
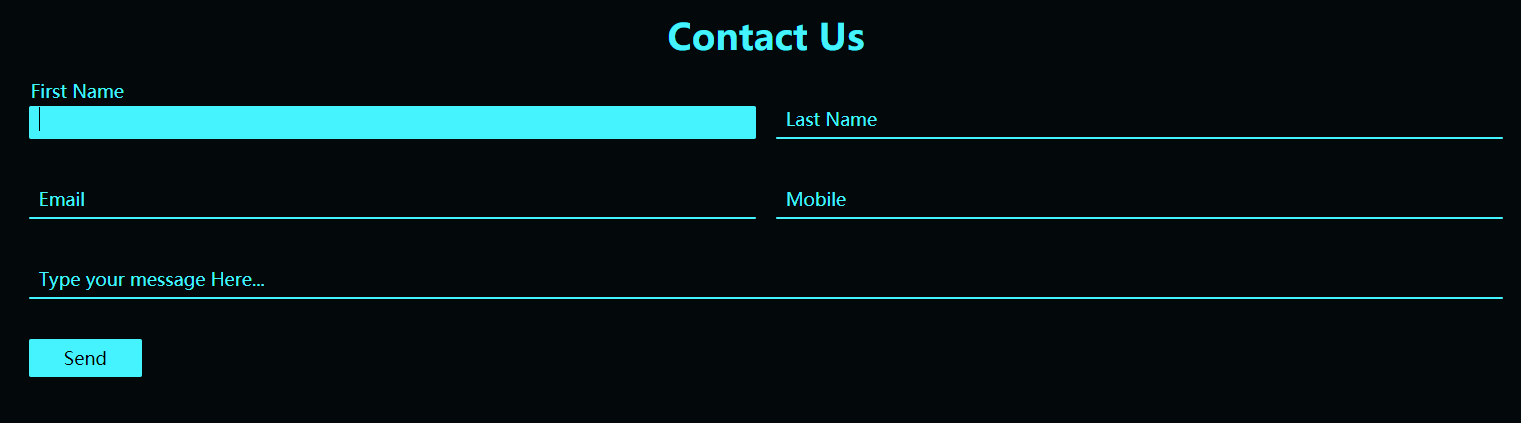
- 自适应效果:

炫酷的CSS3响应式表单的更多相关文章
- ng2响应式表单-翻译与概括官网REACTIVE FORMS页面
本文将半翻译半总结的讲讲ng2官网的另一个未翻译高级教程页面. 原文地址. 文章目的是使用ng2提供的响应式表单技术快速搭出功能完善丰富的界面表单组件. 响应式表单是一项响应式风格的ng2技术,本文将 ...
- Angular2响应式表单
本文将半翻译半总结的讲讲ng2官网的另一个未翻译高级教程页面. 原文地址. 文章目的是使用ng2提供的响应式表单技术快速搭出功能完善丰富的界面表单组件. 响应式表单是一项响应式风格的ng2技术,本文将 ...
- Angular Reactive Forms -- Model-Driven Forms响应式表单
Angular 4.x 中有两种表单: Template-Driven Forms - 模板驱动式表单 (类似于 AngularJS 1.x 中的表单 ) 官方文档:https://v2.angul ...
- Angular2响应式表单-翻译与概括官网REACTIVE FORMS页面
本文将半翻译半总结的讲讲ng2官网的另一个未翻译高级教程页面. 原文地址. 文章目的是使用ng2提供的响应式表单技术快速搭出功能完善丰富的界面表单组件. 响应式表单是一项响应式风格的ng2技术,本文将 ...
- Angular11 模板表单、响应式表单(自定义验证器)、HTTP、表单元素双向绑定
1 模板表单 模型通过指令隐式创建 技巧01:需要在模块级别引入 FormsModule ,通常在共享模块中引入再导出,然后在需要用到 FormsModule 的模块中导入共享模块就可以啦 impor ...
- angular6的响应式表单
1:在AppModule模块里面引入 ReactiveFormsModule 要使用响应式表单,就要从@angular/forms包中导入ReactiveFormsModule,并把它添加到你的NgM ...
- Angular之响应式表单 ( Reactive Forms )
项目结构 一 首页 ( index.html ) <!doctype html> <html lang="en"> <head> <met ...
- angular响应式表单 - 状态字段
用于表单验证的过程: touched,untoched pristine,dirty pending
- 【译】用 Chart.js 做漂亮的响应式表单
数据包围着我们.虽然搜索引擎和其他应用都对基于文本方式表示的数据偏爱有加,但人们发现可视化是更容易理解的一种方式.今年初,SitePoint 发表了 Aurelio 的文章< Chart.js简 ...
随机推荐
- [日常] win10开启和安装ubuntu子系统
在控制面板的程序与功能里启用和关闭windows功能打开,适用于linux的windows子系统 在微软商店里搜索ubuntu,直接点击安装就可以了 安装完成后的windows与linux的磁盘映射见 ...
- node.js守护进程问题的解决
最近自己写了一个node.js来读取redis数据,编写完成后按理来说加& 应该是有效的 nohup node redis.js & 但是每次关闭终端后这个进程就自动停止了,百度了下 ...
- 面向对象程序设计(JAVA) 第12周学习指导及要求
2019面向对象程序设计(Java)第12周学习指导及要求 (2019.11.15-2019.11.18) 学习目标 (1) 掌握Vetor.Stack.Hashtable三个类的用途及常用API ...
- 设计模式-Facade(结构型模式) 针对 最终类的实现通过一系列类的相关操作,重点关注 起始与结尾的操作。
以下代码来源: 设计模式精解-GoF 23种设计模式解析附C++实现源码 //Facade.h #pragma once class Subsystem1 { public: Subsystem1() ...
- Java入门之人需要注意的5大步骤
作为最抢手的程序开发言语之一,Java在互联网领域中的方位无需赘言.抢手也带来了高薪和许多的作业时机,对那些预备通过学习Java来改动自己命运的同学来说,需求做好以下作业. 1.考虑一下 学习Java ...
- 云服务AppId或AppKey和AppSecret生成策略
App key和App Secret App key简称API接口验证序号,是用于验证API接入合法性的.接入哪个网站的API接口,就需要这个网站允许才能够接入,如果简单比喻的话:可以理解成是登陆网站 ...
- 【raid级别】RAID级别工作模式
友情链接 磁盘分区,格式化,挂载,创建交换分区:https://www.cnblogs.com/HeiDi-BoKe/p/11936998.html RAID工作级别:https://www.cnbl ...
- Appium+java ---- Intellij IDEA +genymotion安装配置
引用文章:https://www.cnblogs.com/kaola8023/p/8442686.html Intellij IDEA 中配置Android SDK File-Project Stru ...
- antV G2 为柱状图添加背景颜色
工作中需要在基础柱状图的基础上添加一个自定义高度的背景颜色, 基础柱状图: 目标柱状图: 由于chart绘图可以重叠,通过该特性,我们可以在画两次图重叠在一起,第一次绘图描述背景,第二次绘图描述数据, ...
- requests库的使用、安装及方法的简单介绍
requests库的使用.安装及方法的简单介绍 1.requests库的概述 requests库是一个简洁且简单的处理HTTP请求的第三方库,是公认的最好获得第三方信息的库. requests库更多信 ...