炫酷的CSS3响应式表单
原创YouTube@ Online Tutorials
css代码:
* {

    margin: 0;

    padding: 0;

    box-sizing: border-box;

    font-family: 'Poppins', sans-serif;

}

body {

    display: flex;

    justify-content: center;

    align-items: center;

    min-height: 100vh;

    background: #03080a;

}

.container {

    width: 80%;

    padding: 20px;

}

.container h2 {

    width: 100%;

    color: #45f3ff;

    font-size: 36px;

    text-align: center;

    margin-bottom: 10px;

}

.container .row100 {

    position: relative;

    width: 100%;

    display: grid;

    grid-template-columns: repeat(auto-fit, minmax(300px, 1fr));

}

.container .row100 .col {

    position: relative;

    width: 100%;

    padding: 0 10px;

    margin: 30px 0 10px;

    transition: 0.5s;

}

.container .row100 .inputBox {

    position: relative;

    width: 100%;

    height: 40px;

    color: #45f3ff;

}

.container .row100 .inputBox input,

.container .row100 .inputBox textarea {

    position: absolute;

    width: 100%;

    height: 100%;

    background: transparent;

    box-shadow: none;

    border: none;

    outline: none;

    font-size: 18px;

    padding: 0 10px;

    z-index: 1;

    color: #000;

}

.container .row100 .inputBox .text {

    position: absolute;

    top: 0;

    left: 0;

    line-height: 40px;

    font-size: 18px;

    padding: 0 10px;

    display: block;

    transition: 0.5s;

    pointer-events: none;

}

.container .row100 .inputBox input:focus+.text,

.container .row100 .inputBox input:valid+.text {

    top: -35px;

    left: -10px;

}

.container .row100 .inputBox .line {

    position: absolute;

    bottom: 0;

    display: block;

    width: 100%;

    height: 2px;

    background-color: #45f3ff;

    transition: 0.5s;

    border-radius: 2px;

    pointer-events: none;

}

.container .row100 .inputBox input:focus~.line,

.container .row100 .inputBox input:valid~.line {

    height: 100%;

}

.container .row100 .inputBox .textarea {

    position: relative;

    width: 100%;

    height: 100px;

    padding: 10px 0;

}

.container .row100 .inputBox textarea {

    height: 100%;

    resize: none;

    /* background-color: #000; */

}

.container .row100 .inputBox textarea:focus+.text,

.container .row100 .inputBox textarea:valid+.text {

    top: -35px;

    left: -10px;

}

.container .row100 .inputBox textarea:focus~.line,

.container .row100 .inputBox textarea:valid~.line {

    height: 100%;

}

input[type="submit"] {

    border: none;

    padding: 7px 35px;

    cursor: pointer;

    /* outline設置边框样式 */

    outline: none;

    background-color: #45f3ff;

    color: #000;

    font-size: 18px;

    border-radius: 2px;

}
html源码:
<!DOCTYPE html>

<html lang="en">

<head>

    <meta charset="UTF-8">

    <meta name="viewport" content="width=device-width, initial-scale=1.0">

    <meta http-equiv="X-UA-Compatible" content="ie=edge">

    <title>Document</title>

    <link rel="stylesheet" href="index.css">

</head>

<body>

    <div class="container">

        <h2>Contact Us</h2>

        <div class="row100">

            <div class="col">

                <div class="inputBox">

                    <input type="text" required="required">

                    <span class="text">First Name</span>

                    <span class="line"></span>

                </div>

            </div>

            <div class="col">

                <div class="inputBox">

                    <input type="text" required="required">

                    <span class="text">Last Name</span>

                    <span class="line"></span>

                </div>

            </div>

        </div>

        <div class="row100">

            <div class="col">

                <div class="inputBox">

                    <input type="text" required="required">

                    <span class="text">Email</span>

                    <span class="line"></span>

                </div>

            </div>

            <div class="col">

                <div class="inputBox">

                    <input type="text" required="required">

                    <span class="text">Mobile</span>

                    <span class="line"></span>

                </div>

            </div>

        </div>

        <div class="row100">

            <div class="col">

                <div class="inputBox textarea">

                    <textarea required="required"></textarea>

                    <span class="text">Type your message Here...</span>

                    <span class="line"></span>

                </div>

            </div>

        </div>

        <div class="row100">

            <div class="col">

                <input type="submit" value="Send">

            </div>

        </div>

    </div>

</body>

</html>
效果展示:
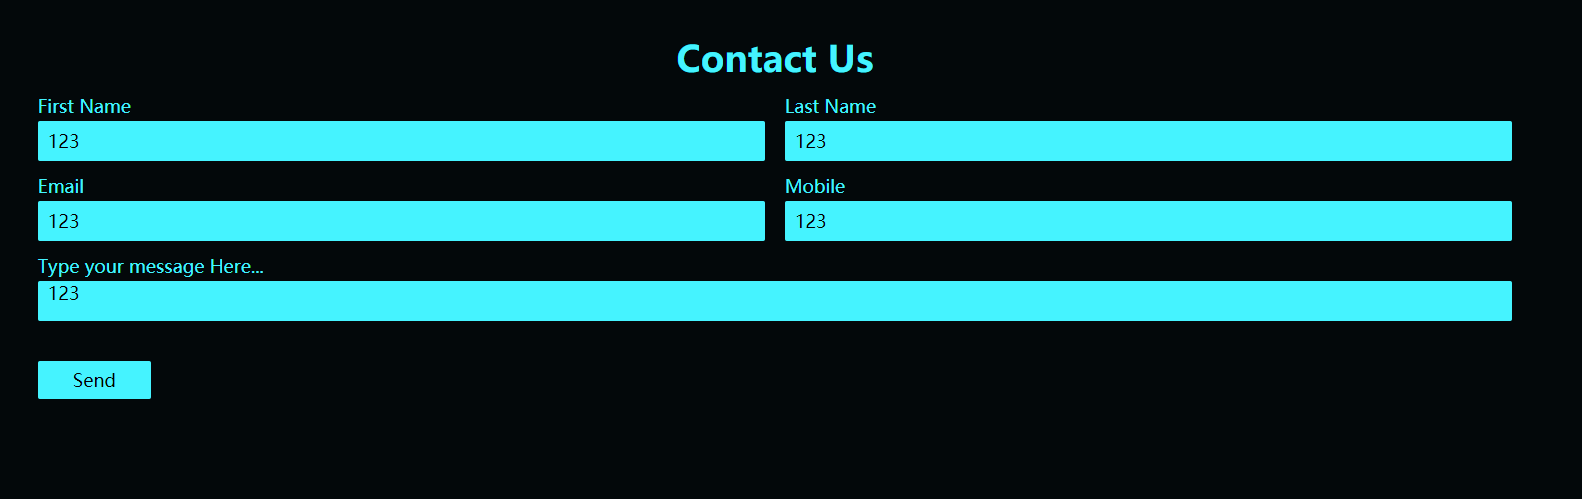
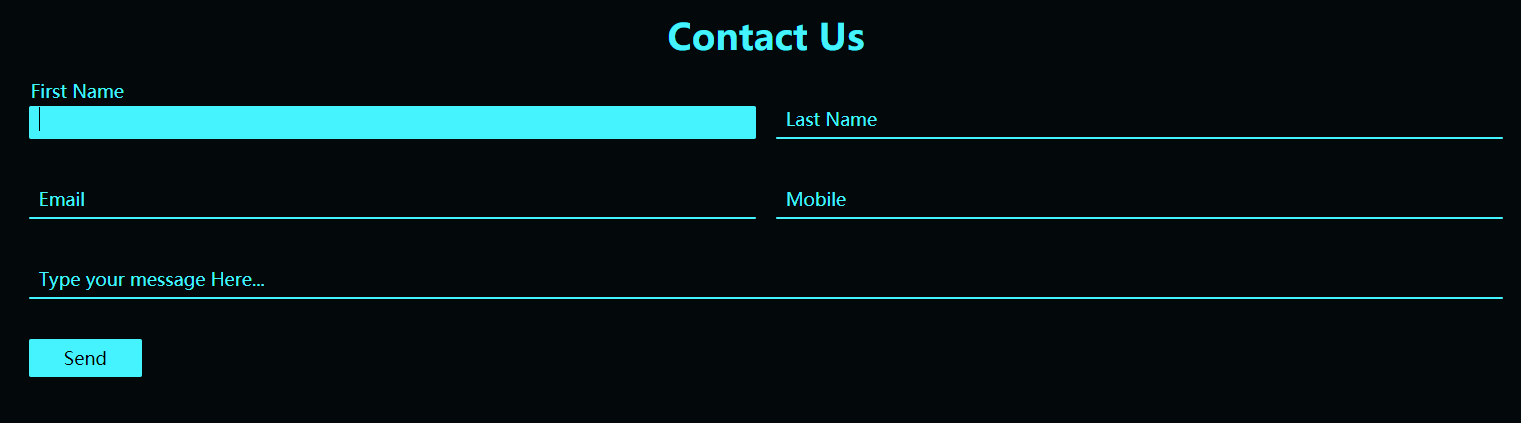
- 自适应效果:

炫酷的CSS3响应式表单的更多相关文章
- ng2响应式表单-翻译与概括官网REACTIVE FORMS页面
本文将半翻译半总结的讲讲ng2官网的另一个未翻译高级教程页面. 原文地址. 文章目的是使用ng2提供的响应式表单技术快速搭出功能完善丰富的界面表单组件. 响应式表单是一项响应式风格的ng2技术,本文将 ...
- Angular2响应式表单
本文将半翻译半总结的讲讲ng2官网的另一个未翻译高级教程页面. 原文地址. 文章目的是使用ng2提供的响应式表单技术快速搭出功能完善丰富的界面表单组件. 响应式表单是一项响应式风格的ng2技术,本文将 ...
- Angular Reactive Forms -- Model-Driven Forms响应式表单
Angular 4.x 中有两种表单: Template-Driven Forms - 模板驱动式表单 (类似于 AngularJS 1.x 中的表单 ) 官方文档:https://v2.angul ...
- Angular2响应式表单-翻译与概括官网REACTIVE FORMS页面
本文将半翻译半总结的讲讲ng2官网的另一个未翻译高级教程页面. 原文地址. 文章目的是使用ng2提供的响应式表单技术快速搭出功能完善丰富的界面表单组件. 响应式表单是一项响应式风格的ng2技术,本文将 ...
- Angular11 模板表单、响应式表单(自定义验证器)、HTTP、表单元素双向绑定
1 模板表单 模型通过指令隐式创建 技巧01:需要在模块级别引入 FormsModule ,通常在共享模块中引入再导出,然后在需要用到 FormsModule 的模块中导入共享模块就可以啦 impor ...
- angular6的响应式表单
1:在AppModule模块里面引入 ReactiveFormsModule 要使用响应式表单,就要从@angular/forms包中导入ReactiveFormsModule,并把它添加到你的NgM ...
- Angular之响应式表单 ( Reactive Forms )
项目结构 一 首页 ( index.html ) <!doctype html> <html lang="en"> <head> <met ...
- angular响应式表单 - 状态字段
用于表单验证的过程: touched,untoched pristine,dirty pending
- 【译】用 Chart.js 做漂亮的响应式表单
数据包围着我们.虽然搜索引擎和其他应用都对基于文本方式表示的数据偏爱有加,但人们发现可视化是更容易理解的一种方式.今年初,SitePoint 发表了 Aurelio 的文章< Chart.js简 ...
随机推荐
- Vue动态设置Dom元素宽高
需求: slider侧边栏是宽度是动态的,使用jquery可以操作dom元素,设置宽高,但vue是避免操作dom的 <template> <div class="slide ...
- 201871010123-吴丽丽 《面向对象程序设计(Java)》第十六周学习总结
201871010123-吴丽丽 <面向对象程序设计(Java)>第十六周学习总结 项目 内容 这个作业属于哪个课程 https://www.cnblogs.com/nwnu-daizh/ ...
- acwing 835. Trie字符串统计
地址 https://www.acwing.com/problem/content/description/837/ 维护一个字符串集合,支持两种操作: “I x”向集合中插入一个字符串x: “Q ...
- 算法问题实战策略 WORDCHAIN
地址 https://algospot.com/judge/problem/read/WORDCHAIN 解答: 1 书上的解法是制作有向图 然后查找欧拉回路 代码实现稍后 假设一定存在欧拉路径的 ...
- ubuntu升级pip报cannot import name 'main'解决方法
执行sudo vi /usr/bin/pip 将代码: from pip import main if __name__ == '__main__': sys.exit(main()) 修改为: fr ...
- 基于Docker的Consul服务发现集群搭建
在去年的.NET Core微服务系列文章中,初步学习了一下Consul服务发现,总结了两篇文章.本次基于Docker部署的方式,以一个Demo示例来搭建一个Consul的示例集群,最后给出一个HA的架 ...
- Sql Server 判断表是否存在方法总结
#使用场景: 1.在创建表之前,需要先判断该表是否已经存在: 2.在删除表之前,需要先判断该表是否已经存在: #方法总结: 1.判断实体表是否存在的方法: 1).方法一: * from sysObje ...
- IT兄弟连 Java语法教程 流程控制语句 分支结构语句3
3 if-else if-else条件语句 if-else if-else的完整形式如下: if(判断条件A){ A语句块(判断条件A的值为true,执行) }else if(判断条件B){ B语句 ...
- vue 仿微信朋友圈9张图上传功能
项目需求要求用户上传商品的时候可以一次性上传9张图,多余9张提示‘只能上传9张图’,并且每张图右上角有个删除按钮,图片也可以点击放大. 出来的效果图如下: 话不多说,上代码: <el-form- ...
- Octave Convolution详解
前言 Octave Convolution来自于这篇论文<Drop an Octave: Reducing Spatial Redundancy in Convolutional Neural ...