
SSM 框架集成
1.SSM是什么?
SSM是指目前最主流的项目架构的三大框架:
SpringMVC : spring的 Web层框架,是spring的一个模块
Spring :容器框架
MyBatis :持久层框架
2.spring与mybatis集成示例
我们集成mybatis和spring,主要是为了让mybatis用spring的事务管理
2.1 相关导入jar包
Spring依赖包:

mybatis依赖包:

MyBatis和Spring框架集成的桥梁包:
Spring自己并没有集成MyBatis框架,而是有MyBatis自己来集成,所以还需要Spring框架集成的桥梁包

数据库驱动包和连接池:


Mybatis支持的日志包log4j:

2.2 项目整体结构

2.3 Mapper层
package com.gjs.ssm.mapper;

import java.util.List;

import com.gjs.ssm.pojo.User;

public interface UserMapper {

    public    int insert(User user);

    public User selectByPrimaryKey(Integer id);

    public List<User> selectList();

    public int delteByPrimaryKey(Integer id);

}
Mapper.xml文件
<?xml version="1.0" encoding="UTF-8" ?>

<!DOCTYPE mapper

  PUBLIC "-//mybatis.org//DTD Mapper 3.0//EN"

  "http://mybatis.org/dtd/mybatis-3-mapper.dtd">

<mapper namespace="com.gjs.ssm.mapper.UserMapper">

    <insert id="insert" parameterType="com.gjs.ssm.pojo.User">

        insert into user (name,password,age)values(#{name},#{password},#{age})

    </insert>

    <select id="selectByPrimaryKey" parameterType="Integer" resultType="com.gjs.ssm.pojo.User">

        select * from user where id = #{id}

    </select>

    <select id="selectList"  resultType="com.gjs.ssm.pojo.User">

        select * from user

    </select>

      <delete id="delteByPrimaryKey" parameterType="int">

          delete from user where id = #{id}

      </delete>

</mapper>
2.4 Service层
package com.gjs.ssm.service.impl;

import java.util.List;

import org.springframework.beans.factory.annotation.Autowired;

import org.springframework.stereotype.Service;

import com.gjs.ssm.mapper.UserMapper;

import com.gjs.ssm.pojo.User;

import com.gjs.ssm.service.UserService;

@Service

public class UserSerivceImpl implements UserService{

    @Autowired

    UserMapper userMapper;

    @Override

    public int inset(User user) {

        return userMapper.insert(user);

    }

    @Override

    public User selectByPrimaryKey(Integer id) {

        return userMapper.selectByPrimaryKey(id);

    }

    @Override

    public List<User> selectList() {

        return userMapper.selectList();

    }

    @Override

    public int delteByPrimaryKey(Integer id) {

        return userMapper.delteByPrimaryKey(id);

    }

}
2.5层与层之间(Mapper和Service)spring对象的创建和依赖关系的维护(A)
之前我们Mapper对象的创建是通过sqlSession对象创建的,sqlSession对象又是SqlSessionFactory对象创建出来的,而SqlSessionFactory对象是通过读取配置文件中的相关配置创建的。
所谓的spring与mybatis集成,说白了就是把这些对象的创建都交给spring来处理。那怎么让spring自己创建这些对象呢?
spring-mybatis桥梁包中提供的org.mybatis.spring.SqlSessionFactoryBean类可以创建SqlSessionFactory对象,org.mybatis.spring.mapper.MapperScannerConfigurer类可以用来创建 Mapper接口的代理对象。所以只要在spring中配置这两个对象并注入依赖即可。具体配置如下:
spring.xml:
<?xml version="1.0" encoding="UTF-8"?>

<beans xmlns="http://www.springframework.org/schema/beans"

    xmlns:p="http://www.springframework.org/schema/p"

    xmlns:context="http://www.springframework.org/schema/context"

    xmlns:aop="http://www.springframework.org/schema/aop"

    xmlns:tx="http://www.springframework.org/schema/tx"

    xmlns:xsi="http://www.w3.org/2001/XMLSchema-instance"

    xsi:schemaLocation="

        http://www.springframework.org/schema/beans

        http://www.springframework.org/schema/beans/spring-beans.xsd

        http://www.springframework.org/schema/context

        http://www.springframework.org/schema/context/spring-context.xsd

        http://www.springframework.org/schema/aop

        http://www.springframework.org/schema/aop/spring-aop.xsd

        http://www.springframework.org/schema/tx

        http://www.springframework.org/schema/tx/spring-tx.xsd

        ">

    <!-- 开启注解包扫描 -->

    <context:component-scan base-package="com.gjs.ssm"/>

    <!-- 读取db.properties 配置文件 -->

    <context:property-placeholder location="classpath:db.properties"/>

    <!-- 配置druid连接池 -->

    <bean id="dataSource" class="com.alibaba.druid.pool.DruidDataSource">

        <property name="driverClassName" value="${jdbc.driverClassName}"/>

        <property name="url" value="${jdbc.url}"/>

        <property name="username" value="${jdbc.username}"/>

        <property name="password" value="${jdbc.password}"/>

        <property name="maxActive" value="${jdbc.maxActive}"/>

    </bean>

    <!-- 配置SqlSessionFactoryBean对象 -->

    <bean name="sqlSessionFactory" class="org.mybatis.spring.SqlSessionFactoryBean">

        <!-- 注入数据源 -->

        <property name="dataSource" ref="dataSource"/>

        <!-- 配置映射文件 -->

        <property name="mapperLocations">

            <array>

                <value>classpath:com/gjs/ssm/mapper/*Mapper.xml</value>

            </array>

        </property>

        <!-- 配置包扫描的别名 -->

        <property name="typeAliasesPackage" value="com.gjs.ssm.pojo"/>

        <!--

        如果需要读取mybatis框架的配置文件mybat-config.xml可使用:

        <property name="configLocation" value="classpath:mybatis-config.xml"/>

        不过一般不需要

         -->

    </bean>

    <!-- SqlSession对象的创建只需通过sqlSessionFactory对象调用openSession()方法即可,spring会自动创建 -->

    <!-- 使用包扫描批量创建 Mapper接口对应的代理对象 -->

    <bean class="org.mybatis.spring.mapper.MapperScannerConfigurer">

        <!-- 配置包扫描创建代理对象的位置 -->

        <property name="basePackage" value="com.gjs.ssm.mapper"/>

        <!-- 注入sqlSessionFactory bean的名称 -->

        <property name="sqlSessionFactoryBeanName" value="sqlSessionFactory"/>

    </bean>

    <!-- 配置事务管理器 -->

    <bean id="txManager"  class="org.springframework.jdbc.datasource.DataSourceTransactionManager">

        <!-- 注入数据源 -->

        <property name="dataSource" ref="dataSource"/>

    </bean>

    <!-- 配置事务通知 -->

    <tx:advice id="txAdvice" transaction-manager="txManager">

        <tx:attributes>

            <!-- DQL -->

            <tx:method name="select*" read-only="true" isolation="REPEATABLE_READ" propagation="REQUIRED"/>

            <tx:method name="get*" read-only="true" isolation="REPEATABLE_READ" propagation="REQUIRED"/>

            <tx:method name="find*" read-only="true" isolation="REPEATABLE_READ" propagation="REQUIRED"/>

            <tx:method name="query*" read-only="true" isolation="REPEATABLE_READ" propagation="REQUIRED"/>

            <!-- 非DQL  -->

            <tx:method name="*" read-only="false" isolation="REPEATABLE_READ" propagation="REQUIRED"/>        </tx:attributes>

    </tx:advice>

    <!-- 使用AOP将事务切入到service层 -->

    <aop:config >

        <!-- 切入点 -->

        <aop:pointcut expression="execution(* com.gjs.ssm.service..*.*(..))" id="pt"/>

        <!-- 切面 = 切入点+通知-->

        <aop:advisor advice-ref="txAdvice" pointcut-ref="pt"/>

        <!-- Spring 负责织入 -->

    </aop:config>

</beans>
下面这段代码是其中的关键
<!-- 配置SqlSessionFactoryBean对象 -->

    <bean name="sqlSessionFactory" class="org.mybatis.spring.SqlSessionFactoryBean">

        <!-- 注入数据源 -->

        <property name="dataSource" ref="dataSource"/>

        <!-- 配置映射文件 -->

        <property name="mapperLocations">

            <array>

                <value>classpath:com/gjs/ssm/mapper/*Mapper.xml</value>

            </array>

        </property>

        <!-- 配置包扫描的别名 -->

        <property name="typeAliasesPackage" value="com.gjs.ssm.pojo"/>

        <!--

        如果需要读取mybatis框架的配置文件mybat-config.xml可使用:

        <property name="configLocation" value="classpath:mybatis-config.xml"/>

        不过一般不需要

         -->

    </bean>

    <!-- SqlSession对象的创建只需通过sqlSessionFactory对象调用openSession()方法即可,spring会自动创建 -->

    <!-- 使用包扫描批量创建 Mapper接口对应的代理对象 -->

    <bean class="org.mybatis.spring.mapper.MapperScannerConfigurer">

        <!-- 配置包扫描创建代理对象的位置 -->

        <property name="basePackage" value="com.gjs.ssm.mapper"/>

        <!-- 注入sqlSessionFactory bean的名称 -->

        <property name="sqlSessionFactoryBeanName" value="sqlSessionFactory"/>

    </bean>
2. 5 测试代码
package com.gjs.ssm.test;

import java.util.List;

import org.junit.Test;

import org.junit.runner.RunWith;

import org.springframework.beans.factory.annotation.Autowired;

import org.springframework.test.context.ContextConfiguration;

import org.springframework.test.context.junit4.SpringJUnit4ClassRunner;

import com.gjs.ssm.pojo.User;

import com.gjs.ssm.service.UserService;

@RunWith(SpringJUnit4ClassRunner.class)

@ContextConfiguration("classpath:spring.xml")

public class UserSerivceImplTest {

    @Autowired

    private UserService userService;

    @Test

    public void testInset() {

        User user = new User(null, "张三", "123", 30);

        int row = userService.inset(user);

        System.out.println(row);

    }

    @Test

    public void testSelectByPrimaryKey() {

        User user = userService.selectByPrimaryKey(3);

        System.out.println(user);

    }

    @Test

    public void testSelectList() {

        List<User> selectList = userService.selectList();

        System.out.println(selectList);

    }

    @Test

    public void testDelteByPrimaryKey() {

        int row = userService.delteByPrimaryKey(3);

        System.out.println(row);

    }

}
3.SpringMVC的集成
3.1 导入相关jar包
SpringMVC依赖包:

Jstl标签库依赖包:

3.2 项目整体结构
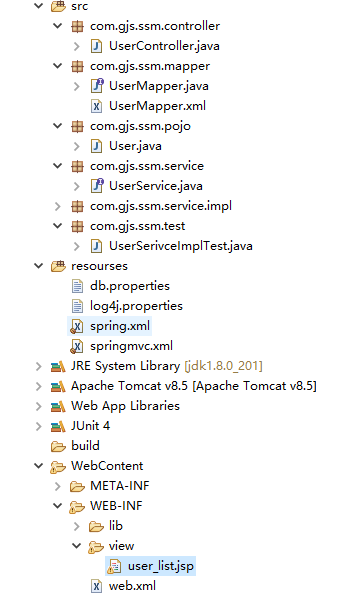
3.3 springmvc.xml配置文件
<?xml version="1.0" encoding="UTF-8"?>

<beans xmlns="http://www.springframework.org/schema/beans"

    xmlns:p="http://www.springframework.org/schema/p"

    xmlns:mvc="http://www.springframework.org/schema/mvc"

    xmlns:xsi="http://www.w3.org/2001/XMLSchema-instance"

    xsi:schemaLocation="

        http://www.springframework.org/schema/beans

        http://www.springframework.org/schema/beans/spring-beans.xsd

        http://www.springframework.org/schema/mvc

        http://www.springframework.org/schema/mvc/spring-mvc.xsd

        ">

    <!-- 开启springMVC注解驱动 -->

    <mvc:annotation-driven/>

</beans>
3.4 编写控制器
package com.gjs.ssm.controller;

import java.util.List;

import org.springframework.beans.factory.annotation.Autowired;

import org.springframework.stereotype.Controller;

import org.springframework.ui.Model;

import org.springframework.web.bind.annotation.RequestMapping;

import com.gjs.ssm.pojo.User;

import com.gjs.ssm.service.UserService;

@Controller

@RequestMapping("/user")

public class UserController {

    @Autowired

    private UserService userService;

    @RequestMapping("/list")

    public String list(Model model) {

        List<User> users = userService.selectList();

        model.addAttribute("users", users);

        return "/WEB-INF/view/user_list.jsp";

    }

}
3.5 在web.xml配置SpringMVC的前端控制器(关键)
web.xml是整个web项目的入口,其他配置文件都需要通过web.xml直接或间接读取。所以springMVC和spring集成的关键就在于在web.xml中配置读取spring和springMVC的配置文件。
<?xml version="1.0" encoding="UTF-8"?>

<web-app xmlns:xsi="http://www.w3.org/2001/XMLSchema-instance" xmlns="http://xmlns.jcp.org/xml/ns/javaee" xsi:schemaLocation="http://xmlns.jcp.org/xml/ns/javaee http://xmlns.jcp.org/xml/ns/javaee/web-app_3_1.xsd" version="3.1">

  <display-name>SSM集成</display-name>

  <welcome-file-list>

    <welcome-file>index.html</welcome-file>

    <welcome-file>index.htm</welcome-file>

    <welcome-file>index.jsp</welcome-file>

    <welcome-file>default.html</welcome-file>

    <welcome-file>default.htm</welcome-file>

    <welcome-file>default.jsp</welcome-file>

  </welcome-file-list>

  <!-- 配置字符编码过滤器 -->

  <filter>

      <filter-name>CharacterEncodingFilter</filter-name>

      <filter-class>org.springframework.web.filter.CharacterEncodingFilter</filter-class>

      <init-param>

          <param-name>encoding</param-name>

          <param-value>UTF-8</param-value>

      </init-param>

  </filter>

  <filter-mapping>

      <filter-name>CharacterEncodingFilter</filter-name>

      <url-pattern>/*</url-pattern>

  </filter-mapping>

  <!-- 配置前端控制器 (分发器)-->

  <servlet>

      <servlet-name>MVC</servlet-name>

      <servlet-class>org.springframework.web.servlet.DispatcherServlet</servlet-class>

      <init-param>

          <!-- 读取配置文件 用通配符 *可以读取多个有相同前缀和后缀的文件-->

          <param-name>contextConfigLocation</param-name>

          <param-value>classpath:spring*.xml</param-value>

      </init-param>

      <load-on-startup>1</load-on-startup>

  </servlet>

  <servlet-mapping>

      <servlet-name>MVC</servlet-name>

      <url-pattern>*.do</url-pattern>

  </servlet-mapping>

</web-app>
3.6 编写jsp页面测试
<%@ page language="java" contentType="text/html; charset=UTF-8"

pageEncoding="UTF-8"%>

<!-- 引入jstl标签库  -->

<%@ taglib uri="http://java.sun.com/jsp/jstl/core" prefix="c"%>

<!DOCTYPE html>

<html>

    <head>

        <meta charset="UTF-8">

        <title>Insert title here</title>

    </head>

<body>

    <h3>用户列表</h3>

    <table border="1" style="width: 500px;" cellspacing="0">

        <tr>

            <th>id</th>

            <th>名称</th>

            <th>密码</th>

            <th>年龄</th>

        </tr>

    <c:forEach items="${users}" var="user">

        <tr>

            <td>${user.id}</td>

            <td>${user.name}</td>

            <td>${user.password}</td>

            <td>${user.age}</td>

        </tr>

    </c:forEach>

    </table>

</body>

</html>
SSM 框架集成的更多相关文章
- Spring+SpringMVC+Mybatis(SSM)框架集成搭建
Spring+SpringMVC+Mybatis框架集成搭建教程 一.背景 最近有很多同学由于没有过SSM(Spring+SpringMvc+Mybatis , 以下简称SSM)框架的搭建的经历,所以 ...
- SSM框架集成各配置文件
SSM框架集成各配置文件 Spring Spring MVC Mybatis 的整合SpringMVC相当于Spring的一个组件 本来就是一个家族的不存在整合的问题,所以主要就是Spring于Myb ...
- Spring MVC 学习总结(十一)——IDEA+Maven+多模块实现SSM框架集成
一.SSM概要 与SSH(Struts/Spring/Hibernate/)一样,Spring+SpringMVC+MyBatis也有一个简称SSM,Spring实现业务对象管理,Spring MVC ...
- SSM框架集成Redis
SSM-Spring+SpringMVC+Mybatis框架相信大家都很熟悉了,但是有的时候需要频繁访问数据库中不变或者不经常改变的数据,就会加重数据库的负担,这时我们就会想起Redis Redis是 ...
- Java高并发秒杀系统API之SSM框架集成swagger与AdminLTE
初衷与整理描述 Java高并发秒杀系统API是来源于网上教程的一个Java项目,也是我接触Java的第一个项目.本来是一枚c#码农,公司计划部分业务转java,于是我利用业务时间自学Java才有了本文 ...
- SSM框架集成及配置详解(Maven管理)
一.pom.xml(依赖管理) <?xml version="1.0" encoding="UTF-8"?> <project xmlns=& ...
- ssm框架集成Quartz定时器
第一步:添加依赖 <dependency> <groupId>org.quartz-scheduler</groupId> <artifactId>qu ...
- Spring+SpringMvc+Mybatis框架集成搭建教程
一.背景 最近有很多同学由于没有过SSM(Spring+SpringMvc+Mybatis , 以下简称SSM)框架的搭建的经历,所以在自己搭建SSM框架集成的时候,出现了这样或者那样的问题,很是苦恼 ...
- 【SSM框架】Spring + Springmvc + Mybatis 基本框架搭建集成教程
本文将讲解SSM框架的基本搭建集成,并有一个简单demo案例 说明:1.本文暂未使用maven集成,jar包需要手动导入. 2.本文为基础教程,大神切勿见笑. 3.如果对您学习有帮助,欢迎各种转载,注 ...
随机推荐
- ASP.NET MVC视图
前言 视图即是用户与Web应用程序的接口,用户通常会看到视图,然后在视图上进行交互,Web应用程序的视图通常是HTML格式. 首先了解控制器选择返回哪个视图的问题.新建一个项目,浏览到/Home/Ab ...
- SSL Converter & Formats
https://www.sslshopper.com/ssl-converter.html PEM Format The PEM format is the most common format th ...
- 树莓派 Qt5.7交叉编译
一.准备软件 1.2016-11-25-raspbian-jessie.img(官网下载) 2.cross-compile-tools-master.zip 3.gcc-4.7-li ...
- QtZint编译过程记录(要使用 QTMAKE_CFLAGS += /TP 参数)
1,下载zint后,在zint-2.4.3\win32\vcx目录下找到zlib.props和libpng.props文件,分别改为zlib和libpng的源码目录.这2个开源库最好是找工程中使用的版 ...
- Qt加载百度离线地图
1.下载百度地图离线API 1.3 下载链接:http://download.csdn.NET/detail/caoshangpa/9476608,网上虽然出现了2.0版本离线API,但是经试用,存在 ...
- 测试链接服务器sql 语句
sp_addlinkedsrvlogin 创建或更新本地 Microsoft® SQL Server™ 实例上的登录与链接服务器上远程登录之间的映射. 语法 sp_addlinkedsrvlogin ...
- HTML连载8-video标签
一.video标签 1.作用:播放视频 2.格式:<video src="视频地址“></video> 3.可添加的属性: (1)autoplay="au ...
- 代码审计之seacms v6.45 前台Getshell 复现分析
1.环境: php5.5.38+apache+seacms v6.45 seacms目录结构: │─admin //后台管理目录 │ │─coplugins //已停用目录 │ │─ebak //帝国 ...
- tkinter + cefpython 仿美团桌面程序
使用js开发桌面程序目前是一个趋势,Electron是其中一个佼佼者,网上也不乏很多文章.今天主要是来讲一下cefpython. 用python的朋友,特别使用过tkinter开发过界面的,一定会觉得 ...
- 10 jQuery的事件绑定和解绑
1.绑定事件 语法: bind(type,data,fn) 描述:为每一个匹配元素的特定事件(像click)绑定一个事件处理器函数. 参数解释: type (String) : 事件类型 data ( ...