
SpringBoot系列——@Async优雅的异步调用
前言
众所周知,java的代码是同步顺序执行,当我们需要执行异步操作时我们需要创建一个新线程去执行,以往我们是这样操作的:
    /**

     * 任务类

     */

    class Task implements Runnable {

        @Override

        public void run() {

            System.out.println(Thread.currentThread().getName() + ":异步任务");

        }

    }
        //新建线程并执行任务类

        new Thread(new Task()).start();
jdk1.8之后可以使用Lambda 表达式
        //新建线程并执行任务类

        new Thread(() -> {

            System.out.println(Thread.currentThread().getName() + ":异步任务");

        }).start();
当然,除了显式的new Thread,我们一般通过线程池获取线程,这里就不再展开
Spring 3.0之后提供了一个@Async注解,使用@Async注解进行优雅的异步调用,我们先看一下API对这个注解的定义:https://docs.spring.io/spring/docs/current/javadoc-api/org/springframework/scheduling/annotation/Async.html
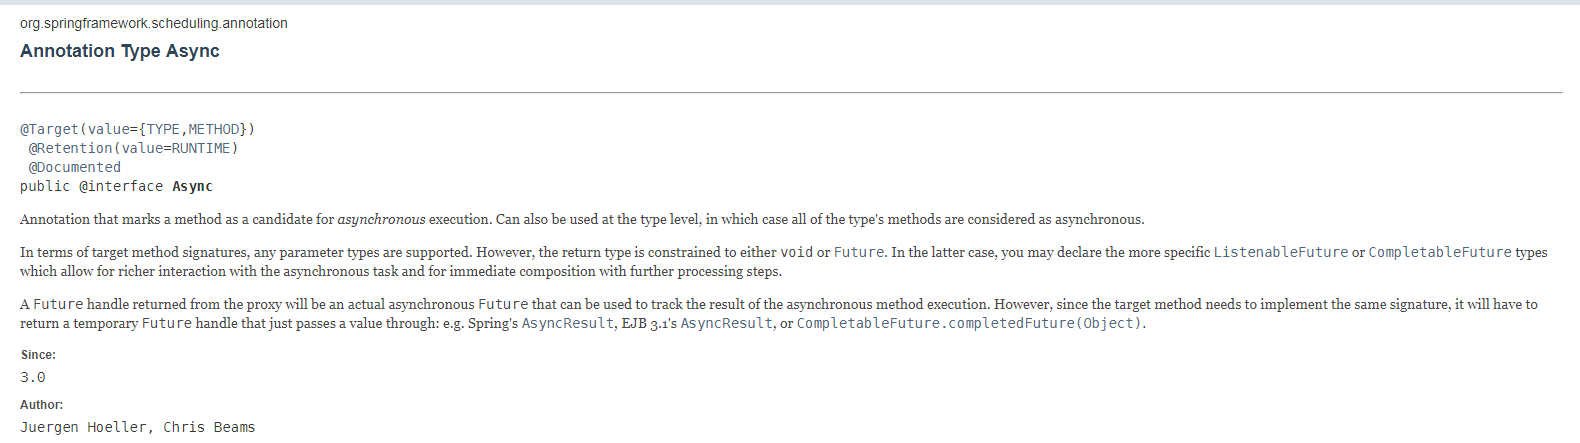
本文记录在SpringBoot项目中使用@Async注解,实现优雅的异步调用
代码与测试
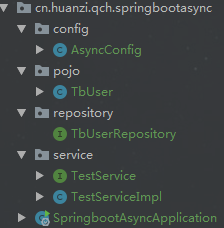
项目工程结构
因为要测试事务,所以需要引入
        <!--添加springdata-jpa依赖 -->

        <dependency>

            <groupId>org.springframework.boot</groupId>

            <artifactId>spring-boot-starter-data-jpa</artifactId>

        </dependency>

        <!--添加MySQL驱动依赖 -->

        <dependency>

            <groupId>mysql</groupId>

            <artifactId>mysql-connector-java</artifactId>

        </dependency>
在启动类开启启用异步调用,同时注入ApplicationRunner对象在启动类进行调用测试
package cn.huanzi.qch.springbootasync;

import cn.huanzi.qch.springbootasync.service.TestService;

import org.springframework.beans.factory.annotation.Autowired;

import org.springframework.boot.ApplicationRunner;

import org.springframework.boot.SpringApplication;

import org.springframework.boot.autoconfigure.SpringBootApplication;

import org.springframework.context.annotation.Bean;

import org.springframework.scheduling.annotation.EnableAsync;

import org.springframework.stereotype.Component;

@Component

@EnableAsync//开启异步调用

@SpringBootApplication

public class SpringbootAsyncApplication {

    @Autowired

    private TestService testService;

    public static void main(String[] args) {

        SpringApplication.run(SpringbootAsyncApplication.class, args);

    }

    /**

     * 启动成功

     */

    @Bean

    public ApplicationRunner applicationRunner() {

        return applicationArguments -> {

            long startTime = System.currentTimeMillis();

            System.out.println(Thread.currentThread().getName() + ":开始调用异步业务");

            //无返回值

//            testService.asyncTask();

            //有返回值,但主线程不需要用到返回值

//            Future<String> future = testService.asyncTask("huanzi-qch");

            //有返回值,且主线程需要用到返回值

//            System.out.println(Thread.currentThread().getName() + ":返回值:" + testService.asyncTask("huanzi-qch").get());

            //事务测试,事务正常提交

//            testService.asyncTaskForTransaction(false);

            //事务测试,模拟异常事务回滚

//            testService.asyncTaskForTransaction(true);

            long endTime = System.currentTimeMillis();

            System.out.println(Thread.currentThread().getName() + ":调用异步业务结束,耗时:" + (endTime - startTime));

        };

    }

}
看一下我们的测试业务类TestService
package cn.huanzi.qch.springbootasync.service;

import java.util.concurrent.Future;

public interface TestService {

    /**

     * 异步调用,无返回值

     */

    void asyncTask();

    /**

     * 异步调用,有返回值

     */

    Future<String> asyncTask(String s);

    /**

     * 异步调用,无返回值,事务测试

     */

    void asyncTaskForTransaction(Boolean exFlag);

}
package cn.huanzi.qch.springbootasync.service;

import cn.huanzi.qch.springbootasync.pojo.TbUser;

import cn.huanzi.qch.springbootasync.repository.TbUserRepository;

import org.springframework.beans.factory.annotation.Autowired;

import org.springframework.scheduling.annotation.Async;

import org.springframework.scheduling.annotation.AsyncResult;

import org.springframework.stereotype.Service;

import org.springframework.transaction.annotation.Transactional;

import java.util.concurrent.Future;

@Service

public class TestServiceImpl implements TestService {

    @Autowired

    private TbUserRepository tbUserRepository;

    @Async

    @Override

    public void asyncTask() {

        long startTime = System.currentTimeMillis();

        try {

            //模拟耗时

            Thread.sleep(3000);

        } catch (InterruptedException e) {

            e.printStackTrace();

        }

        long endTime = System.currentTimeMillis();

        System.out.println(Thread.currentThread().getName() + ":void asyncTask(),耗时:" + (endTime - startTime));

    }

    @Async("asyncTaskExecutor")

    @Override

    public Future<String> asyncTask(String s) {

        long startTime = System.currentTimeMillis();

        try {

            //模拟耗时

            Thread.sleep(3000);

        } catch (InterruptedException e) {

            e.printStackTrace();

        }

        long endTime = System.currentTimeMillis();

        System.out.println(Thread.currentThread().getName() + ":Future<String> asyncTask(String s),耗时:" + (endTime - startTime));

        return AsyncResult.forValue(s);

    }

    @Async("asyncTaskExecutor")

    @Transactional

    @Override

    public void asyncTaskForTransaction(Boolean exFlag) {

        //新增一个用户

        TbUser tbUser = new TbUser();

        tbUser.setUsername("huanzi-qch");

        tbUser.setPassword("123456");

        tbUserRepository.save(tbUser);

        if(exFlag){

            //模拟异常

            throw new RuntimeException("模拟异常");

        }

    }

}
配置线程池
package cn.huanzi.qch.springbootasync.config;

import org.springframework.context.annotation.Bean;

import org.springframework.context.annotation.Configuration;

import org.springframework.core.task.AsyncTaskExecutor;

import org.springframework.scheduling.concurrent.ThreadPoolTaskExecutor;

/**

 * 线程池的配置

 */

@Configuration

public class AsyncConfig {

    private static final int MAX_POOL_SIZE = 50;

    private static final int CORE_POOL_SIZE = 20;

    @Bean("asyncTaskExecutor")

    public AsyncTaskExecutor asyncTaskExecutor() {

        ThreadPoolTaskExecutor asyncTaskExecutor = new ThreadPoolTaskExecutor();

        asyncTaskExecutor.setMaxPoolSize(MAX_POOL_SIZE);

        asyncTaskExecutor.setCorePoolSize(CORE_POOL_SIZE);

        asyncTaskExecutor.setThreadNamePrefix("async-task-thread-pool-");

        asyncTaskExecutor.initialize();

        return asyncTaskExecutor;

    }

}
配置好后,@Async会默认从线程池获取线程,当然也可以显式的指定@Async("asyncTaskExecutor")
无返回值
    /**

     * 启动成功

     */

    @Bean

    public ApplicationRunner applicationRunner() {

        return applicationArguments -> {

            long startTime = System.currentTimeMillis();

            System.out.println(Thread.currentThread().getName() + ":开始调用异步业务");

            //无返回值

            testService.asyncTask();

            long endTime = System.currentTimeMillis();

            System.out.println(Thread.currentThread().getName() + ":调用异步业务结束,耗时:" + (endTime - startTime));

        };

    }

有返回值
有返回值,但主线程不需要用到返回值
    /**

     * 启动成功

     */

    @Bean

    public ApplicationRunner applicationRunner() {

        return applicationArguments -> {

            long startTime = System.currentTimeMillis();

            System.out.println(Thread.currentThread().getName() + ":开始调用异步业务");//有返回值,但主线程不需要用到返回值

            Future<String> future = testService.asyncTask("huanzi-qch");

            long endTime = System.currentTimeMillis();

            System.out.println(Thread.currentThread().getName() + ":调用异步业务结束,耗时:" + (endTime - startTime));

        };

    }

有返回值,且主线程需要用到返回值
    /**

     * 启动成功

     */

    @Bean

    public ApplicationRunner applicationRunner() {

        return applicationArguments -> {

            long startTime = System.currentTimeMillis();

            System.out.println(Thread.currentThread().getName() + ":开始调用异步业务");

//有返回值,且主线程需要用到返回值

            System.out.println(Thread.currentThread().getName() + ":返回值:" + testService.asyncTask("huanzi-qch").get());

            long endTime = System.currentTimeMillis();

            System.out.println(Thread.currentThread().getName() + ":调用异步业务结束,耗时:" + (endTime - startTime));

        };

    }

可以发现,有返回值的情况下,虽然异步业务逻辑是由新线程执行,但如果在主线程操作返回值对象,主线程会等待,还是顺序执行
事务测试
为了方便观察、测试,我们在配置文件中将日志级别设置成debug
#修改日志登记,方便调试

logging.level.root=debug
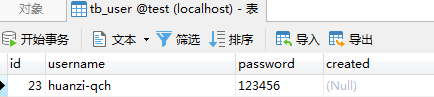
事务提交
    /**

     * 启动成功

     */

    @Bean

    public ApplicationRunner applicationRunner() {

        return applicationArguments -> {

            long startTime = System.currentTimeMillis();

            System.out.println(Thread.currentThread().getName() + ":开始调用异步业务");//事务测试,事务正常提交

            testService.asyncTaskForTransaction(false);

            long endTime = System.currentTimeMillis();

            System.out.println(Thread.currentThread().getName() + ":调用异步业务结束,耗时:" + (endTime - startTime));

        };

    }


模拟异常,事务回滚
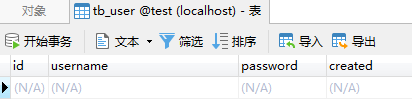
    /**

     * 启动成功

     */

    @Bean

    public ApplicationRunner applicationRunner() {

        return applicationArguments -> {

            long startTime = System.currentTimeMillis();

            System.out.println(Thread.currentThread().getName() + ":开始调用异步业务");

//事务测试,模拟异常事务回滚

            testService.asyncTaskForTransaction(true);

            long endTime = System.currentTimeMillis();

            System.out.println(Thread.currentThread().getName() + ":调用异步业务结束,耗时:" + (endTime - startTime));

        };

    }


后记
SpringBoot使用@Async优雅的异步调用就暂时记录到这里,以后再进行补充
代码开源
代码已经开源、托管到我的GitHub、码云:
GitHub:https://github.com/huanzi-qch/springBoot
码云:https://gitee.com/huanzi-qch/springBoot
SpringBoot系列——@Async优雅的异步调用的更多相关文章
- SpringBoot系列:Spring Boot异步调用@Async
在实际开发中,有时候为了及时处理请求和进行响应,我们可能会多任务同时执行,或者先处理主任务,也就是异步调用,异步调用的实现有很多,例如多线程.定时任务.消息队列等, 这一章节,我们就来讲讲@Async ...
- 使用Spring中@Async注解实现异步调用
异步调用? 在解释异步调用之前,我们先来看同步调用的定义:同步就是整个处理过程顺序执行,当各个过程都执行完毕,并返回结果. 异步调用则是只是发送了调用的指令,调用者无需等待被调用的方法完全执行完毕,继 ...
- 【JDK8】Java8 优雅的异步调用API CompletableFuture
1.CompletableFuture是什么? CompletableFuture是JDK8的新特性之一,是异步调用相关的API,用于简化异步调用,提高异步调用的效率 2.CompletableFut ...
- WCF系列教程之客户端异步调用服务
本文参考自http://www.cnblogs.com/wangweimutou/p/4409227.html,纯属读书笔记,加深记忆 一.简介 在前面的随笔中,详细的介绍了WCF客户端服务的调用方法 ...
- SpringBoot系列: 如何优雅停止服务
============================背景============================在系统生命周期中, 免不了要做升级部署, 对于关键服务, 我们应该能做到不停服务完成 ...
- SpringBoot系列——事件发布与监听
前言 日常开发中,我们经常会碰到这样的业务场景:用户注册,注册成功后需要发送邮箱.短信提示用户,通常我们都是这样写: /** * 用户注册 */ @GetMapping("/userRegi ...
- SpringBoot学习笔记(十七:异步调用)
@ 目录 1.@EnableAsync 2.@Async 2.1.无返回值的异步方法 2.1.有返回值的异步方法 3. Executor 3.1.方法级别重写Executor 3.2.应用级别重写Ex ...
- dubbo同步调用、异步调用和是否返回结果源码分析和实例
0. dubbo同步调用.异步调用和是否返回结果配置 (1)dubbo默认为同步调用,并且有返回结果. (2)dubbo异步调用配置,设置 async="true",异步调用可以提 ...
- springboot 异步调用Async使用方法
引言: 在Java应用中,绝大多数情况下都是通过同步的方式来实现交互处理的:但是在处理与第三方系统交互的时候,容易造成响应迟缓的情况,之前大部分都是使用多线程来完成此类任务,其实,在spring 3. ...
随机推荐
- Windows XP 每次开机都自动检测硬盘 解决办法(可以用HDDRegenerate修复坏道)
Windows XP,每次开机都自动检测硬盘,之前正常关机,没有任何非法操作.Windows XP,每次开机都自动检测硬盘,之前正常关机,没有任何非法操作. 1.和硬盘的分区格式有关,FAT32格式在 ...
- Qt使用第三方库3rdparty
简述 在 Qt 中经常会用到第三方库,例如:FFmpeg.OpenCV 等.第三方库的使用比较简单,只需要一些基本的配置就可以搞定,一起来看看吧! 简述 第三方库 源代码 库文件 目标目录 第三方库 ...
- Cookie概述与应用
一.概述 Cookie是Web服务器保存在客户端的一系列文本信息 典型应用一:判断注册用户是否已经登录网站. 典型应用二:"购物车"的处理. Cookie的作用: 对特定对 ...
- Vista之前的版本,默认本地登陆用户都以管理员权限启动程序
Vista之前的版本,默认本地登陆用户都以管理员权限启动程序,之后的OS版本默认都没有管理员权限,需要用户提权才能做某些操作,否则需要管理员权限的操作都会失败MSSQL是用户名账号连接,Socket方 ...
- jquery事件和动画操作集锦
一,事件 1,加载事件 1 2 3 4 5 6 $(document).ready(function(){ //todo }); //dom准备就绪后执行ready里面的函数,此时dom对应的相关 ...
- LVS-DR模式部署流程
情景一 一.环境介绍 1)RIP.VIP.DIP为同一物理网络 2)LVS Hostname:lvs eth0:DIP-192.168.3.31 eth0:0:VIP-192.168.3.10 3)R ...
- centos 5.5版本中添加ext4格式
1.我在使用centos 5.5版本做练习的时候发现默认是不支持ext4文件格式. 在添加硬盘后,用fdisk -l 查看到信息如下: 分区完后,使用命令:mkfs -t ext4 /dev/sdb会 ...
- 私服 Nexus 的配置 (转)
https://www.cnblogs.com/yuanermen/p/4574473.html 一.概述 1.概要 现在的项目基本都是用Maven来管理工程,这样一来在公司内容搭建一个私服就非常有必 ...
- Node.js Windows Example
Firstly, download the msi file from https://nodejs.org/en/ Second, click the msi file to install nod ...
- jenkin+Git子模块自动拉取代码
jenkins+Git子模块自动拉取代码 添加Git子模块 先克隆想要添加子模块的仓库git clone ssh://git@ip:port/user/project.git,这个是主目录. 进入仓库 ...