企业级堡垒机 jumpserver
环境准备
- 系统:CentOS 7
- IP:192.168.10.101
- 关闭selinux 和防火墙
# CentOS 7

$ setenforce 0  # 可以设置配置文件永久关闭

$ systemctl stop iptables.service

$ systemctl stop firewalld.service

# CentOS6

$ setenforce 0

$ service iptables stop
一、准备 Python3 和 Python 虚拟环境
1、安装依赖包
[root@centos7-1 opt]# yum -y install wget sqlite-devel xz gcc automake zlib-devel openssl-devel epel-release git
2、编译安装
[root@centos7-1 opt]# wget https://www.python.org/ftp/python/3.6.1/Python-3.6.1.tar.xz
[root@centos7-1 opt]# tar xvf Python-3.6.1.tar.xz && cd Python-3.6.1
[root@centos7-1 opt]# ./configure && make && make install
3、建立 Python 虚拟环境
因为 CentOS 6/7 自带的是 Python2,而 Yum 等工具依赖原来的 Python,为了不扰乱原来的环境我们来使用 Python 虚拟环境
[root@centos7-1 opt]# cd /opt
[root@centos7-1 opt]# python3 -m venv py3
[root@centos7-1 opt]# source /opt/py3/bin/activate
注:看到下面的提示符代表成功,以后运行 Jumpserver 都要先运行以上 source 命令,以下所有命令均在该虚拟环境中运行
(py3) [root@centos7-1 opt]#
二、安装 Jumpserver 1.0.0
1、下载或 Clone 项目
项目提交较多 git clone 时较大,你可以选择去 Github 项目页面直接下载zip包。
(py3) [root@centos7-1 opt]# cd /opt/
(py3) [root@centos7-1 opt]# git clone --depth=1 https://github.com/jumpserver/jumpserver.git && cd jumpserver && git checkout master
2、安装依赖 RPM 包
(py3) [root@centos7-1 jumpserver]# cd /opt/jumpserver/requirements
(py3) [root@centos7-1 jumpserver]# yum -y install $(cat rpm_requirements.txt) # 如果没有任何报错请继续
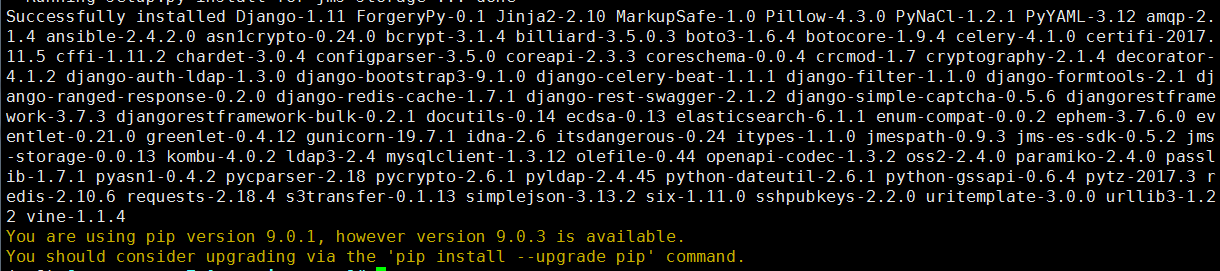
3、安装 Python 库依赖
(py3) [root@centos7-1 requirements]# pip install -r requirements.txt # 不要指定-i参数,因为镜像上可能没有最新的包,如果没有任何报错请继续
成功如下图:
4、安装 Redis, Jumpserver 使用 Redis 做 cache 和 celery broke
(py3) [root@centos7-1 requirements]# yum -y install redis
(py3) [root@centos7-1 requirements]# systemctl start redis
5、安装 MySQL
本教程使用 Mysql 作为数据库,如果不使用 Mysql 可以跳过相关 Mysql 安装和配置
(1)# centos7
(py3) [root@centos7-1 requirements]# yum -y install mariadb mariadb-devel mariadb-server # centos7下安装的是mariadb
(py3) [root@centos7-1 requirements]# systemctl start mariadb.service
(2)# centos6
$ yum -y install mysql mysql-devel mysql-server
$ service mysqld start
6、创建数据库 Jumpserver 并授权
(py3) [root@centos7-1 requirements]# mysql
MariaDB [(none)]> create database jumpserver default charset 'utf8';
Query OK, 1 row affected (0.00 sec)
MariaDB [(none)]> grant all on jumpserver.* to 'jumpserver'@'127.0.0.1' identified by 'along';
Query OK, 0 rows affected (0.00 sec)
7、修改 Jumpserver 配置文件
(py3) [root@centos7-1 requirements]# cd /opt/jumpserver
(py3) [root@centos7-1 jumpserver]# cp config_example.py config.py
(py3) [root@centos7-1 jumpserver]# vim config.py # 我们计划修改 DevelopmentConfig中的配置,因为默认jumpserver是使用该配置,它继承自Config
class DevelopmentConfig(Config):    #找到这一段,进行下面的配置

    DEBUG = True

    DB_ENGINE = 'mysql'

    DB_HOST = '127.0.0.1'

    DB_PORT = 3306

    DB_USER = 'jumpserver'

    DB_PASSWORD = 'along'

    DB_NAME = 'jumpserver'
注意: 配置文件是 Python 格式,不要用 TAB,而要用空格
8、生成数据库表结构和初始化数据
(py3) [root@centos7-1 jumpserver]# cd /opt/jumpserver/utils
(py3) [root@centos7-1 utils]# bash make_migrations.sh
成功如下图:

9、运行 Jumpserver
(1)老版本启动方法
(py3) [root@centos7-1 utils]# cd /opt/jumpserver
(py3) [root@centos7-1 jumpserver]# python run_server.py all
(2)新版本启动方法
(py3) [root@centos7-1 jumpserver]# ./jms start all # 后台运行使用-d 如:参数./jms start all -d
# 新版本更新了运行脚本,使用方式./jms start|stop|status|restart all 后台运行请添加 -d 参数
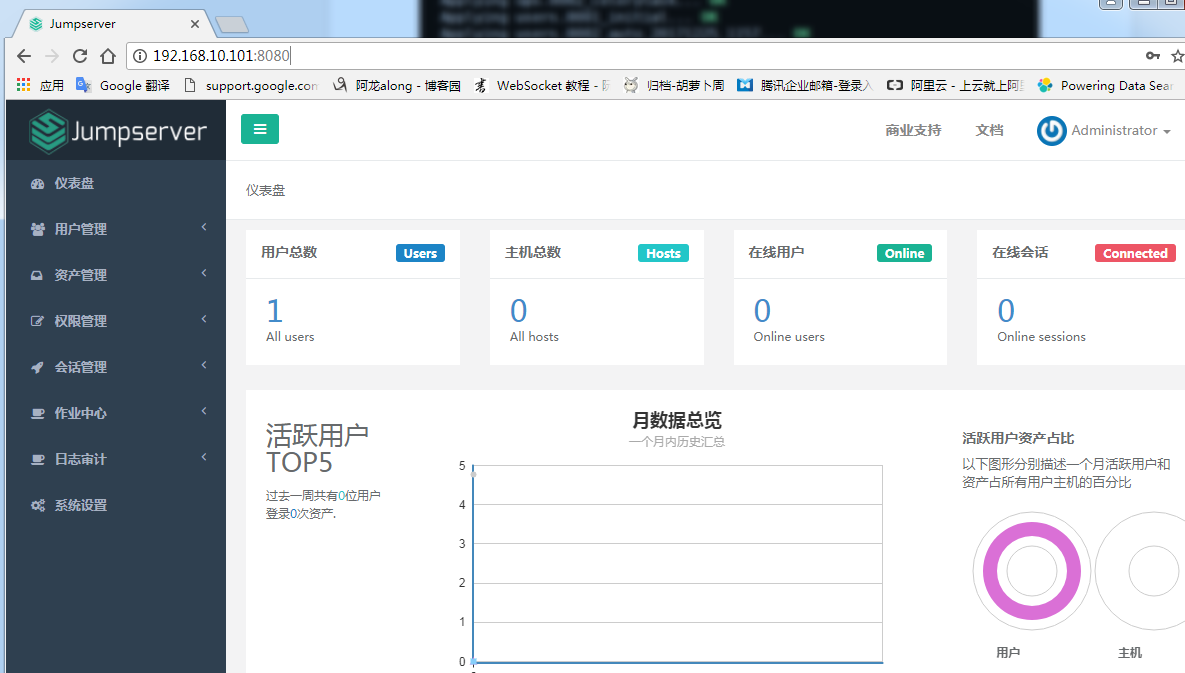
10、浏览器访问http://192.168.10.101:8080/
注意:
① 第一次运行时可能报错,(这里只是 Jumpserver, 没有 Web Terminal,所以访问 Web Terminal 会报错)
② 终止程序,再次执行,就可以登录了
(py3) [root@centos7-1 jumpserver]# ./jms start all
账号: admin 密码: admin
③ 登录成功
三、安装 SSH Server 和 WebSocket Server: Coco
1、下载或 Clone 项目
新开一个终端,连接测试机,别忘了 source /opt/py3/bin/activate
[root@centos7-1 ~]# source /opt/py3/bin/activate
(py3) [root@centos7-1 ~]# cd /opt/
(py3) [root@centos7-1 opt]# git clone https://github.com/jumpserver/coco.git && cd coco && git checkout master
2、安装依赖
(py3) [root@centos7-1 coco]# cd /opt/coco/requirements
(py3) [root@centos7-1 requirements]# yum -y install $(cat rpm_requirements.txt)
(py3) [root@centos7-1 requirements]# pip install -r requirements.txt
成功如下图:

3、查看配置文件并运行
(1)运行
(py3) [root@centos7-1 requirements]# cd /opt/coco
(py3) [root@centos7-1 coco]# cp conf_example.py conf.py
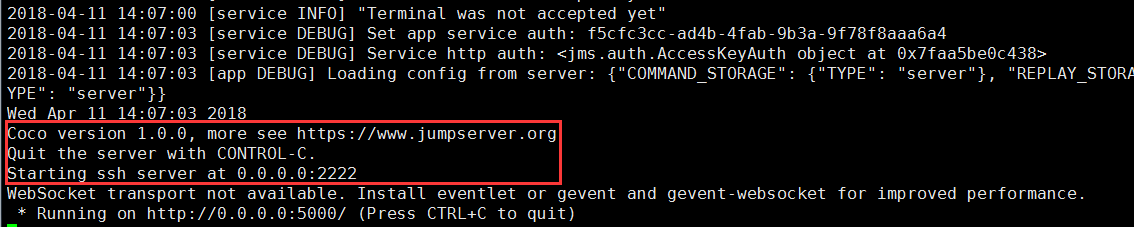
(py3) [root@centos7-1 coco]# ./cocod start # 后台运行使用 -d 参数./cocod start -d
# 新版本更新了运行脚本,使用方式./cocod start|stop|status|restart 后台运行请添加 -d 参数
(2)这时需要去 Jumpserver 管理后台-会话管理-终端管理(http://192.168.10.101:8080/terminal/terminal/)接受 Coco 的注册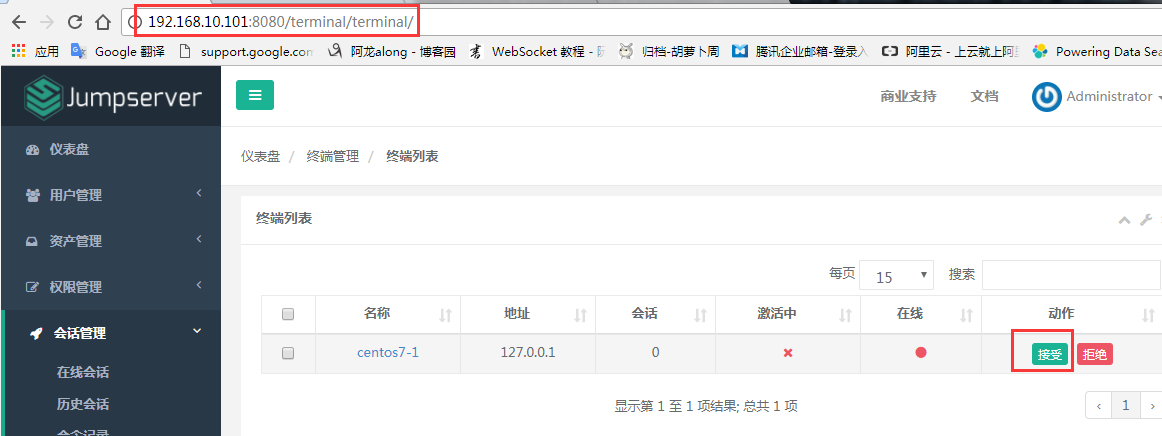
(3)命令行终端显示连接成功
4、测试连接
(1)linux 连接
[root@centos7-1 ~]# ssh -p2222 admin@192.168.10.101 #新开一个终端去连接密码: admin
(2)如果是用在 Windows 下,Xshell Terminal 登录语法如下
$ssh admin@192.168.244.144 2222
密码: admin
如果能登陆代表部署成功
(3)登录成功如下图:

四、安装 Web Terminal 前端: Luna
1、下载 Luna
Luna 已改为纯前端,需要 Nginx 来运行访问
访问(https://github.com/jumpserver/luna/releases)下载对应版本的 release 包,直接解压,不需要编译
[root@centos7-1 ~]# cd /opt/
[root@centos7-1 opt]# wget https://github.com/jumpserver/luna/releases/download/v1.0.0/luna.tar.gz
2、解压 Luna
[root@centos7-1 opt]# tar xvf luna.tar.gz
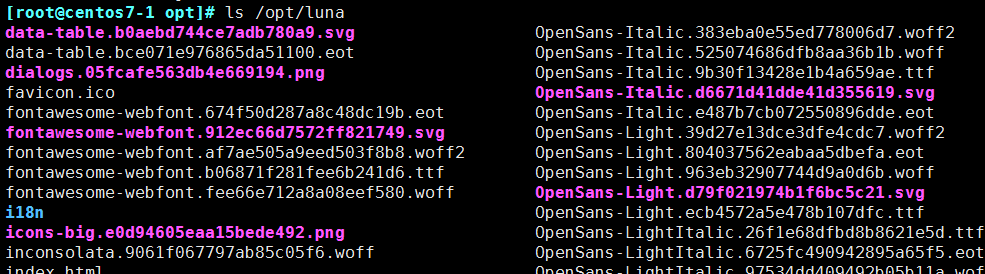
[root@centos7-1 opt]# ls /opt/luna
五、安装 Windows 支持组件(如果不需要管理 windows 资产,可以直接跳过这一步)
因为手动安装 guacamole 组件比较复杂,这里提供打包好的 docker 使用, 启动 guacamole
1、Docker安装 (仅针对CentOS7,CentOS6,安装Docker相对比较复杂)
① 安装依赖

[root@centos7-1 ~]# yum remove docker-latest-logrotate  docker-logrotate  docker-selinux dockdocker-engine

[root@centos7-1 ~]# yum install -y yum-utils  device-mapper-persistent-data   lvm2

② 安装docker
添加docker官方源
[root@centos7-1 ~]# yum-config-manager --add-repo https://download.docker.com/linux/centos/docker-ce.repo
[root@centos7-1 ~]# yum makecache fast
[root@centos7-1 ~]# yum install docker-ce

③ 国内部分用户可能无法连接docker官网提供的源,这里提供阿里云的镜像节点供测试使用
[root@centos7-1 ~]# yum-config-manager --add-repo http://mirrors.aliyun.com/docker-ce/linux/centos/docker-ce.repo
[root@centos7-1 ~]# rpm --import http://mirrors.aliyun.com/docker-ce/linux/centos/gpg
[root@centos7-1 ~]# yum makecache fast
[root@centos7-1 ~]# yum -y install docker-ce

④ 启动docker
[root@centos7-1 ~]# systemctl start docker
[root@centos7-1 ~]# systemctl status docker
2、启动 Guacamole
① 这里所需要注意的是 guacamole 暴露出来的端口是 8081,若与主机上其他端口冲突请自定义
修改 JUMPSERVER_SERVER 环境变量的配置,填上 Jumpserver 的内网地址
# 注意:这里一定要改写一下本机的IP地址, 否则会出错, 带宽有限, 下载时间可能有点长,可以喝杯咖啡,撩撩对面的妹子
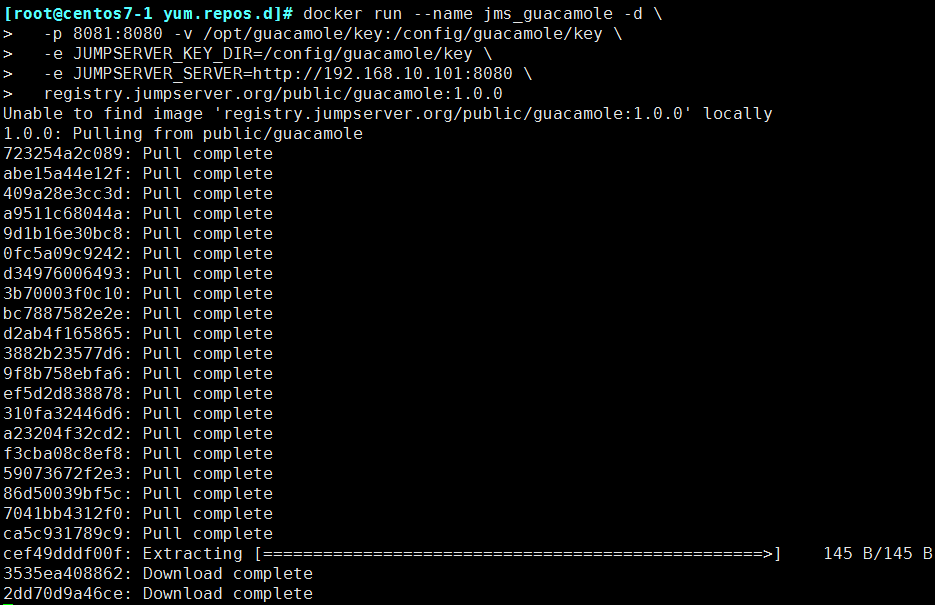
docker run --name jms_guacamole -d \
-p 8081:8080 -v /opt/guacamole/key:/config/guacamole/key \
-e JUMPSERVER_KEY_DIR=/config/guacamole/key \
-e JUMPSERVER_SERVER=http://<填写本机的IP地址>:8080 \
registry.jumpserver.org/public/guacamole:1.0.0
② 执行过程截图
3、在jumpserver 接受注册
启动成功后去 Jumpserver 会话管理-终端管理(http://192.168.10.101:8080/terminal/terminal/)接受[Gua]开头的一个注册,如果页面显示不正常可以等部署完成后再处理 
六、配置 Nginx 整合各组件
1、安装 Nginx 根据喜好选择安装方式和版本
nginx 官网https://nginx.org/en/download.html
(1)安装前准备
① 下载版本包,我以nginx-1.12.2为例
[root@centos7-1 nginx]# wget -c https://nginx.org/download/nginx-1.12.2.tar.gz
[root@centos7-1 nginx]# tar -xvf nginx-1.12.2.tar.gz
② 下载依赖包
[root@centos7-1 nginx]# yum install gc gcc gcc-c++ pcre-devel zlib-devel openssl-devel
③ 创建nginx用户、组
[root@centos7-1 nginx-1.12.2]# groupadd nginx
[root@centos7-1 nginx-1.12.2]# useradd -s /sbin/nologin -g nginx -M nginx
(2)编译安装
[root@centos7-1 nginx-1.12.2]# ./configure --user=nginx --group=nginx --prefix=/mnt/nginx --with-http_stub_status_module --with-http_ssl_module --with-http_gzip_static_module
[root@centos7-1 nginx-1.12.2]# make && make install
[root@centos7-1 nginx-1.12.2]# cd /mnt/nginx/ # 完成

注释:#指定运行权限的用户
--user=nginx
#指定运行的权限用户组
--group=nginx
#指定安装路径
--prefix=/usr/local/nginx
#支持nginx状态查询
--with-http_stub_status_module
#开启ssl支持
--with-http_ssl_module
#开启GZIP功能
--with-http_gzip_static_module
(3)使systemctl 控制nginx 服务
[root@centos7-1 nginx]# vim /usr/lib/systemd/system/nginx.service
[Unit]

Description=nginx - high performance web server

Documentation=http://nginx.org/en/docs/

After=network.target remote-fs.target nss-lookup.target

[Service]

Type=forking

PIDFile=/mnt/nginx/logs/nginx.pid

ExecStartPre=/mnt/nginx/sbin/nginx -t -c /mnt/nginx/conf/nginx.conf

ExecStart=/mnt/nginx/sbin/nginx -c /mnt/nginx/conf/nginx.conf

ExecReload=/bin/kill -s HUP $MAINPID

ExecStop=/bin/kill -s QUIT $MAINPID

PrivateTmp=true

[Install]

WantedBy=multi-user.target
2、准备配置文件
[root@centos7-1 ~]# vim /mnt/nginx/conf/nginx.conf 清除已有的server段
server {

    listen 80;

    proxy_set_header X-Real-IP $remote_addr;

    proxy_set_header Host $host;

    proxy_set_header X-Forwarded-For $proxy_add_x_forwarded_for;

    location /luna/ {

        try_files $uri / /index.html;

        alias /opt/luna/;

    }

    location /media/ {

        add_header Content-Encoding gzip;

        root /opt/jumpserver/data/;

    }

    location /static/ {

        root /opt/jumpserver/data/;

    }

    location /socket.io/ {

        proxy_pass       http://localhost:5000/socket.io/;

        proxy_buffering off;

        proxy_http_version 1.1;

        proxy_set_header Upgrade $http_upgrade;

        proxy_set_header Connection "upgrade";

    }

    location /guacamole/ {

        proxy_pass       http://localhost:8081/;

        proxy_buffering off;

        proxy_http_version 1.1;

        proxy_set_header X-Forwarded-For $proxy_add_x_forwarded_for;

        proxy_set_header Upgrade $http_upgrade;

        proxy_set_header Connection $http_connection;

        access_log off;

    }

    location / {

        proxy_pass http://localhost:8080;

    }

}
3、运行 Nginx
[root@centos7-1 ~]# /mnt/nginx/sbin/nginx -t # 检查配置文件
[root@centos7-1 ~]# service nginx start
4、访问 http://192.168.10.101

umpserver 都要先运行以上 source 命令,以下所有命令均在该虚拟环境中运行
(py3) [root@centos7-1 opt]#
二、安装 Jumpserver 1.0.0
1、下载或 Clone 项目
项目提交较多 git clone 时较大,你可以选择去 Github 项目页面直接下载zip包。
(py3) [root@centos7-1 opt]# cd /opt/
(py3) [root@centos7-1 opt]# git clone --depth=1 https://github.com/jumpserver/jumpserver.git && cd jumpserver && git checkout master
2、安装依赖 RPM 包
(py3) [root@centos7-1 jumpserver]# cd /opt/jumpserver/requirements
企业级堡垒机 jumpserver的更多相关文章
- 项目实战15.2—企业级堡垒机 jumpserver快速入门
必备条件 硬件条件 ① 一台安装好 Jumpserver 系统的可用主机(堡垒机) ② 一台或多台可用的 Linux.Windows资产设备(被管理的资产) 服务条件 (1)coco服务 ① 鉴于心态 ...
- 项目实战15—企业级堡垒机 jumpserver
本文收录在Linux运维企业架构实战系列 环境准备 系统:CentOS 7 IP:192.168.10.101 关闭selinux 和防火墙 # CentOS $ setenforce # 可以设置配 ...
- 项目实战15.1—企业级堡垒机 jumpserver一步一步搭建
本文收录在Linux运维企业架构实战系列 环境准备 系统:CentOS 7 IP:192.168.10.101 关闭selinux 和防火墙 # CentOS 7 $ setenforce 0 # 可 ...
- CentOS7 开源跳板机(堡垒机) Jumpserver
开源跳板机(堡垒机)Jumpserver 环境 CentOS 7 x64 关闭 selinux firewalld jumpserver: 172.24.0.14 testserve ...
- Centos下堡垒机Jumpserver V3.0环境部署完整记录(2)-配置篇
前面已经介绍了Jumpserver V3.0的安装,基于这篇安装文档,下面说下Jumpserver安装后的的功能使用: 一.jumpserver的启动 Jumpserver的启动和重启 [root@t ...
- 开源堡垒机jumpserver
开源堡垒机jumpserver 开源堡垒机jumpserver的安装 开源堡垒机jumpserver的配置和使用
- 堡垒机jumpserver测试记录--使用
快速入门 截图就不放了,官网都有,这里只是就遇到的一些问题做下记录 必备条件 一台安装好 Jumpserver 系统的可用主机(堡垒机) 一台或多台可用的 Linux.Windows资产设备(被管理的 ...
- Centos下堡垒机Jumpserver V3.0环境部署完整记录(1)-安装篇
由于来源身份不明.越权操作.密码泄露.数据被窃.违规操作等因素都可能会使运营的业务系统面临严重威胁,一旦发生事故,如果不能快速定位事故原因,运维人员往往就会背黑锅.几种常见的运维人员背黑锅场景:1)由 ...
- 开源堡垒机jumpserver的安装
开源跳板机jumpserver安装 简介 Jumpserver 是全球首款完全开源的堡垒机, 使用GNU GPL v2.0 开源协议, 是符合4A 的专业运维审计系统 Jumpserver 使用Pyt ...
随机推荐
- emmet的html和css使用技巧大全
emmet html使用技巧大全 ! 初始化 >:后代+:兄弟^:向上*:乘法$:数字():分组#:id命名.:类命名 一.id,类命名p#infop.infoa[href=#] 二.后代:di ...
- 最小生成树唯一性判断-UESTC1959天才钱vs学霸周
天才钱vs学霸周 Time Limit: 1000 MS Memory Limit: 256 MB Submit Status 有一天,天才钱和学霸周闲的无聊玩起了游戏,游戏内容是这样的,现在 ...
- ARTS-S gitlab与jenkins实现持续集成
jenkins配制 系统管理->管理插件->可选插件->选择安装 Gitlab Hook Plugin和Build Authorization Token Root Plugin插件 ...
- kafka生产消息,streaming消费
package com.bd.useranalysis.spark.streaming.kafka2es; import com.alibaba.fastjson.JSON; import com.b ...
- 大数据学习笔记——Java篇之集合框架(ArrayList)
Java集合框架学习笔记 1. Java集合框架中各接口或子类的继承以及实现关系图: 2. 数组和集合类的区别整理: 数组: 1. 长度是固定的 2. 既可以存放基本数据类型又可以存放引用数据类型 3 ...
- docker进阶之路-基础篇 | 一:环境搭建
转载请注明作者及出处: 作者:银河架构师 原文链接:https://www.cnblogs.com/luas/p/12061747.html 一.准备工作 查看内核 Docker 要求 CentOS ...
- Java 从入门到进阶之路(十五)
在之前的文章我们介绍了一下 Java 中的接口,本章我们来看一下 Java 中类的多态. 在日常生活中,很多意思并不是我们想要的意思,如下: 1.领导:“你这是什么意思?” 小明:“没什么意思,意思意 ...
- NodeJS2-1环境&调试----CommonJS
CommonJS 每个文件是一个模块,有自己的作用域 在模块内部module变量代表模块本身 module.exports属性代表模块对外接口 require规则 /表示绝对路径,./表示型对于当前文 ...
- C++程序设计实验考试准备资料(2019级秋学期)
程序设计实验考试准备资料 ——傲珂 #include<bits/stdc++.h> C++常用函数: <math.h>头文件 floor() 函数原型:double floor ...
- Springboot Activiti6 工作流 集成代码生成器 shiro 权限 vue.js html 跨域 前后分离
官网:www.fhadmin.org 特别注意: Springboot 工作流 前后分离 + 跨域 版本 (权限控制到菜单和按钮) 后台框架:springboot2.1.2+ activiti6.0 ...