Flutter 实现图片裁剪
实现原理很简单 ,自己绘制一个裁剪框, 根据手势 选择到适合的位置 ,然后将选中的区域绘制到一个新的图片上,从而完成裁剪
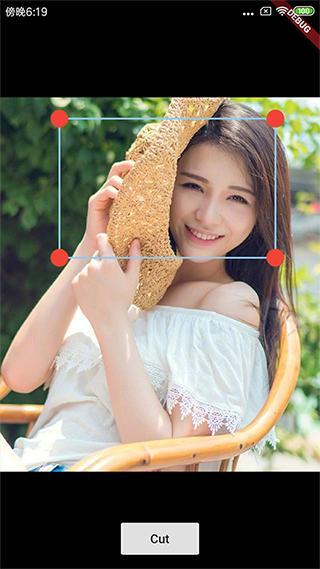

裁剪框的绘制 这里我是根据点来连线的 因为每个点上会绘制一个拉伸的标识符

      List<Offset> points2 = [

        Offset(startX, startY),

        Offset(startX + cWidth, startY),

        Offset(startX + cWidth, startY + cHeight),

        Offset(startX, startY + cHeight),

        Offset(startX, startY),

      ];

      canvas.drawPoints(PointMode.polygon, points2, paint);//draw the clip box

      paint.color = Colors.red;

//      paint..style=PaintingStyle.stroke;

      double radius = 10;

      canvas.drawCircle(points2[0],radius,paint);  //draw the drag point

      canvas.drawCircle(points2[1],radius,paint);

      canvas.drawCircle(points2[2],radius,paint);

//      canvas.drawLine(Offset(points2[2].dx-radius, points2[2].dy-radius), Offset(points2[2].dx+radius, points2[2].dy+radius), paint);

      canvas.drawCircle(points2[3],radius,paint);
源图片的绘制 ,根据屏幕大小 把图片缩放成适合长宽比例的图片
 if (image != null) {

      //draw the backgroud image

      double dwidth = 0;

      double dheight = 0;

      if (image.width.toDouble() / width > image.height.toDouble() / height) {

        dwidth = width;

        dheight = image.height.toDouble() * dwidth / image.width.toDouble();

      }

      else {

        dheight = height;

        dwidth = image.width.toDouble() * dheight / image.height.toDouble();

      }

      if (points.length > 0) {

        points[3] = Offset(dwidth, dheight);

      }

      canvas.drawImageRect(image,

          Rect.fromLTWH(0, 0, image.width.toDouble(), image.height.toDouble()),

          Rect.fromLTWH((width - dwidth) / 2,

              (height - dheight) / 2, dwidth, dheight), paint);

    }
绘制完后 就是根据手势的偏移量来计算裁剪框的大小位置
        GestureDetector(

        onPanDown: onPanDown,

        onPanUpdate:onPanUpdate,

        onPanEnd: onPanEnd,

        ),
List<Offset> _points = <Offset>[];
_points有4个值 [0] 代表down的坐标 [1]代表move的左边 [2]代表裁剪框的坐标 [3]代表源图大小
在touchDown的时候 先存储左边 然后我们要计算点的区域是 拉伸 还是移动 拉伸的话是以顶点为中心的放心
 onPanDown(DragDownDetails details){

    RenderBox referenceBox = context.findRenderObject();

    Offset localPosition =

    referenceBox.globalToLocal(details.globalPosition);

    setState(() {

      if(_points.length<3){

        _points.add(localPosition);

        _points.add(localPosition);

        _points.add(Offset(0, 0));

        _points.add(Offset(0, 0));

      }

      else{

        _points[0]=localPosition;

        _points[1]=localPosition;

      }

      dHeight = cHeight;

      dWidth = cWidth;

      double radius = 20;

      if(hitPoint(Offset(_points[2].dx+cWidth, _points[2].dy+cHeight),radius , localPosition)){

        downPosition =DownPosition.RIGHT_DOWN;

        isDrag = false;

      }

      else if(hitPoint(Offset(_points[2].dx+cWidth, _points[2].dy),radius , localPosition)){

        downPosition =DownPosition.RIGHT_UP;

        isDrag = false;

      }

      else if(hitPoint(Offset(_points[2].dx, _points[2].dy+cHeight),radius , localPosition)){

        downPosition =DownPosition.LEFT_DOWN;

        isDrag = false;

      }

      else if(hitPoint(_points[2],radius , localPosition)){

        downPosition =DownPosition.LEFT_UP;

        isDrag = false;

      }

    });

  }
移动的时候 因为 4个点的处理逻辑是不一样的 所以需要单独判断 这里也做了个最小区域
 onPanUpdate(DragUpdateDetails details) {

    RenderBox referenceBox = context.findRenderObject();

    Offset localPosition =

    referenceBox.globalToLocal(details.globalPosition);

    if(isDrag){

      setState(() {

        _points[1]=localPosition;

      });

    }

    else{

      setState(() {

        if(downPosition==DownPosition.RIGHT_DOWN){

          cWidth = dWidth+localPosition.dx - _points[1].dx;

          cHeight = dHeight +localPosition.dy-_points[1].dy;

        }

        else if(downPosition==DownPosition.LEFT_UP){

          cWidth = dWidth-(localPosition.dx - _points[1].dx);

          cHeight = dHeight-(localPosition.dy-_points[1].dy);

          _points[2]=localPosition;

        }

        else if(downPosition==DownPosition.RIGHT_UP){

          cWidth = dWidth+localPosition.dx - _points[1].dx;

          cHeight = dHeight-(localPosition.dy-_points[1].dy);

          _points[2]=Offset(_points[2].dx, localPosition.dy);

        }

        else if(downPosition==DownPosition.LEFT_DOWN){

          cWidth = dWidth-(localPosition.dx - _points[1].dx);

          cHeight = dHeight +localPosition.dy-_points[1].dy;

          _points[2]=Offset(localPosition.dx, _points[2].dy);

        }

        if(cWidth<20){

          cWidth=20;

        };

        if(cHeight<20){

          cHeight=20;

        }

      });

    }

  }
手指抬起的时候将一些坐标重置下
onPanEnd(DragEndDetails details){

    setState(() {

      isDrag = true;

      double startX = _points[1].dx - _points[0].dx+_points[2].dx;

      double startY = _points[1].dy - _points[0].dy+_points[2].dy;

      if(startX<0)

        startX = 0;

      else if(startX+cWidth>width){

        startX = width-cWidth;

      }

      if(startY<0)

        startY=0;

      else if(startY + cHeight>height){

        startY = height-cHeight;

      }

      _points[0]=Offset(0, 0);

      _points[1]=Offset(0, 0);

      _points[2] = Offset(startX<0?0:startX, startY<0?0:startY);

    });

  }
Flutter 实现图片裁剪的更多相关文章
- iOS常见用户头像的圆形图片裁剪常见的几种方法
在开发中,基本上APP的用户头像的处理都需要把用户所上传的方形图片,处理为圆形图片.在这里就总结三种常见的处理圆形图片的方法. 1.使用位图上下文 2.使用UIView的layer进行处理 3.使用r ...
- Cropper – 简单的 jQuery 图片裁剪插件
Cropper 是一个简单的 jQuery 图像裁剪插件.它支持选项,方法,事件,触摸(移动),缩放,旋转.输出的裁剪数据基于原始图像大小,这样你就可以用它们来直接裁剪图像. 如果你尝试裁剪跨域图像, ...
- 自己积累的一些Emgu CV代码(主要有图片格式转换,图片裁剪,图片翻转,图片旋转和图片平移等功能)
using System; using System.Drawing; using Emgu.CV; using Emgu.CV.CvEnum; using Emgu.CV.Structure; na ...
- web开发实战--图片裁剪和上传
前言: 最近的开发中, 有一个上传头像的任务. 由于头像本身的特殊性, 其一般流程为选择图片, 编辑裁剪区域, 再继而上传图片操作. 看似简单的东西, 实则是挺麻烦的一件事. 借助这次开发机会, 来具 ...
- PHP图片裁剪_图片缩放_PHP生成缩略图
在制作网页过程中,为了排版整齐美观,对网页中的图片处理成固定大小尺寸的图片,或是要截去图片边角中含有水印的图片,对于图片量多,每天更新大量图,靠人工PS处理是不现实的,那么有没有自动处理图片的程序了! ...
- Croppic – 免费开源的 jQuery 图片裁剪插件
Croppic 这款开源的 jQuery 图片裁剪插件能够满足网站开发人员各种不同的使用需要.只需要简单的上传图片,就可以实现你想要的图像缩放和裁剪功能.因为使用了 HTML5 FormData 对 ...
- Android大图片裁剪终极解决方案(上:原理分析)
转载声明:Ryan的博客文章欢迎您的转载,但在转载的同时,请注明文章的来源出处,不胜感激! :-) http://my.oschina.net/ryanhoo/blog/86842 约几个月前,我正 ...
- apiCloud中图片裁剪模块FNImageClip的使用
思路 1.获取需裁剪图片的地址 2.跳转到裁剪页面 3.裁剪成功返回新图片地址 4.替换原有图片地址 增加修饰和事件 str += '<li class="tu image" ...
- ASP.NET MVC在服务端把异步上传的图片裁剪成不同尺寸分别保存,并设置上传目录的尺寸限制
我曾经试过使用JSAjaxFileUploader插件来把文件.照片以异步的方式上传,就像"MVC文件图片ajax上传轻量级解决方案,使用客户端JSAjaxFileUploader插件01- ...
随机推荐
- LDAP -- ldap 的cn, ou, dc的含义
1. LDAP的存储规则 区分名(DN,Distinguished Name) 和自然界中的树不同,文件系统/LDAP/电话号码簿目录的每一片枝叶都至少有一个独一无二的属性,这一属性可以帮助我们来区别 ...
- redis-sentinel 高可用方案实践
近期公司的一块核心业务使用redis作为配置转发中心,存在单点问题,考虑服务的可靠性.针对业务需求,我们确定了我们的需求: 异地跨机房容灾 故障自动切换 尽可能高的保证数据不丢失 针对以上需求,我们分 ...
- Java_jdbc 基础笔记之十二 数据库连接 (beanutils )
public class BeanUtilsTest { /** * Java 类的属性: * 1.在JavaEE中,Java类的属性通过getter,setter来定义: get,set方法,去除 ...
- Android中Activity的启动模式(LaunchMode)和使用场景
一.为什么需要启动模式在Android开发中,我们都知道,在默认的情况下,如果我们启动的是同一个Activity的话,系统会创建多个实例并把它们一一放入任务栈中.当我们点击返回(back)键,这些Ac ...
- spark streaming 流式计算---跨batch连接池共享(JVM共享连接池)
在流式计算过程中,难免会连接第三方存储平台(redis,mysql...).在操作过程中,大部分情况是在foreachPartition/mapPartition算子中做连接操作.每一个分区只需要连接 ...
- Could not get JDBC Connection; nested exception is java.sql.SQLException: ${jdbc.driver}
在一个SSM分布式项目中一个服务报错: ### Error querying database. Cause: org.springframework.jdbc.CannotGetJdbcConnec ...
- Nginx 反向代理 一个IP代理多个域名,不区分端口,类似windows虚拟机。
简介: IP有限,所以我们以前使用端口来区分不同的虚拟主机,提供不同的WEB服务. 小范围还凑活,一旦规模扩大,地址记不住了吧?端口记不住了吧? 这个时候我们可以使用DNS,域名解析,毕竟记名字比记I ...
- Java之第一个Java程序
编写第一个Java程序 打开文本编辑器,输入以下代码 public class Hello { public static void main(String[] args) { System.out. ...
- 2017ACM/ICPC广西邀请赛 1005 CS Course
CS Course Time Limit: 4000/2000 MS (Java/Others) Memory Limit: 32768/32768 K (Java/Others)Total S ...
- Redis 主从配置密码以及哨兵
目录: Redis 主从介绍 哨兵机制 Redis 主从配置 环境 安装 启动服务 检查主从状态 测试数据同步 默认是读写分离的 Redis Sentinel 配置 主Redis宕机测试 配置多个哨兵 ...