.net core webapi jwt 更为清爽的认证 ,续期很简单
我的方式非主流,控制却可以更加灵活,喜欢的朋友,不妨花一点时间学习一下
jwt认证分为两部分,第一部分是加密解密,第二部分是灵活的应用于中间件,我的处理方式是将获取token放到api的一个具体的controller中,将发放token与验证分离,token的失效时间,发证者,使用者等信息存放到config中。
1.配置:
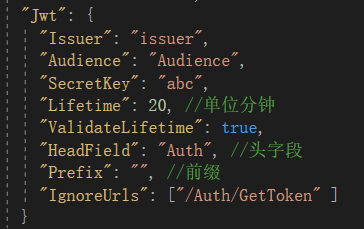
在appsettings.json中增加配置
"Jwt": {

"Issuer": "issuer",//随意定义

"Audience": "Audience",//随意定义

"SecretKey": "abc",//随意定义

"Lifetime": 20, //单位分钟

"ValidateLifetime": true,//验证过期时间

"HeadField": "useless", //头字段

"Prefix": "prefix", //前缀

"IgnoreUrls": [ "/Auth/GetToken" ]//忽略验证的url

}
2:定义配置类:
internal class JwtConfig

    {

        public string Issuer { get; set; }

        public string Audience { get; set; }

        /// <summary>

        /// 加密key

        /// </summary>

        public string SecretKey { get; set; }

        /// <summary>

        /// 生命周期

        /// </summary>

        public int Lifetime { get; set; }

        /// <summary>

        /// 是否验证生命周期

        /// </summary>

        public bool ValidateLifetime { get; set; }

        /// <summary>

        /// 验证头字段

        /// </summary>

        public string HeadField { get; set; }

        /// <summary>

        /// jwt验证前缀

        /// </summary>

        public string Prefix { get; set; }

        /// <summary>

        /// 忽略验证的url

        /// </summary>

        public List<string> IgnoreUrls { get; set; }

    }
3.加密解密接口:
 public interface IJwt

    {

        string GetToken(Dictionary<string, string> Clims);

        bool ValidateToken(string Token,out Dictionary<string ,string> Clims);

    }
4.加密解密的实现类:
install-package System.IdentityModel.Tokens.Jwt
 public class Jwt : IJwt

    {

        private IConfiguration _configuration;

        private string _base64Secret;

        private JwtConfig _jwtConfig = new JwtConfig();

        public Jwt(IConfiguration configration)

        {

            this._configuration = configration;

            configration.GetSection("Jwt").Bind(_jwtConfig);

            GetSecret();

        }

        /// <summary>

        /// 获取到加密串

        /// </summary>

        private void GetSecret()

        {

            var encoding = new System.Text.ASCIIEncoding();

            byte[] keyByte = encoding.GetBytes("salt");

            byte[] messageBytes = encoding.GetBytes(this._jwtConfig.SecretKey);

            using (var hmacsha256 = new HMACSHA256(keyByte))

            {

                byte[] hashmessage = hmacsha256.ComputeHash(messageBytes);

                this._base64Secret= Convert.ToBase64String(hashmessage);

            }

        }

        /// <summary>

        /// 生成Token

        /// </summary>

        /// <param name="Claims"></param>

        /// <returns></returns>

        public string GetToken(Dictionary<string, string> Claims)

        {

            List<Claim> claimsAll = new List<Claim>();

            foreach (var item in Claims)

            {

                claimsAll.Add(new Claim(item.Key, item.Value??""));

            }

            var symmetricKey = Convert.FromBase64String(this._base64Secret);

            var tokenHandler = new JwtSecurityTokenHandler();

            var tokenDescriptor = new SecurityTokenDescriptor

            {

                Issuer = _jwtConfig.Issuer,

                Audience = _jwtConfig.Audience,

                Subject = new ClaimsIdentity(claimsAll),

                NotBefore = DateTime.Now,

                Expires = DateTime.Now.AddMinutes(this._jwtConfig.Lifetime),

                SigningCredentials =new SigningCredentials(new SymmetricSecurityKey(symmetricKey),

                                           SecurityAlgorithms.HmacSha256Signature)

            };

            var securityToken = tokenHandler.CreateToken(tokenDescriptor);

            return tokenHandler.WriteToken(securityToken);

        }

        public bool ValidateToken(string Token, out Dictionary<string, string> Clims)

        {

            Clims = new Dictionary<string, string>();

            ClaimsPrincipal principal = null;

            if (string.IsNullOrWhiteSpace(Token))

            {

                return false;

            }

            var handler = new JwtSecurityTokenHandler();

            try

            {

                var jwt = handler.ReadJwtToken(Token);

                if (jwt == null)

                {

                    return false;

                }

                var secretBytes = Convert.FromBase64String(this._base64Secret);

                var validationParameters = new TokenValidationParameters

                {

                    RequireExpirationTime = true,

                    IssuerSigningKey = new SymmetricSecurityKey(secretBytes),

                    ClockSkew = TimeSpan.Zero,

                    ValidateIssuer = true,//是否验证Issuer

                    ValidateAudience = true,//是否验证Audience

                    ValidateLifetime = this._jwtConfig.ValidateLifetime,//是否验证失效时间

                    ValidateIssuerSigningKey = true,//是否验证SecurityKey

                    ValidAudience = this._jwtConfig.Audience,

                    ValidIssuer = this._jwtConfig.Issuer

                };

                SecurityToken securityToken;

                principal = handler.ValidateToken(Token, validationParameters, out securityToken);

                foreach (var item in principal.Claims)

                {

                    Clims.Add(item.Type, item.Value);

                }

                return true;

            }

            catch (Exception ex)

            {

                return false;

            }

        }

    }
5.定义获取Token的Controller:
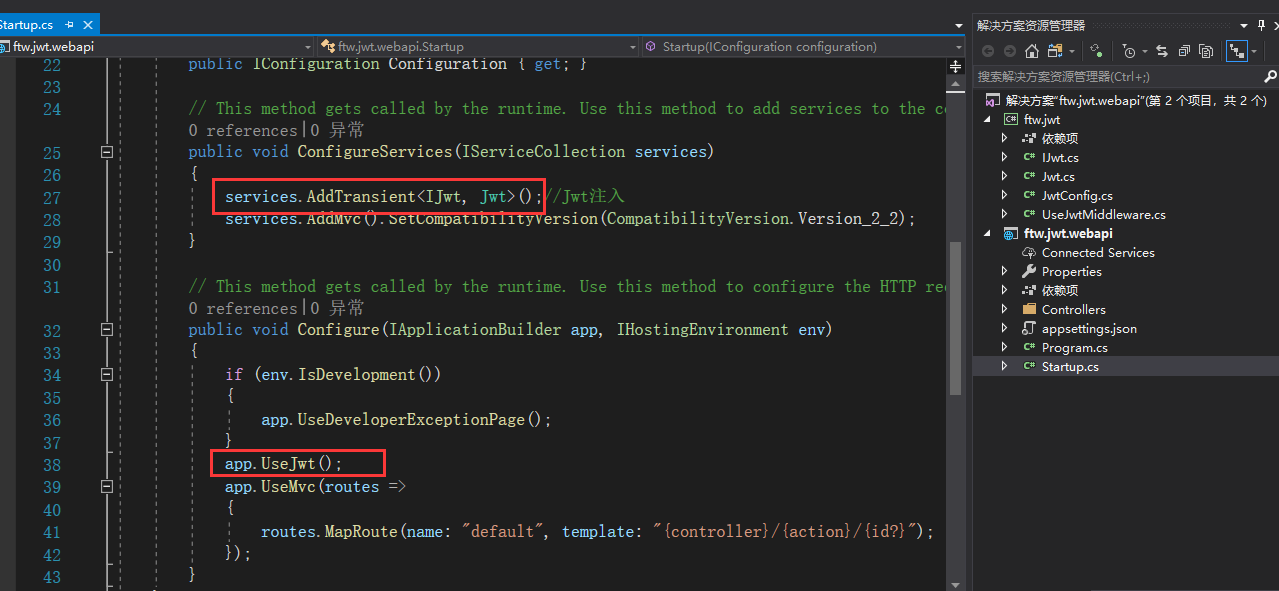
在Startup.ConfigureServices中注入 IJwt
services.AddTransient<IJwt, Jwt>();//Jwt注入
[Route("[controller]/[action]")]

    [ApiController]

    public class AuthController : ControllerBase

    {

        private IJwt _jwt;

        public AuthController(IJwt jwt)

        {

            this._jwt = jwt;

        }

        /// <summary>

        /// getToken

        /// </summary>

        /// <returns></returns>

        [HttpPost]

        public IActionResult GetToken()

        {

            if (true)

            {

                Dictionary<string, string> clims = new Dictionary<string, string>();

                clims.Add("userName", userName);

                return new JsonResult(this._jwt.GetToken(clims));

            }

        }

    }
6.创建中间件:
 public class UseJwtMiddleware

    {

        private readonly RequestDelegate _next;

        private JwtConfig _jwtConfig =new JwtConfig();

        private IJwt _jwt;

        public UseJwtMiddleware(RequestDelegate next, IConfiguration configration,IJwt jwt)

        {

            _next = next;

            this._jwt = jwt;

            configration.GetSection("Jwt").Bind(_jwtConfig);

        }

        public Task InvokeAsync(HttpContext context)

        {

            if (_jwtConfig.IgnoreUrls.Contains(context.Request.Path))

            {

                return this._next(context);

            }

            else

            {

                if (context.Request.Headers.TryGetValue(this._jwtConfig.HeadField, out Microsoft.Extensions.Primitives.StringValues authValue))

                {

                    var authstr = authValue.ToString();

                    if (this._jwtConfig.Prefix.Length > )

                    {

                        authstr = authValue.ToString().Substring(this._jwtConfig.Prefix.Length+, authValue.ToString().Length -(this._jwtConfig.Prefix.Length+));

                    }

                    if (this._jwt.ValidateToken(authstr, out Dictionary<string, string> Clims))

                    {

                        foreach (var item in Clims)

                        {

                            context.Items.Add(item.Key, item.Value);

                        }

                        return this._next(context);

                    }

                    else

                    {

                        context.Response.StatusCode = ;

                        context.Response.ContentType = "application/json";

                        return context.Response.WriteAsync("{\"status\":401,\"statusMsg\":\"auth vaild fail\"}");

                    }

                }

                else

                {

                    context.Response.StatusCode = ;

                    context.Response.ContentType = "application/json";

                    return context.Response.WriteAsync("{\"status\":401,\"statusMsg\":\"auth vaild fail\"}");

                }

            }

        }

    }
7.中间件暴露出去
 public static class UseUseJwtMiddlewareExtensions

    {

        /// <summary>

        /// 权限检查

        /// </summary>

        /// <param name="builder"></param>

        /// <returns></returns>

        public static IApplicationBuilder UseJwt(this IApplicationBuilder builder)

        {

            return builder.UseMiddleware<UseJwtMiddleware>();

        }

    }
8.在Startup.Configure中使用中间件:
app.UseJwt();
以1的配置为例:
除了请求 /auth/getToken 不需要加头信息外,其他的请求一律要求头信息中必须带着
userless:prefix (从Auth/GetToken中获取到的token)
再提供一个demo的下载链接
链接: https://pan.baidu.com/s/1tLpZ-HbZJPp37HQVWew8Rg 提取码: 7n9g
一些截图:
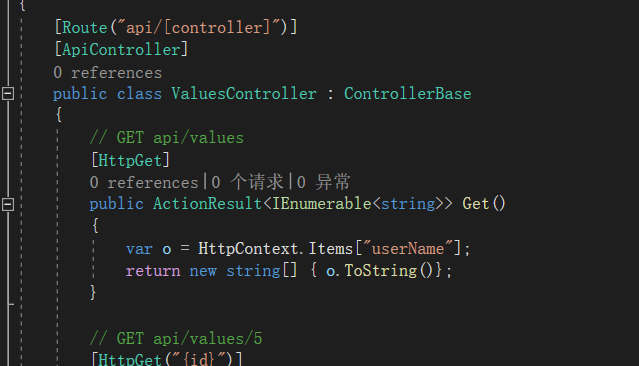
1,在需要认证的的控制器中不需要做任何操作,可以通过httpcontext.item拿到存入clims中的信息
2.startup截图
3.发放token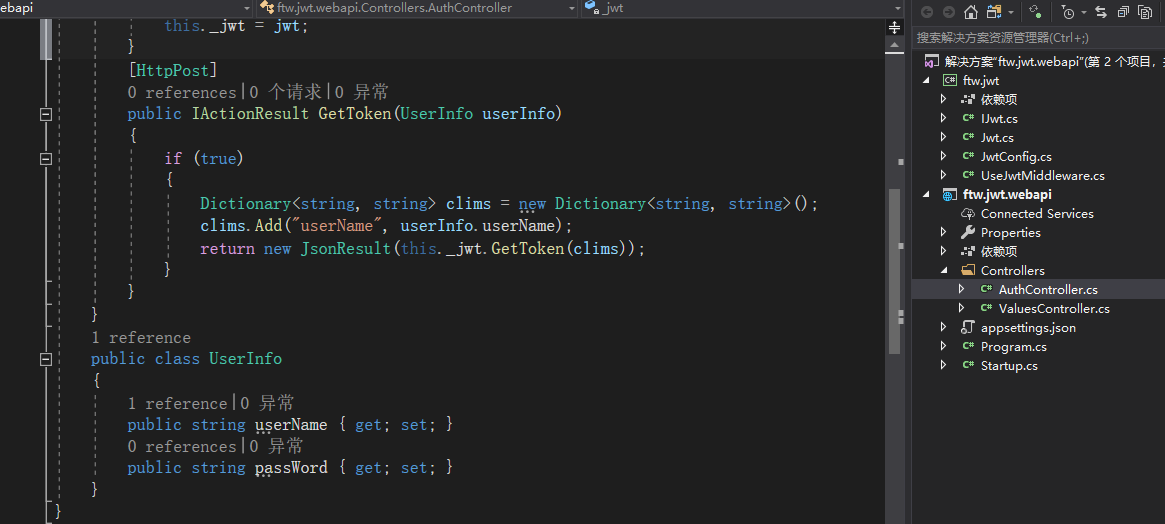
4.配置
简单测试
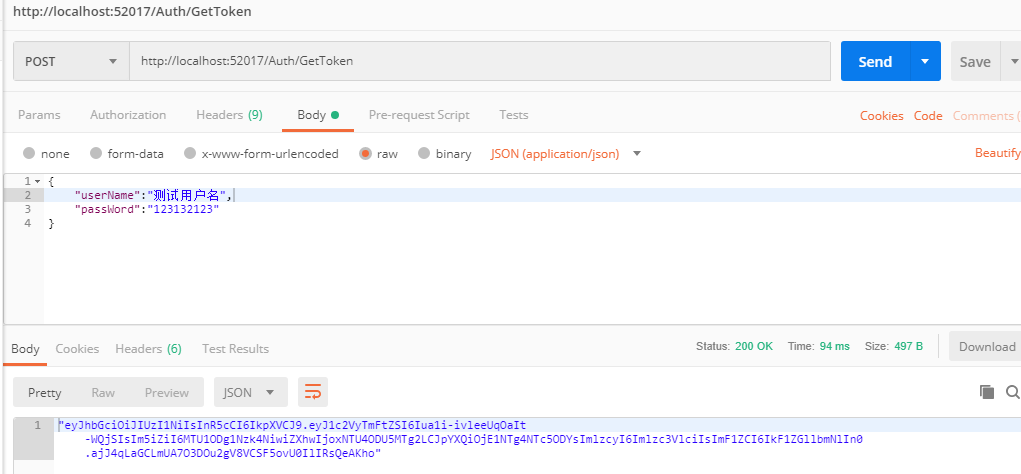
直接请求 无权限

带着token去请求api/values得到响应
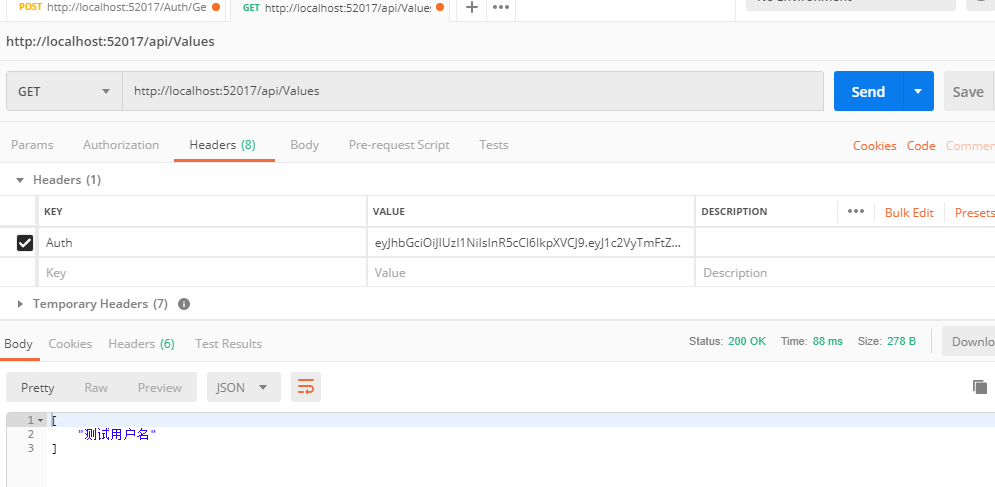

这里的exp就是该token的失效时间(unti时间戳),可以定义一个配置来确定什么时候要去重新生成token,这个动作在中间件中进行(比如给头信息中带上ReToken)客户端下次就用ReToken中的Token重新进行访问,很容易就做到了对token的续期操作
.net core webapi jwt 更为清爽的认证 ,续期很简单的更多相关文章
- .net core webapi jwt 更为清爽的认证
原文:.net core webapi jwt 更为清爽的认证 我的方式非主流,控制却可以更加灵活,喜欢的朋友,不妨花一点时间学习一下 jwt认证分为两部分,第一部分是加密解密,第二部分是灵活的应用于 ...
- .net core webapi jwt 更为清爽的认证 ,续期很简单(2)
.net core webapi jwt 更为清爽的认证 后续:续期以及设置Token过期 续期: 续期的操作是在中间件中进行的,续期本身包括了前一个Token的过期加发放新的Token,所以在说续 ...
- 【转】ASP.NET Core WebAPI JWT Bearer 认证失败返回自定义数据 Json
应用场景:当前我们给微信小程序提供服务接口,接口中使用了权限认证这一块,当我使用 JWT Bearer 进行接口权限认证的时候,返回的结果不是我们客户端想要的,其它我们想要给客户端返回统一的数据结构, ...
- 重新拾取:ASP.NET Core WebApi 使用Swagger支持授权认证
园子里已经有很多.NET Core 集成Swagger的文章,但对于使用授权的介绍蛮少的. public static class SwaggerServiceExtensions { public ...
- .NET CORE WebAPI JWT身份验证
一.appsettings.Json文件配置 配置JWT公用参数. 1 /*JWT设置*/ 2 "JwtSetting": { 3 "Issuer": &quo ...
- ASP.NET Core WebApi基于JWT实现接口授权验证
一.ASP.Net Core WebApi JWT课程前言 我们知道,http协议本身是一种无状态的协议,而这就意味着如果用户向我们的应用提供了用户名和密码来进行用户认证,那么下一次请求时,用户还要再 ...
- ASP.NET Core WebAPI中使用JWT Bearer认证和授权
目录 为什么是 JWT Bearer 什么是 JWT JWT 的优缺点 在 WebAPI 中使用 JWT 认证 刷新 Token 使用授权 简单授权 基于固定角色的授权 基于策略的授权 自定义策略授权 ...
- ASP.NET Core 基于JWT的认证(二)
ASP.NET Core 基于JWT的认证(二) 上一节我们对 Jwt 的一些基础知识进行了一个简单的介绍,这一节我们将详细的讲解,本次我们将详细的介绍一下 Jwt在 .Net Core 上的实际运用 ...
- ionic + asp.net core webapi + keycloak实现前后端用户认证和自动生成客户端代码
概述 本文使用ionic/angular开发网页前台,asp.net core webapi开发restful service,使用keycloak保护前台页面和后台服务,并且利用open api自动 ...
随机推荐
- non-JRMP server at remote endpoint
#在相应的domain的domain.xml文件添加下面红色设置,并重启domain <admin-service system-jmx-connector-name="system& ...
- vue循环出来列表里面的列表点击click事件只对当前列表有效;
<div id="app"> <div class=‘b’ v-for='item in items' @click="toggle(item)&quo ...
- 表单input中提示文字value随鼠标焦点移进移出而显示或隐藏的
jQuery代码 <input value="请输入用户名" type="text"> <input value="请输入密码&qu ...
- ubuntu命令行卸载并清理软件
卸载软件,可以使用下面这两种方式之一: sudo apt-get remove --purge [software name] sudo apt-get autoremove --purge [sof ...
- 【Java_基础】java类加载过程与双亲委派机制
1.类的加载.连接和初始化 当程序使用某个类时,如果该类还未被加载到内存中,则系统会通过加载.连接.初始化三个步骤来对类进行初始化.如果没有意外,jvm将会连续完成这三个步骤,有时也把这三个步骤统称为 ...
- 玩转ApplicationContextAware
当一个类实现了这个接口之后,这个类就可以方便地获得 ApplicationContext 中的所有bean.换句话说,就是这个类可以直接获取Spring配置文件中,所有有引用到的bean对象.结合工厂 ...
- kafka异常问题汇总
1.报错:: java.util.concurrent.ExecutionException: org.apache.kafka.common.errors.NotLeaderForPartition ...
- 用java Graphics生成验证码
以下下是API文档对Graphics的介绍! Graphics 类是所有图形上下文的抽象基类,允许应用程序在组件(已经在各种设备上实现)以及闭屏图像上进行绘制. Graphics 对象封装了 Java ...
- 基础训练 Sine之舞
Sine之舞 #include<iostream> #include<vector> #include<string.h> using namespace std; ...
- Codeforces Round #439 (Div. 2) B. The Eternal Immortality
B. The Eternal Immortality 题目链接http://codeforces.com/contest/869/problem/B 解题心得:题意就是给出a,b,问(a!)/(b!) ...