In Depth : Android Boot Sequence / Process
In Depth : Android Boot Sequence / Process
What is Android boot sequence ?
What is linux kernel ?
What is different between desktop linux kernel and Android linux kernel ?
What is bootloader ?
What is Zygote ?
What is x86 and ARM linux ?
What is init.rc ?
What is System Server ?
Many questions pop-up in mind when we think about Android boot sequence.
 |
| Android Boot Sequence / Process |
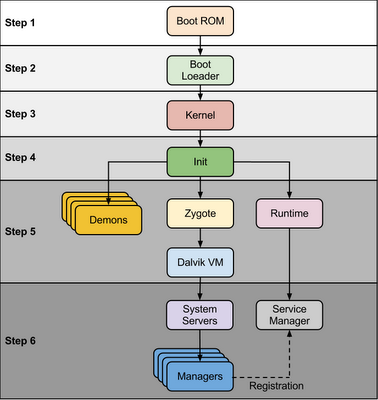
When power start Boot ROM code start execution from pre defined location which is hardwired on ROM. It load Bootloader into RAM and start execution
Step 2 : Bootloader
Bootloader is small program which runs before Android operating system running. Bootloader is first program to run so It is specific for board and processor. Device manufacturer either use popular bootloaders like redboot,uboot, qi bootloader or they develop own bootloaders, It’s not part of Android Operating System. bootloader is the place where OEMs and Carriers put there locks and restrictions.
Bootloader perform execution in two stages, first stage It to detect external RAM and load program which helps in second stage, In second stage bootloader setup network, memory, etc. which requires to run kernel, bootloader is able to provide configuration parameters or inputs to the kernel for specific purpose.
Android bootloader can be found at
2. main.c - Initializes hardware (clocks, board, keypad, console), creates Linux tags
Refer this link to know more about Android bootloader :
https://motorola-global-portal.custhelp.com/app/answers/detail/a_id/86208/~/bootloader-frequently-asked-questions
Step 3: Kernel
Android kernel start similar way as desktop linux kernel starts, as kernel launch it start setup cache, protected memory, scheduling, loads drivers. When kernel finish system setup first thing it look for “init” in system files and launch root process or first process of system.
Step 4: init process
init it very first process, we can say it is root process or grandmother of all processes. init process has two responsibilities 1. mount directories like /sys, /dev, /proc and 2. run init.rc script.
- init process can be found at init : <android source>/system/core/init
- init.rc file can be found in source tree at <android source>/system/core/rootdir/init.rc
- readme.txtfile can be found in source tree at <andorid source>/system/core/init/readme.txt
Android has specific format and rules for init.rc files. In Android we call it as “Android Init Language”
The Android Init Language consists of four broad classes of statements,which are Actions, Commands, Services, and Options.
Action : Actions are named sequences of commands. Actions have a trigger which is used to determine when the action should occur.
Syntax
on <trigger>
<command>
<command>
<command>
Service : Services are programs which init launches and (optionally) restarts when they exit. Syntax
service <name> <pathname> [ <argument> ]*
<option>
<option>
...
Options : Options are modifiers to services. They affect how and when init runs the service.
Let’s take a look of default init.rc file. Here I have listed only major events and services.
| Action / Service | Description |
| on early-init | Set init and its forked children's oom_adj. Set the security context for the init process. |
| on init | setup the global environment Create cgroup mount point for cpu accounting and many |
| on fs | mount mtd partitions |
| on post-fs | change permissions of system directories |
| on post-fs-data | change permission of /data folders and sub folders |
| on boot | basic network init ,Memory Management ,etc |
| service servicemanager | start system manager to manage all native services like location, audio, shared preference etc.. |
| service zygote | start zygote as app_process |
At this stage you can see “Android” logo on device screen.
Step 5: Zygote and Dalvik
1. Load ZygoteInit class,
Source Code :<Android Source> /frameworks/base/core/java/com/android/internal/os/ZygoteInit.java
2. registerZygoteSocket() - Registers a server socket for zygote command connections
3. preloadClasses() - “preloaded-classes” is simple text file contains list of classes that need to be preloaded, you cna find “preloaded-classes” file at <Android Source>/frameworks/base
4. preloadResources() - preloadReaources means native themes and layouts, everything that include android.R file will be load using this method.
Step 6: System Service or Services
Other services
Step 7 : Boot Completed
Once System Services up and running in memory, Android has completed booting process, At this time “ACTION_BOOT_COMPLETED” standard broadcast action will fire.
In Depth : Android Boot Sequence / Process的更多相关文章
- In Depth : Android Shutdown Sequence
What happened when I long press power button ?What is shutdown sequence ?How is it different from de ...
- Android Stduio 发生 Process 'command 'somePath:java.exe'' finished with non-zero exit value 2 异常的解决办法
有时你会发现,在你使用Android Studio 进行编译的时候提示: Error:Execution failed for task ':demo:dexDebug'.> com.andro ...
- com.android.ide.common.process.ProcessException: org.gradle.process.internal.ExecException: Process 'command ' finished with non-zero exit value 1
Error:Execution failed for task ':lenovoAlbum:processReleaseResources'. > com.android.ide.common. ...
- Error:Execution failed for task ':app:dexDebug'. > com.android.ide.common.process.ProcessException
异常Log: Error:Execution failed for task ‘:app:dexDebug’. > com.android.ide.common.process.ProcessE ...
- Error:Execution failed for task ':app:dexDebug'. > com.android.ide.common.process.ProcessException
异常Log: Error:Execution failed for task ':app:dexDebug'. > com.android.ide.common.process.ProcessE ...
- ionic 打包 报错Execution failed for task ':processDebugResources'. > com.android.ide.common.process.ProcessException: Failed to execute aapt
在platform --> android目录下找到build.gradle文件,打开并在def promptForReleaseKeyPassword() {...}函数前加入以下内容: 完整 ...
- java.util.concurrent.ExecutionException: com.android.ide.common.process.ProcessException 的解决办法之一
在查看别人的代码的时候,遇到了把工程导入到 Android Studio ,报:ExecutionException: com.android.ide.common.process.ProcessEx ...
- om.android.ide.common.process.ProcessException: org.gradle.process.internal.ExecException
Error:Execution failed for task ':app:dexDebug'.> com.android.ide.common.process.ProcessException ...
- 高德地图Demo运行报错 com.android.ide.common.process.ProcessException: Failed to execute aapt
最近由于有需求去做导航方面的Android开发,很是无奈,以前也的确是没有搞过,领导开大会当着所有人的面说这是给我分配的第一个工作,无论如何要做好,突然间感觉压力好大,自己已经多年没有敲过代码,而且A ...
随机推荐
- 智能电视TV开发---如何实现程序省电
对于很多使用智能手机的用户来,很多抱怨手机耗电太快,很多人买手机的时候卖家都是推荐买两块电池,还有如果用户留心的话,在买手机的网页上,卖家会显示播放视频多长时间,听音乐多长时间,待机多长时间,不过看的 ...
- java 小数点取2位并且四舍五入
BigDecimal bd = new BigDecimal(0.0199999999999); System.out.println("res:"+bd.setScale(2, ...
- php5.5以上的版本 开启curl
对于php5.5以上的版本开启方法,需要libeay32.dll.ssleay32.dll.libssh2.dll三个文件拷备到C:\Windows目录下,php.ini中 扩展开启,重启apache ...
- 使用TypeScript开发一个在线记事本,支持离线存储
先贴上源码传送门: https://github.com/flowforever/yaryin.note 记事本网址: http://yindoc.com , 井号后面写你喜欢的文件名即可. 最近在研 ...
- VS2010中添加dll目录
RT,比如用VS写QT,用qmake生成的项目,需要在项目属性里设置:调试->环境,path=%path%;C:\Qt\4.8.5\bin 这样省的每次都要把一堆dll复制到debug/rele ...
- KeyEvent
http://blog.csdn.net/elfylin/article/details/8008763 一. 接口KeyEvent.Callback和View.OnKeyListener 二. 流程 ...
- fragment低版本
http://bbs.csdn.net/topics/390271980 Fragment框架开发东西确实很方便,但是恼人的是从4.0才开始支持.以前的版本必须用兼容模式开发,本人在网上找了大量资料, ...
- 【javascript 对日期的扩展 Format\addDays】
// 对Date的扩展,将 Date 转化为指定格式的String // 月(M).日(d).小时(H).分(m).秒(s).季度(q) 可以用 1-2 个占位符, // 年(y)可以用 1-4 个占 ...
- python图片小爬虫
import re import urllib import os def rename(name): name = name + '.jpg' return name def getHtml(url ...
- 悼念512汶川大地震遇难同胞――珍惜现在,感恩生活 分类: dp 2015-05-21 10:50 14人阅读 评论(0) 收藏
Description 急!灾区的食物依然短缺! 为了挽救灾区同胞的生命,心系灾区同胞的你准备自己采购一些粮食支援灾区,现在假设你一共有资金n元,而市场有m种大米,每种大米都是袋装产品,其价格不等,并 ...