基于TensorFlow的MNIST手写数字识别-初级
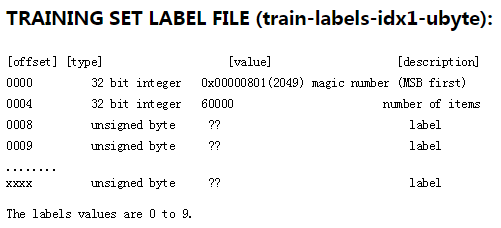
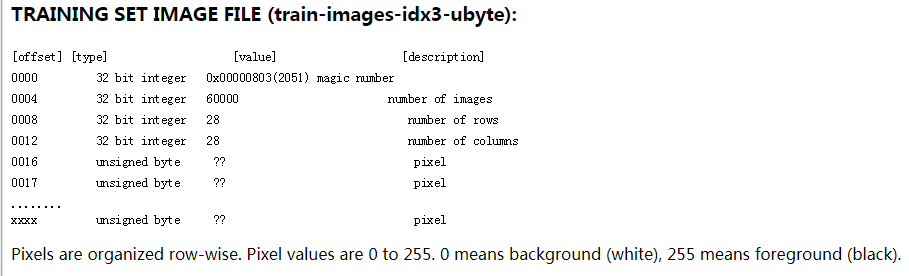
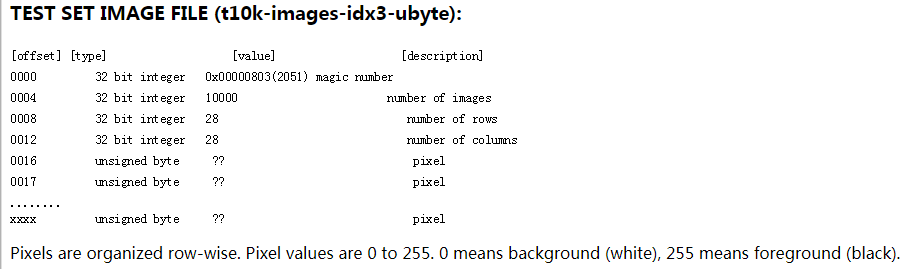
一:MNIST数据集
MNIST是一个包含很多手写数字图片的数据集,一共4个二进制压缩文件

分别是test set images,test set labels,training set images,training set labels
training set包括60000个样本,test set包括10000个样本。
test set中前5000个样本来自原始的NISTtraining set,后5000个样本来自原始的NIST test set,因此,前5000个样本比后5000个样本更简单和干净。
每个样本是28*28像素的图片

二:tensorflow构建模型识别MNIST
导入数据:
from tensorflow.examples.tutorials.mnist import input_data

mnist = input_data.read_data_sets('MNIST_data', one_hot=True)
import tensorflow as tf
x = tf.placeholder(tf.float32, shape=[None, 784])

y_ = tf.placeholder(tf.float32, shape=[None, 10])  #真实值

W = tf.Variable(tf.zeros([784, 10]))

b = tf.Variable(tf.zeros([10]))
y = tf.nn.softmax(tf.matmul(x, w) + b) #预测值
softmax的目的:将输出转化为是每个数字的概率
#计算交叉熵

cross_entropy = tf.reduce_mean(-tf.reduce_sum(y_label *tf.log(y), reduction_indices=[1]))

train = tf.train.GradientDescentOptimizer(0.5).minimize(cross_entropy)
交叉熵:衡量预测值与真实值之间的差别,当然是越小越好
公式为:

其中y'是真实值,y为预测值
最后用梯度下降法优化参数即可
在Session中运行graph:
total_steps = 5000

batch_size = 100

with tf.Session() as sess:

    sess.run(tf.global_variables_initializer())

    for step in range(total_steps+1):

        batch_x, batch_y = mnist.train.next_batch(batch_size)

        sess.run(train,feed_dict={x: batch_x, y_label: batch_y})
预测正确率:
correct_prediction = tf.equal(tf.argmax(y, axis=1), tf.argmax(y_label, axis=1))

accuracy = tf.reduce_mean(tf.cast(correct_prediction, tf.float32))
tf.argmax()函数返回axis轴上最大值的index
tf.equal()函数返回的是布尔值,需要用tf.cast()方法转为tf.float32类型
最后在test set上进行预测:
step_per_test = 100

        if step % step_per_test == 0:

            print(step, sess.run(accuracy, feed_dict={x: mnist.test.images, y_label: mnist.test.labels}))
完整代码如下:
from tensorflow.examples.tutorials.mnist import input_data

import tensorflow as tf

mnist = input_data.read_data_sets('MNIST_data/', one_hot=True)

x = tf.placeholder(tf.float32, [None, 784])

y_label = tf.placeholder(tf.float32, [None, 10])

w = tf.Variable(tf.zeros([784, 10]))

b = tf.Variable(tf.zeros([10]))

y = tf.nn.softmax(tf.matmul(x, w) + b)

#计算交叉熵

cross_entropy = tf.reduce_mean(-tf.reduce_sum(y_label *tf.log(y), reduction_indices=[1]))

train = tf.train.GradientDescentOptimizer(0.5).minimize(cross_entropy)

#eval

correct_prediction = tf.equal(tf.argmax(y, axis=1), tf.argmax(y_label, axis=1))

accuracy = tf.reduce_mean(tf.cast(correct_prediction, tf.float32))

total_steps = 5000

batch_size = 100

with tf.Session() as sess:

    sess.run(tf.global_variables_initializer())

    for step in range(total_steps+1):

        batch_x, batch_y = mnist.train.next_batch(batch_size)

        sess.run(train,feed_dict={x: batch_x, y_label: batch_y})

        step_per_test = 100

        if step % step_per_test == 0:

            print(step, sess.run(accuracy, feed_dict={x: mnist.test.images, y_label: mnist.test.labels}))
运行结果:

准确率为0.92左右
后面我们会构建更好的模型达到更高的正确率。
相关链接:
基于tensorflow的MNIST手写字识别(一)--白话卷积神经网络模型
基于tensorflow的MNIST手写数字识别(二)--入门篇
基于tensorflow的MNIST手写数字识别(三)--神经网络篇
基于TensorFlow的MNIST手写数字识别-初级的更多相关文章
- 基于tensorflow的MNIST手写数字识别(二)--入门篇
http://www.jianshu.com/p/4195577585e6 基于tensorflow的MNIST手写字识别(一)--白话卷积神经网络模型 基于tensorflow的MNIST手写数字识 ...
- 基于TensorFlow的MNIST手写数字识别-深入
构建多层卷积神经网络时需要多组W和偏移项b,我们封装2个方法来产生W和b 初级MNIST中用0初始化W和b,这里用噪声初始化进行对称打破,防止产生梯度0,同时用一个小的正值来初始化b避免dead ne ...
- Android+TensorFlow+CNN+MNIST 手写数字识别实现
Android+TensorFlow+CNN+MNIST 手写数字识别实现 SkySeraph 2018 Email:skyseraph00#163.com 更多精彩请直接访问SkySeraph个人站 ...
- Tensorflow之MNIST手写数字识别:分类问题(1)
一.MNIST数据集读取 one hot 独热编码独热编码是一种稀疏向量,其中:一个向量设为1,其他元素均设为0.独热编码常用于表示拥有有限个可能值的字符串或标识符优点: 1.将离散特征的取值扩展 ...
- Tensorflow实现MNIST手写数字识别
之前我们讲了神经网络的起源.单层神经网络.多层神经网络的搭建过程.搭建时要注意到的具体问题.以及解决这些问题的具体方法.本文将通过一个经典的案例:MNIST手写数字识别,以代码的形式来为大家梳理一遍神 ...
- [Python]基于CNN的MNIST手写数字识别
目录 一.背景介绍 1.1 卷积神经网络 1.2 深度学习框架 1.3 MNIST 数据集 二.方法和原理 2.1 部署网络模型 (1)权重初始化 (2)卷积和池化 (3)搭建卷积层1 (4)搭建卷积 ...
- Tensorflow之MNIST手写数字识别:分类问题(2)
整体代码: #数据读取 import tensorflow as tf import matplotlib.pyplot as plt import numpy as np from tensorfl ...
- TensorFlow——MNIST手写数字识别
MNIST手写数字识别 MNIST数据集介绍和下载:http://yann.lecun.com/exdb/mnist/ 一.数据集介绍: MNIST是一个入门级的计算机视觉数据集 下载下来的数据集 ...
- 持久化的基于L2正则化和平均滑动模型的MNIST手写数字识别模型
持久化的基于L2正则化和平均滑动模型的MNIST手写数字识别模型 觉得有用的话,欢迎一起讨论相互学习~Follow Me 参考文献Tensorflow实战Google深度学习框架 实验平台: Tens ...
随机推荐
- 配置本地目录作为yum端
---恢复内容开始--- 最近在配置gnome-session中发现需要太多依赖的包,又由于实验室使用的是局域网,没有办法连接网络,所以想着配置本地yum安装.在网上找了一些资料,经过整理,把自己这次 ...
- Java框架之Spring01-IOC-bean配置-文件引入-注解装配
Spring 框架,即framework.是对特定应用领域中的应用系统的部分设计和实现的整体结构.就相当于让别人帮你完成一些基础工作,它可以处理系统很多细节问题,而且框架一般是成熟,稳健的. Spri ...
- SharePoint REST 上传文件请求403错误
最近,需要在SharePoint上传文件到文档库,但是,上传的过程报错了. 错误代码 { "error": { "code": "-213057525 ...
- vs删除空白行 注释
在vs编辑器中有时需要批量删除无用的空白行,为此,可以使用vs编辑器的查找替换功能: 1. Ctrl+H,打开替换功能框. 2.选择“使用正则表达式”,“当前文档”. 3.在查找框中输入: (?< ...
- nginx负载均衡动态自动更新(微博开源模块nginx-upsync-module使用)
这几天项目有个需求:负载要求能根据节点健康状态动态的增减.nginx自带的upstram已经很强大,而且基于Nginx Upstream配置动态更新已经有很多开源方案,大多数都是基于生成配置文件后进行 ...
- Java Data类
Date类的概述 java.util,Date 表示日期和时间的类类 Date 表示特定的瞬间,精确到千分之一秒(毫秒) 获取时间原点到当前系统时间经历了多少秒 // 时间原点:1970 年 01 月 ...
- CSP-S rp++
心无旁骛 认真思考 努力骗分(哈哈) I Love CSP! 反正像我这种大菜鸟也考不了多少 尽力打 本次考试期望 day1 100 70-100 30-? day2 100 ? ? 总:300-? ...
- scala基本语法
scala基本语法scala函数1 def定义方法2 方法的返回值类型可以省略3 方法体重最后一行计算结果可以返回 return 如果省略方法类型4 方法参数 要指定类型5 如果方法体可以一步搞定 方 ...
- Django后台管理系统的使用
目录 django后台管理系统的使用 检查配置文件 检查根urls.py文件 启动项目,浏览器输入ip端口/admin 如: 127.0.0.1/8000/admin 回车 注册后台管理系统超级管理 ...
- WeihanLi.Npoi 根据模板导出Excel
WeihanLi.Npoi 根据模板导出Excel Intro 原来的导出方式比较适用于比较简单的导出,每一条数据在一行,数据列虽然自定义程度比较高,如果要一条数据对应多行就做不到了,于是就想支持根据 ...